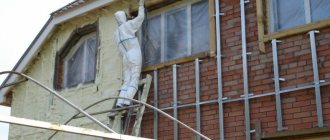
The construction of a private house involves not only its interior decoration, but also the cladding of the outer part, that is, the facade. The most popular solution today is siding, that is, panels made of different materials with a lock and an edge. It has a number of valuable advantages, excellent performance characteristics and attractive appearance. Siding can be smooth and glossy, imitating the structure of wood or stone, so it will fit perfectly into any landscape. The most important thing is to choose the right material and lay it according to all the rules.
Facade cladding with siding
Brief description of siding and its types
A person without professional training can install siding with his own hands.
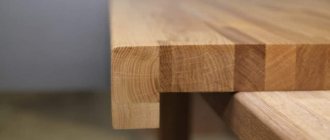
Siding consists of narrow slats with an external relief pattern that imitates masonry or the structure of wooden structures. Locks are located on the end edges of the parts, allowing you to sheathe a wall of any height using a pre-assembled frame.
The blanks are lightweight, and the small area allows one person to install the elements.
In addition to the standard horizontal material, there are products for vertical placement (there are universal options).
Finishing parts are divided into categories according to the raw materials used for manufacturing:
- wooden - characterized by increased thermal insulation, but have a short service life and require periodic treatment with an antiseptic followed by painting;
- composite (from a mixture of polymers and wood flour) - characterized by increased resistance to precipitation and correspond in structure to wooden products;
- acrylic - they are more expensive (compared to PVC), but can withstand changes in ambient temperature from -50 to +85°C without the risk of deformation;
- fiber cement - characterized by increased weight and strength;
- plastic (polyvinyl chloride or vinyl) - resistant to temperature changes or precipitation;
- ceramic - have a high cost;
- made of carbon steel with an additional protective layer - they are resistant to mold or mildew, but rust if the top layer is damaged.
The variety of types of siding allows you to finish the exterior of your home in any stylistic direction.
Temperature Requirements
Siding as a material was created in countries with warm climates. In Russia, siding can be installed at sub-zero temperatures. Sheathing of houses in our country occurs in four seasons, but at a temperature not lower than -10°C.
From November to March, there is significantly more waste when trimming material. At low temperatures, it is difficult to divide siding into the necessary sections - the panels become fragile. They often break in the autumn-winter period, when they are cut out with a milling cutter along the contour of the window opening and corner. Take care of quality material.
Preparatory activities before finishing
Before starting installation work you must:
- calculate and deliver materials for the manufacture of sheathing to the plot;
- purchase a pre-calculated amount of finishing material and auxiliary parts (metal or wooden beams, screws and nails);
- prepare a tool for marking, cutting or installing material.
Calculation of the quantity of materials
Before sheathing a house, you should calculate the need based on design documentation or measurements of the dimensions of walls, window and door openings. To determine the amount of timber, you should take into account the installation step of metal or wooden guides, which is in the range of 400-500 mm.
When calculating the amount of material, the area of the openings is subtracted from the area of the walls, and 10-12% of the reserve is added to the resulting result in case of damage to the building material during delivery or errors during installation work.
Additional elements
By extensions we mean finishing and transition strips that allow you to decorate corners, door or window openings. The list and quantity of materials are calculated on the basis of a sketch drawing of the house indicating the dimensions of the walls and openings for window or door blocks. The material of the auxiliary profiles can match the characteristics of the main finish. It is allowed to use details of a different color to highlight the contours of the building.
Necessary tools: how to cut building materials
To carry out installation work you will need:
- hydraulic or laser level to determine the correct position of sheathing slats and slabs;
- metal scissors for cutting workpieces or guides;
- electric drill for tightening screws;
- set of replaceable heads for screws;
- construction marker for marking;
- a corner for checking the correctness of the angles between the beams;
- plumb line for additional control of the vertical position of the frame;
- pliers and a nail puller for preparing the surface of the walls of the house.
Budget plasterboard sheathing
This material is one of the most budget options given in this article. In appearance, it consists of gray or colored sheets, on which the manufacturer’s logos are often printed. Drywall always requires painting. Without a protective layer, it gets wet and gets damaged by snow and wind. Under a good layer of paint, sheets of drywall trap wind and cold, retaining heat inside the building.
In summer, the casing does not overheat even in extreme heat. The advantage of this covering is easy replacement, which takes a couple of hours. Drywall weighs very little; a light wooden frame is sufficient for it. If the toilet is made of wood, drywall can simply be nailed to the walls.
Frame making
Before attaching the sheathing to a wooden house, it is necessary to remove the decor that protrudes beyond the walls (for example, window frames, drainpipes or ebbs). If there is a layer of finishing material, it should be carefully removed.
After preliminary preparation, the partitions are inspected, cracks are eliminated, as well as areas affected by rot are treated.
Do-it-yourself selection and installation of lathing
The location of the sheathing bars depends on the chosen installation scheme. For horizontal positioning, a vertical frame is used. If the home owner decides to install the products vertically, then horizontal beams should be mounted. In this case, the owner must take into account in advance the negative visual effect of narrowing the sheathed walls.
You can assemble a vertical frame for installing siding from wooden blocks.
To make the frame use:
- A wooden beam pre-impregnated with antibacterial liquids that reduce the rate of decay. It is necessary to take into account the curvature of the slats or the risk of bending the elements with a screw under the influence of external climatic factors.
- Metal profile with a galvanized surface, resistant to rotting, but having high thermal conductivity. An additional advantage is the stable geometry of the parts that do not bend during installation or during operation.
Algorithm of work when installing sheathing for horizontally directed siding:
- Mark the lines for installing the slats vertically with a gap of 400 to 500 mm.
- Screw metal U-shaped hangers (every 500-600 mm) using screws or dowels inserted into pre-drilled holes.
Insulation and waterproofing
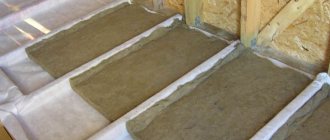
To protect the house from cooling, a layer of thermal insulation is used, which has increased vapor permeability compared to the characteristics of the wall material. This requirement makes it possible to minimize the formation of condensation at the line of contact between layers of dissimilar substances, which causes rotting or deterioration of the protective properties of the insulation. For residential buildings, compacted mineral wool slabs are most often used, in which windows are cut to allow the suspension plates to exit.
The preferred insulation material is mineral wool, which allows water vapor to easily pass through.
After laying a layer of wool 5-10 cm thick in the openings between the frame beams, it is necessary to attach a waterproof membrane over the insulation, which allows steam to escape, but prevents the penetration of moisture from the air into the thermal insulation. The film strips are installed in a vertical direction, overlapping (layers overlap up to 15-20 cm) and additionally secured with adhesive tape.
Continuation of frame assembly
Step-by-step instructions for dummies for the further manufacture of the frame include the following steps:
- Mount the strips with screws in the corner areas, the outer surfaces of which should be located on the same vertical plane.
- Pull the cords diagonally to control the position of the frame.
- Install and secure in the hangers with screws pre-cut (if necessary) slats made of wooden or metal profiles.
If it is intended to install an insulating layer with increased thickness from polystyrene foam boards, then a double frame is used. The base strips are screwed horizontally, then the thermal insulation layer is laid and secured with disc-type dowels. After placing the waterproofing membrane on top of the main frame at an angle of 90°, a counter-lattice is mounted. The gap ranges from 300 to 600 mm. Additional strips provide ventilation of the space between the thermal insulation layer and the sheathing.
Technology for installing sheathing under siding.
How to cover a toilet outside in a country house: conclusion
Among the many options that modern stores provide, it is easy to find the best option for your wallet and goals. Of course, for most people, a country toilet is a secondary structure that does not represent any aesthetic value. However, with a skillful choice of finishing, it can become a cozy place. In addition, by choosing the right material, you will ensure comfort of use, practicality and long-term operation of the closet. Therefore, you should not take the question of how to cover a toilet in your dacha outside lightly.
Source
Self-installation of siding: stages
After completing the assembly of the frame, they check the correct position of the elements, correct any deficiencies found, and then begin installing the slabs. To hold the skin in place, you will need to secure the starting profile and corner strips. When performing work, you must follow the recommendations of the finishing manufacturer.
Failure to comply with the requirements leads to skewing of the panels or damage to the edges.
Before starting installation work, the quality of the products is assessed:
- Products are inspected selectively; uneven coloring with foreign inclusions on both the front and rear parts of the part is not allowed. There should be no peeling of protection on metal plates.
- Several elements are inspected, assessing the uniformity of wall thickness. Floating dimensions or depressions indicate poor product quality.
- Check the condition of the mounting holes. Burrs or burrs are not acceptable. At the same time, you should evaluate the ends of the locks, which must have a flat surface.
Installation of the starting strip (J-profile)
J-profile is used for laying the bottom strip. On the outside, the bar has a side that prevents it from falling out. To attach the guide, determine the bottom line of the position of the finish, and then step back 4 cm upward and draw a horizontal line. After this, the plank is applied to the sheathing and secured with screws through oval holes to wooden or metal beams. The screws are not tightened all the way, which allows you to maintain the mobility of the profile. A temperature gap of 5-7 mm is required between the ends of the planks.
Installation diagram of the starting bar.
Attaching corner strips
At the inner corners of the building, using screws in increments of 25-30 cm, it is necessary to attach a rail or J-bar, the lower edge of which corresponds to the position of the starting profile. To improve installation, it is allowed to cut off the mounting flange from the corner to a height corresponding to the size of the starting pad.
When increasing the profile in height, it is necessary to cut off the flange from the top bar by 3 cm, and then join the parts with an overlap of 2-2.5 cm (the front part of the top bar overlaps the bottom one to ensure water drainage).
Some craftsmen use the installation of a pair of J-planks located on the sides of the inner corner. The technology provides an improved appearance of the finish, but it is impossible to seal the joint line between the elements. Water entering the gap freezes and destroys the plastic or metal. Attempts to minimize gaps lead to damage to parts due to temperature deformations.
H-profile
The profile is installed vertically and secured to the sheathing with nails or screws. The element allows you to neatly connect the planks and protects the joint line from precipitation. When installing the H-profile, a gap of 5-6 mm is maintained (in winter, the parameter is increased to 10 mm). The element allows you to connect plates of different widths. The resulting joint has high rigidity.
Installation of the H-profile is carried out immediately after installation of the starting strip.
The bottom edge of the profile must be positioned 6 mm below the edge of the starting pads. If there is a protruding foundation under the bulkheads of the house that prevents thermal expansion, then a gap of 5-7 mm is provided between the end of the guide and the concrete bases. It should be taken into account that if the walls of the house are shorter than the dimensions of the planks, then the H-profile is not used.
Extension of panels
If the length of the elements is not sufficient to seal the wall of the house, then it is necessary to connect the blanks using the following methods:
- Installation using an H-shaped profile mounted on the sheathing and forming a rigid joint.
- By overlap joining. Before joining, the fastening frame is cut off from the part to a length that ensures that the central sections overlap by 2-2.5 cm and the gap between the edges of the frames is within 12 mm. The frames are cut with scissors according to the applied markings, and the burrs are removed with a knife or an abrasive tool.
Framing door and window openings
The methods for bypassing openings for window or door blocks are identical, but it is necessary to install sills on the windows to drain water. The technology for tying the openings depends on the deepening of the frame relative to the plane of the wall. If the window opening is located in the same plane as the partition, then platbands with grooves are used to install the edges. They are attached to the sheathing until the house is sheathed. Before finishing the openings, bars and a layer of synthetic or natural insulation are installed (the work is carried out simultaneously with the installation of the frame on the walls of the house).
Technology of finishing windows and doors with siding.
For openings up to 20 cm deep, J-planks are used, which are attached to the installed siding, and a finishing profile is mounted on the window or door block. The gap around the perimeter of the opening is filled with planks. For deep openings, you will need to mount a universal strip around the perimeter of the block, insert siding elements and decorate the outer edge of the opening with a complex angle.
The final covering of the walls of the house is carried out after the completion of the procedure for decorating window or door openings.
Laying the finishing strip
The closing trim strip allows you to shape the edge of the finishing panel and fix the position of the part. The plank is attached to the sheathing horizontally, and on the last slab an edge with holes for fixation with nails is cut off. On the slabs it is necessary to make cuts 20-30 mm long in increments of 20-25 cm, the petals are folded forward. Once the finishing strip is installed, the petals ensure a tight fit.
Installation of a pediment
The pediment is finished by analogy with vertical planes, maintaining gaps to compensate for thermal deformations. Installation begins from the center line along a pre-installed sheathing with a layer of thermal insulation.
Scheme of gable siding.
To trim the material along the top edge, use a rectangular wooden or metal template, which is moved along the J-profile attached to the slopes. To strengthen the upper section, it is possible to install a screw through a hole drilled in the body of the part. There is no other way to secure the bar.
Sandwich panels
This is ideal for regions with strong winds. Panels with insulation between two layers of plastic provide excellent protection from wind and cold. The plastic does not get wet, so the interior of the closet will be protected from water penetration. The advantage of this material is its presentable appearance.
The panels are mounted on a frame, usually metal. To do this, take metal profiles, cut them to the length of the walls and lay them on them in a row. The width between the profiles is approximately 20-30 cm.
The frame parts are connected to each other with self-tapping screws. Panels are placed on the finished frame, which also need to be cut to the dimensions of the structure. Self-tapping screws are also suitable for securing the panels to the frame.
The only drawback of sandwich panels is their high cost. However, given their service life, this investment will pay off.
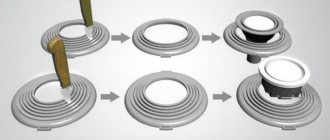
The nuances of laying siding under the roof
To install the top panel located under the roof overhang, you must:
- Attach the finishing profile to the edge of the wall.
- Using a ruler or tape measure, measure the distance between the lock of the top panel installed on the partition and the inner plane of the groove in the fixing profile.
- Transfer dimensions taking into account a technological gap of 1-2 mm (allows you to compensate for temperature deformations or measurement errors).
- Using a hacksaw or an abrasive wheel mounted on an angle grinder, cut off part of the workpiece with a lock.
- Cut the hooks on the installed strip (the gap between the petals is 200 mm), and then bend the cutouts to the front side.
- Install the finishing panel and fasten the lock by moving the element upwards.
Digging a cesspool
In fact, the pit of an outdoor toilet is nothing more than a single-chamber anaerobic septic tank. With a relatively small volume of incoming waste, it is possible to effectively clarify it and discharge it into the soil without the prospect of involving a sewage disposal machine. The drainage field of such a septic tank is located along the contour of the walls and at the same time, the ingress of waste into the high water is prevented. However, in addition to the correct design of the pit itself, two specific issues need to be resolved.
The first is determining sufficient capacity. The calculation of the volume should be carried out in depth from the line of occurrence of the upper waterproof layer, because under normal conditions the level of waste in the pit should not rise above this mark. It is believed that forced cleaning of the toilet pit can be eliminated if its capacity is 1–1.5 m3 per person. This is a very rough approximation, because the intensity of toilet use in a country house can vary widely.
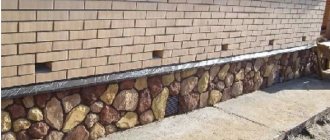
The second issue is placing the toilet cabin at least halfway above the pit. For this reason, it is much easier to first build a foundation - a thin strip with a cross-section of about 20x20 cm. The toilet foundation is rectangular in plan, it can be square or slightly elongated along. Instead of reinforced concrete strip, you can use brickwork in 3-4 rows. The part of the masonry located directly above the pit is reinforced with steel corners.
The pit itself does not have to have the correct shape. In order to reduce the size of the cabin, it is possible to make a narrow protrusion under the seat, and then dig out the expanded outer part. The hole must be dug in such a way that a pillar of soil of at least 30–35 cm remains at the corners of the tape; these areas must be supported during the digging process from collapse with panel formwork. Keep in mind that the dimensions of the pit will eventually be reduced by about 40 cm on each side.
Carrying out work in winter
When performing work at subzero air temperatures, the fragility of the plastic increases. The brought material should not be stored near heating appliances. Vinyl panels should be cut in a heated room. Since the material contracts when cooled, a thermal gap of 6 mm is provided between the ends. Other actions are performed by analogy with the work algorithm described above. If the technology is followed, the siding strips will not warp when the air temperature rises.
Vinyl siding should only be cut indoors.
Possible difficulties during installation
A construction hair dryer is used to trim parts directly during installation.
Difficulties during installation in winter arise quite often and are associated with additional restrictions.
- Siding should not be left outside if the forecast calls for cold weather, rain or snow. At the same time, leaving it in a heated living space is also not a good idea. The material should not be exposed to large temperature changes.
- When cutting parts directly during installation, use a construction hair dryer to heat the material. However, this technique is permitted only for a small amount of work.
- It is better to leave the siding under a canopy or cover it with a tarp while working.
In case of precipitation, work is stopped immediately. If possible, cover the area with film or install a canopy.
Dismantling process
To disassemble the structure (for example, to replace several panels or install new trim), you must:
- Using a factory unpacker or a homemade tool made from 3 mm thick sheet, remove the edge of the bottom siding plate from the guide. The tip must be inserted into the gap and pulled towards you, while simultaneously moving the tip along the panel.
- Bend the edge of the top strip, and then use a nail puller to remove the fasteners (or unscrew the screws with a screwdriver). It is not recommended to make sudden movements, which could lead to damage to the panel.
- Remove the siding strip and lay it on the ground, and then continue dismantling the structure.
Restoring corner profiles does not require siding removal. It is necessary to cut off the front part of the part while preserving the base attached with screws or nails to the sheathing. In place of the cut out part, a fragment of the profile is mounted and fastened to the remaining base using aluminum blind rivets.
Do-it-yourself technology for dismantling siding.
How to cover the outside of a toilet in a country house?
How to cover the outside of a toilet in a country house? This question is often asked by new happy owners of summer cottages who are arranging them to their own taste. This question is very important, because if the exterior decoration is chosen correctly, the design will become not only attractive in appearance, but also comfortable.
In the cold season, it will not be blown by the winds, and in the warm season, it will not heat up from the sun's rays. Below are several modern materials that summer residents often use to decorate toilets and outbuildings.
Useful tips and tricks for tiling beginners
Recommendations for beginning craftsmen on how to perform the work:
- Exterior finishing elements to protect against water should be installed from bottom to top or from left to right.
- Panels made of metal or vinyl are installed using fasteners with a thermal gap that compensates for changes in the size of parts depending on the temperature of the material. When using galvanized nails, a gap of 1 mm is required between the edge of the head and the surface of the part. During installation, fasteners are placed in the center of the oval holes.
- When installing a layer of vinyl siding, do not drill holes in the panels. Screws or nails are installed into the sheathing at a right angle; when tilted, the mobility of the coating layer relative to the base is disrupted.
- After installing every 3 finishing panels on the sheathing, check the position of the upper edge of the part with a level. Deviations of siding from the horizon are not allowed.
- The lock between the panels should ensure tight contact between the parts; excessive force should not be applied during installation.
- There is no need to seal the joints between the planks with sealants or other materials, since different coefficients of thermal expansion lead to warping of the finish and make disassembling the structure difficult.
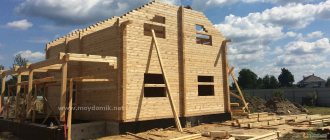
- Between the construction of a house made of logs or timber and the procedure for installing the frame and layer of siding, at least 5-7 months must pass for the walls to shrink.
The strength and tightness of the finish, which can last up to 50 years without repairs (if vinyl panels are used), depend on compliance with installation technology and careful work. It should be remembered that thermal gaps are required between the elements. Violation of the rule leads to warping or destruction of the panels and frame. If the home owner does not have the skills to conduct construction work, it is recommended to invite a team of installers, which will reduce the cost of finishing the house with siding.
Is it allowed to sheathe a house in winter?
It is still better to insulate the facade and cover it with any finishing materials in the summer. During this period, there are many factors that create favorable conditions for the entire process:
- easy to prepare the surface;
- the base is completely freed from excess moisture naturally;
- there are no strong gusts of wind that can tear off insulation or trim;
- The temperature regime is favorable for the installation of panels.
But if there is a need to sheath the house in winter, then this can be done. In this case, it is necessary to adhere to a number of conditions and recommendations that will help keep the materials intact, and the result will be good.
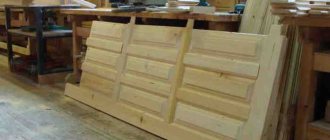
Simple seat design
If you do not plan to concrete the floor in the toilet, lay several beams on the tape as joists and lay a wooden floor. In the part of the floor above the pit you need to immediately make a hole approximately 50x50 cm exactly along the longitudinal center of the cabin. On a wooden floor, the seat is usually knocked down across the entire width of the cabin. All you need is a wooden rectangular frame made of timber, which is screwed to the floor and not fixed to the walls.
While the frame is not sheathed on the outside, two jumpers are added to its upper part and a neck is knocked out of the boards according to the dimensions of the cutout in the floor. After this, the front wall is hemmed shut, and an egg-shaped hole is made in the top shelf and the toilet seat is attached. It is advisable to treat wood with antiseptics. The shelves formed on the sides are convenient to use for storing hygiene items; it also makes sense to arrange a hidden paper bin on one side.
On a concrete floor, you can fold the seat like a pedestal. When installing a screed, you need to roll a sheet of galvanized iron about 50–60 cm high into an oval roll and install this sleeve over the pit. The internal dimensions of the resulting throat are 25 cm in width and 30–35 cm in length. After pouring the floor, a casing of plaster mesh is rolled up around the sleeve and about 4–5 cm of cement mortar is poured. While the solution has not yet set, it is necessary to insert mortgages in the back of the pedestal to secure the toilet seat. The outside of the pedestal can be tiled, forming an aesthetic octagonal column.
Important advice: for both a wooden and a “stone” seat, it will be very useful to lay in advance at a depth of 60–70 cm from the toilet seat a wide cut-off corner with the edge up and along the hole, protecting against back splashes.