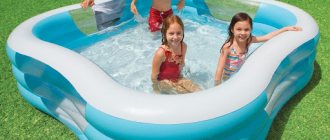
The concept of “frame” when applied to a swimming pool has a slightly different meaning than when applied to houses and other residential and non-residential buildings. In this case, the frame is understood as a rigid power structure that holds the film/membrane/PVC fabric or other rolled waterproof material. Making such a pool yourself will be cheap and quick.
Why the frame?
Despite the fact that there are a lot of ready-made products on the market - containers made of fiberglass or propylene, bowls - as well as a large number of proposals for the construction of swimming pools, this pleasure is not cheap.
Even the smallest bowl (1.5x1.2x1.2 m) will cost about 30,000 rubles (with delivery), and a container of 5x2.5x1.5 m will cost about 160 thousand. At the same time, the cost of constructing a frame pool of the same dimensions will be 5...10 thousand rubles (depending on the selected materials).
Another important factor is the complexity of installation. More precisely, in relation to a frame pool, simplicity. It can easily be assembled by one person in a day, of course, if we are not talking about training space for the Olympic team. There is no need to dig a pit or build up a podium (although this can be done), and you will not need concrete or other durable building materials.
Not the last factor is the ability to choose the most suitable size and shape, based on the characteristics of the site, and not on the available range of suppliers.
Unfortunately, in addition to its advantages, a frame pool in a country house also has disadvantages. The main thing is considered to be a short service life - up to 5 years for the bowl (container) itself, up to 10...12 years for the structure as a whole under normal operating conditions. Compared to capital pools made of concrete with your own hands, this is not much.
Hidden Water Pools transform into a patio
Patios are open courtyards enclosed by fences, building walls, or gates. They are adored for their homely atmosphere of comfort. Fountains, pools, small gazebos, and openwork paths add special beauty to the patio. A small courtyard of a private house is decorated with paving stones.
The round platform, by pressing a button, is transformed into a swimming pool, and a fountain is placed in the middle. Everything is beautifully illuminated and looks mesmerizing in the evening.
The bottom of the pool can be raised to create either a level floor or a picnic patio with the optional extension of the table.
Example:
The mechanism and design of this pool were developed by Hidden Water Pools. This option is very suitable for families with small children. You don't have to worry about letting them go outside. Let them play quietly in the yard alone. And if children want to swim, the depth of the pool can be adjusted.
A short visual overview of this technology:
The most important thing is capacity
When constructing such artificial reservoirs, the main element is a waterproof container. It can be purchased ready-made (for example, a round container with a diameter of about 3 m will cost 14...16 thousand rubles, including the frame and everything necessary for installation) or made independently.
Basic requirements for the bowl:
- high density and strength of the material. Recommended films and fabrics made of polyvinyl chloride with a density of 650 g/m2;
- smooth surface, especially facing the inside of the pool. Glossy fabric is easier to clean from any dirt and disinfect;
- completely waterproof. Since the container cannot be solid, special attention is paid to the tightness of the joints of the panels;
- good resistance to ultraviolet radiation, frost, high temperatures, mechanical strength (resistance to puncture, tearing).
Industrially produced containers meet the requirements listed above; when creating a bowl yourself, you should choose high-quality awning fabric with the smoothest possible surface.
To connect panels of fabric, use a hair dryer with a temperature range of 70...600 degrees. The temperature is selected according to the recommendations of the fabric manufacturer; a crevice nozzle is used for directed action. An overlap of 20...30 mm is required.
The cut bowl is assembled on a large, flat surface. Heat the overlapped edges of the panels to the recommended temperature and carefully roll them with a special roller to seal the seams.
The upper edge of the bowl (it is cut out in advance with a reserve) is folded twice, heated again and rolled. Next, grommets are mounted on the canvas - metal double-sided ring-holes. To install them, you need a special press or available tools. The pitch of the eyelets is no more than 50 cm.
Which frame to use
Manufacturers of frame pools prefer a frame made of steel profiles - pipes of round or (more often) oval cross-section. The metal base absorbs and distributes the load from the weight of water poured into the pool well and dampens vibrations. However, such a frame is quite expensive.
It is cheaper to use wood with appropriate processing, and it is not necessary to take an edged board or timber; both a shalevka and a half-edged board will do.
You can also use panel materials - thick plywood, chipboard, OSB and the like. However, timber and boards will still be useful, at least as racks and struts.
Important: the wooden parts used to create the pool frame must be impregnated with an antiseptic and protected from water with special coatings (varnishes, paints).
If you plan to build a pool with a podium around the entire perimeter or part of it, you should also use wood. However, in this case it is advisable to take a planed board or deck board (decking). They also need to be protected from water and microorganisms.
Styles
High tech
Baths in a modern style are not loaded with furniture and have clear shapes. The pool traditionally has an irregular shape and lighting. The bathhouse is finished from moisture-resistant materials using contrasting colors. Sensors for monitoring the temperature of the pool water and air are controlled remotely through a program. High ceilings and accent lighting complement the modern style.
A small high-tech style bathhouse takes up a minimum of space, but at the same time is adapted for ideal relaxation
Provence
A bathhouse with a swimming pool in the style of the south of France looks as if the furniture and interior items are slightly shabby and worn out. The style is characterized by: wooden furniture, complemented by forged elements, light colors in the design of the space. Rough plaster with stone trim, linen, wrought iron fixtures and lamps, while the pool is built in a rectangular classic shape. If the bath complex has a veranda or terrace, then in order to emphasize Provencal sophistication, flowers and plants are placed in pots.
A Provence style bathhouse with stained glass windows adds natural light, expanding the space
Chalet
Stone and wood are the two main materials when arranging a bathhouse and a swimming pool in a style with a pronounced spirit of wild nature and the environment. The cladding of walls, ceilings, and floors adds massiveness and majesty to the interior. The style of the chalet will additionally be recreated by bouquets of fragrant herbs, tablecloths, tea sets, and hunter’s attributes. The simplicity of the form and the absence of decorations, patterns, and decorative elements creates the feeling that the location is in an Alpine castle.
An open-air swimming pool and a small sauna using natural materials create the feeling of being in the Alps
Country
Countryside style looks great in a Russian bathhouse. A lot of wood, both in the decoration and in the choice of furniture, creates air, comfort and a special atmosphere for relaxation. Natural shades predominate, without sharp contrasts and transitions. Tiles are laid on the floor. The walls of the room are decorated with paintings with carved patterns.
A country-style bathhouse, decorated with wooden materials and a small plunge pool, is a good choice for a country project
Loft
When arranging a bathhouse in the loft style, wood, metal, and porcelain stoneware are used. Nothing superfluous, just what is necessary. Imitation of premises of a factory or plant. A rectangular pool with a descent ladder made of metal - and here you are, enjoying the industrial style to the fullest.
A gray loft-style interior, trimmed with tiles imitating stone, looks bold and noble
Half-timbered
In this style, everything is decided by the ceiling wooden beams, which protrude noticeably. They are painted dark so that, against the background of a light ceiling, all attention would be focused on them. Simple wooden furniture is matched to match. A light-colored tile floor complements the space.
A sauna with a swimming pool in the courtyard of the house - as close as possible to nature
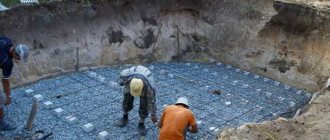
Do-it-yourself frame pool: preparing the base
This stage is required for both purchased frames and homemade ponds.
Please note: the sequence of actions is given for a FREE pool. If you plan to mount it in a recess, then all of the above work is performed after excavation of the pit.
- Level the site, removing depressions and protrusions more than 2...3 cm high. It is also necessary to remove solid objects (stones, remains of building materials), plants and their roots.
- Arrange a sand cushion. The thickness of the cushion is 50...100 mm, this parameter depends on the size of the pool. The larger the container, the greater the pressure on the bottom and the thicker the cushion should be. It is better to use sand of medium fraction, without foreign inclusions. To obtain a perfectly flat and horizontal surface, profiles (wooden beams or metal) are leveled and the sand is leveled over them according to the rule.
- You can additionally moisten the sand and compact it slightly.
After installing the frame, the sand will have to be leveled again!
Beams. Longitudinal location
Next, according to the project, it is necessary to install beams on vertically located supports. This is the next step in building a deck around the pool.
Triple or double beams are installed according to the load. In the case where there is no more than 12 feet between adjacent beams located in one row, then double beams are installed, as in this project under consideration, where between each two nearest beams there is no more than ten feet.
The cross-section of the longitudinal beams can vary, ranging from 2x4 inches to 2x12 inches. This choice will depend on the number and distance between adjacent lines of longitudinal beams. It is best to use as few supports as possible; accordingly, there will also be fewer beam lines, and the distance between them will be greater. But then you won’t have to dig a lot of holes for supports, which are not so easy to build.
The fourth picture is a diagram of the beams. The dimensions of these items are 2 x 10 inches.
Figure 4. Beam diagram
DIY pool in the courtyard of a private house
After preparing the site, it’s time to install the frame. Regardless of what it will be, the racks must be installed according to the markings with the required spacing. For massive racks made of timber (section 100x50 mm or more), a step of 1.2...1.5 m is acceptable, for thinner supports - 0.8...1.2 m.
To give the racks the necessary stability, they should be buried 50...80 cm into the ground (for industrial pools, you must follow the manufacturer's instructions). The holes for installing the racks are made using a drill; with a regular manual drill, the holes in the hole are too large. The supports are placed strictly horizontally, checking the position with a level.
For particularly large pools, you can backfill the wells under the racks with crushed stone and tamper and even concrete them, but this is usually not necessary.
The racks are “tied” with a shalevka or edged board (you can also use timber, slabs) at the top and bottom. The position of the top trim is chosen at the level of the top of the future container. For example, for a bowl with a depth of 1.2 m, the upper edge of the upper trim should be at a height of 1.2...1.15 m. We place the lower trim at a height of 0.2...0.3 m from the ground level.
The larger the pitch of the racks, the greater the pressure of water from the bowl on them. Therefore, it is advisable to make struts for intermediate and, possibly, corner supports. It is better to perform them in the form of triangles, this provides a more rigid connection. For the bottom side of the rectangle, you can use an unedged board and even a slab; for the struts themselves, it is better to take high-quality dry timber with a cross-section of 40x60 or 50x50 mm.
Immediately after assembling the main frame, it is worth installing the stairs. It can be mounted only from the outside or a suspended structure can be added from the inside.
In the proposed example, the staircase is made on strings cut from edged or unedged boards with a thickness of at least 20 mm. To strengthen the frame structure, another rack is mounted at the place where the stairs are attached (it is better to immediately include it in the general outline during the initial installation).
The upper step of the ladder rests on the upper frame frame, the lower one can lie on the ground, as shown in the photo, or be located at a distance from it. The distance between the steps is determined individually, depending on the height and age of the users (for children it makes sense to make steps more often).
It is easier to make a regular vertical staircase into the pool, attached to the top frame and the external staircase.
Important: inside the bowl, the ladder should not rest on the bottom of the pool! Otherwise, there is a dynamic load on the bottom of the bowl, and a tissue breakthrough is possible!
You can replace a wooden staircase with a ready-made metal one.
After the frame is completely assembled and the sand on the site is leveled again, you can attach the pre-glued bowl. It is mounted using galvanized self-tapping screws through eyelets. The diameter of the eyelets is selected in advance so that it is 1...2 mm larger than the nominal diameter of the screw threads.
It is imperative to use a washer in fastenings; its outer diameter must be 2...4 mm larger than the outer diameter of the grommet.
You should pull the fabric carefully so as not to tear it; it is better to first “bait” the screws and tighten them after the fabric has been straightened across the entire frame.
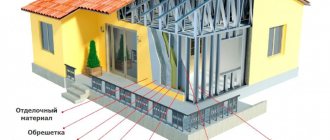
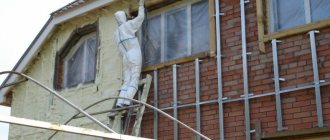
Features of combined construction
It is not always possible to equip a large and reliable swimming pool in a finished bathhouse. This point should be taken into account at the planning stage in order to clearly determine the type of suitable base, the method of connecting communications, and choose a moisture-resistant finish for the room.
Let's look at the nuances of each of these parameters in more detail.
Choosing a foundation
Popular materials for building a bathhouse:
- foam block;
- beam;
- log.
The raw materials do not carry a large load, so a columnar foundation or a shallow reinforced concrete strip will suffice. The same applies to frame-type baths.
For comparison, a pool measuring 3*4 m, 1.4 m deep, completely filled with water, creates a load on the soil of 17 tons. And if you take into account the weight of construction, finishing materials, and plumbing equipment, the figure will increase even more.
The greater the depth of the reservoir, the higher the pressure on the soil.
Craftsmen recommend separately pouring a powerful monolithic reinforced concrete foundation under the pool, which can withstand heavy loads.
Proper ventilation and dehumidification
Due to the constant presence of water, there will be high humidity in the room. Therefore, not every type of finish is suitable. If these are wooden elements, then it is better to take species with increased moisture resistance - cedar, larch. It is good to saturate the material with antiseptics.
The recommended humidity level should be between 50-60%.
To achieve it, use:
- Special tank coating. Regular thick polyethylene film will do. When the pool is not in use, it is simply covered with film.
- Forced ventilation. It is effective in spring and summer, but in winter it will reduce the temperature in the room and increase heating costs.
- Dehumidifiers are the best option. They perfectly reduce humidity in the room, while heating the air. In combination with properly equipped ventilation, they will give maximum effect. There are budget models on sale.
Using an air conditioner to dehumidify the air is not the best solution, since along with the humidity of the air, its temperature will also begin to decrease. Another disadvantage is that it cannot be used in winter.
Heating a room with a swimming pool
The room is heated from a common system with a gas, electric or solid fuel (wood, coal) boiler. There are combined heating options. Radiators are fixed to the walls. The degree of heating is controlled by a regulator on each battery.
Infrared heaters that are attached to the ceiling are popular.
For bath complexes, a heated floor system always remains relevant.
The water temperature in the pool is considered comfortable for procedures from +24 to +28 degrees. Heating is carried out from a common, autonomous heating system.
Sewerage
Only central sewerage is suitable for water drainage. A standard cesspool in a country house will not handle such a volume of water. Sewerage with related components (drain pipe, valves) is calculated in advance.
Don't neglect installing a good filtration system. This will reduce the replacement of water in the pool to 1-2 times a year.
And provided there are no chemicals in the water, it can be used to water plants on the estate.
Frame options
In addition to the described wooden frame made of timber and boards, you can use a homemade welded or prefabricated frame made of rolled metal. It is best to use a rectangular pipe with a cross-section of 20x40 mm for racks, a corner or strip for piping and struts.
By raising the posts 1.5...2 m above the pool level, you can stretch an awning over it or install a polycarbonate canopy.
Another practical and inexpensive option is a pool made from pallets.
Pallets installed along the contour are tied into a single structure with boards or timber; metal plates can also be used. In this case, there is no need to install racks buried in the ground - the connection between the enclosing elements is sufficient. Installation inside the fence of an additional protective layer of thick plastic or rolled material (roofing felt, old linoleum, any other flexible flooring) is not necessary, but it significantly increases the strength of the structure.
Areas for care and sports
Creating a full-fledged wellness area in a country house includes not only a swimming pool and a sauna. It’s hard to imagine self-care without the gym.
This can be either a separate spacious room located near the pool, or a compact corner with a couple of your favorite exercise machines.
Private gym with a sleek design
For the sports area, light, natural shades and contrasting accents are used. Large mirrors are placed on the walls to monitor your progress towards a healthy and strong body.
Exercising in an aesthetically pleasing space is much more enjoyable. Place a treadmill near a panoramic window overlooking a green area, and your daily run will become a pleasant ritual of self-care.
Mirrors and panoramic windows in the gym are demonstrated in the Zhedochi cottage project.
Loft-style gym with access to the garden
The cosmetology room adjacent to the gym will serve as a suitable place to reward yourself for your work on the equipment. It is equipped with a comfortable couch or massage chair. Aroma lamps, dim warm light, and light music will immerse the owners in the atmosphere of a spa resort.
A small beauty salon in light colors will allow you to enjoy beauty treatments without leaving your home
A country house is the best place to create your own space for water healing treatments. The design of the pool is in tune with the overall style of the house, but at the same time it has its own unique features and characteristics. It is important to remember: in order for relaxation in the sauna and swimming to bring joy for many years, the design project and technical aspects must be agreed upon in advance with experts.
How to make a pool with a podium with your own hands
A homemade frame pool may not look aesthetically pleasing enough, so it makes sense to mount a podium or at least decorative trim around an already erected structure.
To create a podium, use a beam or board with a thickness of at least 20 mm. The racks of the podium frame must be deepened into the ground by 30...50 cm (the same as the racks of the pool frame). In this case, only the top binding is performed. It is better to lay flooring on the frame using deck boards (decking) made of larch, combined materials or plastic.
If desired, the podium can be built only on one side or it can go around two or three sides of the bowl.
In both cases, the level of the flooring on the podium should be slightly higher than the top of the bowl. It is also desirable for the flooring to slightly overhang the bowl - this will prevent deformation or damage to its attachment points and will make it easier to get out of the water.
Step-by-step instructions on how to finish a tank
Pool decking is a step-by-step process of creating a support system and laying down the deck.
Tools and materials
You need to prepare the following tools:
- power saw or jigsaw;
- electric drill or screwdriver;
- measuring instrument - ruler, tape measure, square, building level;
- grinder with cutting wheel;
- welding inverter with a set of electrodes.
The last two items are tools for working with screw piles, if used.
Materials:
- terrace board;
- support bars (logs) with a cross section of 45 × 80 mm (approximately);
- strips for making a strapping belt connecting the tops of the piles;
- bars for making railings, handrails or other design elements (if they are planned);
- clamps for installing decking boards;
- nails, screws.
Stages of work
The installation process is as follows:
- Make a strapping belt from bars connecting the upper parts of the supports (or screw piles). The belt will be the main supporting structure, so it is necessary to ensure complete immobility and strength of the harness.
- Lay the joists in a transverse direction to the trim strips. It is recommended to place rubber bands (or strips of roofing felt, which is somewhat worse) under the joists. The tops of the joists should form a flat, horizontal plane.
- The flooring is laid on one side of the site. The end panel is secured in a secret way, then, using clamps, other flooring elements are sequentially attached. When the canvas is laid, the edges are sheathed with transverse boards, forming the edges of the area or paths.
The installation of railings or other vertical elements is carried out at the stage of assembling the support system to ensure proper strength and immobility.
Finishing the beach area around the pool with a terrace board - in the video:
Useful additions
Since it is extremely difficult to fill even a small pool manually, renew the water in it and drain it, a pump should be a mandatory addition to the swimming area. The choice of a specific equipment model depends on the volume of the pool, the desired pumping speed and other nuances.
Also useful are filters, installations for heating water, illuminating it, and so on. The photo below shows a water heating system from a solar collector.
In addition to equipment, other devices will also be useful - for example, a sliding or regular canopy.
And, of course, relaxation near the pool cannot be imagined without a comfortable place to relax - sun loungers, sun loungers, umbrellas and so on.
Have a good holiday!
Hidden under the lawn
A swimming pool helps the owner of a house or cottage cope with the summer heat. But sometimes you have to choose between a green lawn and a pond, because... The area of the site is small.
A sliding deck lined with artificial grass helps solve the choice problem. It looks like a lawn, but when pulled back, it reveals a pool hidden underneath. When no one is swimming, the platform closes it, again forming a lawn. Everything is done with one click of a button.
The closed platform can be used for relaxation, games, etc.
A visual overview of this technology: