During installation work, stones of any fraction and different geometries are used.
It is not so difficult to build a stone foundation with your own hands. It is a high-quality replacement for a concrete foundation, and therefore many developers strive to build a house using natural stone for the construction of the supporting structure. The work does not require the use of heavy construction equipment if the stone is freely available directly on the site where construction is taking place. In other cases, the owner of the future building will have to take care of purchasing and delivering a sufficient amount of building material.
A little about the stone
Natural stone is a fairly strong and durable material. It is used not only for foundation construction, but also for the construction of walls, barbecues, and barbecues. It has found its application in landscape design. In addition, natural cut stone is currently actively used in construction as a facing material.
The stone has found such widespread use due to its properties:
- Durability.
- Environmentally friendly.
- Aesthetics.
- Strength.
- Resistance to all adverse climatic and chemical influences.
However, not every stone can be used in construction work.
Soft and exfoliating rocks do not provide sufficient strength, so rubble stone, which is irregularly shaped rock fragments, is chosen to construct the foundation of the house.
When thinking about constructing a rubble stone foundation, stones with a flat shape are chosen, since they are easier to lay in rows, held together with cement mortar. Particularly large ones will have to be split or trimmed.
Advantages of rubble foundations
Thanks to the special strength of the stone, the durability of structures reaches 150 years or more. There are known structures made of natural stone that are hundreds of years old.
As a natural material, rubble stone is not afraid of sudden temperature changes. It is highly resistant to aggressive groundwater.
But for all its positive qualities, rubble foundations require a lot of labor. Foundations made of this material are massive and large in size, which cannot be said about concrete structures, which, although small in size, due to the presence of a reinforcement frame, can withstand the same loads as rubble concrete.
It is also inadvisable to make columnar foundations from rubble stone; too much effort and material will be required. Therefore, here we will consider the construction of a strip foundation made of rubble.
It must be said that the use of rubble is justified in the case when the price of foundation stone is significantly lower than the cost of a concrete strip foundation. Otherwise, the game will not be worth the candle, as they say. Working with stone is heavier than the work of constructing concrete structures, so you need to think seven times before deciding on this labor-intensive task.
Is this type of base suitable for every bath?
Some experts note that the heaviest buildings have long been built on the rubble. After all, rubble tape is much more mobile and less rigid than a regular foundation. Therefore, if it is not well “pressed down” by brick walls and the presence of a second floor, the bathhouse may, unfortunately, not last long. But wooden steam rooms, although they are light, can be safely installed on such a basis: after all, wood, due to its fibrous structure, works well “in tension” and it is not scary for it if the foundation underneath it “moves” slightly, whereas brick and concrete the wall, if it could not sufficiently press down and “pacify” the rubble foundation, will definitely crack. What a paradox!
Laying stone in the foundation
Rubble stone can be placed both in the formwork and directly in the trench. Formwork should be installed if the soil is crumbling. In this case, instead of formwork, you can use roofing felt, roofing felt and other rolled or sheet materials. It is important to prevent soil from getting inside the foundation, as this will weaken the adhesion strength of the stones to the mortar.
Any foundation must be placed below the freezing level of the soil if it is heaving or excessively wet, and rubble is no exception. On the contrary, a foundation made of natural stone must lie below the freezing point of the soil, since rubble foundations are usually not reinforced, and in severe frosts there is a risk of the foundation bulging along with the frozen soil. This applies, as mentioned above, to heaving and moisture-saturated soils. For strong and dry soils, the depth of the foundation must be at least 50 cm. All this is determined at the design stage.
A sand bedding is made at the bottom of the trench, on which the largest stones are placed, pressing them with great force into the sand. The stones should take a stable position and not wobble. The width of the foundation should be 15-20 cm greater than its height.
Experts recommend soaking the stone for one hour before placing it in the trench. This allows it to be saturated with moisture for better adhesion to the cement mortar, while at the same time excess crumbling particles are removed from its surface. However, before laying, the stone must dry slightly.
When building a stone foundation for a house, it is necessary to carefully select stones of a more regular shape for the corners and the first row. If necessary, you need to shape them using a sledgehammer and chisel. The voids formed between the stones are filled with smaller fractions, after which the row is filled with liquid cement and a bed of normal cement-sand mortar is laid on top. The next row of stones is installed on it.
The stones must be selected according to their shape so that they are laid with minimal gaps. Be sure to adhere to the dressing, as in brickwork, otherwise the entire foundation will quickly crumble.
The space formed by the stone foundation and the trench wall is filled with small crushed stone from the same stone. Thus, a drainage layer is formed, which helps drain water from the foundation.
If reinforcement is necessary (this also happens), reinforcement is used only in the form of vertical rods and wire.
When installing a rubble foundation, you should immediately leave ventilation holes so as not to use a hammer drill later.
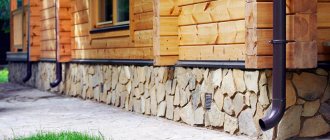
If you want to give your house a solid and rich appearance, you can simply cover the foundation with stone. This is much easier than setting up the actual base of their rubble stone. In this case, the stone, which is cut into flat tiles, is attached using special glue or cement mortar. If the stone is heavy, then metal hooks or reinforcing mesh are used to secure it.
When building massive houses, a particularly strong, solid foundation is required. Similar strength can be provided by rubble - massive pieces of rock. When constructing a foundation from it, material costs can be significantly reduced - after all, the cost of this material is minimal.
Installation stages and technologies
As with the construction of any strip foundation, the rubble construction technology consists of similar stages:
- Design – calculation and drawing of the plan of the proposed subwall.
- The preparatory part is digging a trench, installing a sand and gravel cushion, waterproofing the underground part.
- The main construction is laying out the first and subsequent rows.
Tools and materials
To build such a foundation, specialized equipment is not required, but creation requires a certain tool:
- shovels - for digging a trench (in the case of digging a whole pit, it is better to use an excavator and then finish the soil with a shovel);
- mallet - for laying out cobblestones;
- concrete mixer - for making concrete mixture;
- box for solution at the installation site;
- gutters - for lowering boxes and raw materials;
- stepladders - for going into the pit.
Calculations
When constructing this frame, it is very important to make the calculations correctly. First of all, this will allow you to order material in the required quantities. To find out the correct quantity, you must first calculate the width, height and total length of the support being erected.
Minimum dimensions of strip rubble foundation:
- width – 35 cm or more;
- trench depth – 70 cm;
- total height including depth – 1.6 m;
- length - measured according to the finished drawing.
When choosing these parameters, one should take into account the expected loads on the finished foundation, as well as the composition of the soil on which construction is proposed, and the natural and climatic features of the area.
If you doubt the correctness of the calculations, then you should contact specialists, because the quality characteristics of the structure being built directly depend on this.
The procedure for calculating the volume of consumed raw materials:
- Using the known parameters of length and width, it is not difficult to calculate the area of the upcoming structure.
- By dividing the area of the frame by the approximate diameter of the selected stone, we obtain the amount of material required to lay out one row.
- Based on the known height of the subwall and the approximate height of the boulder, by division we find out the number of lines to be laid out.
- By multiplying the number of rows by the amount of raw materials required per row, we get the total volume of material for the complete layout of the planned building.
Example: let the width of the foundation be 0.35 m, length - 150 m, height - 1.6 m. The size of the rubble stone is 35x15 cm. Then:
- 0.35 m * 150 m = 52.5 m2 – base area;
- 52.5 m2/0.35 m2 = 150 pcs – amount of raw materials per line;
- 1.6 m/0.15 m = 11 rows;
- 150*11 = 1650 pieces - the amount of rock to build a complete structure.
This method is used if the size of the rock material used is approximately the same.
If you plan to purchase cobblestones of different sizes for construction, then the calculation can be made by tonnage. It is known that the average weight of rubble per 1m3 is 1.8 tons.
First, using known design parameters, you need to calculate the volume of the entire base. To do this, just multiply the length by the width and height (0.35x150x1.6=84 m3). And then divide the resulting volume of the skeleton by the volume of rubble consumed for the construction of 1 m3 (84 m3/1.8 t = 47 m3).
Stone selection
The strength characteristics of the finished structure directly depend on the choice of a high-quality sample. To check the suitability of a boulder, you need to knock on it. A ringing sound with an echo is a guarantee of strength. A dull sound indicates that it will soon crumble, since its structure has already been damaged.
You should look for a suitable cobblestone among the rocks.
It can be :
- granite,
- dolomite,
- basalt,
- diorite,
- shell rock,
- sandstone,
- limestone and others.
The pieces of rock should be large, from 35 cm to half a meter, and “torn” for better adhesion.
Preparatory work
First, you should make markings according to the original drawing at the site where the building is supposed to be constructed. Next, you should move on to excavation work and dig a trench.
If the house is supposed to have a basement, then it is necessary to build a pit over the entire area of the future building. The trench should have a margin of width for the convenience of creating and expanding the lower part of the base.
The bottom mark of the trench should be 30 cm or more below the soil freezing mark. Deepening the structure adds strength to the structure and resistance to sudden temperature changes.
If the soil in the trench tends to crumble, then you cannot do without formwork to prevent the soil from getting into the solution. This will prevent damage to the integrity of the structure in the future.
Sand and gravel cushion
Under no circumstances should blocks be laid on an unprepared surface. In a dug trench you need:
- Construction of a sand and gravel cushion with a tamper 10 to 30 cm thick. For better compaction, the sand must be moistened with water.
- Laying roofing felt waterproofing.
- Concrete preparation device from B7 grade mortar with a thickness of 10-15 cm.
Preparation of a suitable solution
To build the base you will need a large amount of concrete mixture, so it is best to use a concrete mixer for mixing.
The order of operations is as follows:
- dry mixtures of sand and cement are poured in according to a 3:1 ratio;
- add 5 parts of crushed stone;
- Add water in a small stream as you knead.
Stir the solution until smooth after adding each component. The finished mixture should have a consistency similar to sour cream. To fill the cracks between the laid raw materials, it is better to use concrete mortar, which has the greatest strength.
Rubble stone has the property of taking away heat from the solution if the laying is done in cold weather . To prevent the mixture from losing its adhesive properties, it is better to carry out the construction of the structure in the warm season.
Laying the first layer in the trench
For laying out the first layer, good specimens of approximately the same shape are selected. They should also have a smoother surface. This will prevent damage to the underlying waterproofing layer of roofing felt.
The laying distance between each block should be 5-7 cm. All remaining gaps should be filled with concrete.
During construction and installation work, it is necessary to use a clean boulder . To do this, it is first washed to remove clay, dirt and other impurities. And before laying it is moistened to ensure better adhesion.
Laying out subsequent lines
Laying out subsequent lines should be started only after the first layer has dried. If pebbles of various sizes are used during construction, then it is better to place large specimens along the edges, and fill the middle with small blocks.
The technology for laying rubble stones is the same as laying out a brick structure .
They are also adjusted with a mallet during the installation process. The same applies to the arrangement of an individual object in a row, which alternates in the likeness of a brick. When the laying takes place above ground level, it is better to select beautiful and even blocks for the outer belt, since further finishing of the base is not expected with this type of construction.
The last layer on top of the laid plinth should be a layer of reinforced screed, which will strengthen the structure and make it level for subsequent installation of walls.
The completed foundation needs to be thoroughly dried for a month under a layer of roofing material , and the walls should be erected after a year, when the sub-wall has withstood all weather changes and acquired its final position.
Waterproofing
From the above it follows that waterproofing of such a sub-base is necessary only as an underlying layer and below the zero ground level. The open top does not require additional waterproofing.
Types of rubble masonry
Rubble masonry has been known for quite a long time: even 2000 years ago, most massive medieval fortresses and houses for wealthy landowners were built from it.
Rubble was also used as a foundation in the construction of buildings in St. Petersburg. High-strength foundations made of this stone are widely used in modern construction. There are several types of such masonry: “under the shoulder blade”
: horizontal rows, with all stones selected according to size;
“for pouring”
: without laying out rows and selecting stones, the rubble is simply filled in layers, with each layer filled with mortar;
however, the safety margin of such a foundation is small, so this method is used only on dense, non-subsidence soils; “under the bracket”
: not used in the foundation, this way only partitions and pillars are erected;
a variation of the “under the shoulder blade” method, in this case the stones are selected exactly according to the template; with vibration compaction
: stones are compressed until the solution stops penetrating into the masonry; this method increases the strength of the future foundation by up to 25-40%.
a) “under the shoulder blade”; b) “bracket”; c) pouring into formwork; d) masonry by surprise
Since rock stone does not absorb water, practically does not collapse in water and does not delaminate, a foundation made from it can last a long time. In construction, it is better to use high-strength stone made of diorite, granite or basalt with high load-bearing capacity (at least 100 kg/cm2). It is not recommended to use rubble made of loose sandstone or limestone on wet soils.
Recommendations from professionals
With a professional approach to work, you can reduce the time required to pour the foundation by several times. There are instructions for this:
Work with rubble on a marked area
- The site is marked.
- Trenches are dug and formwork is installed.
- A little sand is poured into the finished trench and stones are placed there, pressing them into the created “cushion”.
- All gaps resulting from laying are filled with crushed stone and compacted.
- Prepare a concrete mixture (1:3) and pour it into the first row to make it more durable.
- Another row is laid out using the same principle. At the same time, do not forget to “bandage” the seams, as when laying brick material.
- The rows that will protrude above the ground are reinforced with wire or relief reinforcement.
By following these fairly simple recommendations, you can lay out the rubble base much faster. The result is a reliable and durable structure that can withstand the heaviest buildings and is designed for long-term use.
Layout of rubble
1. To prevent the foundation from being pushed upward during frost heaving, it is laid to a depth
slightly greater (at least 20 cm) than the depth of soil freezing.
For example, if in Moscow it freezes to 140 cm, then the foundation is laid at (140 + 20) = 160 cm. If the house and basement are heated throughout the winter season, without interruption, the foundation can be laid at a shallower depth
(from 50 cm) from the ground or basement floor. With an unheated basement (but constant heating of the house), it can be equal to half the freezing depth of the soil.
Diagram of soil freezing depth in the Russian Federation
2. To relieve stress and protect against subsidence on heaving soils, the foundation is made slightly sloping, in the shape of a trapezoid.
, wide part down. The gap between the bevels of such a trapezoid is subsequently filled with soil or sand and compacted.
Trapezoidal foundation for heaving soils
3. Minimum width
the foundation when laying rubble should be at least 50 cm. When using large rubble flagstone, its width can be reduced to 30 cm. 4. A “
cushion
” is placed at the bottom of the foundation - a water-spilled and carefully compacted layer of sand and crushed stone 12-25 cm deep 5. To prepare the solution, use cement
grades M-400-500
and dry sand without clay impurities. First, the dry components (cement and sand) are thoroughly mixed, and only then water is added. Too thin a solution will not adhere well. However, it must be sufficiently mobile and freely penetrate between the stones.
6. It is difficult to accurately calculate the amount of solution required. Since this figure depends on the size (fraction) of the rubble and the fit of the stones to each other, it may fluctuate. 7. When laying under the “shoulder” in the corners of the foundation and every 4-5 m, beacon stones
.
moorings
are pulled tightly on both sides of them .
The next row also begins with beacon stones. 8. Lay out the first row of rubble into the pre-prepared formwork dry, without mortar. All stones are laid flat side down. The solution is added only after filling the voids with crushed stone and compacting it. 9. For the foundation, it is better to use rubble flagstone (flat stone) without cracks and delaminations with a strength grade of at least 100
.
Before starting work, it is cleaned of dirt and moistened with water
.
10. After laying the stones, they should be pressed as tightly as possible to each other (settled). This is done with a cam hammer
(a tool with a rounded head).
Hammer-cam
11. Laying any row begins with miles
(side faces of the wall).
Then they lay out the backfill
(the inner layer, the place between two miles).
12. If installed correctly, reinforcement
is required.
If desired, the bottom and top rows can be tied with an armored belt of 4 rods each. 13. The stones are selected in size so that the height of the entire row along the entire length of the foundation is the same. It is allowed to add 1-2 thin stones
with a bunch of them with cement mortar and careful adjustment. Large stones can occupy 2 rows.
Rubble masonry
14. When laying, it is recommended to use stones up to 30 kg. A more massive quarry is broken (plinthed)
using a large sledgehammer and cleaver.
Too sharp corners should also be chipped with a hammer so that the shape of the stone is closer to a rectangle. 15. Laying is carried out in strictly horizontal rows
(the height of each of them is 25 cm) so that the free space between the stones is minimal.
In this case, the stones are pressed into the concrete by 1/2 or more of the height. 16. One of the important points is laying out the corners
.
It is carried out using the ligation
so that each vertical seam is covered with the top stone.
Laying out corners
Laying rows
Important!
Contact of stones with each other without strengthening with cement mortar is not allowed.
17. Stones with short sides are called bonded
.
Booth with long sides - spoon
. They are placed alternately. First a series of splice and then spoon stones.
Bandaging seams a) in ordinary masonry; b) at the junction of walls; 1 – tychkovy; 2 – spoon bottle
Important!
The stones should be positioned so that the seams are not over the seams.
18. The resulting voids are filled with crushed stone
followed by compaction. 19. Each subsequent row is filled with a solution 3-4 cm high. Laying is done on uncured concrete mixture. To prevent it from setting, the rubble should be laid within 1.5 hours after pouring it. In the hot season, to prevent drying out, it is better to periodically moisten the masonry with cold water or cover it with shields, roofing felt or film. 20. After passing each row, the concrete is compacted and leveled.
Important!
Breaks in work are allowed only after all stones have been embedded in the concrete mixture and compacted.
21. At the end of the work, to ensure that the foundation dries evenly, it is covered with film or roofing felt.
and dry in this state for 2-4 weeks.
You can additionally coat it with varnish or bitumen. 22. After the concrete has completely hardened and the formwork has been removed, the foundation is checked for defects
. To do this, use a steel brush and a chisel to clean off all problem areas and seal them again with a solution consisting of cement and sand (1:2), and after setting, rub them down. 23. During long breaks in work, the masonry is cleaned of the cement film and moistened. To increase adhesion on the frozen mortar, it is better to make notches with an ax or chisel.
Ready rubble foundation
The foundation of the house does not have to consist exclusively of monolithic concrete. Today we will talk about a stone foundation, the conditions under which its construction is possible, suitable rocks and types of stones, and we will also describe in detail the technology of rubble masonry.
Types of natural stone and its quality
In construction, this natural rock is called rubble. It can be of various origins. It includes sandstone, limestone, some types of shell rock, granite, dolomite and tuff.
To lay the foundation of a house, rubble weighing up to 30 kg is used. The maximum suitable size of the rubble along its largest side should not exceed 50 cm.
Torn rubble has uneven surfaces and different sizes
The bottle is distinguished by its shape and size:
- Torn - distinguished by its irregular shape and uneven edges, has uneven chips;
- A cobblestone is a small-sized type of rubble with a maximum size ranging from 12 cm to 30 cm. A cobblestone is a boulder with a rounded surface;
- Butte flagstone is a rock whose transverse size is much smaller than its horizontal dimensions. Its main advantage is the relative parallelism of the upper and lower planes. Laying a foundation requires significantly less labor to adjust the stones to each other;
- A bottle up to 50 cm in size, which has smooth sloping edges, is called “bedded”.
The main differences between a rubble foundation
As you know, reinforced concrete almost ideally combines such properties of building materials as compressive strength and resistance to bending influences. This makes it possible to erect buildings of significant mass on a concrete foundation, while neglecting the heterogeneity of the underlying soil layers. But in some cases there is no need to provide both of these conditions.
A rubble foundation is a masonry of relatively large stones. Due to the strength of the rocks, the foundation can withstand even very heavy loads, and the relative cheapness of the base material makes it possible to make the foundation more massive. Rubble masonry does not have reinforcement and the concentration of loads is critical for it, however, due to its massiveness, increased support area and location at great depth, where the soil layers are much denser, such a foundation is also very stable.
Separately, it is worth mentioning the decorative and operational qualities of the rubble foundation. It is less susceptible to the forces of frost heaving, does not require additional protection, and the above-ground part of the rubble masonry is an almost finished base with a unique appearance. But to be able to install a stone foundation, a number of conditions must be met:
- Favorable geological conditions.
- Lack of seismic activity.
- Availability of natural stone in the construction region.
- The ability of the wall material to withstand concentrated impacts or the installation of an armored belt.
Columnar-grillage foundation
Captivated by the cheapness and ease of constructing a columnar-grillage foundation , in the future you can get it to settle and destroy the house.
• The column of a standard columnar foundation (bored or TISE) has a depth of about one and a half meters and an expanded base, and transfers the weight of the walls downwards.
• The pressure from the house on each column is different, the composition of the soil under each of them may be different. They are subject to subsidence and bulging, each in its own way.
• Displacement of one column by several millimeters will cause a violation of the geometry of the grillage and destruction of the stone walls.
These foundations are very good for frame and timber houses, but practically unsuitable for stone ones. When calculating the frequency of columns (depending on the weight of the house and the properties of the soil), sometimes such a number is obtained that the design loses its economic feasibility
Geological setting
Before laying the foundation of the house and thereby finally approving the project, it is necessary to agree on the possibility of constructing a rubble masonry foundation. To do this, it is necessary to carry out hydrogeological surveys - to puncture the soil below the freezing depth, determine the dynamics of groundwater twice a season and submit samples taken from the reference depth to check the physical and mechanical characteristics of the soil.
The ideal operating conditions for a rubble foundation are those in which the groundwater level does not rise closer than 20-30 cm to the plane of the foundation. Exceptions are possible, but in this case the structure of the base changes: the flooded part is laid without a binder with mortar, but with careful compaction and chipping. Any rubble foundation must lie below the freezing depth. The exception to the rule is non-heaving soils - rocky and clastic, as well as coarse and medium-sized sands.
The requirements for supporting soil are the same as for the construction of prefabricated block foundations; they are described in detail in SP 50-101-2004. The main requirements are uniform soil density at all points, absence of subsidence properties and load-bearing capacity corresponding to the mass of the building and the support area.
Why is it durable
Stone is not afraid of water.
The service life of a stone foundation exceeds 150 years, because of all the existing ones it is the most resistant to freezing and is not afraid of groundwater. Using this environmentally friendly building material, you can make the foundation yourself, without using additional construction equipment. All that remains is to find a good stone and master the simple technology of building from it.
Choosing a foundation stone
It is necessary to distinguish between the concepts of rubble concrete and rubble masonry. The first is a method of reducing the consumption of concrete mixture by filling unreinforced areas of the massif with stone or construction (concrete) waste. Rubble masonry is a massif that does not have reinforcement and consists of at least 80% natural stone.
The stone used for rubble concrete can be completely different. Of course, preference is given to rock and igneous rocks, which, due to their high density, ensure the massiveness and stability of the base. But limestone and sandy shale can also be used, provided they are mined from open-pit mines. Waste rock from underground mines is not suitable: when exposed to atmospheric pressure, it stratifies and acquires a loose structure.
Usually, the origin of rubble stone does not have to be chosen; the raw materials that are available in the construction region are used. However, if you still have a choice, you need to consider the trade-off between strength and ease of processing. Firstly, the average weight of the main elements of rubble masonry is 30-50 kg; larger and heavier stones can be laid exclusively on corners and dressings. In view of the above, it may be necessary to split stones that are too large.
In addition, stones may require processing to remove sharp protrusions and edges. Ideally, the stones should have the shape of an irregular polygon that fits into a parallelepiped with a length of 50 cm, a width of 20-30 cm and a height of up to 20-25 cm. To do this, the largest elements are subjected to plinting, during which the main surfaces are trimmed, which should be as as flat as possible. All stones used in rubble masonry must be washed with water and a wire brush, with special care on those edges that were not chipped during processing.
Flaws
Some of the listed advantages are conditional, since everything depends on specific circumstances. You can install the base yourself, but during the work you will have to carry heavy stones manually. Calculating the exact quantity can be difficult due to the fact that their shape and mass are not uniform. To simplify installation, you will have to select products with wide edges, otherwise the process may be delayed. In practice, more often than not you still have to hire workers for installation. The price of the material increases if there is no quarry in the region.
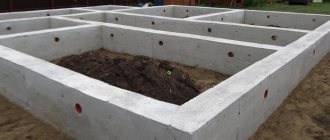
Preparing the trench
The rubble foundation has a width at the bottom that is 20-30% greater than a strip foundation with a calculated support capacity. Thus, in cross section, the tape takes the shape of a trapezoid, the upper base of which should be at least 20 cm greater than the thickness of the walls, taking into account the finishing. It is thanks to this form that susceptibility to the forces of lateral heaving is lost.
The trench is dug 20 cm below the freezing depth with a width equal to the bottom of the foundation. The bottom is covered with one layer of crushed stone of fraction 20-40, and then very carefully compacted with a wooden block with a metal penny. After this, the walls of the trench are covered with plastic film, the edges of which are turned over the sides and pressed down with stones. The purpose of the film is to prevent soil particles from getting into the thickness of the foundation during the laying process.
When the walls of the trench are closed, its bottom is filled with crushed stone in 10-20 thin layers, each of which is carefully compacted with a hand tamper. Layer-by-layer compaction is carried out until the total thickness of the crushed stone cushion is 20 cm.
Methods of strengthening structures
If the rubble mortar begins to crumble and crack, use one of the following methods to strengthen it:
- Cementation. The solution is injected into cracks and voids. It is also used for main masonry to fill hard-to-reach voids.
- Silication. It is carried out in several stages. At the first stage, silicates are introduced under pressure, at the second stage calcium chloride is poured into the cracks. The process is carried out under high pressure up to 0.4 MPa. The break between phases is at least 6 hours.
- Application of reinforced concrete frames. It is used when it is necessary to strengthen the lower layers of masonry. For better effect, the clips are placed on both sides.
- Targeted strengthening of individual parts. If a weakening of individual stones is detected, they are removed from the overall structure. The surface is cleaned. The cavity is filled again with rubble, and then they are installed in place.
Laying a rubble foundation
The first row of rubble masonry is made with the largest stones, which are placed with the long side along the direction of the trench. For the bottom row, you should select stones that have two parallel faces and are approximately equal in height. If necessary, masonry elements are plinthed, and all formed voids are filled with chips.
The next row of stones is laid in a transverse direction. In this case, dressing with mortar between the first and second rows is not performed; the gaps between the masonry elements are also filled with small crushed stone, which is compacted with a hammer. Dressing with a solution is carried out when laying the third and subsequent rows. In this case, you can choose one of the methods of rubble masonry - under the bay or with a shovel.
The first involves laying large stones to a height of about 70-80 cm, fitted as tightly as possible, but with the formation of vertical gaps. When the stones are laid, the foundation is filled with liquid concrete of class 7.5 or higher with a fine filler; as a rule, stone chips, granite or slag screenings are used.
Shovel laying is a classic method of constructing a rubble foundation. The masonry is done in layers, with the direction of the main stones changing from longitudinal to transverse for additional ligation. Each large stone is always installed with its widest and flattest side down, with a small amount of cement mortar applied to the previous layer of masonry.
When a whole row is laid out, a mortar is thrown on top of it with a shovel, and then the debris remaining after plinting, or coarse crushed stone. Using scrap metal, pinning is carried out, ensuring that the fine filler fills all the free space as tightly as possible. When the top layer of cement has set a little, the next row is laid.
Both types of masonry are carried out in such a way that its width becomes a little smaller with each layer. After laying the next row, the width of which is smaller than the previous one, the film is lifted and the sinuses are filled with a small amount of soil. When the foundation has reached ground level, the masonry technique either changes to decorative with careful adjustment of stones and jointing, or formwork is erected and a concrete belt with upper and lower reinforcement about 20-25 cm high is poured.
Preparing material for masonry
High-quality raw materials can be purchased immediately. The bottle does not undergo preparatory work if it is of optimal size. But in practice, the cost of the material is high and builders themselves adjust the rubble to the appropriate dimensions. Plinting is also done at the construction site.
This is breaking the rubble into homogeneous cobblestones weighing up to 30 kg. The procedure helps to obtain the most even stones. But this is important, because... less solution is consumed to fill voids and the structure itself becomes much stronger.
The building material is laid on a flat base, then markings are applied to it, along which the pieces will be cut off. A chisel is driven into the building material and struck. A high risk of incorrectly splitting stones is eliminated by making gentle and careful blows.
Foundation types and designs
The choice of foundation type and design is determined by how many floors you plan to build. If we are talking about a stone house without a basement (ground) floor, you can use a recessed strip foundation.
This is due to the fact that the work will be carried out with heavy materials and, of course, the stone cottage will shrink over time. In order to prevent the erected walls from cracking, it is necessary to make a reinforced solid foundation. Since our foundation will be slightly different from the usual structure intended for a frame house, we will consider this issue in more detail.
Tools and materials
First, about tools and materials. To build a foundation for a stone building you will need:
- Construction hydraulic level (GUS)
- Building level
- Plywood or board
- Jigsaw
- Screws, nails
- Screwdriver
- Hammer
- Bayonet shovel, shovel
- Knitting wire
- Pliers
- Crushed stone
- Buckets
- Master OK
- Fittings with a diameter of 12mm-14mm
- Cement, crushed stone, sand
- Concrete mixer.
Planning
At this stage, you need to decide on the dimensions of the load-bearing walls (those walls on which the floors will be supported), the number and location of the partitions (those walls that divide the common space into rooms, bathrooms and other premises).
Sketch everything in detail - this will help transfer your idea to the ground. The main rule is that under each of the walls or piers a separate section must be poured, which is an integral element of the entire foundation.
Trench preparation
In the next step, you will transfer your diagram to the ground. To do this, you will need to hammer in pegs and pull a strong thread or rope over them. Afterwards, you need to dig trenches along the stretched thread. If you plan to build a cottage up to 3 floors high, then the height of the foundation should be from 60 cm to 100 cm.
In this case, at least 10 cm - 15 cm of the foundation should rise above the soil. To do this, formwork (knocked down with nails or twisted with screws) is placed over the trench exactly along the edge.
The formwork is constructed from plywood or boards. Every meter and a half along the lower and upper edges of the formwork you need to make transverse struts. Thanks to this, the concrete will not be able to crush the formwork structure.
To ensure that the entire foundation plane is absolutely level, the upper edge of the formwork must be level. This can be achieved through a building hydraulic level.
Recommendations from professionals
With a professional approach to work, you can reduce the time required to pour the foundation by several times. There are instructions for this:
Work with rubble on a marked area
- The site is marked. Trenches are dug and formwork is installed. A little sand is poured into the finished trench and stones are placed there, pressing them into the created “cushion”. All gaps resulting from laying are filled with crushed stone and compacted. A concrete mixture is prepared (1: 3) and fill the first row with it to make it more durable. The other row is laid out using the same principle. At the same time, do not forget to “bandage” the seams, as when laying brick material. The rows that will protrude above the ground are reinforced with wire or relief reinforcement.
By following these fairly simple recommendations, you can lay out the rubble base much faster. The result is a reliable and durable structure that can withstand the heaviest buildings and is designed for long-term use.
Arrangement of the “pillow”
In order for your foundation to “sleep securely” in the ground, it needs a pillow. To create such a cushion, a layer of crushed stone (at least 5 cm thick) must be poured onto the bottom of the dug trench. This will provide your foundation with a denser base, which will help reduce the number of cracks and deformations as the building shrinks.
Thanks to the reinforcement, the foundation will not crack, but will lie as a single mass. Reinforcement also helps reduce settlement and deformation of walls. Therefore, it is necessary to make a reinforcement box for all foundation trenches and along their entire length.
The box should have the shape of volumetric rectangles, which are connected to each other at the corners of the future structure. When making a box, you can use welding, but you can also simply tie the reinforcement with wire using pliers.
Well, if the cushion is poured, the box of reinforcement is tied, the formwork is in place, then you can start pouring the foundation. The main rule here is solid casting, i.e. All of your foundation trenches must be filled at one time.
Of course, in this case it is necessary to use a concrete mixer or a ready-made solution, and also use the help of a team of friendly assistants. Concrete is poured into the trenches in buckets, you can do this in layers - alternately pour layers to the top of the formwork.
If the depth of the trench is more than 60 cm, then backfilling is allowed: after laying the first layer of concrete, large granite blocks, large pieces of broken old concrete or any other dense stones are placed in the trench.
When you start pouring the formwork, for better shrinkage of the concrete you need to tap the outer sides of the formwork with a trowel. The ideal option here is to use a deep vibrator, but tapping will do. Finally, so that the surface of the foundation is smooth, go over it with a trowel.
It is important to know!
There are cases when, in the presence of a box of reinforcement, trenches are filled with a break of seven to ten hours. This is allowed. However, the places where already poured and fresh concrete will be joined must be wetted.
Well, the foundation for your “fortress” is ready. Now we need to wait until the concrete “sets” completely, and in the meantime, bring building materials to the site.
If the work was carried out in dry, hot weather, then the poured structure must be periodically moistened with plenty of water at first. The ideal period for drying the foundation is 24 days.
Video. Slab foundation
Video. Strip foundation
The foundation is the basis of the building and ensures the stability and durability of the entire building structure. Recently, foundation laying has been done mainly using concrete. However, the stone base is no less durable, and also has an original and aesthetic appearance. Another significant advantage is that laying the stone foundation of the building is completely doable with your own hands.
Features of the material
Rubble stone is mainly used for the construction of building foundations and basement floors. This material has been used for similar purposes for many centuries. The choice fell on this type of stone not by chance. Rubble stone is very durable. Its availability and, consequently, its relatively low cost also play an important role. The extraction of rubble material is no more complicated than the process of extracting natural clay.
Rubble is mined in two ways: by blasting and chipping in quarries or by natural destruction of the rock.
The most suitable for building a foundation is rubble flagstone. The fragmentary elements of this rock have a relatively flat shape, which makes its installation more convenient.
First, let's look at the advantages of a base made of stone material.
- High strength indicators. Natural stone is practically resistant to splitting and deformation. This will provide the entire building with a reliable foundation without subsidence, cracks or damage.
- The material is environmentally friendly. Rubble rock is extracted from natural reserves. The stone contains no artificial impurities and is not subjected to any chemical treatment.
- Natural stone is very resistant to temperature and atmospheric factors. Rubble stone is quite moisture resistant.
- Aesthetic appearance of the base. Rubble stone can have different colors and textures. Often on stone chips you can see very beautiful natural patterns of rock veins.
- The material is resistant to damage by microorganisms: fungus, mold. Insects will also not be able to damage it.
- Rubble stone is affordable, since its extraction is not labor-intensive. It is not rare or scarce.
It would be useful to recall the difficulties that may arise during the construction of a stone foundation.
- It is somewhat difficult to adjust the stones during the laying process. Since the material is extracted by chipping and does not undergo further processing, the elements retain their natural free shape and vary in size. For a dense and uniform installation, you need to take time to optimally select stones for each layer.
- Additional time and effort will need to be spent on preparing the cement or concrete mortar. It is necessary for fastening stone elements together.
- Rubble stone is unsuitable for laying the foundation of multi-story buildings.
When choosing a wild natural stone, you need to carefully examine the fragmentation elements. The stone should not have defects in the form of cracks or peeling, and it should not crumble.
It is necessary to make sure that the lot contains at least 90% large stone, and its color is uniform and identical.
The most convenient for laying are flat stones.
The strength of the rock can be tested by applying force to the material.
To do this you will need a heavy, massive hammer. After striking the stone hard, a loud sound should be heard. This indicates the good quality of this breed. A durable stone will maintain its integrity and will not split.
The material should not be overly porous. To check the water resistance of a stone, it is necessary to observe how it reacts to contact with water. If the rock actively absorbs water, it is unsuitable for construction.
How to choose the optimal material
The most common raw material for bitumen foundations is ordinary cobblestone. Shell rocks, sandstones and limestones are used less frequently. A rubble is considered to be a stone with two even parallel sides. For construction, pieces of approximately the same height and width are selected.
Options:
- the material does not crumble when split, does not produce dust;
- preliminary quality of raw materials (surface contamination and suitable dimensions).
If the cobblestone does not split upon impact, and the sound is clear and clear, this is a guarantee of the quality of the raw material. It is better to purchase building materials for construction work from reliable suppliers. At the request of the customer, they select the optimal size of cobblestones for a specific construction.
In addition, suppliers clean the surfaces of stones from dirt and dust. Without this procedure, the solution will not adhere to the surface of the building material. Searching for building materials manually is a long process, and washing most often costs more than centralized procurement.
DIY stone foundation
Required tools:
- hammer;
- level;
- plumb line;
- tamping;
- hammer-pick;
- chisel;
- sledgehammer;
- measuring tape;
- shovel and bayonet shovel.
The first stage of work is to prepare the area.
- The surface is cleared of debris and vegetation.
- Next, markings are carried out according to the dimensions of the base of the building under construction. Using this marking, trenches are prepared for laying stone. Their depth should be at least 80 cm, width at least 70 cm. The depth of the laying trenches directly depends on the degree of soil freezing in the cold season.
- The formwork is being installed.
- A small layer of sand, about 15 cm, is poured into the bottom of the trenches. Next is filling with water and compacting. Then gravel or small crushed stone is poured.
Cost of construction work
The total cost of the finished canvas depends on various factors:
- application of waterproofing;
- quality of foundation preparation;
- category of land for construction;
- cost of delivery of materials to the construction site;
- type of stones;
- complexity of construction and additional costs.
The financial part of the project is affected by the scope of work. It depends on whether concrete preparation, cushion creation, rubble reinforcement, and different types of waterproofing will be included. The average cost of 1 m3 of work is 6,000 rubles. Additional costs include double waterproofing and bitumen filling.