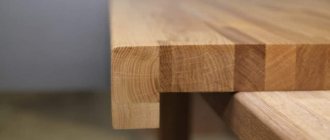
Floor porcelain tiles appeared in the homes of ordinary citizens relatively recently. But, despite this, it managed to gain popularity among consumers throughout the civilized world. Porcelain tiles are distinguished by their aesthetics, environmental friendliness, moisture resistance and, of course, durability, strength and wear resistance. This material is an almost exact imitation of natural stone and has a huge range of textures, textures, colors, shapes and sizes.
Of course, it would be more correct to entrust the laying of floor tiles to an experienced specialist, but if you stock up on the necessary knowledge, you can try to do it yourself. The installation process itself consists of several important points, each of which can affect the final result.
Preparation and calculations
First, establish the sequence of work and draw a diagram.
At the moment, there are several options for how to lay porcelain tiles on the floor. You can lay out a mosaic, place it in a checkerboard pattern, or create a pattern using products of different colors. It all depends on your ideas and imagination.
As soon as you draw up a diagram, you will understand what quantity of tiles and adhesive to purchase in the store. You can use online calculators for calculating finishing materials.
- Decoration Materials
How to glue tiles: a detailed guide that will leave no questions
Selection of adhesive composition
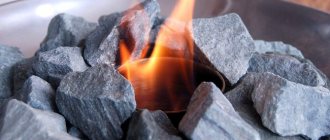
One of the features of porcelain stoneware is its absolute resistance to moisture absorption. This indicator determines the progress of such a process as the choice of adhesive composition with which the tiles will be fixed. Adhesion to the base must be maximum, and therefore it is impossible to use ordinary cement mortar and the choice should fall on types of adhesive mixtures that contain a high content of polymer substances.
It is also very important to take into account the manufacturers' advice on the use of such mixtures. The packaging with the adhesive composition provides similar information about the conditions under which it can be used. Naturally, it is worth taking care of the quantity of the purchased composition so that it is enough to lay porcelain tiles throughout the room and does not have to make additional purchases.
In this case, such a parameter as the thickness of the adhesive for porcelain tiles on the floor is very important, which significantly affects the volume of the mixture required to cover the floors in one room or the entire house.
Selection of materials
Nowadays there is a huge selection of porcelain stoneware in stores. It differs in color, structure, purpose and is divided into several types.
Choosing a tile
Technical
This material is not suitable for interior decoration of apartments or houses, and therefore has a very unsightly appearance. However, it differs from all others in its increased strength and wear resistance.
Polished
The name of this product speaks for itself. To achieve an absolute mirror shine, manufacturers not only polish the surface, but also coat it with a special varnish. Its main disadvantage is that it is very traumatic.
Matte
It did not go through the polishing stage, which gives it some advantage in price and operation: unlike the polished look, it is much cheaper and stronger.
Structured
Its surface imitates the structure of various materials, from leather to wood.
Lapped
In other words, not completely polished. On it you can find both matte and shiny areas. A very non-standard option that is suitable for bold design solutions.
Glazed
It is covered with a layer of colored glaze. However, despite its attractiveness, such a coating quickly wears off or chips, so this option is best glued in places where it will not be subjected to strong mechanical stress.
Satin
To make it, wax and mineral salts are used, which give it shine, but do not make the surface slippery.
Choosing glue
Depending on what product you have chosen and where you are going to do the masonry, you need to select an adhesive composition.
Polyurethane adhesive that can be used for finishing work both outdoors and at home. Its versatility and good grip fully justify the high price.
Dispersion adhesive - it contains special hardening agents and epoxy resin. It is well suited for rooms with high humidity, including the bathroom.
Cement glue - its advantage is that it is the most affordable of all mixtures, but after dilution it dries quickly and causes a lot of trouble. In addition, it is destroyed when exposed to moisture, so you should immediately purchase moisture-resistant grout for it.
Choosing grout
Don’t forget to choose grout, which also comes in two types.
- Cement - the name immediately reveals its composition. Such mixtures have a very affordable price and a huge range, but they are susceptible to moisture and have low strength.
- On the contrary, grouts based on epoxy resin are very resistant to water, but they do not mix well with dyes and are expensive.
Pexels
Craftsmen advise buying gray grout, since it is not so easily soiled. In any case, select a mixture that will match the color of the floor you have in mind. But you can also choose a contrasting option.
Preparatory work for installing tiles
As always, before starting work it would be a good idea to refer to the basic standard SNiP 3.04.01-87/SP 71.13330.2011 “Insulating and finishing coatings”. The surface of the concrete floor must meet the basic requirements of this document and be:
- Clean - traces of oil, old paints, bitumen mastics, soot, soot and anything that interferes with adhesion are not welcome.
- Dry – concrete moisture content should not exceed 4%. Highly absorbent surfaces are treated with a deep penetration primer, and wet surfaces are treated with special primers for substrates with a high level of residual moisture.
Cleaning the base.
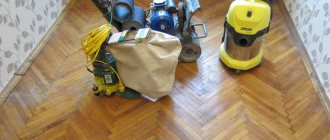
- Dust-free – fine dust and sand reduce the level of adhesion of the base to the tile adhesive. Therefore, the surface must be thoroughly cleaned with a construction vacuum cleaner or at least swept.
- Durable - at least 150 MPa, which provides good load-bearing capacity, as well as almost zero deformability.
- Flat - the permissible difference is up to 2 mm for every meter of surface. Before laying tiles, it is recommended to trim off bumps, ridges and other protrusions. And fill the holes, cavities, cracks with cement-sand or any other repair mixture from a series of quick-drying ones (compositions based on gypsum, cement or gypsum-cement).
Modern adhesives are mixtures of cement, mineral fillers and modifying additives. Therefore, it is allowed to level the floor with tile adhesive if there are uneven surfaces of up to 5 mm.
It would be useful to remind you that before starting all work you need to read the instructions for using dry building mixtures for tiles and porcelain stoneware. This will help avoid many mistakes during the installation process.
We also note that this article discusses preparing the floor for laying tiles in the kitchen, bathroom, hallway or any other room. When installing a shower in a bathroom, the technology becomes more complicated due to:
- the need to maintain slopes of 2-4%;
Arrangement of the floor in the shower room.
- installation of plumbing equipment to ensure water drainage.
Preparing the base for the tiles
If you roughly imagine how to lay porcelain tiles on the floor with your own hands, then this work may seem quite simple and easy. However, it requires a special approach and careful preparation of the floor.
Pixabay
First, use a level to check the floor. If there are many bulges, protrusions or depressions in it, then it will have to be filled with cement screed. If it is already smooth, then all that remains is to clean it and degrease it.
After it has dried, fill the floor with self-leveling mixture and let it dry too. This way you will achieve a perfectly even coating.
After this, apply the markings. If you have a laser level, then this will save your time. Determine the center of the room, put a point in this place, and draw four lines through it: two diagonal, which diverge at the corners, and two perpendicular, abutting the walls.
Next, following the instructions on the package, mix the glue solution and begin installation.
How to lay porcelain tiles on the floor: all the steps
[email protected] _master
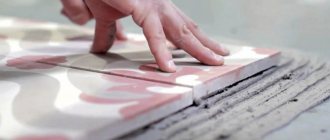
Installation begins from the center of the room. Glue is applied and spread over the surface with a notched trowel. The thicker the tile, the larger the adhesive layer should be. However, it should not exceed five millimeters.
[email protected] _master
The product must be lubricated with adhesive on the back side, then laid and tapped with a rubber hammer. Repeat these steps with other parts, not forgetting to put dividing crosses between them.
[email protected] _master
Constantly check the evenness of the laying with a level. If you notice that the stacked items do not match in height, tap the protruding surface with a rubber mallet. Excess glue that comes out through the joints can be removed with a rag or sponge. Tiles laid about an hour ago may become lower. This causes the coating to shrink.
Pixabay
When laying near walls, you may need to trim the flooring. You can find information on the Internet that a glass cutter can handle this task, but such information is erroneous. Such a tool cannot cope with the thickness of porcelain stoneware, so use a grinder to cut it.
After completing the installation work, let the glue dry for 24 hours. Next, you can dilute the grout and begin processing the seams. It is most convenient to fill the grooves and remove excess mixture with a rubber spatula. After the grout has dried, remove any excess with a sponge or damp cloth.
When looking for tips on how to lay porcelain tiles on the floor, you may come across information about a seamless laying method, which supposedly will help save on materials. However, it is worth considering that it can lead to displacement of products and curvature of the masonry completely.
Alignment methods
When working with porcelain stoneware, use a holder with suction cups. As a result, you will be able to lift heavy tiles when they are piled up.
Often the tiles clearly float on the adhesive, pressing it down, especially if there are differences in plane on the floor. Uneven shrinkage occurs. If the glue is made thicker, it will begin to lag behind the porcelain tiles, so you should use other methods.
When laying heavy porcelain tiles with joints, tile leveling systems should be used. Few piece systems are needed, since the products are usually large in size. Thanks to the SVP, you will ensure an absolutely flat floor surface.
Seamless installation requires a different method. Under the corners of the tiles, 4 screws in plastic plugs should be driven into the floor. Adjust their height by scrolling before applying the adhesive, aligning the tiles in the plane of the floor. This will allow you to lay heavy porcelain tiles evenly, although it will require considerable effort.
Porcelain tiles do not have edging or distorted geometry, so precautions must be taken. An insufficiently responsible approach to work will lead to the fact that even small flaws will completely ruin the floor covering.
Rules for laying porcelain tiles on a heated floor
Separately, it is worth considering the question of how to properly lay porcelain stoneware on a heated floor. Although the process is not very different from conventional masonry, there are still several features.
First, check the functionality of the heating system. If you have water heating, then all the pipes need to be covered with a cement screed; if the heating is electric, then you don’t have to make a screed and lay the material directly on the rubber backing.
When laying glue, keep in mind that the degree of heating of the surface depends on its layer. The larger it is, the less heating will be. The same principle applies to the thickness of the porcelain stoneware product itself.
The glue must be distributed over the entire surface, avoiding damage to the heating elements. Do not turn on the heating itself until the glue and grout have completely dried, and after installation is completed, the temperature should be increased in stages so that cracks do not form under the coating.
To improve the thermal conductivity of the laid floor, we recommend leaving a distance of at least two millimeters in the seams.
The whole process can be seen in the video.
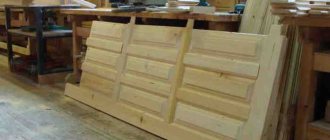
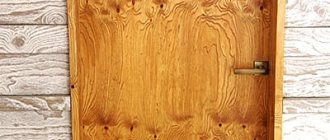
Laying porcelain tiles on a wooden floor
This material can also be placed on a wooden surface. However, you need to carefully prepare for such work and study all the details of this process. Check out our instructions with photos.
First, you need to install wooden logs on the surface, which must first be treated with an antiseptic. It is better to leave a gap of 15-20 cm between them, so you can avoid bending down in the future.
Expanded clay is poured between them to the very top, after which the structure is covered from above with a board and secured with self-tapping screws. It is important to use waterproofing materials to prevent moisture from the glue from saturating the wood. Otherwise, it will become deformed in the future, which will affect the quality of the tile covering. Then you have two installation options.
[email protected] _stygka
A metal mesh is attached to the prepared wooden base with self-tapping screws, then beacons are placed and a cement screed is poured, which will be the base for installation.
In the second option, you can resort to a dry screed. Here, moisture-resistant plasterboard is laid on top of the waterproofing in several layers. After fixing it, you can start laying tiles. However, pay attention to the properties of the glue. He must be suitable for working with such material.
There has also been a long-standing debate among craftsmen about whether it is possible to lay porcelain stoneware on plywood. If you follow all the techniques and follow all the recommendations, then there will be no problems. As in the first case, first you need to install the logs at a small distance from each other.
Then a sheet of plywood with a thickness of at least three centimeters is fixed on them. Fix it well on the joists, then remove all debris and grout the joints if there are several sheets.
Then the plywood must be coated with two layers of primer, and only after it has dried can you begin laying. Please note that in this case it is better to choose adhesive for installing parquet.
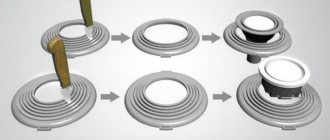
Features of crosses
A tile cross is a convenient device for securing vertical lines, which makes laying tiles easier. The elements are used only by domestic installers. The technology increases installation speed by 30% and allows seams to be made uniform and of the same thickness.
What it is
Spacer crosses help maintain the same spacing between tiles. The device is popular not only among beginners, but also among professional installers. The element allows you to quickly tile the surface, avoiding unevenness and slipping.
Distance crosses are made of plastic. The choice of shape depends on the tasks that the products perform:
- Traditional. Popular models are used for cladding floors and walls. Suitable for easy installation.
- In the shape of a "T". Visually resemble a printed letter. The elements are appropriate when laying tiles using the “braid”, “herringbone”, and “labyrinth” technologies.
- Wedge. Used as selections for lower tile tiers.
- 3D. Crosses help to align the ceramics in length and width. The elements evenly press the raw material to the base, preventing subsidence before fixation.
According to their structure, spacer parts can be hollow or solid. The first types do not deform under the weight of the tiles. Due to their lightness, the second varieties do not allow the glue to protrude onto the surface during installation.
Tips for use
If you want to extend the life of your flooring, you need to know a few simple rules for its use.
If any acidic composition gets in, try to remove it from the seams as quickly as possible, since in such cases they are the first to suffer. Just be sure not to over-water them or soak them.
Pexels
Alkaline compounds can be used to remove stubborn stains. They also work great on grease and wine stains. Sticky and hard substances such as wax or resin can be removed with gasoline or acetone.
When cleaning such a floor, you can use acid-based products, but not in particular. Because of them, again, the seams can change color and collapse. Don't overdo it with hard brushes either. It is better to use mops with soft bristles.
Grouting joints
There are separate putties for sealing tile joints. Standard adhesive cannot be used for installation - it has a coarse-grained structure and an unaesthetic appearance.
If there are expansion joints, they must be sealed with silicone or two components:
- Elastic filler. Suitable materials include polystyrene foam and polyurethane foam. The depth of the seam should be greater than the size of the strip - this will allow space for the expansion of the filler.
- Surface sealant. There are products based on silicone and polyurethane. Such sealants are characterized by increased elasticity, so they can be used for grouting gaps.
Cement putties
Cement grouts are inexpensive and come in a variety of colors, which makes them popular and widespread. Optimal material from European manufacturers. The choice of fugue must be taken responsibly, because even if the cladding is done at a professional level, poor-quality putty will completely ruin it after a while.
Typically, porcelain stoneware is laid in places of high humidity, so you should buy putty with antifungal and moisture-repellent elements in its composition. To ensure enhanced waterproofing of joints, there are special drinks that are used to cover caulked joints. There are 2 classes of impregnations, differing in the degree of penetration into the fugue:
- Polymer varnish. It is characterized by high waterproofing and deep penetration.
- Water repellent. Used to impregnate the putty surface. If the top layer of the fugue is damaged, water barrier weak points will arise.
Before applying impregnation with a brush, you should protect the tile from contact with the composition, otherwise stains will appear on its surface. Double application is necessary: repeated treatment is carried out every other day.
No earlier than 24 hours after lining, you can begin to cover the seams. But if quick-setting glue was used, then the waiting time is reduced to 3-4 hours from the moment of installation. It is necessary to thoroughly clean the joints from the binder mixture and wash the tiles. When mixing grout, follow the manufacturer's instructions.
Joining requires a rubber spatula or grater - with the help of these tools a fugue is applied to the seams. To prevent the caulk from breaking down, fill at least 2/3 of the depth of the gap with the mixture. The composition should be applied with effort. Voids require re-processing. Residues are immediately removed with a spatula. One approach allows you to process up to 3 m2. The chosen manufacturer and type of putty influence the specific area.
The easiest way to proceed is with glossy porcelain tiles. In the case of structured or matte material, grouting becomes more complicated: due to the penetration of the fugue into the pores, it is difficult to wash out. In such situations, you should wash the mixture using a dampened dish sponge, applying its hard part to the surface.
The final step is to treat the seams with a moistened foam sponge. A number of manufacturers offer special products, but their use is not necessary. The main thing is to move diagonally in relation to the joints, since if you move parallel, the fugue from the gaps will be washed out.
It is first necessary to smooth and compact the fugue layer using a round rubber spatula or a cylindrical cable (8-10 mm). This will ensure that the seams are evenly deepened and smooth. After 10-20 minutes, when the grout begins to dry, you can completely wash the lining.
Epoxy putties
Epoxy putties contain resin and filler. If you grout the seams with such a fugue, this will ensure their higher quality compared to cement putty. The material is characterized by increased density, resistance to moisture and chemicals.
Applying epoxy putty is a more complex procedure compared to standard grout. When mixing the components, carefully observe the gramming and wear rubber gloves to avoid harm to your health. In one approach, a maximum of 1 square of cladding should be processed. The spatula movements are standard. The finished composition “lives” for a maximum of 30 minutes.
Undried seams should be thoroughly wetted with water using a kitchen sponge until an emulsion is formed. Be careful not to allow the mixture to wash out of the joints.
To remove liquid residues of the mixture, a rigid cellulose sponge is used. Once the sponge is soaked in resin, it changes. The manufacturer Litokol offers sponges designed specifically for working with epoxy grout. Their cost is higher, but their service life is longer. It is important to wash off the epoxy before it begins to harden. If plaque remains, use a solution of water and specialized detergents (or 10% ethyl alcohol).
A little about silicone
Silicone gets on the ceramics, so it must be urgently removed with ethyl acetate, toluene or gasoline before it sets. If the material has time to harden, then the solvents will be powerless - you will have to resort to mechanical force, which increases the risk of damaging the tiles.