The desire to get more free space in the bathroom or to purchase an original shower stall leads to the fact that glass blocks are gaining wide popularity among consumers and winning the attention of designers.
Durable and resistant to various influences, the blocks help create convenient structures and act as an interesting interior decoration.
Advantages and disadvantages
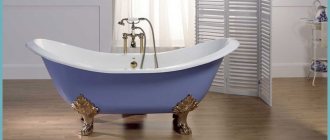
A shower stall in a bathroom is a practical and functional solution.
A partition made of glass blocks will save the family budget and make the interior truly special. This solution has a number of advantages:
- strength and stability;
- waterproof and fireproof;
- soundproof;
- the size range of blocks allows you to build fences of any shape;
- let in daylight and retain heat;
- fungus and mold do not form on the surface of the glass;
- easy to clean with regular cleaning products;
- the durability of glass blocks will extend the life of the shower stall;
- partitions made of such material do not require additional finishing.
Along with the positive qualities, there are also some disadvantages:
- such a wall cannot be drilled, therefore, if you want to hang shelves or other structures, you must insert dowels into the masonry during work;
- it is impossible to adjust to the required size: they cannot be sawed or cut;
- the blocks are quite heavy, so large partitions can have an impact on the floor structure.
A glass block shower partition looks original, but installing such a structure requires knowledge and construction skills.
Photos of ready-made solutions
We have prepared for you a selection of photos of showers with partitions made of glass blocks in bathrooms of different sizes, both small and large.
Glass block design
Renewed interest in glass blocks is motivating manufacturers to offer various ways to design this building material.
The most popular type of glass blocks is made of transparent glass. This option suits any interior, regardless of color scheme. Tinted products are often chosen in colors reminiscent of shades of water: blue, green, turquoise, sea green. When used correctly, colored glass blocks can create an interesting play of refracted, reflected and scattered light in different directions in the bathroom.
We suggest you familiarize yourself with Installing a sink with a cabinet in the bathroom: how to do it right?
Small multi-colored elements give the finished structure the effect of a stained glass window. They can be laid out in any order or created in ordered symmetrical or asymmetrical patterns. Stained glass paints can also be used to coat colorless glass blocks.
Smooth and textured
The outer surface of glass blocks can be smooth and available in both glossy and matte versions. The most in demand are relief products that imitate sea waves, ripples on the water or patterns of geometric shapes. The choice of relief is determined by the specific purpose. If you need a design that allows maximum light transmission, glossy transparent glass blocks are preferred.
With filling
Modern design suggests using the hollow structure of glass block for decorative purposes. If desired, the voids can be filled with various decorative elements: sea stones and shells, dried plants and twigs of interesting shapes, drawings and even photographs.
Backlit
Glowing glass blocks are not only decorative, but also practical: they fully replace night lighting. The backlight of transparent blocks looks the brightest. The matte surface of the glass blocks gives a muted soft glow.
Illumination of glass blocks is done using LEDs - due to their efficiency and long service life. Spotlights are mounted inside the block in several places, for example in the corners and in the center. The most modern models can be operated by remote control. The color of the LEDs can be any and is determined by personal preferences, but when choosing a backlight, you should consider how comfortable it will be for vision. The glow can be made one color or with a gradient transition from one color to another.
You can do the illumination of glass blocks yourself - during installation of the structure. The easiest way is to use self-adhesive LED strip. If it is necessary to illuminate only some individual blocks, such a tape is fixed on the end side of the block with the LEDs facing inward. The narrow strip of paint at the end where the tape is fixed will have to be scraped off, otherwise light will not be able to penetrate through the paint layer into the glass block.
Strip or spot LEDs can be built inside the glass block by drilling a hole for them in the end part. The power cable is laid along the seams of the back side of the wall or partition.
When installing cables for lighting, careful insulation of connections from moisture is required.
Pros and cons of glass blocks
This building material has both advantages and disadvantages. The first include:
- The ability to improve the penetration of sunlight into the room, which allows you to save on electricity.
- Glass bricks are characterized by high heat and sound insulation. According to these indicators, they are not inferior to two brick walls put together.
- High resistance to high and low temperatures.
- Strength. Glass itself is a fragile material, but blocks are not. It's not that easy to break them.
- Resistance to aggressive substances.
- Hygiene. They are easy to care for by removing dust, they do not emit pungent odors or any toxins.
Of the minuses it is worth noting:
- Cannot be used as load-bearing walls.
- Do not cut; only whole blocks are used in construction.
- Although they are hollow, it is not possible to lay electrical wires, any utility networks or ventilation ducts inside.
- It is prohibited to hang any cabinets, shelves, hooks, etc. on a wall lined with glass blocks.
- When using colored products for exterior design, the paint may fade over time.
Door installation
If the cabin is supposed to have a door, then its hinges should be attached to the base surface using dowels. Fixing to the screen is only possible if it has a durable modular frame.
An option without a door frame is also possible, in which case you can curtain the opening with a shower curtain.
Waterproof drapes are a very economical option. Essentially, this is oilcloth. They can be attached to the top of the frame and open and close like a curtain. In addition to the favorable price, waterproof curtains have another undeniable advantage - a variety of colors, patterns, and textures. You can change the curtains from time to time, depending on your mood, to spice up your bathroom design.
Classification
Classification of glass blocks according to four parameters will help the consumer in selecting the optimal option.
- According to the degree of matting: matte, semi-matte, transparent, colored.
- For additional decoration: ombre, with a pattern, metallized, with applique.
- Shape: round, oval, square, rectangular, combined.
- Contents: hollow, with decorative filling.
- By purpose: end, corner, main, finishing.
Shape and size
The most popular shapes of glass blocks are square and rectangle. They can have the following sizes:
- squares: 19x19x5 cm, 19x19x7 cm, 19x19x8 cm, 20x20x2.2 cm, 24x24x8 cm, 30x30x10 cm;
- rectangles: 190x90x80 cm, 240x11.5x8 cm;
- small (mini) glass blocks: 11.5x11.5x8 cm, 14.6x14.6x5.5 cm, 14.6x14.6x8 cm, 14.6x6x8 cm.
To create a pattern or clear corners on the shower wall, you can use triangular blocks that have dimensions of 17.2 x 23.6 x 8 cm (legs, hypotenuse and thickness).
To form edges and wall transitions, curved, half-shape and rounded models are available. The dimensions of the corner glass block are 19x19x8 cm (for the top joint of the two sides) and 19x15x8 (for the side joint). The standard halves have dimensions of 19x9.4x8 cm, and the end halves have dimensions of 19x9x9 cm.
To decorate the edge of the partition, end blocks are used, having 1 connecting and 1 transparent side wall. They are available in standard sizes - 19x19x8 cm and 24x24x8 cm. The convex end blocks have parameters of 19x14.4x11 cm and 19x13x8 cm.
The thickness of the seam between the elements should be from 2 to 5 mm. The recommended opening size is indicated by the manufacturer.
Calculation of the number of blocks for the partition
A glass block wall is assembled using cement mortar, special glue or a frame. The choice of material for the base depends on the weight and configuration of the partition. Small structures made of standard and mini-blocks are mounted on a plastic frame, and high walls made of heavy and large elements are mounted on a metal frame.
The number of glass blocks is calculated in the following sequence:
- Designing the height and length of the wall. When creating a project, you need to take into account the height of the users, the size of the opening and the shape of the partition (smooth curves increase the overall length). After measuring the length and height, you need to calculate the area of the glass wall. If the structure area is more than 15 square meters. m, then for installation you need to use a metal frame or a reinforcing rod with a diameter of 4-5 mm.
- Selection of shape and size. The linear dimensions of the partition are multiples of the length of the sides of the elements, taking into account the thickness of the seams. For example, to create 1 level of a wall about 2 m long, you will need 10 standard glass blocks (19 cm) and 1 “half”. If the partition is erected from floor to ceiling, then the number of end blocks corresponds to the number of levels, and if it does not reach it, to the number of rows vertically and horizontally.
- Quantity calculation. The area of the partition is divided by the area of 1 element. After the initial calculation, the correspondence of the number of blocks to the linear dimensions (height and width) is specified. To more accurately calculate the number of glass elements, construction adhesive, fittings and mounting crosses, you can use online calculators. When making your own calculations, you need to take into account the thickness of the seams and the dimensions of the outer blocks (halves, corners, ends).
Decorative and colored inserts are excluded from the total quantity and are counted separately. For the vertical ends of the shower, between which the entrance to the cabin is located, only glass blocks with a rounded edge are used.
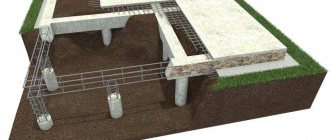
Pallet and device features
Once you have determined the location for the future shower stall, it’s time to move on to action. First of all, you should decide on the choice of pallet. You can buy it in a store, or you can make it yourself. It's not difficult at all. Pallets come in different shapes and from different materials. If we talk about the shape, it is usually square, angular or rectangular.
Diagram of a tile shower tray.
Material – cast iron (retains heat well, but is very vulnerable to scratches due to the enamel coating), ceramics (easy to clean, retains its original appearance for a long time, but has extremely low thermal conductivity), acrylic (an excellent material in all respects, has virtually no disadvantages ).
The first step is to prepare the floor for waterproofing. It is necessary to knock down everything on the floor (tiles, screed) down to the concrete floors. The walls are knocked down to the very foundation. How much to knock down the wall depends on the height of the installed pallet. If unreliable seams are discovered during work, they should be cemented. After the concrete has completely dried, a bitumen coating is applied. You need to coat the corners especially carefully. The layer thickness is about 1.5 cm. Then it is necessary to lay waterproofing materials. They need to be heated using a gas burner and carefully smoothed out. After this, the cement screed is poured.
The second step is to install the drain and outlet pipe. It is best to lay them on wooden blocks. This will allow you to adjust the height and provide the necessary tilt. Pipes can be metal or plastic. In the modern world, preference is given to the latter due to their durability.
The third step is the manufacture of enclosing walls. It is necessary to make formwork and pour concrete mortar. After all these steps, the pallet is tiled.
All of the above steps are performed if you decide to make the pallet yourself. If you bought it, everything looks even simpler.
How to do it yourself: step-by-step instructions
The glass block shower is built according to the plan:
- determining the type of pallet, partition design, shape and type of elements;
- calculation of the number of blocks and materials;
- selection of necessary tools;
- erection of a pallet;
- installation of the frame and installation of glass blocks.
Required tools and materials
To install the partition yourself, you will need the following tools:
- ruler;
- building level;
- hammer drill or drill;
- trowel, rubber spatula;
- construction marker, masking tape to mark the level.
In addition to glass blocks, the following materials will be required to build the wall:
- cement, sand and water for preparing the solution (1:3:1) or ready-made tile adhesive for fastening the elements;
- PVA glue (when using a cement mixture) - 200 g per 1 bucket of cement;
- mounting crosses made of plastic for leveling the blocks;
- metal reinforcing wire (4-5 mm) or fiberglass rods (6-8 mm);
- plastic module, metal frame or wooden beam 40x80 mm;
- polyethylene foam tape (when using timber);
- silicone sealant (when installing a modular frame);
- grout for glass blocks.
The color of tile adhesive and grout is selected based on the lightest blocks. The adhesive is diluted a little thicker than required for laying tiles. To prevent drying out, it is prepared in batches.
Construction of a shower tray from tiles
To create a shower tray you will need concrete mortar M200-M250 (for screed), bitumen or other waterproofing, bricks for the sides, tiles and tile adhesive. Ceramic tiles must have a non-slip surface. The installation may involve a hammer drill, a grinder, a tile cutter and a mixer for cement (concrete) mortar.
The pallet is built according to the following algorithm:
- make a branch for the drain hole;
- assemble the formwork for the elevation, taking into account the width of the sides, mark the height of the proposed pallet inside;
- prepare concrete mortar, pour formwork;
- if the screed thickness is up to 7 cm, place a metal mesh in it at a distance of 3 cm from the floor;
- 2-3 days after pouring, lay polystyrene foam (50 mm), roofing felt or bitumen (1-2 mm) on the screed;
- adjust the height of the drain hole (ladder);
- lay the sides in 1-2 bricks, wait for the cement to harden;
- pour the finishing screed with a slope of 1 cm per meter towards the drain, re-insulate the cement with bitumen mastic;
- After the concrete has hardened, lay the pallet with tiles, laying it on a special tile adhesive and checking it with a building level.
Laying should begin from the corner of the structure. The distance between the tiles is maintained using plastic crosses. After the glue has hardened, they are removed and the joints are covered with grout.
The connections between the pallet and the walls and sides must be treated with silicone sealant.
If the bathroom is undergoing a major renovation or insulation, you can do without formwork. In this case, the pallet is formed directly on the finishing floor screed with a recess towards the drain.
Installation of glass block partitions
To build a partition from glass blocks you need:
- Mark the walls with construction tape and a marker to determine the laying level.
- Drill holes in stationary surfaces, install a metal frame or modular profiles (QuickTech) on dowels or anchor bolts. When laying on timber, attach it to the floor and wall along the partition line. If the structure is reinforced with wire or rods, the junction of the tiles and glass blocks can only be treated with a sandy primer.
- Apply a layer of tile adhesive 1 cm thick and 1 block long to the profile or primer. Press the glass block into it, treat the free end with tile adhesive and install the next one, adjusting the gap with plastic crosses. When bending the partition, the crosses are installed only on the inner side of the radius.
- Lay rows 2 and 3 of glass blocks, covering their upper ends with tile adhesive.
- In order to reinforce the structure, metal or fiberglass reinforcement is laid on top of each horizontal layer. For it you need to pre-drill holes in the supporting walls. To prevent contact with glass, the rods are laid on top of the mounting crosses and covered with a thick layer of glue.
- If the shower stall has a door and not a free opening, then it needs to be mounted on the wall: the glass partition is not designed for increased load. Following the marked marks, several holes are drilled in the wall. Dowels are inserted into them, which are intended for fastening the hinges. The glass door is hung on ready-made hinges.
When assembled into a modular frame, each element is installed in its own niche, and the ends are treated with liquid sealant.
The film, which protects the glass from damage, is removed after all work is completed. If the protective layer is damaged, you can seal the open area with transparent tape. If the manufacturer did not provide for the presence of a film, then after laying each layer, traces of glue, sealant and grout must be removed from the surface of the glass.
Installing a glass block partition is a lengthy process. After installing 3 rows, you need to leave the masonry for 1-2 days to harden. Otherwise, the wall will turn out to be fragile and may deform under its own weight.
Design options for glass blocks
Glass blocks are classified according to surface texture, color scheme, the presence of lighting and additional accessories between the glass walls.
Smooth and textured
The surface of the glass can be smooth, matte or embossed. Smooth elements visually expand the space, matte elements softly diffuse light and hide the silhouette of a person in the shower. Glass with a relief pattern intricately distorts the direction of light and creates an imitation of frozen water.
Colored and transparent
In a small bathroom, it is recommended to combine colored and transparent blocks: the former will create bright accents in the center of the room, and the latter will visually increase the area of the room.
When installing the wall yourself, you should study photos of designs in advance and decide on the ratio of multi-colored elements.
Backlit
LED lighting inside the glass blocks provides night illumination and well delineates the space. With a matte surface, the light will softly diffuse throughout the room, and with a transparent and embossed surface, it will form a bright accent. Diodes can be single-color to match the wall palette or with a gradient transition.
With filling
The internal space of the block can be filled with various decorative elements: shells, flowers, models of butterflies, etc. Instead of a three-dimensional figure, an image can be placed between the glass walls. Blocks with photographs are available upon individual order.
Tools and materials
To install glass blocks, you will need:
- tape measure, building level, marking pencil, building square;
- special crosses for laying glass blocks and plastic wedges for leveling the floor;
- grinder or wire cutters (for cutting crosses, cutting reinforcement), electric drill, 6 mm tile or concrete drills and a whisk;
- white tile adhesive, fiberglass reinforcement with a diameter of 6 mm, container for preparing glue;
- medium spatula, beta contact primer, masking tape, sponge and quick-setting glass glue;
- glass block and end glass decorative strips.
Quality
Modern glass blocks are made from a special prefabricated material; they are glued together from two equal parts. Inside there are glass blocks, but the corrugated shape, which is located at the edges, gives them stability and strength.
View gallery
From the very beginning, this finishing material was used for the construction of windows in non-residential buildings and the construction of non-load-bearing walls. But in the current version, a wall made of glass blocks may well be load-bearing, for example, in country cottages to highlight a personal plot or winter garden.
Decorative glass blocks are characterized by special strength, heat and noise insulation, resistance to frost and moisture, and, in addition, fire safety. Although their most basic quality feature is, of course, the ability to obtain interesting lighting effects. Their smooth or corrugated surface perfectly transmits light. Once inside this structure, it breaks, making the room visually appear lighter and more spacious. Also, unlike simple glass, their surface can be matte, and this, in turn, allows the use of glass blocks in the interior of a bathroom or bathrooms.
But, having decided to use them in the interior of your home, you should take into account that sewer systems or wiring cannot be installed inside this material. Also, if the blocks are used to fill windows in a damp and small room, this may cause some difficulties with ventilating the room.
View gallery
What is glass block
A glass block is a closed, hollow “brick” with thin glass walls, inside of which there is rarefied air or vacuum. The wall thickness is no more than 6-8 mm, so the facing element is light - up to 2.2-4 kg.
Depending on the transparency of the glass and the texture of the surface, the blocks can transmit, scatter or refract light. To create an original light pattern, you can combine different types of blocks in your bathroom design.
The advantages of block cladding are:
- high moisture resistance, sound and heat insulation;
- easy installation, light weight;
- assortment of designs, colors and shapes of blocks;
- easy care of the material, inertness to household chemicals;
- no mold.
The only disadvantages include the need for a frame made of metal or plastic, as well as the low strength of glass blocks. The construction of a wall of large area and height can lead to cracking of the lower rows of the structure.
Curved walls made of glass blocks must have a large radius of curvature: large gaps between the elements worsen the appearance and reduce the strength of the structure.
Shape and size
The most popular shapes of glass blocks are square and rectangle. They can have the following sizes:
- squares: 19x19x5 cm, 19x19x7 cm, 19x19x8 cm, 20x20x2.2 cm, 24x24x8 cm, 30x30x10 cm;
- rectangles: 190x90x80 cm, 240x11.5x8 cm;
- small (mini) glass blocks: 11.5x11.5x8 cm, 14.6x14.6x5.5 cm, 14.6x14.6x8 cm, 14.6x6x8 cm.
To create a pattern or clear corners on the shower wall, you can use triangular blocks that have dimensions of 17.2 x 23.6 x 8 cm (legs, hypotenuse and thickness).
To form edges and wall transitions, curved, half-shape and rounded models are available. The dimensions of the corner glass block are 19x19x8 cm (for the top joint of the two sides) and 19x15x8 (for the side joint). The standard halves have dimensions of 19x9.4x8 cm, and the end halves have dimensions of 19x9x9 cm.
To decorate the edge of the partition, end blocks are used, having 1 connecting and 1 transparent side wall. They are available in standard sizes - 19x19x8 cm and 24x24x8 cm. The convex end blocks have parameters of 19x14.4x11 cm and 19x13x8 cm.
The thickness of the seam between the elements should be from 2 to 5 mm. The recommended opening size is indicated by the manufacturer.
Laying glass blocks on cement mortar
- The solution must be spread not only on horizontal surfaces, but also on vertical walls.
- Using a building type level, measure the evenness of the installation.
- In order to strengthen the structure, reinforcement is performed with rods.
- After the solution has hardened, the seams are rubbed with the required color and the surface is washed away from dirt.
Shower cabin
Of course, you can purchase a collapsible or monoblock cabin. But if you want your bathroom to look unusual, a glass block shower will suit you. This solution will help you significantly save money, room space, and time spent on renovations.
A glass block shower should be semi-matte or matte. This material can be laid on regular cement mortar or tile adhesive. Interblock spaces are masked some time after installation of the walls using conventional grout; in this case, the joints between the bathroom wall and the partition are treated with sealant.
View gallery
Preparatory stage
- The site for installing partitions is cleared of debris and dirt.
- To prevent damage to finishing and facing materials, the installation work area is protected with covering materials (plywood).
- Installation of shower partitions is carried out only if there is a diagram of plumbing and electrical communications, so as not to damage them during the installation process.
- The glass panels are carefully removed from the packaging and the packaging corners are removed from them.
- Using a building level, mark the drilling locations for the holes.
- At the drilling points, the surface is punched with a center punch. After this, using a drill, holes are made corresponding to the size of the dowels.
Options for using glass blocks in different rooms
There are a lot of options for using this material: interior partitions, bar counters, zoning of rooms, illuminated blocks as decorative elements, stands. Thanks to the range of products, the shape of the partitions can be any - from oval to square.
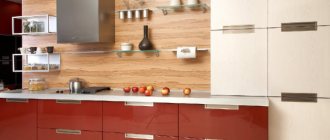
- Living room. To decorate the hall, you can use multi-colored or one-color bricks of different textures.
Glass blocks can be an effective decoration for one of the walls in the living room
- Bedroom. In living rooms, glass blocks can be used to create soft, diffused light and increase sound insulation. This will add peace and soothing notes to the room.
In the bedroom, glass blocks can create a pleasant atmosphere of relaxation
- Kitchen. You can use the material even for the smallest rooms. A panel made of medium and small cubes, an area near the stove or above the surface made of multi-colored blocks looks beautiful and stylish. If you have a studio apartment, make a partition - this way, a well-zoned space will add coziness and separate two rooms. The bar counter made from pieces of glass of different colors looks creative.
Glass blocks are not afraid of water, so they can be used to decorate the wall above the sink
- Bathrooms. You can successfully partition the toilet from the bathroom; the shape of the partition can be curved or straight. Shower cabins made of glass blocks are popular, in different designs - this will add exclusivity to the design. Cover the floor with glass blocks? Why not! You can add lighting, which will add a special charm.
A partition made of glass blocks will divide the bathroom into functional zones
Area of application: bathroom
Glass blocks get along well with the urban styles of high-tech, loft, contemporary, minimalism and some variants of classics and baroque. In doses, you can introduce glass brick into a Scandinavian interior with a cold color scheme, but in “warm” eco-style and Provence, glass will most likely look alien.
There are several common ways to use glass blocks when decorating a bathroom. Each option can be used individually or in combination with others.
Walls
A wall made of glass blocks is a current solution for dark rooms. In this way, you can effectively decorate a divided bathroom and reduce energy costs. Replacing at least one blank wall or part of it with glass blocks will visually expand the space and improve illumination (due to the penetration of sunlight or artificial light from neighboring rooms).
In a small bathroom, it is better to build a glass wall from elements of the same shape and color. The color can repeat the main shade of the interior or create a bright contrast with it, but overall the wall should look uniform. Too colorful designs focus attention on the size of a small room. In large spaces there are no such restrictions; it is only advisable to take into account the general color palette.
Partitions
Glass blocks are an ideal solution for constructing partitions: the transparent or translucent structure of the material does not “eat up” the space, but does an excellent job of functional zoning. Partitions made of glass blocks are especially appropriate in a combined type bathroom. Glass blocks are laid in continuous rows or combined with other materials (brick, drywall). The side part of the partition can be designed flat, figured or stepped.
Window
Glass block windows are a fashionable and cost-effective choice. The design will cost much less than double-glazed windows, but will provide the necessary tightness. Glass blocks can be used to decorate only the perimeter of the window opening, but the option of filling the entire window is more practical and is used more often. The level of transparency of a glass block window is determined at the planning stage, taking into account the height of the opening above the floor level and the amount of natural light entering. It is advisable to make low-lying windows as opaque as possible.
Shower cabin
Very often glass blocks separate the shower area. Such fencing is more reliable than fragile solid glass partitions and more aesthetically pleasing than conventional curtains. Glass blocks can be used to make all the shower walls. Such designs look impressive, especially with the mutual reflection of the walls of the shower stall and the refraction of falling water drops. Rounded glass block railings are especially original and look most organic in the shower area.
To assemble the shower cabin you will need the following tools
The shower cabin is not included in the package!
- Sealant (with application gun)
- Screwdriver
- Drill Ø1-3mm
- Phillips screwdriver
- Pencil
- Pliers or wrenches
- Level
According to the manufacturer, some shower cabins are assembled without sealant. But even for these types of showers, you will still need a sealant. They need to process the shower drain hole, install water traps and magnetic seals, and other small options if available, such as processing the hole for the radio and nozzles.
In all other shower stalls, sealant is required.
With its help, all fixed elements are processed. The joints of the rear wall between the central panel and the pan, the joints of the front frame and the pan, fastening the drain and nozzles, installing seals and water shut-offs.
Glass shower cabins are supplied unassembled, in cardboard boxes. The number of boxes per shower cabin is from 3 to 5 (depending on the manufacturer)
Main stage
Step-by-step instructions for installing glass shower partitions directly depend on their type of construction.
All-glass partitions (frameless installation method) are installed as follows:
- Using a building level, the floor, walls and ceiling are marked.
- Next, the profile is installed, and the tires are fixed along the marked lines. Rubber gaskets are placed under them in advance.
- The next step is to mount squares on the tires with a pitch of 80 cm. They are secured with dowels.
- Silicone seals are placed on the glass.
- Fixed walls are installed in the shower.
- Before the walls are completely secured, doors are hung on them and their correct position is adjusted. Please note that when the doors are closed, the seal must fit snugly to the mounting surface and to the edge of the pan.
In order not to damage glass partitions during installation, it is not recommended to tighten them tightly with screws or self-tapping screws.
The installation process for framed glass partitions is as follows:
- First, all structural elements (except doors) are connected. That is, the frame is assembled and glass elements are installed with special clips.
- Next, markings are carried out on the floor and walls at the places where the partitions are attached.
- The necessary holes for the fixing elements are drilled.
- Partitions are installed according to markings and attached to surfaces with dowels and screws.
- The final stage is sealing the joints with sealant. Afterwards you can begin installing the sashes and fittings.
If the partitions are mounted on a mounting rod, first the clamps are installed on the glass, then the rod is inserted and only after that the rod is attached to the wall. If partitions are installed using a roller mechanism, the carriage with rollers is first attached, and then the glass panels are installed.
Before installing shower screens, you must carefully study the manufacturer's instructions. This will help prevent errors during the installation process.
Cabin benefits
- affordable price compared to installing a bathtub or shower box;
- tightness of the structure;
- economical water consumption;
- easy installation.
Glass walls will not hide the beauty of the finish in the bathroom and can be installed on any type of tray (acrylic, cast iron or simply laid out from tiles or natural stone).
Photo 1. An example of a glass shower installed in a modern bathroom interior.
Glass is not covered with mold, mildew and is resistant to corrosion. It is enough to periodically wipe it with special products and the cabin will always look like new. Another advantage of glass is hypoallergenicity. The use of glass is absolutely safe in a humid environment, which cannot be said about wood, plastic and other materials.
Important! The glass partition and doors are airtight and heat resistant. This is one of the most suitable materials for decorating a bathroom, since it is practically unbreakable and easy to clean.
Common self-installation errors
Most often, inexperienced craftsmen make the most common mistakes when installing showers:
- structures are insufficiently sealed, which leads to leaks and increased moisture in the room;
- make incorrect calculations when arranging the drain, which leads to slow drainage of water;
- the guides along which the doors move are confused - this leads to the doors coming out of the grooves and may even fall out and break.
For those who do not have specific skills in this area, it is recommended not to install shower partitions on their own. It is better to invite real professionals in their field for this, who will carry out all the work efficiently, quickly and inexpensively.
Features of installation on the floor and on a pallet
Floor installation
When installing a shower corner on the floor, even at the stage of floor screed, it is necessary to provide for the installation of a shower drain to drain into the floor, since it must be installed flush with the floor and all drainage pipes will be located directly in the floor screed.
If your bathroom has already been finished, you will have to dismantle the floor covering and screed to install a drain and ensure the necessary slope of the floor so that water flows into the area of the drain hole.
The main disadvantage of this method, as you understand, is the need to foresee everything in advance. Let's list the advantages:
- You are absolutely not limited in your choice of shower enclosure. Absolutely any solution, regardless of shape and size (if there is enough space in the bathroom), is available to you.
- The absence of hills and sides that affect the smooth movement from the shower space and back. And also on the overall aesthetic appearance.
Installation on a pallet
Installing a shower enclosure on a shower tray is much simpler, but it also has its own characteristics that must be taken into account. With this approach, the tray determines the shape of the future shower enclosure.
The walls and floor must be at right angles to each other, so that the tray fits snugly against the walls, in order to maintain tightness and prevent water from getting under the shower tray and into the cracks between the tray and the walls.
The main advantage is ease of installation. There are no shortcomings as such, apart from the absolute attachment to the shape and size of the shower tray.
Turnkey installation price
It is quite difficult to say definitely how much it costs to install glass partitions in a turnkey shower room, because... the price is influenced by a number of factors. In any case, installing a turnkey shower is much more profitable financially than installing it yourself.
The price depends on the overall complexity of the design, the wishes of the customer, the dimensions of the room, the materials used, and design solutions. On average, the cost of 1 m2 of installation of a shower enclosure ranges from 1200 to 2500 rubles .
Since specialists in this field will give a long-term guarantee for all work performed, and the high-quality result of installing a shower will allow owners to enjoy not only a pleasant bathing experience for a long time, but also a stylish and modern appearance of the bathroom.
Construction and design tips
To create your own unique design, you can combine various materials, without forgetting about the practicality and safety of the future shower. For example, for the floor it is advisable to choose small embossed tiles or mosaics - there is less chance of slipping on a rough surface with frequent seams.
As a finishing material for the pallet, you can use multi-colored pebbles or other decor, filling the finishing layer with a transparent sealant.
If desired, you can equip your homemade design with hydromassage and other functions from the arsenal of a factory hydrobox, but for this you will have to install additional pipes and make special outlets
A few important nuances:
To prevent water from building up in the pipes, you must follow an important rule: the entrance to the sewer must always be below floor level. The height of the pan with a built-in siphon or drain depends on this.
Before installing the drainage system, pay attention to the drainage capacity: the larger it is, the faster the water will leave the pan. In some cases, for example, for a cabin with a rain shower function, a standard drain may not cope with the flow of water
It is best to lay whole tiles or mosaic sheets on a pallet. To do this, at the stage of marking the booth, you can make a dry layout
If you cannot do without undercuts, install end caps on the cut.
When creating the design of your future cabin, think about comfortable little things.
At the construction stage, it is easy to provide various shelves or niches for placing all kinds of shampoos, gels and other hygiene items, or build a small chair covered with tiles.
The construction of a homemade shower stall with tile or mosaic cladding allows you to bring the most creative design ideas to life. And if all the work is done efficiently, not forgetting about slopes and waterproofing of surfaces, such a shower will last much longer than plastic cabins.
But if you are not confident in your construction skills, you can always hire professional builders or plumbers to do the work.
Do you like tile shower stalls and want to build one for yourself? If you still have questions or have any questions after reading our instructions, ask them in the block below.
Or would you like to supplement our material with practical recommendations for laying tiles and connecting to the water supply/sewage system? Perhaps you have just completed the construction of a shower stall? Write your comments and advice, add photos of a booth you made yourself - your experience will inspire many newcomers to this business.
The fast pace of life does not allow people to take a bath for a long time, and for this reason, very often people began to equip shower cabins in their bathrooms. Sometimes it happens that it is not possible to install a bathtub and installing or installing a shower is a good option. But it is not always possible to buy a ready-made shower cabin. There is a way out; you can make a shower without a shower stall with your own hands. We will consider below what kind of shower you can make and how.
Glue method for laying glass blocks?
- The block located at the edge is fixed on the guide horizontally.
- To connect vertical surfaces, special dividing strips are used.
- Before you start laying the second row, install the horizontal guide again and attach it to the wall.
- The glue can harden either quickly or over a long period, depending on its type.
- At the end, all joints are grouted with the required color, and then the blocks are washed from the solution that has fallen on them.
What are glass products used for?
A house with a combined bathroom is not uncommon. If you put a small partition between the bathtub and toilet made of transparent blocks, you won’t have to turn on the electric lighting in the bathroom during the day. Glass blocks can be used to fill window openings in the bathroom. They let in enough light from adjacent rooms and do not require the use of curtains or curtains. A house with such windows can also be found in the countryside. In the interior of an apartment or house, you can create unique windows from multi-colored elements of different shapes. They can transform a home. Windows come in different heights and widths. It can be panoramic. Mirrors and small shelves are hung right on its square.
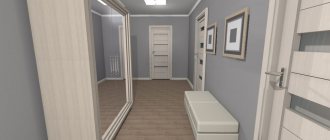
Glass blocks are not only used in the bathroom. This inexpensive material is also used in other rooms. The house can be equipped with walls between individual rooms. They can separate the kitchen-dining room from other rooms. In the interior of a home hallway, windows made from glass blocks look quite organic. Some owners of private houses make ceilings, floors and roofs from this material. The building looks airy and light.
In the apartment you can build a semicircular bar counter from translucent material with colored lighting. It will look great in the interior of the apartment.
Creating a round wall from glass blocks
Rounded walls can be built from cement. In this case, the reinforcing rods have to be bent to fit the shape of the future wall, which is not so easy. To facilitate the process, thinner metal rods are used than when constructing straight walls.
Spacer crosses are inserted between blocks only inside the rounding. On the outside, the seams remain the same, and their size depends on the radius of curvature. There is a discrepancy in the size of the seams inside and outside the rounding. This cannot be avoided if solid glass blocks are installed.
The use of “half” glass blocks allows you to reduce the size of seams in a rounded wall . And the smaller the radius of curvature, the more desirable it is to use narrow blocks.
Some foreign manufacturers of glass blocks offer special systems for the construction of rounded walls. But this is still the same frame installation method, which is not suitable for creating a durable, strong, waterproof wall. But you can create a light round partition. Ask for such systems at stores that sell glass blocks.