In order to correctly select the desired element and install it correctly, you need to familiarize yourself with the basic requirements for its characteristics.
What is the purpose, technical requirements and characteristics, as well as how to correctly install this part - read on.
General information
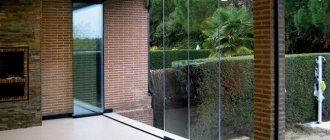
When arranging openings intended for the installation of translucent structures, external window sills are important elements. These are inexpensive parts, but their presence prevents the penetration of water as a result of melting snow or rain under the windows and inside the walls. Therefore, the destruction of structures due to the negative effects of moisture is prevented, and houses will not require repairs longer. In other words, their service life increases.
The drainage system is also called an external window sill. However, this is an incorrect name. After all, the installation of such a part is carried out at a calculated angle or it has an inclined upper surface so that water can drain outside the building structures of the house. Drainage also prevents snow accumulation in some cases. When installed correctly, the sound and thermal insulation of the window opening is further increased.
The drainage system protects the facade from moisture and prevents it from entering the wall Source oknakomforta.ru
Thanks to the presence of ebb at the bottom of the window, the façade plaster under the opening does not begin to fall off longer, or this possibility is eliminated altogether. This element also prevents water from getting behind the siding, which can prevent major problems. In addition, low tide is also a decorative element. This detail gives the window a finished look. Therefore, the translucent design looks organic.
In the case of installing a modern plastic window, a gap remains between the translucent structure and the opening below, which is filled with foam. It appears to be a good heat insulator. However, this material breaks down when it is exposed to moisture and low temperatures at the same time. After all, water tends to freeze and expand. It is this process that leads to the destruction of the foam layer. Therefore, it is usually closed from the street side with drainage.
Installing a drainage system protects the foam under the window from water, which will freeze in winter and destroy this material. Source okna-nemplast.ru
Installation of ebb tides is carried out not only when installing windows. They are often secured during the construction of a house. In this case, the installation is carried out before the façade finishing is completed. In addition, some homeowners decide to install drainage systems after putting the house into operation, when furniture has already been placed in it and people are fully using all the benefits of a residential building on their land.
Regardless of the time when it is decided to install window sills, it is better to entrust the work to highly specialized professionals from companies with a good reputation. After all, they know all the intricacies of both the manufacture and installation of drainage systems.
If the ebb is fixed during the construction of the house, then a full range of installation work is carried out. During their implementation, the joints and seams are properly sealed. This process requires less money and time. When fixing the ebb, when the house has already been put into operation, installation becomes more complicated. However, it is still performed efficiently if it is carried out by professionals.
When installing drainage during the construction of a house, all joints are properly sealed Source kapelniki.ucoz.ru
Important! Installation of drip tides is not regulated by GOST. Therefore, only professionals can perform high-quality work using their accumulated experience.
Low tide as a decorative window element
In addition to its immediate main task, as a rule, modern tides also perform a decorative function. When selecting window sills, it is necessary to take into account the color of the window and the design of the building facade, while the window sills should look quite neat and not provocative. A truly high-quality ebb means, under all other conditions, that it should be installed very simply, without creating any additional difficulties.
Thanks to modern technologies, manufacturers can now offer their customers shimmers of different colors. It's no secret that the correctly selected type of ebb can improve the overall appearance of a window opening.
The tide configuration includes:
- main part located at an angle to the plane;
- bends into which fastening is made;
- drippers that remove moisture.
The capabilities of modern equipment for the manufacture of castings make it possible to withstand a fairly wide range of sizes and configurations. The flashing is made according to the configuration of the window, and the width of the flashing must meet the requirement that this product protrudes from the wall by 3-5 centimeters.
Most manufacturers of window sills produce standard models of sills that are adapted for various windows, but this does not mean that it is impossible to find your own type of sill for non-standard projects. Today, window companies are working to expand the range of products and services that allow you to select a specific type of material. Basically, the types of window sills differ only in their overall dimensions, texture and color scheme. Therefore, in the first case, even the most difficult situation can be solved by cutting off the required amount of material and further installing it.
Thanks to the variety of textures and colors (designs), ebb tides fit beautifully into any image and facade of the house. Manufacturing companies claim that cases of non-standard solutions when creating window sills are quite common. All this ceases to be a problem due to the widespread development of production capabilities, as well as the quality of the material used for the work. Ultimately, the client receives exactly what he planned to see in his home.
When choosing individual configurations of window sills, as well as conventional ones. the manufacturer provides all the necessary information that allows you to get a general idea of the benefits and quality of these structures.
Types of window drains
Low tides must be installed on all windows. They are basically a special board. The most common are metal and plastic drainage systems. However, they are also made from other materials. All types of drainage systems have certain advantages and disadvantages.
Plastic casts
If you install such drainage systems, then you don’t have to worry about noise when raindrops fall on them. In addition, such products are inexpensive. When arranging window openings, less money is required. Only galvanized flashings that are not coated with paint will cost less. However, they are not very attractive and are practically not used in private homes. Unpainted drainage systems are more suitable for industrial facilities.
Window with plastic tint Source eurolux56.ru
Plastic castings are modern products. They are used when installing PVC windows. To produce such drainage systems, modified plastic is used. It is resistant to sunlight. At the same time, its modern brands are increasingly used. They increase the resistance of products to ultraviolet radiation. However, despite the modified structure, slow destruction still occurs in the material.
In plastic, the connection between molecules is broken over time. Therefore, his fragility increases. In addition, plastic can crack under dynamic loads. Microcracks also form in the material. Dust accumulates in them and moss appears. Even if the manufacturer guarantees many years of operation of plastic ebbs, the actual durability is a maximum of 30 years.
Important! Plastic turns from a snow-white plastic into a gray or yellow material after a few years. It will not be possible to return it to its previous appearance even with the use of super expensive detergents. Therefore, many homeowners change the tides after about 10 years.
Snow-white plastic drainage becomes gray or yellow over time Source ooostroy31.ru
The disadvantages of plastic also include high flammability. In addition, the material has significant thermal expansion. After all, any plastic begins to melt when exposed to high temperatures. Therefore, if a cigarette butt, for example, hits a plastic surface, at least a yellow spot will appear on it, and at most a hole will appear.
If such window drains are installed rigidly, then a disadvantage may appear due to thermal expansion, which will certainly occur in hot weather. In such a situation, there is a high probability that the plastic surface will become wavy. However, as the temperature decreases, it usually returns to its original state.
On a note! To prevent negative consequences after thermal expansion, specialists make an oblong hole in the edge of the ebb. Craftsmen also do not fully tighten the screws that secure plastic products. Such measures help ensure that the drains will not leak during operation.
When attaching a plastic drainage system, the screws are not fully tightened Source okna-pmr.com
Experts also leave thermal gaps on the sides of the products. The empty space is filled with sealant. However, only waterproof material is used. This will also prevent the formation of a wavy surface in hot weather. With this installation, plastic products simply expand slightly without negative consequences. As the flashings increase in size, the plastic sealant contracts.
See also: Catalog of companies that specialize in doors, windows and related work
Metal casts
Before correctly installing ebb tides on plastic windows, you need to become familiar with the features of such metal products. First of all, they are durable. Therefore, they are often installed by homeowners. However, they choose coated galvanized products.
To protect and decorate such drainage systems, manufacturers use polyester and plastisol. The first coating option is quite popular because it is used during the production of metal tiles using well-established technology.
Metal window drainage Source flugarka.ru
Polyester coated flashings are available at low cost. Their production is mainly carried out by companies that manufacture metal tiles and other roofing products.
Drains coated with plastisol are more expensive than products with polyester. However, this protective and decorative layer is thicker. Therefore, products with it are not so noisy when raindrops fall on them. In addition, plastisol allows you to create a coating on the metal that is smooth, leather-like or embossed.
The problem of noise, which is the main disadvantage of metal drainage systems, is partially solved with the help of polyurethane foam. It fills all the empty space when installing tides on the windows. This allows you to reduce the “drum” effect when water drops fall on the metal.
To reduce the “drum” effect, all voids under the metal shimmer are filled with polyurethane foam Source okonremontik.ru
During installation work, foamed rubber material or other similar sheet sound insulator is also used, which is able to withstand significant temperature changes. After all, it is secured on the street. Sound-absorbing rubber or other material is placed at the bottom of the metal product. It is usually used together with polyurethane foam. This combination can significantly reduce the noise of metal drainage systems.
One of the types of metal drainage is an aluminum product. It is usually powder coated. Aluminum has less ringing than galvanized steel. However, products made from it are more expensive. In addition, they are quite difficult to find. In most cases, they are made to order only by certain companies as they are not produced in mass quantities.
If you choose a metal cast, it is recommended to give preference to a product with a zinc coating. Although it will cost more than products without it. Any of the options can be painted in the desired color. Therefore, it is always possible to solve design ideas.
Metal drainage systems come in a variety of colors. Source s11.buyreklama.ru
The metal product has no installation restrictions. Thanks to this, it can be installed on a plastic window in a wooden house or building made of bricks. In any case, a high-quality drainage system will last at least 50 years.
Important! You cannot walk on metal castings. After all, they have low mechanical strength.
Other tide options
Drainage drains made of concrete alone are rarely found in private residential buildings. They are created, but a plastic or concrete product is additionally mounted on top.
An exotic option is a stone drainage system. In its manufacture, polished marble or granite is used. Such products have an attractive appearance and high strength. They can only be broken with a sledgehammer. In addition, they do not make noise when water drops fall on them. However, the cost of these products is very high.
Some homeowners order the production of drainage systems from facade tiles. This option is used when finishing wooden or plastic windows. It is often chosen when the base of the house is lined with facade tiles.
Window drainage made of tiles Source the-brick.ru
When making tile flashing, the material is placed so that it protrudes beyond the facade by 10 mm. Lay the tiles on a slope. To install it and create a slope, a cement-sand mortar is used. Typically, all work on the manufacture of such drainage systems is carried out before finishing the facade.
Factors affecting cost
There are several factors that influence the cost of low tide
. First of all, this is the material from which the product is made. Experts recommend not to put the price of the product at the forefront, since it pays off very quickly. Correct installation of the protective element allows home owners to significantly save on foundation repairs.
When choosing a low tide, you should concentrate on the advantages
one material or another. For example, copper is very resistant to wear. Aluminum easily tolerates sub-zero temperatures and high humidity. Products made of galvanized steel are very practical and beautiful in appearance. Concrete products are considered the most reliable - they can withstand very heavy loads. But if you prefer this option, then keep in mind that the installation of such a low tide has its own specifics and, most likely, you will need the help of a specialist.
Features of sizing
Some manufacturers produce metal window drainage in the form of a strip. Its length can be up to 6 m. In most cases, the manufacturer cuts a long casting into several parts in accordance with the required dimensions. Usually the order is fulfilled in such organizations. After all, turning to them allows you to purchase window sills, the dimensions of which will exactly correspond to the installation location.
Experts determine the length of the product by the width of the window opening. The calculated size is increased in most cases. In this case, the main dimension by which the ebb is selected is its depth. This size for a metal product is usually at least 90 mm. It increases in increments of 20 mm.
The minimum depth (X) of metal casting is usually 90 mm Source polymer-plus.rf
The total width of the metal product is made 40-80 mm larger than the originally measured value. In other words, a window molding is made, the dimensions of which on each side are increased by 20-40 mm. This allows the edges to be folded. Moreover, its width in most cases should be greater than the depth of the street part of the window opening. Although in some cases the drainage is made flush with the outer surface of the wall. It all depends on the façade finishing.
On a note! They do not make the drainage overhang too large beyond the façade. However, it all depends on the design of the wall and ease of use. After all, a large product can look ugly and even get in the way.
Usually, moldings are made for windows whose dimensions are approximately 40 mm larger than the street part of the opening. In other words, each of the manufactured products, after installation, will protrude beyond the facade by 4 cm. A protrusion of this size is quite enough to prevent water from entering the wall, which will begin to flow from the window during rain. With this design it will flow onto the blind area.
The size of the ebb protrusion is often 40 mm Source oostroy31.ru
If you decide to install a plastic drainage system, then difficulties often arise when choosing a product. After all, its smallest width is 140 mm. In addition, this size increases in specific increments. For most manufacturers it is 40 mm. Because of this, it is difficult to choose a flashing whose dimensions will exactly fit a specific opening.
Important! When choosing a drainage system, take into account the frequency of people moving under the window, as well as the quality of the wall, foundation, blind area, construction and finishing materials used, including waterproofing. After all, a large product will interfere with free passage under the opening, and a small one will not protect the bottom of the facade and the base from getting wet.
Making metal casting with your own hands
You can make metal castings yourself; the design is not particularly complex.
Window sill patterns
How to make them?
Step 1. Buy a sheet of galvanized steel with a thickness of within 0.5 mm. Pay attention to the quality of galvanizing, the layer thickness must be at least 40 microns, the surface is uniform in appearance, sagging and omissions are prohibited.
Galvanized sheet (galvanized)
Prices for galvanized steel sheets
Galvanized steel sheet
Step 2. Measure the length and width of the workpiece, taking into account the hems. Leave about two centimeters around the entire perimeter for hems. Take the length with a reserve; it is better to cut off the excess later than to throw away the ebb.
Step 3. Transfer the measurements taken to a sheet of iron. For drawing, it is better to use an ordinary felt-tip pen; pencil lines are hard to see. Use regular markers, do not use waterproof ones. Visible marking lines must then be removed; problems will arise with waterproof dyes. The sheet must have a bend line for installation under the window frame and a bend line for the protruding part of the ebb. It is better to cut with metal scissors, or at least with a grinder. After the grinder, you need to remove burrs from the cut line.
Step 4. Place the sheet on the flat edge of the table, press it with one hand, do not allow vibration. With your other hand, gently bend it, tapping the sheet with any piece of the board. If you have a mallet, that’s great, it’s easier to work with.
Galvanized sheet
Sheet fixation method
Bend of steel sheet
Practical advice. To increase rigidity, you can make a drip. It not only improves the tide, but also diverts water further from the wall. The drip edge is an additional Z-shaped bend along the lower edge of the ebb.
Bend the metal slowly, start from one edge and gradually move towards the opposite. The sheet should bend like a wave. Do not try to bend it right from the middle, as unevenness will certainly appear. Apply blows from top to bottom, part of the plane of the mallet should bend the metal, and the second part should hit the edge of the table at the same time. The first time, bend approximately 30°; until the right angle, you need to make several passes along the line back and forth. The more passes, the smoother the bend of the sheet.
Making low tide
It’s not difficult to learn how to bend sheet iron; after just a few centimeters, you gain experience. If you have concerns, practice on unnecessary pieces of galvanized steel. You will be able to control the strength, direction and frequency of the blows, and the bend will be even. In terms of quality, it is, of course, somewhat inferior to a sheet bending machine, but you have the opportunity not only to save on cost, but also to produce moldings of your own sizes separately for each window.
Video - Installing window sills
Basic requirements for the installation of window drainage systems
The specialist knows perfectly well how to install a sill on a plastic window. However, if any mistake is made, it can only be detected after the consequences of improper installation have become apparent. It could even be the destruction of a wall due to exposure to water. Therefore, you need to trust the installation to professionals. Then you won’t have to spend a lot of time and money correcting errors.
Incorrectly installed ebb and flow can even cause destruction of the wall under the opening Source silverstar.by
During installation, specialists always follow specific rules. They are simple, but allow you to provide a guarantee for the work performed. First of all, all connections are properly sealed. Particular attention is paid to places where the drainage area is adjacent to the slopes.
On a note! Craftsmen use sealants as an additional material. The reason for this is their durability of several years. Over time they begin to peel off. As a result, cracks are formed where moisture freely penetrates.
Another rule is that slopes and ebbs for plastic windows are mounted only level. In this case, the lower shelf is installed exclusively along the horizon in the same way as the window, but only with a forward slope. Otherwise, water will drain from it in one place. It can even accumulate. If the slope is installed strictly horizontally, then drops will drip from its entire outer edge. Therefore, the area under the drain will become evenly wet. This will allow it to dry faster.
The long edges of the window sill should be horizontal Source fasad-sp.ru
Another rule is to build a solid and level base. Typically, a solution of cement and sand is used to create it. However, fastening the ebb to a PVC window is done using self-tapping screws, and to a concrete base using polyurethane foam.
During installation, the drainage system is aligned horizontally. Adjust its position using wedges. The resulting free space is filled with polyurethane foam. This installation option allows you to do the job inexpensively, but efficiently and quickly.
Important! The use of wedges strengthens the structure. In some cases, you can even stand on it with your feet, for example, when washing windows from the outside.
When installing sills on plastic windows, their usually curved side edges are placed under the slopes. This will prevent water from flowing under the finishing elements. If the slopes are planned to be made from plaster mixtures, then the edges of the drains should cut into the finish by about 10 mm on each side.
The side edges of the ebb should extend under the vertical slopes Source tildacdn.com
Important! The gap between the vertical slope and the ebb is never sealed with only one sealant. After all, it will collapse over time. Therefore, to better seal the joints, the drains are placed under the side slopes or cut into them.
Every professional knows how to properly attach sills to plastic windows on the first, second or even third floor. Often, for ease of work, the master removes the double-glazed windows from the frame and removes the sashes. Less often, he collects scaffolding from outside the building.
What is a window tide, what is its purpose?
Window sills perform not only a decorative function. It simultaneously solves several problems:
- protection from moisture on the window sill and window frame;
- removal of moisture from glass;
- gives a finished look to the external design of the window opening.
If you neglect to install the low tide, moisture will accumulate on the window sill and the processes of destruction of finishing materials will begin: the plaster will fall off, the window frames will become unusable. If the slopes are covered with PVC, mold and mildew will form under them.
This is the main answer to the question of what slopes on windows are, and why they must be installed without fail. That is why the installation of structures is carried out not only for the decorative design of the opening, but also in order to prevent possible damage to the finishing and structures.
The process of professional installation of metal drainage in a stone house
Metal flashings are installed in 95% of cases. Typically, these parts are made in the workshop of the company that manufactures and installs the ordered windows. Drains made of metal and plastic are installed according to the same scheme. Additionally, gaskets are used with steel products to reduce the drumming effect during rain.
Installation of ebb sills on plastic windows by professionals is quick, as the craftsmen have all the necessary tools and consumables. The process itself is carried out sequentially by specialists.
Step 1
Before installing sills on plastic windows, always check the condition of the lower slopes on the street side. If they have defects, including large cracks, depressions and elevations, then they are plastered using a mortar of cement and sand. Tile adhesive is also used when surfaces have small irregularities.
On a note! Basically, a cement-sand mixture is used if the base in the window opening of a house made of brick or other similar material has not previously been prepared for work.
Before installing the ebb, make a base from a cement-sand mixture Source tvplaneta.ru
When leveling the lower slope, create a slope of approximately 10°. This work is done as follows:
- Place a layer of the prepared mixture on the wetted surface with a thickness that exceeds the required value by approximately 10 mm.
- Make the recess in fresh solution at the required slope using a level. To do this, the tool is pressed into the mixture in the middle and edges of the base.
- Remove excess solution. The result is a surface whose slope matches the slope of the created grooves.
After this, the surface is finally leveled. Then wait for the cement-sand mass to harden.
Step-by-step instructions for installing metal flashing
You can order a metal cast or make it yourself. We will tell you how to make the structure yourself below, and for example we will use a custom-made element. We will take the following indicators as the initial data: sheet steel casting, brick house with cement-sand plaster. The ebb tide is installed on plastered slopes.
To work, you will need metal scissors; if you don’t have them, you can use a grinder. In addition, you need to have a square, a marker (a pencil draws very poorly on metal), a tape measure, a screwdriver and self-tapping screws. If you need to prepare a cement-sand base, then prepare construction tools.
Step 1. Check the condition of the lower outer slope. If it does not meet the above conditions, then it will have to be plastered. Use ordinary cement-sand mortar or ceramic tile adhesive. Glue can only be used to level out small irregularities, and plaster mortar is used if the place is not prepared at all. During operation, ensure that the slope is within 10°.
How to make a slope?
- Apply a layer of mortar, about 1 cm thicker than needed. Before plastering, do not forget to wet the surfaces of the bricks.
- Using a level on fresh plaster, make indentations at the desired angle. Press it into the mass, watch the scale readings. Grooves should be made along the edges and in the middle of the slope.
- Gradually remove excess mass as an even rule, and control the position of the tool along the grooves made.
- Use a trowel to completely level the surfaces. Continue installing the drip lining after the mixture has hardened.
Step 2. Take the drip dimensions to place your order. It should be several centimeters longer and wider than the slope.
Taking measurements
Width measurement
Step 3. Measure the parameters of the slope and transfer them to low tide.
Slope measurement
Next, there are two options for carrying out the work.
- Bend the ebb according to the marked marks. Trim the kinks a little with metal scissors or a grinder. The height of the side folds is approximately a centimeter. Make sure that the edges are smooth and fit as tightly as possible to the side slopes. We have already mentioned that we do not recommend installing flashings using this method; the risks of leaks appearing at the junction points are too great. There is a more reliable option.
Low tide trimming
Bend the edge of the tide
Prices for construction scissors for metal
Metal scissors
Edge bend
- Using a grinder with a diamond blade, cut even grooves up to a centimeter deep in the plaster at the bottom of the slopes. The cut should be smooth and located at the level of the low tide. The groove in the corner between the window frame and the slope will have to be hollowed out manually; the disc will not fit into this place.
- Make the length of the ebb about two centimeters greater than the width of the lower outer slope. There is no need to bend anything on the sides.
- Insert the molding into one groove as far as it will go, bend it slightly and carefully insert the other end into the opposite groove. Move horizontally so that both ends of the ebb are located in the groove.
- Use a small putty knife to seal the groove. Pack the mixture tightly. Using a slightly damp sponge, trim the edges, making the transition smooth and imperceptible.
Unfortunately, plastic flashings cannot be installed in such a reliable way. They are mounted end-to-end, the contact area is sealed with sealant. The ends are jammed with special inserts.
Step 4. Fix the bend of the ebb to the window frame with self-tapping screws. There are special recesses on the frames; make sure that the edges of the bend do not extend beyond them; the bend of the ebb should be located in the groove.
Remove the film from the low tide
Low tide installation. Final fitting and fitting
Foam application
Putting the ebb in place
If the metal ebbs are more than one and a half meters long, then you can use liquid nails during installation, lubricate the surface of the base and then put the ebb in place.
Low tides on the windows
Correct sizing for drainage
The quality of the final result depends on the accuracy of the original dimensions according to which the casting is made. If they are removed correctly, there is no need to redo the work. At the same time, it is performed as quickly as possible. However, an error of a few millimeters is allowed.
To make sills for windows, the dimensions of which will be as accurate as possible, the master performs the following steps:
- measures the length of the window frame together, where the drainage system will connect to it;
- first applies a construction square to one side and then to the other side of the window;
- measures in each case the small leg of an imaginary triangular figure that is formed between the applied tool and the slope;
- adds the sum of the small legs to the previously measured length of the window frame to obtain the final length of the drainage.
Measuring drainage for a window opening Source torg111.ru
After this, you need to know how the drainage will be installed. If it is factory installed under vertical slopes or simply touches them, then the craftsman makes bends on its side edges. Therefore, it increases the overall length of the product by approximately 40 mm - 20 mm on each side. If the drainage bouquet crashes into plastered slopes, then this size increases by 10 mm on each side.
Choosing a gutter shape
The gutters through which water flows can be:
- rectangular;
- rounded;
- triangular.
It is into the gutters that water enters from the roof surface, which is then discharged in the desired direction. Without them installed, drainage will not flow smoothly and water can cause damage to your home.
The gutters through which water flows can be of various shapes Source staltd.ru
The shape of the gutter plays not only an aesthetic role. It depends on how well the water flows.
Advice! Experienced craftsmen consider a rounded shape to be more functional. It is less likely to cause blockages as a result of debris, dry leaves and dust. Therefore, you will have to clean it less often.
Methods for bending drainage edges
Experts use different methods to bend the edges of metal window sills. All of them have been tested in practice and allow you to get high-quality results.
One option involves using a tinsmith’s tool – these are special pliers. This device is distinguished by the presence of wide jaws. Thanks to the increased size, metal can be captured over a larger area.
Another method involves the use of pincer clamps. They clamp the metal along the bend line and bend it. In this case, wooden blocks are additionally used. The entire process is carried out on a flat surface.
Plier-shaped clamp for bending the edges of metal window drainage Source chebo.pro
Important! When using clamps, it is necessary to deviate 1 or 2 mm from the bend line. This distance is required to accurately bend the metal.
If the third method is used, then the workpiece is placed on a flat, stable surface. It could be an iron table. In this case, the fold line is placed on the edge of a stable surface. Then they take a mallet and bend the metal. This process begins at some end of the bend line. If necessary, pass over it with a mallet several times. They strive to achieve an even and precise bend.
If the drain is made of thin metal, it can be easily bent with just your fingers. In this case, be sure to wear thick gloves or mittens on your hands. They will protect your fingers from cuts. If they appear, then it will take a lot of time for them to heal.
On a note! To obtain the maximum even and precise bend, a beard is made on the back side of the metal workpiece in the desired direction.
Types of tides for windows
Currently, several types are produced, differing in the material of manufacture. There are no functional features of the structures. The essence comes down to protecting part of the structure from adverse external conditions.
When choosing a low tide, you need to pay attention to the parameters of the window opening, the shape of the structure, and the general style of the building. The color and material are matched to the window frame. They must be in harmony. The width of the flashing depends on the thickness of the wall and the design.
White window tints look great with the same plastic frames. If the color is different, then the drainage should be chosen to match or slightly darker.
Bay window openings require an individual order for outlets. Galvanized products coated with a polymer composition look good. They consist of several rounded parts, which together create the desired shape.
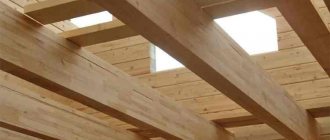
Features of installing metal ebb and flow in a wooden opening
The main fundamental difference between installing a metal drainage system in a stone house and installing it in a wooden opening is the creation of a base not from a cement-sand mixture, but from bars. The frame is made from them. It is on this that the ebb will rest.
Depending on the features of the building and the horizontal slope, only a few bars can be used. However, they will not always have the same thickness. The bars are attached to the building structures of the house using nails or self-tapping screws.
During installation, additional foam is used. It allows you to strengthen the fixation and prevent snow from falling under the tide.
On a note! To prevent the drainage from moving when the foam expands and to prevent it from moving, a weight is used. In this case, you need to choose the right weight. It should not bend the metal and allow the mounting foam to move it in any direction.
Concrete
Concrete sills are the best option to protect the foundation of the house from precipitation. Various brands are used to make such visors, but most often it is M450. This cement is highly resistant not only to moisture, but also to temperature changes. It is also worth noting the long service life of such structures.
In addition to concrete, other components are added to such casts. These include sand, crushed stone, as well as various plasticizing substances. Thanks to the latter, the visors are resistant to deformation. As for their dimensions, they have a wide range. In this case, it all depends on how wide the base of the building is.
Helpful information! There is also one disadvantage of using cement canopies. This is a large mass of them. If you have firmly chosen this particular variety at the construction stage, then it is advisable that this point be taken into account in the design of your house.
In order to make flashings around the house, you need to follow simple rules, because the process of installing cement canopies is quite simple. However, it also has many nuances. It is also worth saying that such products have a wide range. They can have different shapes and colors.
Interesting: Canopy over the porch: types and installation
Features of connecting two ebb tides
The need to connect two drainage systems arises when one of them is not enough to completely cover the lower slope of the window. Although this situation happens extremely rarely. After all, it has already been mentioned what low tide is in plastic windows, and what it may look like. Basically the product is a metal strip. Its length can reach 6 m if necessary.
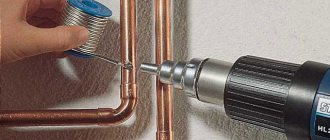
If you still need to connect two metal products to reduce the final cost, then soldering is used. It is performed with a soldering iron with a power of at least 200 W. Hydrochloric acid is also used in this work. It will allow you to remove the zinc coating from the metal at the soldering site. After all, ordinary solder will not cope with such a task.
The master connects the two ebbs as follows:
- Places products with overlap.
- Eliminates large gaps by pressing one drainage pipe against another with some kind of weight.
- Pour a small amount of hydrochloric acid onto the joint or apply it with a brush. The solution is distributed throughout the joint. Otherwise, the metal will not connect in unlubricated areas.
Hydrochloric acid is poured or applied with a brush to the joint Source torgopthim.ru
- Heats up the soldering iron so that solder brand, for example, POS 60, melts on the tool.
- Applies the heated end of the soldering iron along with solder to the joint where hydrochloric acid is already present.
- Removes the load, but only after the solder has cured.
Usually the seam is made from the front side. If necessary, solder can be passed from below the joint to increase the strength of the connection. At the end of the process, the adhesion site is washed with a solution of water and baking soda. This allows the remaining hydrochloric acid to be neutralized.
The connection of two galvanized sheets is also done using a lock. It consists of two parts. They are created on the opposite edges of the connected drains. An experienced locksmith will always make a quality lock. After its creation, a folded seam is obtained.
The lock itself consists of two curved edges in opposite directions, which hook into one another. After this, the seam is compacted with a mallet. Strong blows are made on it with the instrument. They are performed first on one side and then on the other side of the seam.
The order of making a seam when connecting two ebbs Source castle.pri.ee
What are residential building tides?
The organization of water drainage from the roof of a residential building directly depends on the shape of the roof and
A house without organized water drainage: is this realistic?
Perhaps you have ever had the idea that it is possible to do without any gutters at all - didn’t they do without them in Rus' before? Yes, not only that, I still practice this approach today!
For example, if a house is built strictly in a certain style, and the drainpipes on it cannot be hidden or adjusted to the chosen exterior design in any way. In this case, builders do everything to ensure that rainwater does not harm the building in any way.
To do this, the roof is built so that it has a wide canopy and protrudes beyond the front of the wall by at least half a meter. Next, vertical insulation is laid on the foundation walls, and the foundation itself is a high base made of non-moisture-intensive materials, such as ceramic tiles or stone.
The second step is to make a vertical layout of the area so that there is a noticeable slope from the house under your feet - this way the water will flow freely from the roof and immediately move away from the foundation of the house.
Flashings of a standard gable roof
Standard flashings for a gable roof consist of the following elements:
In those places where the water flow will be under high pressure (most often under the valley), a limiter is also placed on the gutter or corner of the gutter.
Organization of water drainage from a flat roof
But on the roof of a flat house, the ebb tides look a little different:
In order to organize the drainage of water from a flat roof, it is first equipped with a parapet with a height of 30 to 90 cm, which also serves as a fence. Next, a drain is installed, in most cases internal.
Internal drainage is considered more reliable, because... such a system is almost not exposed to atmospheric influences. Install water intake funnels only on low areas of the roof, which is quite logical. If your roof is up to 150 m2, then install two funnels: a standard one with a riser and an emergency one, which will remove water through the parapet.
But it is extremely important that your flat roof drip system always works properly. And for this, such a system must be passable, i.e. protected from being blocked by leaves in autumn and snow in winter. For this purpose, a basket is attached to the crimp ring or flange on the funnel and heating cables are laid. And at the bottom of the pipe an inspection is installed for cleaning and control. The water itself flows through the internal drain into the main collector.
Briefly about the main thing
Shutters are installed to drain water from windows during rain and prevent it from getting under translucent structures and inside walls. They are mainly made of plastic and galvanized metal. However, they can also be created from facade tiles, aluminum, and stone.
Drainage drains made of plastic and metal are produced in mass quantities to standard sizes. It is easier to order steel products to order in the required dimensions. It is easy to cut them at the installation site to fit the size of the openings, leaving a metal reserve of 10-40 mm for bends.
Galvanized flashings can be connected by soldering or locking. They are installed on a prepared concrete or wooden base. During installation, foam and self-tapping screws are used. Their side edges are bent and brought under slopes or straight edges are deepened into them when they are plastered.
Ratings 0
What to look for when purchasing and installing
Even if you choose a good material, poor installation can ruin everything.
It is necessary to pay special attention to the installation of the drip sill Source ms.decorexpro.com
In order for roof drainage systems to serve for many years, you must adhere to the following rules :
- The size of the gutter should correspond to the area of the roof slope. The larger it is, the larger the diameter of the gutter should be. Otherwise, the structure may not cope with water drainage during heavy rain or intense snow melting.
- Fittings and all materials for fastening must match the design in size and material.
- When ordering flashings, you must add a margin of 15% or slightly less to the required length for installation of joints.
- A drip cap will prevent splashing. It slides under the roof and its bottom fits into the gutter.
- Each slope is usually equipped with two drainage pipes.
- A sufficient number of drainpipes are required
- The ebb tides should be a few centimeters . Otherwise, they may be damaged when the snow melts.
- In most cases, the color of the tides The approach to external design depends on whether this element should serve as a decorative element or whether it should be practically invisible.
The color of the ebb can be matched to the color of the roof Source coh.noribeta.ru.net
Device and purpose
The drainage system for rain and melt water is a set of elements that allows you to first collect and then remove excess moisture to a place specially designed for it - a sewer, a container for drainage, etc. The system prevents water from flowing down the walls of the house and damaging the finishing, yes and basic building elements. If water is not drained from the roof in a systematic manner, then over time it will not only destroy the beauty of the walls of the building, but also, penetrating into the joints of the walls and roof, will gradually destroy the building itself.
Installation of a drainage system
Attention! A roof that is not equipped with flashings cannot protect the building well from water. The fact is that in this case, the liquid flows from it chaotically, falls on the mauerlat, and forms puddles around the structure, which negatively affect the foundation and paths surrounding the house.
The drip system consists of gutters fixed along the roof eaves, which are responsible for collecting liquid from the roof covering. Next, the collected water flows through funnels into vertically located pipes leading to water collection points - sewers, containers, etc.
Elements of external drainage
Rainwater drains
Flashings can be made from several materials. Each of them has its own disadvantages and advantages.
Table. Materials used to make castings.
| Material | a brief description of |
| Copper | This is the most reliable, strong, durable, but also the most expensive option for low tides. Such tides are made from oxidized copper, which not only looks beautiful, but is also not susceptible to negative influences from weather conditions. The disadvantages of such ebbs include the considerable weight of the structure, which is important to take into account when designing the roof and walls of a building. Also, you should not install such low tides on buildings that are unattended for a long time (for example, seasonal cottages). |
| Aluminum | Aluminum can also be used to create ebb tides. The system is lightweight, does not weigh down the structure, and does not place additional load on the foundation. Unfortunately, aluminum is prone to oxidation and can only be used if it is treated with special compounds that protect it from external negative influences. |
| Steel | Quite often, steel flashings are used to create a drainage system. They are strong, durable, but just like aluminum, they are prone to destruction, namely, they are afraid of corrosion. And their weight, although less than that of copper systems, is still very significant. And the load that the structure will experience is important to take into account at the design stage. |
| Plastic | Nowadays, plastic moldings are used most often, as they have a long service life, are lightweight, and are affordable. They practically do not put pressure on the structure, are not afraid of water, but are quite fragile, so the fastening system must be well thought out and reliable. Another advantage is the ability to choose tides of absolutely any color, which are ideal for the style and color scheme of the building. |
Plastic gutters for roofs
Layout of drains for various types of roofing
Prices for gutters
Gutters
Installation of waste pipes
After gutters have been installed to collect liquid from the roof, drain pipes are installed and brought to the water collection point.
Step 1. The required length of the drain pipe is determined, which should be such as to connect the gutters with the elbow and the liquid outlet elbow. A hacksaw will help you cut the pipes to give them the required length. In general, the pipe should have such a length that the final bend, located at the outlet of the pipe, is at a distance of 20 cm from the ground or blind area. Otherwise, splashes of leaking liquid will fly in all directions.
Pipe cutting
Step 2. Pipe holders are mounted on the wall of the building. They are mounted so that the pipe takes a strictly vertical position or has a very slight slope. The distance between the individual brackets should be about 2 m, but one pipe should be held by two holders.
Distance between holders
Step 3. The brackets are fixed using reliable metal fasteners. First, the brackets are installed at the joints - for example, at the junction of a pipe with an elbow or a connecting pipe at the top. Next, the pipe itself is fixed on the installed brackets.
The bracket is attached with screws
Step 4. All drain elements are connected. To do this, a drain pipe, a pipe elbow, a connecting pipe (if necessary), and a drain elbow are connected to each other.
Connection of drain elements
Step 5. The structure is leveled, only after this the connecting pipe is attached to the gutter funnel.
The pipe is connected to the gutter funnel
Attention! Drain pipes should be installed approximately every 5-6 m along the roof edge to effectively remove water. It is also best to provide for their locations at the corners of the building, especially for houses with complex geometry.
Video - Installation of ebb tides
Additional Information
After installation is completed, the operation of the tides can be checked by running a large flow of water through the system. At this point, you can immediately identify leaks, if any, and also see how effectively the system copes with wastewater. If deficiencies are identified, it is better to correct them immediately, without delaying until the system is put into operation.
Mistakes when installing roof drains
It is best to discharge rainwater into specially made grooves leading to the sewerage system. You can also install collection containers under drain pipes. The water collected in this way can be useful for gardening and other needs.
In general, outlets should be located so that they do not interfere with movement around the house, and also so that water flowing through the pipes does not harm the plants planted around it. During heavy rains, flows of liquid can cause irreparable damage to crops.
Drain from sewer pipes
To avoid difficult situations, it is recommended to regularly inspect the drainage system for damage and malfunctions. Defects that are noticed immediately and are not neglected are much easier to correct than those that have existed for a long time and gradually undermine and destroy the bends even more.
To install drip tides, you will need a little experience in using construction tools, desire and knowledge of information about how all the work is done in stages. In general, there is nothing complicated here, but still, you should not neglect to thoroughly study the instructions. Correcting mistakes made out of ignorance is often too difficult.
What should the window tint be?
When choosing a protective strip, pay attention to various profile characteristics:
- material;
- color;
- shape;
- noise insulation characteristics;
- resistance to moisture, ultraviolet rays, mechanical damage;
- price.
The color is selected to match the shade of the window frame, the shape is selected to match the design of the facade and roof, the width of the shelf should be slightly larger than the size of the window opening protrusion. If the windows are non-standard, the shaped elements are made individually. It is necessary to take correct measurements in any case.
The shape of the main surface can be rectangular, trapezoidal, or “with ears.” The latter variety is typical for private residential buildings with window sills with projections on the sides.
Drainage profiles are made of sheet steel, plastic, aluminum, copper, stone, facade tiles. The first two types of materials are the most popular, so let’s look at them in more detail.