Today, either tiles or decorative stone are increasingly used as cladding materials. But it’s no secret that these materials are very expensive on the construction market and not everyone can afford them. The simplest solution to the problem is a do-it-yourself mold for artificial stone.
To make simple-shaped stones that have an even geometric shape, it is enough to use wooden boards as a base, knocking them together.
If you need to make a truly beautiful stone, it is recommended to use silicone as a base.
Preparation of master models
Ready-made decorative materials with an interesting texture, natural materials, or hand-made models can be used as master models. When making models yourself, plaster, wood, plastic, or even papier-mâché models can be used as the starting material. But among all the listed materials, the best models are made from gypsum.
Preparing models begins with cleaning their front surface. When pouring silicone or polyurethane, the front part of the model should be:
Tools and materials for preparation
For high-quality templates that can accurately convey the texture of natural materials, injection molded polyurethane is used. This unique material is resistant to wear, corrosion and flexibility, and can withstand high mechanical loads.
Polyurethane molds are made by cold polymerization, a solution to form two-component polyurethane compounds. Despite the simplicity of the technology, creating a reliable model requires a lot of experience.
To obtain a polyurethane mold with your own hands, you need:
- samples made of artificial or natural stone;
- two-component polyurethane compound;
- sanitary silicone;
- plywood, MDF or chipboard;
- self-tapping screws;
- liter bucket;
- putty knife.
To make frames, you need to prepare a smooth section of MDF or particle board according to the size and pattern of the side wall elements. A texture pattern is copied onto the surface of the plate by mounting plumbing silicone. The distance from the sample to the side walls must be at least one centimeter. Next, the assembled formwork is sealed with a silicone frame and filled with mortar.
Filling with mortar
Before the first pouring of concrete, the inner surface of the template, as well as the matrix, is treated with a grease or separator. The form is pre-installed on a rigid, level base.
The filling solution is thoroughly mixed; it should be mobile, but not liquid. Pouring into silicone and other forms is done in the center, and then leveled along the edges. It is recommended to remove excess solution with a spatula after completely filling the template.
The form cannot be moved until it is completely dry.
Filling forms
When the molding silicone is ready, it is necessary to place the blanks on a flat surface. Under no circumstances use silicone-based compounds as a separating element, as they will definitely stick to each other. As an alternative to wax, you can use fat or soap solutions.
The material for the mold is poured carefully, slowly, so that it can spread well around the workpiece and no air cavities are formed.
Complete hardening occurs within 24-48 hours
. During this time, you need to place the forms in a dark place, protected from moisture. Then we carefully unwind the boards, separate them from our workpiece, then take out the stones, and that’s it - the form is finally ready for use.
Video: making a silicone mold for artificial stone
In custody
A do-it-yourself mold for artificial stone is a great way to save on building cladding materials, which you can now make yourself. During operation, it is necessary to provide for the possibility of the surface of the mold and the future product sticking together, so a fat-containing composition is applied on top or a plastic film is applied.
However, if you have lost the desire to tinker with making forms, or you have not found the most suitable template you want, you can always visit construction stores and find ready-made forms of various sizes, shapes and patterns at a very reasonable price.
Was this article helpful to you?
[Total: Average: /5]
Assessment of the quality of molds for the manufacture of decorative stone
Don’t worry if the mold for making decorative stone at home doesn’t turn out perfect the first time. A couple of trainings and you will be able to make high-quality goods with minimal costs only on raw materials.
Quality control
Purchased products from reputable manufacturers may be of higher quality than homemade ones. Nowadays there are many fakes on the construction market and no one guarantees that you will be able to purchase a truly worthwhile product the first time.
Wooden forms
Wooden models are not the most successful example, but we should also point to it, because stone production takes place with their help. How does the production of a model for facing material take place?
Everything here is quite simple - to create a wooden model, several old boards are selected, preferably with as many defects as possible, as well as even slats. The bottom of the model is made from boards, and the side sides are made from slats. We take old and broken boards so that the upper, decorative part of the stone has a unique shape, with a unique pattern. The sides must be even, as well as the additional partitions inside the form, so that we can maintain the same distance between the stones during laying. Although, if the stone is produced for a chaotic pattern, you can do everything according to your own requirements, the shape can even be non-standardly curved, the partitions can draw the most intricate patterns and shapes.
The model is knocked down with nails, well strengthened and compacted so that the future solution does not disappear from it. In terms of size, the decision is yours alone, since we cannot decide for each summer resident what characteristics the material needs.
Then everything goes according to technology - preparing the solution, pigment, reinforcement, coating the mold or laying polyethylene, pouring with stirring or tamping, drying the solution and obtaining the finished material.
We simply cannot claim the practicality or high quality of such a model for stone production. No, of course, we have experience working with such structures, but not the best, and even more so, today there are more reliable technologies that provide decent results.
Peculiarities
The distinctive properties of gypsum brick are hygiene, high heat and sound insulation, and chemical harmlessness. What also makes the product in question special is its practicality, the ability to change shape at any stage of manufacturing or installation, painting it in any color you like, and using it as an additional air humidifier.
Installation of gypsum tiles is significantly different from laying building bricks: to secure this material, only an adhesive mixture is needed. It is enough to apply a mixture of PVA, special mounting and other glue of your choice to the primed walls. Then apply a plaster stone, press down and hold it for a couple of seconds.
Read also: How to make a resonator with your own hands
Description
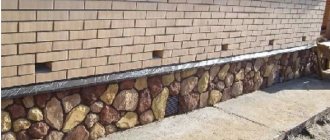
In appearance, this material is very similar to natural rocks . The tiles obtained from a hardened special mortar have proven their practicality and durability.
Natural minerals, when external conditions, temperature, humidity change, change their properties and characteristics, which is reflected in their appearance. The weight of natural stones increases the load on the foundation or walls.
Artificial stones are free from all these disadvantages. In addition, the significantly lower price, compared to natural wood, has finally won over buyers.
An increasing number of people want to surround themselves with natural materials, but at the same time take advantage of modern technologies: reliability, durability, and a constantly well-groomed appearance.
Decorative Portland cement brick
To work you will need:
• cardboard; • white Portland cement; • sand; • foam balls (they are sold in any furniture store); • cement-based sealant; • reinforcing mesh.
Styrofoam balls
1. The first step is to make a mold for bricks
. It can be made of ordinary cardboard. A reinforcing mesh of suitable size is placed on its bottom and walls.
2. To make a solution
sand, foam balls and water are mixed in water in a ratio of 1:1:2. Next, Portland cement is poured so that the solution acquires the consistency of very thick sour cream. To increase viscosity, it must stand for 20 minutes.
3. The mass is placed by hand (it is better to wear rubber gloves) into a cardboard box, leveled and left for a day to harden.
4. To make the products smooth, they are coated with a more liquid solution consisting of water, sand and Portland cement (3: 1: 1).
5. Bricks should be painted with acrylic paint diluted with water. First, you should tint them with a darker solution, and then cover them with a transparent layer of lighter paint.
Portland cement bricks can be any color
6. The last step is to seal the paint with liquid sealant.
Silicone stone molds
Making such a design will take you some time, plus there will be the inconvenience of traveling to the supermarket to purchase consumables, as well as some costs. But as a result, you will get a truly exclusive stone that no one else has, if, of course, you can cope with the production process the first time.
Selecting samples for making molds
Perhaps the simplest stage of the process is when you need to determine what type and size of material you want to receive subsequently. To select a sample, you can take a natural sample, its fragments, or do something yourself, breaking stones or cutting and grinding their edges.
Making a mold for casting the model
Here we will need experience in the production of wooden boxes and boxes, which is generally very simple. As a basis, you can take a piece of old furniture, a square or rectangular sheet of laminated chipboard, for example. Next, you need to nail the sides to the sheet of the same height as the thickness you plan to make the model. Everything should be quite tight and secure; you can even coat all parts with glue, and only then twist it with screws or knock it down with nails.
Laying the stone into a mold
We carefully lay out the samples that we found at the dacha or made using a tool. Be sure to maintain a certain distance between them, a few centimeters. When laying the stone on the bottom of the box, coat the joints with plasticine so that liquid silicone does not flow under the samples.
When preparing the stone, you should understand that one side of it must be flat; this is necessary for convenient placement in the box, as well as in order to obtain as a result a high-quality material for work, one side of which will be able to adhere to the surface being finished.
Preparation of silicone for mold production
There is nothing complicated in preparing the material - you just need to work according to the instructions, add the hardener and catalyst in the required proportions, mix everything thoroughly using an electric mixer.
After preparing the silicone, let it sit for about half an hour and proceed to the next step.
Filling the form
The stones are checked for correct installation in the box, coated with grease or other lubricant, and the silicone is poured into the box with the stones. During this process, you should constantly tamp the silicone so that it lays down in an even layer. This will also prevent the formation of unnecessary voids in the future form. Pour silicone until it covers the tallest stone in the box by about 5 cm.
Now the molds with silicone must be placed in a dark and dry place and allowed to dry thoroughly. In some cases, the product is ready within 36-48 hours, but sometimes you have to wait a week. Everything here depends on the material and conditions of production and drying.
At the end of the drying period, the side sides of the box are removed, and the finished form is carefully separated from the sample stones. Now it is completely ready for use for the production of material.
Preparing a blank for the mold for artificial stone
If the decorative surface should be located on one side, it is enough to make one; if on both, then two shapes of the same size are made, which are then superimposed on each other and connected.
Now we make a wooden container for making molds of the required size.
To prevent any leaks, it is necessary to seal the cracks with silicone. Connections for insurance are screwed together.
Now the wooden surface is covered with a layer of plasticine up to 5-10 cm high. We place one or more stones on it, which were chosen as templates. The exact same base can be made from plastic or siding.
Now you need to measure the volume of the mold and subtract the volume of stones from the result. What is it for? In order not to prepare excess volume of the silicone mixture from which the mold for the artificial stone is made.
Making a polyurethane mold
First of all, we buy one package of the artificial stone we like at the hardware store. Usually the package is one square meter. They won't sell less anyway.
We lay out half a square of stone on the edge of an MDF furniture sheet. We need to make sure everything fits. Leave gaps of about 1 cm between the stones. Experiment with the position. Then glue the stone tiles one by one to the MDF sheet using silicone.
Make formwork from scrap MDF or panels, a few centimeters high above the edge of the stone. Just screw them to the panel with stones. Then insulate all joints from the outside with plumbing silicone. It will prevent liquid polyurethane from leaking.
Be sure to level the surface with the formwork installed on it. This way you will get an even shape in the future. You can lay the formwork on the table, it’s more convenient to work.
After the silicone has cured, coat the stone and formwork with release agent. It is based on polyvinyl alcohol. When it hardens, it forms a thin film, like PVA glue. Let the separator crystallize and move on to working with cast polyurethane.
To make the mold I use 10 liters of Duramould ET 45A cast polyurethane. It is made in the UK and is of very good quality and has a long service life.
It is located in two 5 liter canisters. One part is red and liquid, the second part is transparent and more viscous. Using scales, measure half a liter from one and the other canister. Combine them in a bucket and mix thoroughly with a mixer. Then we pour it into the formwork.
According to technology, liquid and mixed polyurethane must be vacuumized. But hardly anyone has a vacuum chamber at home. The surface is still quite porous and textured, so there is no need for special precision here. In addition, air bubbles will self-displace under the pressure of the polyurethane. Be sure to ensure that the substances from the canisters are mixed in equal proportions.
Mixing and pouring polyurethane, fill the form to the brim. Let it harden for about a day. Work with polymers must be carried out in a room with a positive temperature. Ideally at least 22 degrees. Polyurethane has no special smell. But it’s better to do this not at home in the kitchen.
In a day, the polyurethane will turn from a liquid, syrupy mass into a good mold for casting artificial stone.
Now we disassemble the formwork, cut off the silicone and polyurethane with a utility knife in those places where it is very stuck.
After removing the formwork, we tear the form off the table. If you glued the stone tiles well at the beginning, they will remain on the table surface. If not, and polyurethane has leaked under the tiles, then you will have to cut them out and squeeze them out of the mold.
The form, freed from stone tiles, should dry a little more. Its surface, which has not been in contact with air, will be slightly damp or greasy. Wipe it with a cloth, let it dry for a couple of hours and you can start casting the stone. In the next article we will tell you how to do this correctly.
Preparing silicone for pouring
To make silicone, two components are needed: a catalyst and a hardener. It is necessary to read the instructions and carefully follow the proportions. Next, combine the components together and then mix thoroughly using a drill or electric mixer.
When the mixture is thoroughly mixed, you need to leave the silicone to infuse for 20-30 minutes. At this time, you should once again check the previously prepared elements to make sure that everything is done efficiently and reliably. It is recommended to make several holes in the plasticine.