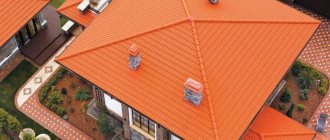
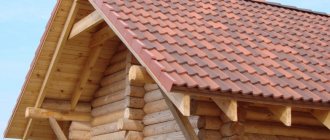
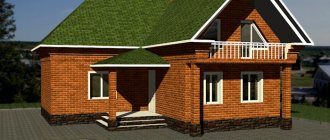
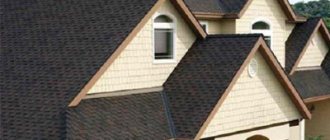
Hip roofs impressively rise above private houses, outbuildings, gazebos, and summer kitchens. They are most often built over boxes that are square in plan. Less commonly used on objects that resemble a regular polygon with an even number of sides. The list of advantages of a hip roof includes all types of advantages of hipped roofing structures.
They are economical and have excellent resistance to weather attacks. True, the rafter system of a hip roof is erected according to special rules. They are worth studying for home craftsmen who want to work as an independent roofer.
Features of hip rafter systems
Envelope roof is the second name for a hipped structure, reflecting its configuration in plan. The construction of a hipped frame is carried out according to the rules that govern the technology of constructing hipped roofs, but in compliance with its own specifics. The design completely lacks a ridge as such. Its function is performed by a central support, at the top of which all load-bearing rafter elements converge.
In a geometric sense, a hip roof is composed of four or more isosceles triangles. The bases of the triangles rest on the walls through the mauerlat, upper rims or leveling boards. The tops either lean on the support pillar or rest against each other.
Choosing a construction method
By analogy with pitched roofs, two types of rafter legs are used in the construction of a hipped structure:
- Layered - rafters that have two reliable supports in the upper and lower parts. The use of layered rafter legs is possible if the box being equipped has an internal wall on which the central support is installed. Instead of a wall, a support pillar installed on a basement or attic reinforced concrete floor can be used.
- Hanging - rafters that have only one lower support. They are installed if the box being equipped does not have an internal wall, and the installation of a central pillar is impractical.
The choice of layered or hanging type of rafters determines the method of installing elements of other structural parts.
Most often, in the field of installing rafter systems for hip roofs over private houses, layered technology is used. The hanging circuit is more difficult to install and inconvenient to repair. Some of its components are interdependent, so when replacing damaged elements, it is often necessary to dismantle undamaged parts at the same time.
Diagonal and shortened rafters
The corners of the box and the top of the hipped structure are connected by diagonal or otherwise slanted ones, they are also corner rafters - obligatory participants in the construction of hipped roofs. These are the longest and most loaded elements of the rafter system. It is on them that the shortened rafters, the rafts, rest, forming the planes of the triangular slopes of the hipped roofs. If the length of the diagonal rafter is more than 4.5 m, it is constructed from two boards sewn together with a meter-long piece of similar material. In general, according to the rules, it is customary to initially make sloping legs from a double stitched board, intended for the manufacture of central hip rafter legs and splices.
The width of the board from which it is planned to construct the frame for the insulated roof is calculated taking into account the formation of a ventilation gap of 2-3 cm. It should be formed between the upper plane of the slope formed by the rafter frame and the thermal insulation slabs. For example, if the thickness of the insulation is 125mm, then the width of the board should be 150mm, etc. If the dimensions of the material offered on the market or in a construction market do not allow creating a ventilation gap of the required size, then a counter-lattice made of a block is nailed to the rafters from the outside.
Additional supports for mowing elements
To increase the rigidity of the structure and prevent sagging of long mowing legs, additional supports are installed under them. The number and type of additional supports depends on the size of the span covered by the diagonal leg:
- At a distance of up to 7.5 m, the rigidity of the diagonal leg is provided only by the strut located in the upper part of the span.
- At a distance of 7.5 to 9 m, in addition to the strut, a support is also installed in the lower part, located at a distance of approximately a quarter of the span from the extreme point. As additional support, either ordinary racks made of timber or T-shaped truss trusses turned upside down are used.
- At a distance of more than 9 m, another additional support is installed in the center, which building codes only allow for installation on a reinforced concrete floor.
The struts are installed at an arbitrary angle from 45º to 53º, the trusses, truss trusses and racks are installed strictly vertically.
Options for ridge assembly solutions
Naturally, ridge girders are not used in the construction of frames for hipped roofs. In the majority of cases, the diagonal rafters and the central legs of the hips are supported by notches on a single supporting pillar. The only upper support for the tent, in turn, also has three options for support:
- On the lower floor. This is not the most popular method, taking up part of the usable space and determining the characteristic order in the design. It is often used in the construction of summer gazebos, which makes it possible to use a massive load-bearing pole to build a common table around it, for example.
- On a floor beam laid on an internal load-bearing wall. Most often, in low-rise construction, it is this option that appears as the most rational. Sometimes a beam is laid on the beam, to which it is wiser to attach struts so as not to weaken the ceiling.
- On the upper heels of the central hip rafters connected by corners. With the specified connection method, thrust can be transferred to the Mauerlat. Therefore, each hip is equipped with a crossbar tie.
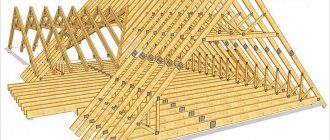
Typical methods for constructing a rafter system with or without support for a hip roof are shown in photos and diagrams:
Nuances of installing spigots
The lower attachment point for the shortened rafters - the spigots - is arranged by analogy with the nodes of the central hip legs. If they are installed using layered technology, one should not deviate from the principle. Upper support on the diagonal element is performed in different ways:
- By cutting into a solid beam used to construct a slanted rafter leg.
- Through leaning on an auxiliary block nailed along the lower edge of the diagonal.
- By means of a banal nail with two or three nails measuring 82 mm, if the nailsmiths are not subject to increased requirements for strength indicators.
The most reasonable option is rightfully considered to be installation through a support block nailed flush with the lower edge of the slope. And the strength indicators of the diagonal leg will not be affected, and the installation of the spigots will take place at a faster pace. In addition, there will be no need to observe the spacing of the shortened rafters when marking and installing. But when fastening with notches, the upper heels of the splices are prohibited from converging at one or closely located points.
The installation pitch of both standard and shortened insulated roof rafters is usually equal to the width of the insulation slab. However, if the upper nodes are fastened with nails or notches, it is permissible to change the pitch in order to move the upper heels of adjacent slopes relative to each other.
Preparing for work
Before starting the construction of a hip roof, you should carefully study all available information about the construction of such a roof, prepare all materials and tools, having previously made calculations.
Calculation of materials
To make calculations, you need to acquire a special measuring rod. It can be built from plywood five centimeters wide. We will need the following parameters:
- length and width of the building;
- height of the ridge part.
The calculations themselves are not as complicated as they might seem at first glance:
- The total length of the mauerlat beams is calculated by simply summing twice the length and twice the width of the base if the house has a rectangular shape. If the base of the structure is a square, then its side is simply multiplied by 4.
- The size of the central rafter is found using the Pythagorean theorem. The central rafter is nothing more than the hypotenuse of a right triangle, and its value can be obtained by taking the square root of the sum of the squares of two values (the height of the ridge part and half the side of the house).
When calculating roofs, the well-known Pythagorean theorem is often used. - The length of the sloped rafter is calculated in a similar way. The only difference is that the sides of the right triangle are now half the width of the house and the central rafter.
All the necessary parameters of a hip roof can be calculated by referring to one of the online calculators that are easy to find on the Internet.
Required tools and materials
To install a hip roof, you should prepare the following tools:
- Bulgarian.
- Hand saw and gasoline saw.
- Jigsaw.
- Hammer.
- Plane.
- Electric drill.
For the construction of a hip roof, it is recommended to use only one type of wood. To fasten roofing elements, nails, dowels, steel brackets and self-tapping screws are required. You should also take care of the roofing material, the choice of which depends on the preferences of the developer and his financial capabilities.
An example of a hip roof construction
We have become familiar with the intricacies of constructing a hip rafter system and variations on its theme; now we will consider the process itself with a detailed study of the stages. The basis for the structure will be a box measuring 10x10m with a load-bearing inner wall in the middle.
Before work, we arrange the Mauerlat around the perimeter so that it lies flush with the inner contour of the box. We also lay it along the internal partition. Along the outer contour of the brick wall, a side of one brick is constructed, which is necessary to compensate for expansion. The beams of the wooden frame of the Mauerlat are connected to each other by an oblique cut, duplicated with screws, bolts or nails. Corner joints are reinforced with staples; they are also used to connect the frame to the walls. The lower nodes of the rafter system are marked using the installed Mauerlat.
Floor beams are laid on top of the horizontally aligned mauerlat, the central part of which rests on the load-bearing wall. If the length of the beam alone is not enough to construct a solid beam, the junction of the two elements is placed directly above the load-bearing internal partition. Short beams - extensions - are attached to the ends of the beams with a step corresponding to the design, forming overhangs over the second pair of walls of the box. They are attached to the outer beams on the opposite side with a nail or a strong rod like a pin, and the internal corners of the stems are duplicated with LK-type corners.
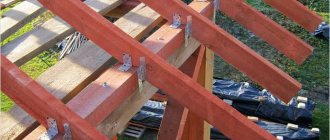
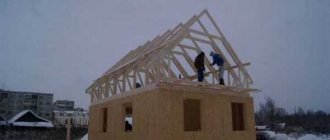
Installing the support and hip rafters
The construction of a rafter frame for a hip roof is carried out in three standard stages. During the first of them, the support post and central hip rafters are installed.
We will build the starting load-bearing part of the rafter system as follows:
- We install the rack of the designed height directly in the center of the ceiling. To make the stand we use 150×150mm timber. Before fastening, we check the verticality of a very important part with a plumb line. If everything is good, we fasten it with nails and staples. To prevent the central support from becoming distorted during the construction process, we additionally fix it with a pair of temporary spacers.
- We make a rafter template according to the layered method. We try the board on the floor beam and on the installed support. To support the upper heel, a 5cm deep notch will be made. Therefore, to determine the exact line of the bottom cut, you need to put a block of similar thickness on the beam so that with its help you can immediately draw everything you need without unnecessary hassle.
- According to the template, we make only two opposite rafters, whose upper cuts should rest against each other. We mount them and fasten them with one nail so that they are not disturbed during work.
- We follow a proven path in the manufacture and installation of rafter legs arranged in a cross-mounted pair. Their upper cut must rest against the end of the connection of the first rafters.
- After installation, the legs are sewn together with nails or connected using metal corners.
The first part of the work requires increased attention and control to dimensions, horizontal and vertical directions. If everything is arranged perfectly during its production, then it will be much easier. There will be no need to adjust anything, correct anything, or do each element separately. Having made sure that the construction of the first part of the rafter system is impeccable, we nail the cornice board around the perimeter.
Installation of diagonal rafters
Before installing the slanted rafter legs, the roof is broken down with a cord. It is stretched from the top of the central post to the corners formed by the cornice board. Focusing on the projection from the laces in the corner segments of the roof, we try on, manufacture and install short corner beams. To do this, we place a suitable length of timber, which was used for the ceiling, on top of the unfilled corner space. Positioned below, we outline the lines of the upcoming cuts. We fasten the corner extensions to the mauerlat and adjacent floor beams with nails and metal corners.
Let's start manufacturing and installing diagonal rafter legs:
- We select any of the corners of the mounted part of the frame and in its top literally by “manual” selection, but using a tape measure we find a place equal to double the thickness of the rafter board. We mark it with a pencil.
- We apply to the top of our “pyramid” a piece of board with dimensions equal to the cross-section of the material used in the manufacture of the central hip rafters. One of the cutting edges should run exactly along the lace. We draw a line for a vertical cut and carry it out.
- Using a construction goniometer, we measure the angles between adjacent already installed rafters. The result should be divided in half, because in the corner you need to place an element sewn from two boards.
- We file the edge of the cutting board to the right or left vertically at the angle obtained as a result of dividing. As a result, we received a template for the upper node of the diagonal rafter. If everything was done previously without any complaints, then the sawed-off trim can serve seven more times. If not, it will still serve, but with some adjustments and adjustments to the location.
- Having put together or temporarily sewn together the two upper templates with a nail, you need to try it on again and mark the actual location of the notch if the lower edge of the diagonal rafter intersects the edge of the post. If its installation does not require cutting, it is easier to make sure of this in advance than to mess around with adjustments on the roof later.
- At the bottom, we again apply a piece of board to the lace, aligning its edge with our stretched guide. The combined edge must follow the central axis of the corner offset. Mark the line of the bottom cut. We adjust the edge vertically, according to the “indications” of the cornice board.
- We similarly carry out work on the production of a mirror-deployed lower pair.
- Using templates, we make both parts of the diagonal rafter leg, which, after installation, need to be sewn together in increments of 30-40 cm.
If the length of the span covered by the sloped rafter is more than 4.5 m, it is obviously made of four parts. Sew, for example, the right part with the upper notch and the left part with the lower notch. After they are installed in place, the missing parts are sewn directly on site.
Following the described algorithm, three more slopes are manufactured and installed. Having completed the fixation of the diagonal legs, install the struts and supports in accordance with the technological requirements described above.
Manufacturing and installation of spigots
The central hip rafters are already in place. It remains to fill in some semblance of triangles between the diagonal and central hip legs. The lower heel of the short rafters will rest on the outrigger and the beams, the upper part on the slanted rafters.
By analogy, we make templates with lower and upper cuts. We measure the length of the elements after the fact; according to the dimensions and template information, we make the spouts and install them. All that remains is to arrange the sheathing, over which the installation of metal tiles, profiled flooring, slate or other type of covering is carried out.
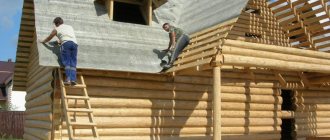
About change houses, storage of materials and physics
Termit.spb
...A few words about the change house itself: if you decide that you need a change house, and you will live in it for some time (the time of year does not matter), never buy ready-made ones! In the summer it will be hot in such houses, even with a split, but in the winter (what am I talking about), in the fall, you will simply freeze. If you want to live and build in comfort, make a change house yourself, with insulation, at least 100 mm thick, with films and taped seams. Remember, warm air will find somewhere to go.
Lumber with natural moisture, imported in advance, dries out when properly stored, which affects both the work and the result. Instead of a “small pile” - a retreat from the ground and storage of wood through spacers for ventilation and drying. As for blackening, it is not so critical; in unfavorable conditions, namely, under a well-ventilated roof, the fungus will stop developing.
To save on a crane or accessories, Anatoly advises using a hoist (electric winch). And if there is no electricity at the site, blocks will simplify lifting loads. One block reduces the weight of the load by half, two blocks - by four times. If you apply knowledge of physics, you can really make your physical work easier.
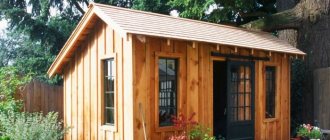
Envelope roof for gazebo
There are many more options for using tent technology than it might seem to a person unenlightened in the roofing business. As an interesting example that can be implemented independently, let’s consider the method of constructing a two-tier roof over a summerhouse. The design is non-trivial, but not too complicated.
In fact, another hipped miniature rises above the main rafter system of a conventional hip roof. Only the sequence of work is slightly different:
- The first step is to install the diagonal rafter legs.
- Then, at the design height, double lintels are mounted, performing the work of the crossbars of the trusses and the base for the installation of the upper tent dome. In plan, the lintels should form a square with clearly symmetrical sides.
- The central rafters of the hips are attached at the top to the lintels, at the bottom to the mauerlat, in the described case to the veranda trim.
- Without much regard for the weakening of the future rafter system, the installation points for the spigots are marked. Although they have to be fastened with nails, it will not do much harm to the lightweight structure if the upper cuts of the splices are connected to the diagonals in one or a nearby place.
- The template for making the bottom cut can be made one for the entire hip. For impeccable construction, it can even be in the singular. There will be several templates for the upper cuts: for the rafters adjacent to the lintels, for the legs adjacent to the junctions connecting the lintels with the diagonals, and for the elements attached to the diagonals, the cuts will be different.
It is easier to make a dome on the ground and then lift it up. In the example given, the tent miniature has frame walls, which it is advisable to cover with a fine metal or polymer mesh. Can be sheathed with light-conducting panels.
This is not the only way to build a custom envelope roof. The training video will tell you how else you can build a hip roof rafter system for a gazebo:
Within one article it is difficult to describe all possible options for constructing roofs with a tent-type envelope. We have described only the general principles that should be followed in the construction of rafter frames for all such roofs. Using technological principles, you can independently design a rafter system for your favorite country property and successfully implement your plans.
Roofing pie
A roofing pie is sequentially assembled layers of materials for roofing.
For a hip roof, the cake consists of the following layers:
- Rafter system . It is made of wooden beams and serves as a massive frame for the entire system;
- vapor barrier . A layer that prevents the formation of condensation;
- sheathing _ A system of boards that provides structural strength and is the basis for attaching the layers of the cake;
- insulation _ Serves to insulate the roof and the building as a whole;
- waterproofing . Material that prevents moisture from entering from outside;
- counter-lattice . A wooden structure that serves to provide a ventilation gap between the roofing material and the layers of the pie, as well as to secure the outer covering;
- roofing material . The outer coating is the main protection against external factors.
CAREFULLY!
The correct sequence of laid layers of the cake ensures its reliability and the creation of a comfortable microclimate. If mistakes are made in the arrangement of at least one layer, this can cause the destruction of the entire roof.
Photo of the hip roof diagram:
Scheme
Laying roofing
For hipped roofs, an important indicator in the choice of roofing material is the slope angle of the slopes.
For different coatings, the possibility of laying it in accordance with the slope is determined:
- Tile - from 30 to 60°;
- asbestos-cement coating - from 14 to 16°;
- soft roof - from 8 to 18°.
In addition, you can use decorative coverings typical for this type of roofing - reed, reed. Such coatings are short-lived and less common in the central region, taking into account climatic conditions .
Most often, tent systems are covered with tiles and other types of sheets (corrugated sheets, copper sheets, metal tiles).
Covering with roofing material must be done on each slope in turn . The laying features of each material provide for the fulfillment of installation requirements.
So, for example, sheets of corrugated sheets should begin to be laid from the lower left edge of the slope and continue to be covered, secured with special screws. In this case, the edges of the sheet are cut diagonally from the edge of the slope.
ATTENTION!
Calculation of the external covering of a hip roof should be made taking into account a sufficiently large number of material scraps .
Even though the waste can be used on the upper parts of the ramp, there will still be quite a lot of it.
Laying roofing material
Installation of vapor barrier, sheathing and waterproofing
There are two ways to install sheathing: for hard and soft roofing. In the first case, it is allowed to make a small gap between the boards, and in the second, chipboard sheets are used, since the material for covering the roof will be built-up. According to the standard, the thickness of the boards should be 25 mm and the width 150 mm. But under the sheathing a layer of vapor barrier is first laid.
You can choose a special membrane as waterproofing. But you can also use regular roofing felt. In the first case, the material is of better quality and the service life is longer. There are different options: breathable, insulating and others. The waterproofing layer is secured with a stapler and overlapped by 10 cm. An outlet of 15 cm must be left at the bottom.
To prevent condensation from inside the roof, special films are used, which are sold at any hardware store. For example, you can use polyethylene, special membranes or propylene coating. Fastening is done using a stapler. The sheathing is installed, and the cells are filled with insulating material - foam plastic or mineral wool.
Varieties
- Hip sloping roof. The slopes are not straight, they consist of two parts. The upper part is flat, the lower part is steep. A sloping roof is one of the options for installing an attic.
- Hip roof with bay window. Otherwise - yandovaya. More precisely, a yand roof is the roof of the bay window itself, and the main one can be anything: gable, hip, or hip.
- Mansard hip roof. Either a broken line or roof windows (balconies) are located on remote consoles.