Pallets are a material that can easily be used in construction. They are most often used to build country houses and children's houses, for which strength is not a priority. Having at your disposal a couple of dozen pallets, a few hours, imagination and desire, you can build a house with your own hands, which will become a favorite summer vacation spot.
Ready-made pallet house project
DIY furniture made from pallets for the garden: technology for making chairs
You will need one pallet for the job. It must be cut in accordance with the drawing, preparing parts of the required size. After processing, these elements are assembled together using fasteners, such as nails or screws. This must be done so that a small angle of approximately 10° is formed between the seat and the back of the chair.
Scheme for making a country chair from shipping pallets
To make the legs, boards of the appropriate length are suitable. One of them must be fixed strictly perpendicular to the ground, the other must be located at an angle of 10°. It is advisable that the height of both types of legs exceeds the level of the seat. Thanks to this arrangement, they can be connected to each other using a board. As a result, the chair will have two comfortable armrests.
The design options for country furniture made from pallets do not end there. Chairs with straight backs can be made from pallets. The assembly of the side and back walls of the furniture is carried out on the basis of boards. They are fixed in a horizontal position on vertical bars from the very bottom. The back of the chair should be located at an angle of 90°, and in relation not only to the seat, but also to the armrests.
Dining chair and high stools made from wooden pallets
A country chair can also have a more intricate design, for example, in the form of a table surrounded by two benches. It should rise two levels in relation to the seats. To make such a structure, you will need 4 pallets.
You can use different parts of the pallet to assemble the chair. The peculiarity of this design is that the surface of the armrests is located slightly below the upper part of the backrest. In this case, the frame of the chair is covered on all sides with boards, pre-painted in different colors. The backrest should be fixed at an angle of 90° relative to the seat.
Helpful advice! Pallets can be used for the construction of flower beds and flower beds, as well as fences in a summer cottage.
Chair made from a pallet reinforced with a metal profile
Upholstered seat design
When a comfortable corner or sofa for a kitchen made from wooden pallets is completed, it’s time to decorate, for which a variety of pillows or mattresses are used. Carefully selected textile accessories can radically change the appearance of furniture. When choosing them, they take into account where the device will be located (in the yard, on a covered terrace or in the house). Based on this, the final decision is made. Recommendations:
- It is more advisable to use water-repellent furniture fabric for the soft seat of a sofa, for example, flock or jacquard.
- Most often, the soft part is filled with crushed foam rubber or wear-resistant sheet polyurethane foam. If you need a particularly comfortable mattress, choose sheet latex foam for filling the sofa.
- On thin mattresses, it is better to use non-removable covers (stitched through), on thicker models - with a zipper.
Material characteristics
For a house made of pallets, any standard wooden pallets, which can be found in large quantities at any base outside the city, are suitable. And it doesn’t matter what the organization stores. The stand is equally used for both food products and any household items.
Playhouse made from palletsSource roomester.ru
Pallets began to be widely produced at the beginning of the twentieth century due to the increase in cargo transportation. Over the course of a century, the product has retained its relevance and structurally has changed little. Inexpensive types of wood and ordinary nails are also used for production. But over the years, a common standard emerged and the whole world began to use products of the same shape and size.
Today, the entire planet uses a wooden pallet made according to only two standards - European and Finnish. Moreover, the latter differs only in its wider width (by 200 mm). Otherwise, both designs are completely identical.
European standard wooden palletsSource art-pallet.ru
A standard Euro pallet consists of five boards at the top and three at the bottom. The sides are fastened together using square bars. And the finished design is obtained with the following dimensions: 800×1000×145mm. All lumber is chamfered and the product has a mark of three English letters - EUR.
It happens that pallets are produced for one-time use. But basically the products are consumed until they are completely discarded. Before this, the product may undergo repairs, and more than once.
Wooden pallet, European styleSource palletshop.ru
Therefore, all pallets that have already been used are divided into three grades:
- Higher. A strong and intact white item that has been used no more than 3 times.
- First. Sturdy construction without cracks, light color. The product has never been repaired.
- Second. Quite strong specimens, but darkened with age. Those that have been repaired and even have small cracks (up to 30 cm).
It is the last position that you can pay attention to when choosing material for building a house. Because in rare cases the material is received for nothing
Most likely, you can come to an agreement with your superiors and get second-class products cheaper. And at best, write it off like firewood.
Constructing a structure from wooden palletsSource Pinterest
What is a woodcutter?
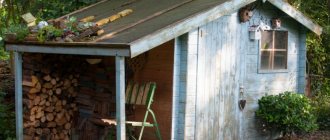
So, first of all, you need to understand the terminology. There are two almost identical structures: the woodshed and the woodshed. They differ from each other in that the first is a woodshed built on a foundation, which is a separate building. That is, it should not be adjacent to the main house on a suburban area. The second is a light structure, almost a canopy, which is adjacent to the house.
There is another similar term - firewood. This is a firewood basket. Firewood is carried in it, it is installed inside the house, where firewood is stored for heating the stove, heating and other household needs.
Firewood box for carrying and storing logs Source find-clever.de
Why do you need a woodcutter?
It is clear that wet firewood burns poorly, does not emit heat well, but smokes very well, clogging the stove chimney with soot. That is, there are many negative aspects from using such firewood. Therefore, they must be stored in a dry place. But in rural areas, where heating is often based on the use of solid fuel, this can be said about cooking, and about lighting a bathhouse, and even preparing shashlik or barbecue, firewood is collected in large quantities. This means they need space, closed on all sides.
So, the woodcutter has certain requirements:
- It should be located in a convenient place . There should be a free approach to it.
- Overall dimensions are selected based on the stored fuel .
- The barn must have a well-thought-out ventilation system . The firewood inside the structure must not become damp during storage.
- should not be allowed to be exposed to sunlight . Wood that is dried too much will burn quickly.
- It is necessary to ensure that the woodshed fits into the landscape design of the suburban area.
A shed for firewood, assembled from pallets and covered with OSB boards Source astroyresurs.ru
How to build it yourself
Laying the foundation
It is not necessary to make a capital foundation. For example, you can clear the area, fill it with sand, crushed stone and pour a floating concrete pad, which will also serve as the floor of the barn.
Another option is a columnar base. In this case, concrete will be poured into pre-dug holes, the walls of which are wrapped with roofing felt. It will be necessary to install metal rods into the freshly poured solution, to which the walls of the shed will be attached.
Making the bottom trim
You can skip this point of work, saving on building materials. The beams are cut according to the dimensions of the poured foundation. At the corners, 4 beams are joined using the “wood floor” or “paw” method. The frame is connected to the foundation with anchors through holes drilled in the beams.
Before laying the bottom trim, it is recommended to coat the foundation with mastic and cover it with roofing felt. Wooden elements must be cleaned and treated with impregnation.
Installing corner posts
This point is also a recommendation. The lower trim and racks will increase the rigidity of the structure, but if you need to save money, you can do without these beams. Corner posts are attached to the bottom frame with dowels, metal perforated corners and self-tapping screws. Additionally, jibs are nailed for reliability.
Laying the subfloor
The floor joists are connected to the bottom trim with metal plates (fastening perforated corners) and self-tapping screws. Edged boards are laid on the joists. The lags and boards are fastened with nails (20 cm long).
You will find all the information about the construction of wooden outbuildings and cabins here.
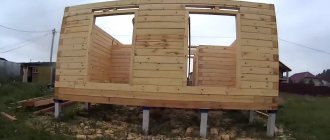
Walling
Work begins from any of the corners of the barn. The first pallet is taken, placed on its edge (with the flooring inside the shed), screwed or nailed to the bottom frame and vertical beam. It is advisable to check verticality with a bubble level.
The second pallet is nailed in the same way. The structure can be further strengthened with perforated mounting angles.
The first row of pallets must be fastened with boards, nailing them into the grooves between the pallet decks. Don't forget to pre-cut the opening for the door or gate. Pallets can also be fastened with wire.
Even if vertical beams were installed in the corners, before installing the second row, it is necessary to nail vertical boards to the pallets of the first row. They will become stiffeners and prevent the walls of the barn from tilting.
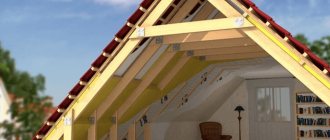
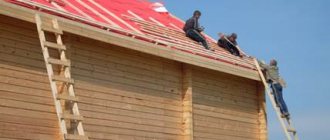
Roof and roofing
Before installing the roof and roofing covering, a ceiling is constructed and the top trim is attached. The latter is either a 100x100 beam, nailed along the perimeter of the shed walls, or double 25x100 boards installed on the edge. If the roof of the barn is single-pitched, then the framing is done only on two sides - from the rear of the building and from the facade.
Floor boards are laid edgewise on the mounted frame, which can simultaneously serve as rafters.
The design of the roof may change, but the general rules for arranging the roofing pie remain unchanged.
A waterproofing film (or roofing felt) is stretched over the rafters and the sheathing is filled. Next, the roofing finishing covering is installed - profiled steel sheet, ondulin, slate, etc. If necessary, roof overhangs are sheathed.
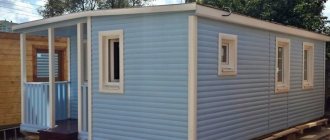
Design of a change house
A barn is a stationary building that should ensure the safety of country tools, personal belongings and other similar items. Based on your own preferences and free space on the site, you should determine the desired dimensions of the building. Ideally, the length, height and width should be multiples of the pallet dimensions. In this case, you will not have to cut the elements.
You may also be interested in the technology for building a woodshed in your country house.
Example: if pallets of 120x120 cm are available, then the optimal dimensions of the barn are 480 (L) x 240 (W) x 240 (W). You will need 24 pallets for the walls and 8 for the floor.
It is better to make the ceiling covering from boards. Also, boards will be needed to fasten the pallets together. And it is recommended to use timber 100x100 or 150x150 cm as the lower, upper trim and corner posts.
For construction you will also need: sheets of moisture-resistant plywood, fasteners, a screwdriver, vapor barrier film, insulation, fire-retardant impregnation, roofing material, roofing felt, bitumen mastic.
Calculation of approximate costs, prices of materials
New pallets are sold at a price of 250-300 rubles. Used pallets are half the price. Pine timber will cost approximately 5-6 thousand rubles per cubic meter, larch timber - two and a half times more expensive. A 25x100 mm edged board made of pine costs from 3,500 to 6,500 rubles per cubic meter.
Moisture-resistant sanded birch plywood:
- 8x1525x1525 mm – 550 rubles per sheet;
- 12x1220x2440 – 1050 rubles per sheet.
A set of doors with fittings or a gate for a barn can be purchased for 1-5 thousand rubles. Ruberoid costs about 300 rubles. per roll, bitumen mastic - from 270 rubles per container weighing 16 kg.
Materials for the roof and foundation arrangement will cost 2-5 thousand rubles. Mineral wool (8 pieces per package, 1,200×600×50 mm) costs from 65 rubles/m2 or 385 rubles/pack. Izospan (vapor protection) costs approximately 1,650 rubles/roll (70 sq.m).
Flower beds and decor from pallets for the garden
Using paints, varnishes and your imagination, you can give each item its own unique character.
You can make a beautiful shelf for flower pots from a pallet.
Or a device for storing garden tools.
If you have children, you can make a sandbox for them.
Or an entire playground.
Or maybe you have been dreaming of a swing for a long time?
Use your imagination and combine ideas. This way you can create something of your own, absolutely unique and reflecting your personality.
From old pallets you can make many interesting, convenient and beautiful things for the garden, with the help of which you can completely transform your site and add zest to the interior of your home. We hope our selection of unique items made from pallets will inspire you to find your own solutions. Don’t be afraid to experiment, the main thing here is a bold idea and a flight of imagination
Please yourself and surprise your friends with original things, because looking at your new table or sofa, they simply will not believe that you made it yourself from old unnecessary pallets that have been lying in your garage for years.
Overview of species
We bring to your attention the most popular children's houses.
A typical house of their painted pallets, which is a scaled replica of a real residential house. There is only one room inside, which allows the baby to stay comfortably.
Chum house with a folding wall. The second name for this type of children's houses is transformer. It is erected from two panels, which are knocked together from pallet boards and then joined at the tops. Children will find this shape of the house and the folding wall especially interesting.
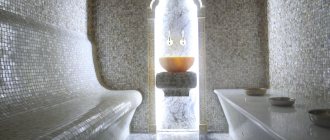
Interior decoration of a bathhouse made from pallets
In general, we adhere to this order:
- We cover the floor with pre-milled and sanded boards from a pallet. If desired, you can buy ready-made tongue and groove boards.
- We fix aluminum foil on the ceiling combined with the roof, overlapping it by 15-20 cm, making an approach to the walls. The material is easy to damage, so we work with it very carefully.
- We cover the walls with the same layer. Please note that the reflective surface must be turned inward.
- We carefully glue all joints and areas damaged during installation with metallized tape.
- We fill the lathing on the ceiling and walls in increments of 0.5 meters and a thickness of 2-3 cm.
- We install wooden lining on the ceiling, then on the walls.
- We install an electric heater, fencing the surfaces around it with a galvanized sheet of metal.
Floor
First, boards (or OSB-3) of the subfloor are attached between the joists. The protruding edge of the bottom trim beam (150×100 mm) is used as a support.
Do-it-yourself change house floor installation.
Then the surface of the subfloor is covered with waterproofing film. For this purpose, dense polyethylene is often used, but roll materials with bitumen or polymer-bitumen impregnation Gidroizol are considered more reliable. The film is laid with an overlap between the strips of at least 20 cm, with the seams taped with construction tape. The edges of the strips should extend onto the walls (the same 20 cm).
Insulation is placed between the joists. It is better to choose mineral wool, for example URSA. Unlike polystyrene foam, it is not flammable and does not harbor rodents. Its only drawback is its hygroscopicity and the property of losing its insulating properties when saturated with moisture (the same condensate). Therefore, you need a gap between the finished floor covering and a vapor-permeable membrane or use Izospan, which does not allow water to pass through - this will protect the mineral wool from direct contact with water and allow water vapor to erode from it.
The best choice for a finished floor is a tongue and groove board. The tongue-and-groove connection principle of the coating makes it possible to further protect the insulation from water getting into it.
But you can lay the same OSB, and linoleum on top.
How to build summer cottage buildings from wooden pallets
Before you start creating a building, you should think about its design, as well as its future location. For small structures, it is acceptable to do everything for the eyes. For large buildings, you should calculate in advance all the dimensions of the parts and the load. Approximate calculations are undesirable, as they may affect reliability.
Drawing of a utility block for a summer cottage made from pallets
The process of creating buildings can be divided into two main parts: preparing materials and assembling the structure. Also, at any stage, decoration, painting, varnishing and other decorations of wood can be carried out.
Wooden pallet for country houses
Pallets are assembled pieces of wood. Therefore, the process of constructing buildings from wood is absolutely the same as in the case of using boards. However, in the end there are more possible variations.
Preparatory stage
Wooden pallets should be prepared for subsequent use. First of all, they should be inspected for the presence of various defects, the possibility of splinters and general integrity. If necessary, get rid of negative factors that may affect the safety of the structure.
If part of the pallet is rotten, then separate it from the whole part. Use a hammer and a double-sided crowbar or nail puller to remove all nails and screws. Smooth out all roughness with sandpaper.
Sand the pallets before starting construction
The preparatory stage is completed by shaping the wooden pallets for assembly. Here everything depends on the final design of the building. A power tool is best for preparing the workpiece, but a simple saw will suffice.
Preparation of workpieces according to the drawings
Assembly
Assembling the elements is the main stage of constructing a building for a summer house from wooden pallets. The further service life and reliability of the design will depend on its quality, as well as the thoughtfulness of the plan.
The assembly process is individual for each structure. But, there are also similarities. The main methods will be to fasten the pallets.
Connecting pallets with self-tapping screws
The simplest option for connecting would be to use nails or self-tapping screws. They simply attach the pallets to each other. In particularly thick places, hammer nails or screw in screws at an angle.
A more difficult option to implement is remote connections. With this type of fastening, additional materials are used. For example, metal fittings or wooden beams. They are applied to the junction of the pallets and then attached.
Fastening pallets with metal corners
The first method is less expensive in terms of materials and easier to implement, but provides low reliability of the design. The second method will make the structure more durable and strong, but requires additional materials.
Treatment
At any stage, additional processing of wooden pallets can be done. This can be done both for the purpose of decoration and with the intention of increasing the service life of the building.
First you need to degrease the wood and also remove microcracks. This is done by grinding the surfaces of the pallets with sandpaper. It is not necessary to process all the edges; only those that will be visible on the front and inside of the building are enough. This is necessary so that the paint and varnish last longer.
Before starting assembly, sand the pallets with sandpaper
After the tree has already been processed, the next stage begins. The pallet is painted on it. One layer will be enough. Enamel, oil-based, and aerosol paint will work. It will take a day to dry. After or instead of the painting process, you can apply a water-repellent varnish. Exterior products are preferred.
At the end of the work, treat the finished building for a summer house made of wooden pallets with varnish
Wood carving and other types of decoration are carried out before painting and varnish work.
Care
To increase the service life of summer cottage buildings made from wooden pallets, they must be properly cared for. Renew varnish and paint in a timely manner, as well as replace damaged pallets. In fact, it is quite simple, and all actions will be carried out quite rarely.
It is recommended to update paint and varnish once a season. The old layer is removed using sandpaper. As a result, nothing should remain on the wooden surface. Afterwards a new layer of paint is applied, dries during the day, then a layer of varnish.
The surface layer of buildings made from pallets needs to be renewed annually
Replacing damaged pallets is much more difficult. Most of their designs are modular. Then getting a separate pallet is either very difficult or impossible. It will be easier to assemble a new structure or think through a disassembly system in advance.
Blocks for building walls
It is convenient to erect small buildings from blocks, each of which consists of two boards from 1 to 2 m long. Short trimmings (liners) are nailed between the boards, which are always available in abundance during any construction. The length of these liners does not matter.
For blocks intended for the construction of walls, liners are installed on one side just above the edges of the boards. They form protrusions, a kind of ridge. On the other side of the block, the liners are recessed relative to the edges. The ridge of one block, inserted into the groove of another, forms a reliable connection, similar to the connection of tongue and groove boards. The same principle is used when constructing the corner and intermediate posts of the frame.
To save on expensive long materials with a large cross-section, they make a kind of “sandwich”. Blocks from pallets are installed on the inside, and long boards are placed on the outside, strengthening the structure. Before building a house from pallets, you should prepare the required number of such wall elements.
In particular, this is done when installing the lower and upper trim or rafter system.
Look at the house you built from pallets with your own hands - the photo illustrates all the stages of its assembly:
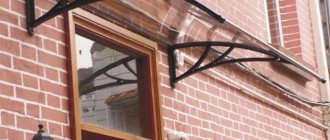
Door installation
The door to the barn can be made from an edged board, nailing it on both sides to a rectangular frame made of bars. It is better to assemble the door frame from high-quality lumber, securing the structure with long self-tapping screws and polyurethane foam. Once the box is secured in the opening, all that remains is to screw on the hinges, door handle, and locking hardware (such as padlock lugs).
What kind of cellar can you build in your country house? Read the article on our website.
We build an enclosure for a dog on a personal plot with our own hands.
How to install a plastic utility unit? The answer is in the article.
We make a fence with our own hands from solid pallets
It’s easy to make a fence for your vegetable garden or garden using pallets. This does not require the help of qualified craftsmen. You just need to first think through the installation algorithm step by step, so that later you don’t have to interrupt the work for redevelopment and correction of defects.
Preparatory stage
Before proceeding directly to installation, you need to carefully prepare. To begin with, it is worth calculating the size of the territory and the number of pallets that will be needed in the work. To do this, the length of the perimeter is divided by the length of the pallet. The resulting number will be the number of pallets. This calculation is correct if pallets of equal length are taken. In the case when their sizes are different, it is necessary to sort by length, and then do the calculation.
Then you need to purchase cement and crushed stone to fix the supports, the supports themselves are made of timber (10x10 cm) or metal pipe (at least 60 mm in diameter). The distance between the support pillars depends on how massive these elements will be. For a light fence made of individual boards, the interval between them will be about 2 m, for structures weighted with more powerful crossbars or additional decor - about 1.5 m. Taking these parameters into account, the amount of timber when purchasing is calculated.
You can also use a square metal profile. Before installation, metal poles are coated with a primer. You will need fasteners. They must be welded to the posts in places where the pallet fence will subsequently be attached. You can’t do the work without a screwdriver, a level, a tape measure, pliers, and a drill. Instead of the latter, you can use a regular shovel.
Pouring the foundation
The first and most important stage is the installation of supports. The stability and reliability of the structure will depend on it. You can simply hammer the posts into the ground with a sledgehammer, installing them in pre-dug holes. Having made them wider at the top, they are filled with concrete. Full filling is more reliable.
At the corners of the future fence, holes are dug or drilled, which should be approximately 40% wider than the support itself. The post is installed and crushed stone is poured into the hole. The solution is poured there. While the mixture has not hardened, the timber is leveled vertically. Then they begin to install other supports between the corner ones.
We process and assemble pallets
To make the fence without roughness, the pallets are processed with a grinding machine, after hammering the protruding nails deeper inside. If you don’t have a tool and you have enough time, you can use sandpaper. Then an antiseptic is applied to the boards, which prevents the development of rot and fungi and protects against insect attacks. Then the pallets are attached to the supports and fastened together using hardware.
It is better to take galvanized ones that are not subject to corrosion. Fastening to metal poles is carried out by screwing self-tapping screws into fixing elements welded to the supports. Unassembled pallets are attached to each other and to supports without additional beams. It is necessary to lift the pallets 15 cm from the ground when securing them.
Since wood is a “living” material, it is subject to slight deformation when exposed to atmospheric conditions. To prevent the fence from suffering from expansion during the summer heat, you can leave a gap of several millimeters between adjacent pallets.
We design and decorate
The natural pattern and texture of wood are decorative in themselves. Therefore, many summer residents limit themselves to covering the fence with varnish. But if you want to show your imagination, you can use wood paints for exterior work. Lovers of climbing plants can use a fence made of wooden pallets as a support for a hedge. Flowers in small pots will find their place on the posts and at the end of the fence.
Other crafts
There are still many different things that can be done in a short time using such inexpensive and pliable material as pallets.
Hanger
You can easily make a very practical and attractive hanger from pallets. It can become an original decoration for a country house or an ordinary city apartment.
To do such a thing, you will need to use the flooring from the pallet (its base). The side parts will need to be carefully removed. There is no need to throw away the leftovers right away - they can still be useful.
The base will need to be thoroughly sanded, coated with protective solutions, and then painted in a suitable color. All that remains is to attach a few hooks to the prepared part. Their number and intermediate distance depend only on the wishes of the owners. The finished structure is installed near the entrance door in the hallway.
Shoe shelf
A great idea is to create a shelf out of pallets to place pairs of shoes on.
You need to cut one pallet into 2 halves, and then put them on top of each other and fasten them together as securely as possible. In the space occupied by such a shelf, it will be possible to place many more shoes than before. In addition, a well-decorated shoe rack can easily become an original interior decoration.
Outbuildings
Few people know, but you can build an entire gazebo or outbuilding from pallets. Of course, these crafts will be more complex to make than shoe racks or hangers, but their functionality will be much higher.
Using the same principle, you can make gazebos, sheds, chicken coops, and so on from pallets. Ready-made designs are complemented with various decorations and decorations.
- If you plan to build a large structure, then you will need to prepare a good foundation for it. The choice of its type depends on the characteristics of the soil located on the site. In places where the soil is clayey, it is better to install a pile-type foundation. If the soil is rocky, then a tape option is suitable. The floor in a home-made building can be laid out with a beautiful terrace board or from the same pallets.
- The frame base for the construction of outbuildings can be made from wooden blocks or metal pipes. It is to them that the pallets will be attached in one or two layers.
- Using pallets it will be possible to completely cover absolutely all the walls of the gazebo or install them only to a certain height. One way or another, the interior space will still be sufficiently filled with natural light and will be well ventilated.
- The easiest way to construct the roof of a homemade gazebo on a summer cottage is from polycarbonate sheets. If polycarbonate seems too simple and boring, then you can use flexible tiles, ondulin or metal tiles instead.
- If you line the inner walls of the gazebo from pallets with plywood sheets, you will get a full-fledged summer house. From the outside it can be decorated with different plants and flowers. They should be placed in the “pockets” formed in the structure. Some summer residents decide to decorate the outside of such buildings with siding panels. As a result, few people can discern homemade pallets in such buildings.
Support for flowers
You can make neat flower stands from wooden pallets. To make them, a minimum of actions will be required: you just need to turn the pallet on its side and it can already be used as a stand for flowerpots with seedling material. Additional shelves with hooks will allow you to turn your homemade structure into a beautiful garden shelf.
Dog bed
From wooden pallets you can make not only furniture for people, but also for animals. Many summer residents often go to their plots in the company of four-legged friends. To take care of your pet, you can make a cozy and cute bed for him from wooden pallets: build small sides, and in the space between them put a soft mattress with thick foam rubber pillows. The end result is a very cute and convenient homemade product. This is an excellent alternative to a simple closed booth in fresh air conditions.
You can make a lot of cool products for your garden from pallets.
Use these wooden structures for beautiful vertical gardening in your summer cottage. The pallet will be an excellent base for hanging flower pots and entire containers of flowers.
How to make a sofa from pallets, watch the video.
Selection of materials
You need to start using the method “by contradiction” - which you definitely can’t use. Since we are talking about a building that will be used by children, the prohibition applies categorically.
Which pallets are not suitable for a children's playhouse:
- covered with paint - it can be toxic, therefore, if you want to make the house colored, you need to choose the appropriate composition yourself;
- already used in markets, large warehouses where chemical products were stored - this is unsafe;
- pallets marked IPPS (they were treated with chemicals).
If wooden pallets do not meet these characteristics, if they look clean, there are no defects, nothing is broken, they are suitable for building a house.
The minimum set of tools for construction is as follows:
- hand saw (or table saw);
- hammer and nail puller;
- screwdriver and electric drill;
- jigsaw
Be sure to stock up on film that will cover the structure that is not yet ready. However, construction may be delayed, and it is better not to leave untreated Euro pallets to be torn to pieces by the rain.
The construction components themselves must be returned to normal condition before work begins - if necessary, cleaned, ventilated, rubbed with a stiff brush. After this, the pallets should be disassembled into thick crossbars - the frame of the house will be built from them, but thin ones are optimal for building walls. A saw and a nail puller will be very useful at this stage.
Briefly about the main thing
Recycled pallets are an excellent building material. It can be used to create garden paths, light buildings, and play complexes.
Freight pallets are suitable for constructing furniture. They make comfortable sofas and beds, cabinets and even kitchen units. It is enough to show a little imagination in order to create beautiful accessories to decorate different rooms.
Usually decommissioned cargo containers are used for work. It costs almost nothing, so both garden decorations and interior items are very cheap.
Ratings 0
Choosing pallets and pallets for your shed
Pallets or pallets are containers that ensure the safety of goods during transportation. Such containers are made of plastic or wood
Moreover, for the construction of a barn it is worth paying attention to wooden pallets. One of the best options is larch
This wood has sufficient strength and is resistant to moisture. A larch barn will last a very long time.
In Russia, wooden pallets are made in the following sizes:
- 80x120 cm, flooring thickness 2.2 cm;
- 100x120 cm;
- 120x120 cm, board thickness up to 2.5 cm;
- 120x160 cm;
- 120x180 cm.
Pallets are also available in other sizes, for example, 32x40, 36x42 and 48x48 inches. Euro pallets have dimensions of 120x80x15 cm and 120x100x15 cm. Pallets with a deck thickness of 2.5 cm are best suited for construction.
Video description
The video shows just such an option for constructing a shed, where pallets and direct hangers are used:
Another option. It is connected to metal pipes. This is somewhat reminiscent of a frame structure, but the approach to fastening is completely different. To do this, pipes with a diameter of 32 or 40 mm are driven into the ground at the junction of the pallets. A pair of plates are pre-welded to them by electric welding, in which holes for fasteners are first made. That is, two pallets in one horizontal row are attached through plates with self-tapping screws to one pipe support.
Preparing for the construction of a bathhouse from pallets
The basis of any construction is proper design. Therefore, first you need to draw up a plan for the bathhouse. Traditionally, it consists of a dressing room, steam room, washing room and rest room. At this stage, it is necessary to calculate the amount of materials required and stock up on them. The main element of construction is the pallet. These designs must be selected with special care. Old products made from rotten wood are not suitable for this type of work. Broken, insect-damaged, rotten pallets are also not suitable for construction. In addition, they should all be the same size. As for fastening elements, you will need a lot of them to give rigidity to the structure. Self-tapping screws, nails, and corners must be chosen only galvanized ones, since they are not exposed to the negative effects of moisture. The best insulation material is mineral wool (in this case you need to protect it as much as possible from moisture) or expanded polystyrene. For maximum energy savings, it is also advisable to use aluminum foil. Among waterproofing materials, give preference to rolled ones. Do not forget also about antiseptic and fire-retardant compounds, which will need to be used to treat all the wood before building a bathhouse from pallets.
Drawing up a project with drawings
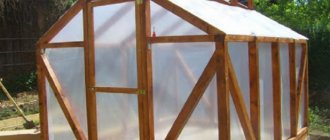
If you are planning a construction with more or less comfortable conditions, then it is best to build a warm shed from pallets using a frame scheme.
In this case, the design of the walls makes it possible to lay insulation and sew cladding onto the outer surface with siding or regular clapboard. A gable roof will ensure good drainage of rainwater and at the same time improve ventilation of the room.
If the barn will be used only for household needs, then the box can be built from pallets, only reinforced with frame inserts. In this case, the roof is made pitched, but it is better to also line the walls of the house with plastic or siding panels.
In the first case, the barn can be built on a columnar foundation, which greatly simplifies the process of constructing the building. In the second option, the foundation will need to be poured, otherwise the structure will be unstable.
Pallet selection
Pallets or pallets are containers that ensure the safety of goods during transportation. Such containers are made of plastic or wood
Moreover, for the construction of a barn it is worth paying attention to wooden pallets. One of the best options is larch
This wood has sufficient strength and is resistant to moisture. A larch barn will last a very long time.
In Russia, wooden pallets are made in the following sizes:
- 80x120 cm, flooring thickness 2.2 cm;
- 100x120 cm;
- 120x120 cm, board thickness up to 2.5 cm;
- 120x160 cm;
- 120x180 cm.
Pallets are also available in other sizes, for example, 32x40, 36x42 and 48x48 inches. Euro pallets have dimensions of 120x80x15 cm and 120x100x15 cm. Pallets with a deck thickness of 2.5 cm are best suited for construction.
Rules for choosing pallets for construction
It is better to purchase pallets from the manufacturer
Pallets are ready-made fragments for assembling the frame of a floor, walls, ceiling and even a roof. In some cases, blocks can be obtained for free or for a symbolic amount from transport companies, where scheduled write-offs of consumable property are regularly carried out.
Not all types of such products are suitable for such construction. An important role in the selection of raw materials for the construction of a house from pallets is played by its origin, storage and operating conditions.
The following products are not suitable for building a house:
- Covered with bright, sometimes reflective paint. Such mixtures may contain toxic substances harmful to human health.
- Previously used for selling vegetables, in open areas, stored in damp and cold rooms. Such wood absorbs a lot of moisture and unpleasant odors, which can disrupt the feeling of comfort and cause allergies.
- With IPPC marking. It means treatment with chemically active substances that are incomparable to residential construction and human habitation.
- Having dark spots, inclusions of mucus and many small holes. This is evidence of damage to the material by fungus, mold and insects.
When choosing material for a pallet house, it is necessary to study the condition of the wood. It should be clean, dry, even. The overall gray tint is not a cause for alarm - this is a natural property of the raw material. Stains of dried dirt are also not a problem. It could just be splashes from a passing car.
How to build a house from pallets (pallets) with your own hands: photos and videos of accessible technology
Economical construction is possible nowadays
After all, it is enough to pay attention to those materials that are production waste. You can build a house from pallets for next to nothing
To do this, you just need to find a manufacturer who sells materials for pickup.
A house made from pallets with your own hands can be not only a country house, but also a residential one - it all depends on the size of the structure and the degree of insulation of its wall structures.
Another advantage that a house made of pallets has is its light weight. Due to this, you can abandon massive types of expensive foundations and use the most common car tires as a basis.
Types of designs
The flexibility of polycarbonate allows you to create structures of various shapes and purposes.
The shape of the shower can be:
- square;
- rectangular;
- cylindrical.
According to their purpose, the following types of shower stalls are distinguished:
- simple;
- with a locker room;
- with toilet.
An outdoor shower for a summer residence is a frame structure of various shapes. A water tank is installed on top of the cabin. It’s not difficult to create a design with your own hands:
- Prepare the base.
- A strip foundation or foundation is erected on piles.
- The frame is constructed from aluminum or steel profiles.
- Lined with polycarbonate.
- Install the tank.
- They supply water.
- Arranging the interior space.
Wastewater is discharged in various ways:
- install a septic tank;
- pipes are used;
- construct collecting pallets;
- create drainage systems.
In some cases, a summer shower with hot water is installed in the country house. The easiest way is using water pipes. However, not every dacha community has this luxury. Sources of hot water supply can be instantaneous or storage water heater.
Most often, summer residents install a boiler for the kitchen and shower. In this case, the outdoor shower is adjacent to the outer wall of the kitchen.
Attention! For a family of three people, a storage water heater with a volume of 50 liters is installed. The water in it heats up within an hour.
Simple summer shower for a summer house made of polycarbonate
The base of a simple polycarbonate country shower design can be round or square.
Photo instructions for constructing a summer shower at the dacha made of polycarbonate with an absorption well:
- In the selected area, a pit is prepared according to the size of the shower stall, 1-1.5 m deep.
- A third of the pit is filled with fine gravel, the second third with medium gravel, and the third with coarse gravel. Formwork made of boards or bricks is installed around the perimeter and the foundation is poured, leaving a hole in the center for the drain.
- Assembling the frame. The second stage of pouring the foundation is carried out with a slope to the center.
- After the concrete has dried, the hole for draining the water is treated with bitumen mastic.
- The frame is covered with polycarbonate.
- A pallet made of boards is placed on the shower floor. Connect the water supply hose.
- A water tank is installed on the roof.
- Arranging the interior space of the cabin. The siphon, shelves and hooks are attached.
The country shower is ready. Before operation, check the water supply and drainage system. If deficiencies are found, they are eliminated.
Shower for a summer house made of polycarbonate with a changing room
When building a polycarbonate shower for a summer house with a dressing room, you should take into account its differences from a simple design. They consist of dividing the space into two sections using a waterproof bathroom curtain or a lightweight door.
To drain water in the floor, a slope is provided under the drain with a grate. The wooden sheathing will not allow moisture to accumulate in one place and will help the cabin dry out quickly.
Instructions for installing a shower with a changing room and a heated tank:
Shower with toilet for a summer house made of polycarbonate
Summer residents often set up a utility block at their dacha, which solves several problems. It includes:
- shower;
- toilet;
- storage place for garden tools.
Sometimes the utility block includes a kitchen. The summer building is built from inexpensive building materials. A frame structure made of profiles, covered with polycarbonate, is a budget option.
A place on a summer cottage for arranging a utility block is selected according to the same parameters as a toilet
It is important that wastewater does not enter the source of drinking water, so if there is a well on the site, the distance from it to the utility block should not be less than 30 m
Before arranging the foundation for a shower and toilet, a cesspool is prepared.
A frame made of a metal profile or a 4*4 cm wooden beam is erected on the equipped foundation. A base is erected for the toilet seat.
The next step is to erect a gable roof. Set up a base in the shower room. The frame and interior are sheathed.
Pros and cons of pallets
The main advantage of choosing pallets for the construction of gazebos is the environmental friendliness of the wood. In addition, the material has the following advantages:
- ease of processing and installation;
- the ability to implement various design ideas;
- open design, which allows air to circulate freely (a favorable atmosphere is maintained inside the building);
- low cost of material;
- the possibility of making structural elements with your own hands;
- strength of the structure.
The downside is low resistance to fire and damage by rodents. The material requires additional treatment with antiseptics and fire retardants.