Designers and builders have several options for roofing designs at their disposal. Choosing the optimal option is a responsible matter, because... The reliability and durability of the entire structure depends on it.
It is quite logical to ask questions about how to properly make a hip roof of a house with your own hands, what distinguishes it and when is it most suitable? To answer them, you should consider the structural and technological features of such a roof.
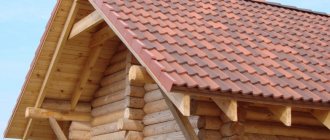
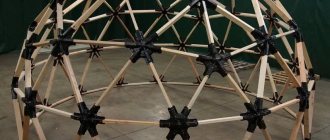
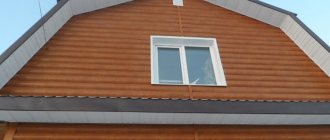
Photo of a hipped roof
Types (tent, hip, half-hip)
Main types of hipped roofs:
- Tent type . The roof has 4 triangular slopes, the tops of which converge at one point. Usually its base has the shape of a square, and all slopes are equal in area. This design is suitable for a house in which the lengths of all walls are equal. Typically these are small buildings. The roof is particularly attractive.
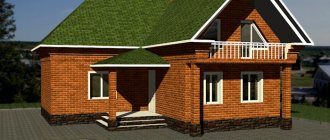
- The classic option is the Dutch hip roof . A rectangle is formed at its base. The roof resembles a gable structure, because the slopes, supported by long walls, converge at the top along a line, forming a ridge run. However, in a hip roof, it is not the pediment that is erected above the short walls, but slopes in the shape of a triangle. As a result, the roof is made up of 2 trapezoids and 2 triangles, on opposite sides of the house. This roof has versatility. It is suitable for any structures, especially when erected in regions where significant winds can blow from all directions.
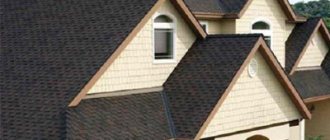
- Half hip type . Instead of triangular slopes, more complex structures are provided in it, which accordingly changes the side edges of the trapezoidal slopes. There are 2 main varieties - Dutch and Danish half-hip roof. In the first case, the triangular slope is located at the top, but does not descend to the entire height of the roof. The lower part ends with a vertical wall in the shape of a trapezoid. This design allows you to equip a convenient entrance to the attic or attic window. In the second option, the vertical element has the shape of a triangle and is located in the upper part. The bottom is made in the form of a trapezoidal slope. The upper gable provides the possibility of installing an attic window.
All types of hipped roofs have an attractive appearance and have long been popular abroad. Recently, they are finding more and more admirers in Russia.
Differences for different types of roofing
Taking into account the angular shape of the slopes, small-piece or soft types of roofing materials are better suited for covering such roofs. The frame of the structure is calculated taking into account their specific weight, but is designed according to general requirements, regardless of the chosen coating. The difference is manifested in the type of sheathing - for soft roofs it is laid solid, for other types - loose, taking into account the manufacturer’s recommendations.
With rare exceptions, the space under the roofing is made ventilated , with fresh air entering through the eaves and exiting at the highest points of the roof.
In systems with solid sheathing, point aerators (from 1 piece per 100 m2 of roof) and air intake devices mounted just above the base of the slopes help ensure complete ventilation of the pie.
Advantages and disadvantages
The following advantages of a hipped roof are noted:
- The absence of a pediment makes it possible to increase the resistance of the structure to wind loads from all sides, which is important for regions with variable wind roses.
- Effective drainage of precipitation and melt water around the entire perimeter of the house.
- Possibility of arranging a comfortable attic of considerable size.
- Attractive appearance.
Disadvantages include more complex design and construction and increased costs. This design is more often used in luxury homes, where special attention is paid to design.
Mounting the Mauerlat
This element is an important component of any pitched roof. There are two options for installing it - reinforce it or use concrete blocks or a wooden base.
The first option involves laying an armored belt on strong walls made of concrete materials. Studs are inserted into the concrete to mount the Mauerlat. The belt is laid narrower than the walls, so that there is room for insulation. Before installing the Mauerlat, waterproofing is laid.
The second method is to use staples, pins, or wire for fastening.
Design (drawings) and necessary calculations
In order to make a hipped roof, it is necessary to correctly make calculations and establish the basic parameters of the roof . It is most important to determine its area, because it determines the operating loads, the size and number of rafters, the angle of inclination of the slopes, on which the height of the roof depends.
For the construction of a hipped roof, detailed drawings must be developed. Without knowing the exact dimensions of all roof elements, it is impossible to reduce them into a single whole. It is best to create a 3D model using a special computer program. With its help, the exact dimensions of all parts will be determined.
Area calculation
The total roof area consists of the areas of 4 slopes. The calculations use formulas for isosceles triangles and rectangles.
In a hip roof, the total roof area will be S=4Sc=4(aha/2cosA)/2 =aha/cosA, where:
- a is the length of the house wall,
- A is the angle of inclination of the slopes.
In a hip roof, the total area consists of 2 triangles and 2 trapezoids: S=2(b+c)h/2 +2ah/2sinA = h(b+c)+ah/sinA, where:
- a is the width of the house,
- b – length of the house,
- с – length of the ridge purlin (ridge),
- h – roof height above the ceiling,
- A – angle of inclination of the triangular slope.
When calculating, it is necessary to take into account the length of the overhang, which is formed on all sides of the roof. To do this, add 3-5% to the calculated area, depending on the length of the overhang.
Calculation of rafter cross-section
The complete calculation of the rafter system is quite complex . It takes into account all operational loads, rafter length, slope angle, installation pitch, support reactions and other factors.
It is not always possible to carry it out on your own, and therefore it is recommended to use building codes.
The choice of rafter cross-section is based on the strength properties of the material, taking into account a safety factor of about 0.8 . In general, the calculation of a hip roof is in many ways similar to the calculation of a gable roof.
Recommendations for choosing a rafter section, taking into account some factors, are summarized in Table 1.
Table 1. Section of the rafters of a hip hip roof:
| Rafter length, m | Rafter dimensions, mm | Rafter installation pitch, m | |
| beam (paired board) | Log, diameter | ||
| Until 3 | 80x100 90x100 90x160 | 100 150 160 | 1,1 – 1,4 1,4 – 1,7 1,7 — 2,2 |
| 3- 4 | 80x160 80x180 90x180 | 160 180 190 | 1,1 – 1,4 1,4 – 1,7 1,7 — 2,2 |
| 4- 5 | 80x200 100x200 | 200 200 | 1,1 – 1,4 1,4 – 1,8 |
| 5- 5,8 | 100x200 | 200 | 1,1 – 1,5 |
| Up to 6.5 | 120x220 | 240 | 1,1 – 1,4 |
The length of the rafters does not exceed 6.5 m. If it is necessary to obtain a longer length, it is necessary to make splices and introduce additional reinforcing elements.
Selecting the angle of inclination
The angle of inclination of the slopes is selected based on the snow and wind load, the roofing materials used and the size of the attic space. It can vary widely - from 5 to 65°.
For regions with significant snow load, an angle of 45-65° is required. Moreover, with a slope of 60%, the load from snow can not be taken into account at all, because it does not accumulate on the roof.
However, as the slope increases, the windage of the structure increases, which reduces wind resistance. This load can be ignored at an angle of less than 25°E. For regions where strong winds are possible, the inclination should not exceed 45-48°.
Taking into account the properties of various roofing materials and the characteristics of their application, the following angles of inclination are recommended:
- soft, rolled materials – from 5 to 20°;
- slate, metal, asbestos-cement sheets – 12-65°;
- ceramic tiles – 22-60°.
It is also important to take into account that with an increase in the angle of inclination of the slope, the height of the roof increases, and therefore the consumption of materials. In each specific case, you should look for the optimal ratio between the size of the attic space and the cost of materials.
Rafter pitch
The distance between the rafters or the pitch of their installation depends on the operational loads, as well as the size of the structure and the rafters themselves. The weight of the roofing material is important. In addition, the dimensions of the roofing elements or the width of the rolls of soft materials are taken into account.
Minimal steps required for slate, metal, tiles. They are installed within 0.6-0.8 m. When laying a soft roof, the pitch increases to 1.4-1.6 m.
Another important factor is rafter length . So, with a length of more than 4 m, the optimal pitch for a soft roof is 1-1.2 m.
Preparing for work
Before starting the construction of a hip roof, you should carefully study all available information about the construction of such a roof, prepare all materials and tools, having previously made calculations.
Calculation of materials
To make calculations, you need to acquire a special measuring rod. It can be built from plywood five centimeters wide. We will need the following parameters:
- length and width of the building;
- height of the ridge part.
The calculations themselves are not as complicated as they might seem at first glance:
- The total length of the mauerlat beams is calculated by simply summing twice the length and twice the width of the base if the house has a rectangular shape. If the base of the structure is a square, then its side is simply multiplied by 4.
- The size of the central rafter is found using the Pythagorean theorem. The central rafter is nothing more than the hypotenuse of a right triangle, and its value can be obtained by taking the square root of the sum of the squares of two values (the height of the ridge part and half the side of the house).
- The length of the sloped rafter is calculated in a similar way. The only difference is that the sides of the right triangle are now half the width of the house and the central rafter.
All the necessary parameters of a hip roof can be calculated by referring to one of the online calculators that are easy to find on the Internet.
Required tools and materials
To install a hip roof, you should prepare the following tools:
- Bulgarian.
- Hand saw and gasoline saw.
- Jigsaw.
- Hammer.
- Plane.
- Electric drill.
For the construction of a hip roof, it is recommended to use only one type of wood. To fasten roofing elements, nails, dowels, steel brackets and self-tapping screws are required. You should also take care of the roofing material, the choice of which depends on the preferences of the developer and his financial capabilities.
Preparatory stage
After developing the project and drawing up drawings (models) of the hipped roof, preparations for the construction of the roof begin. At this stage, it is important to choose the right material, control its quality and prepare the necessary tools.
Before purchasing basic and consumable materials, it is necessary to calculate their need , because... they must be purchased immediately for the entire volume of construction, but without excessive reserves.
Particular attention is paid to wooden elements for the rafter system. A board, timber or log of coniferous species is most suitable for it. Larch stands out especially for its strength and resistance to decay. If you have financial resources, you can use oak.
The calculation of the need for rafters is made taking into account the installation pitch and the height of the roof (the angle of inclination of the slope). The length of each rafter is determined as L=h/sinA. The lumber of the ale rafter system must be of high quality and have a residual moisture content of no more than 20%.
Roofing material is selected based on financial capabilities, size of the house and overall design. It could be:
- rolled material (including ondulin),
- slate,
- tiles,
- corrugated sheets,
- metal tiles,
- asbestos-cement or metal sheets.
For waterproofing, bitumen mastic, roofing felt or polymer films are usually chosen . Mineral wool and expanded polystyrene (foam plastic) are most often used as insulation.
The need for these materials is selected based on the roof area, taking into account the overlap of elements or strips, as well as inevitable waste.
Required Tools
Before starting the main work, you need to prepare the following tool:
- Bulgarian,
- hacksaw,
- electric drill,
- screwdriver,
- plane,
- axe,
- hammer,
- pliers,
- screwdriver,
- chisel,
- construction knife,
- scissors,
- construction or furniture stapler,
- paint brush and roller,
- building level,
- plumb line,
- roulette,
- metal ruler,
- square
For large amounts of work, it is advisable to have a circular saw.
Flaws
- Technical difficulty. Without practical skills, it is difficult to cope with work. It is better to entrust the construction to specialists.
- A roof will require more materials than a gable roof. Since four slopes imply the same number of connections, and they will have to be trimmed. Roofing material will cost more according to the estimate.
- The attic is small, since rafters, supports, and braces take up a lot of space. Hip structures are not used for attic construction.
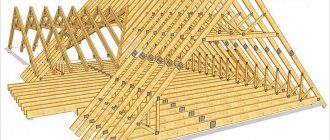
Construction of the rafter system
The basis of a hipped roof is a rafter system with reinforcing elements. However, other design details that provide the necessary strength and reliability are no less important.
Support beam
To ensure a reliable connection of the rafters with the load-bearing walls and uniform distribution of loads, a Mauerlat is mounted. This is a beam or beam attached to the top of the walls around the entire perimeter of the house .
Typically, a wooden beam measuring 10x10, 10x15 or 15x15 cm is used. It must be positioned strictly horizontally and form a continuous support frame.
Sloping legs
At the junction of the long and short slopes of the hipped roof, on both sides of the house, inclined rafter pairs - slanted legs - are installed. The length of the rafters in them exceeds the length of other rafters that form the slopes.
In addition, the load on this element is increased. Taking this into account, paired boards are usually used to make legs . Their total size reaches 10x15 or 10x20 cm.
Ridge beam
In hip roofs, the rafter legs in the upper part are connected by a beam, called a ridge purlin or ridge. It provides rigidity to the entire rafter system and serves as an upper support for the racks.
There is no such element in a tent structure. For the ridge, a 10x10 cm beam is most often used .
Scheme of arrangement of the supporting structure
The basis of the supporting structure of the roof is made up of rafters, which, in fact, form its load-bearing frame. In hip roofs, in addition to slanted legs, two types of rafters are used - main rafter legs (pairs) and outer (shortened) rafters.
The rafter pairs form long slopes, rest on the Mauerlat below, and on the ridge beam at the top. Their design is similar to the rafters of a gable roof.
External rafters connect the slanted legs to the mauerlat. The choice of rafter section is given above.
Strengthening elements
The rafter system must be strong and rigid. The following elements are used to strengthen the rafters:
- Racks are vertical beams that support the rafter system and hold it at the desired height.
- Sprengels are inclined elements supporting the rafters of a short slope.
- A bench is a beam that serves as a support for the racks. It is laid on internal walls or ceilings.
- The crossbar and tie are horizontal beams that fasten the rafter pairs in the upper and lower parts, respectively.
- Struts are inclined supports that strengthen the racks. They serve to increase the strength of the entire structure.
- Fills are boards that form an overhang.
The need for additional reinforcing elements determines the size of the span to be covered and the length of the rafters.
Materials for a hip roof
Any type of roof requires a rafter system consisting of standard elements. The supporting structure includes mauerlats, tie rods, rafters and support posts. There must also be a ridge beam and sheathing. To build a roof of four slopes, wood species such as pine, larch or spruce are usually used. There should be no defects on the lumber, and the maximum permissible humidity is 22%.
Rafter board for creating mauerlats Source derevyannyy.com
For the production of rafters, 50*150 boards are most often used, as mentioned above. The same board is used to create mauerlats. But for the manufacture of load-bearing structures, other sizes can also be used, such as 50*100 or 50*200. Experts buy threaded metal studs as reinforcing ties. It is also necessary to have boards for sheathing and plates for joining elements together.
Before proceeding with installation, be sure to impregnate all wooden parts with antiseptics and fire retardants. This allows you to protect the roof from fungi and fire.
For a 4-pitched roof, like for any other, it is necessary to have a roofing pie consisting of a vapor barrier and waterproofing, as well as a layer of insulation and sheathing. In order to give additional rigidity to the roof and increase the support area of the finishing coating, a counter batten is used.
Creating a roofing pie and finishing counter-lattice Source kakpostroit.su
Any materials can be used as roofing. It can be slate or corrugated board, shingles or planks, metal tiles or cathepal and many other options. When choosing them, you need to pay attention to quality, resistance to stress and decorative properties.
Step-by-step instructions for constructing a 4-pitched roof for a private house
Step-by-step instructions for constructing a hipped roof for a house or gazebo include several characteristic steps. They should be carried out in a given sequence, taking into account technological nuances.
Mauerlat installation
When constructing load-bearing walls made of bricks or aerated blocks, an armored belt is formed on their upper part - a concrete pour with a reinforcement frame. When pouring, vertical rods made of steel reinforcement with a diameter of 10-14 mm with an outward projection of up to 10 cm are installed into it. They serve to secure the Mauerlat.
Before installing the mauerat on the beam, the locations of the rods are carefully marked. Holes are drilled according to the markings. The Mauerlat should form a continuous rectangular frame around the entire perimeter of the house.
To do this, the ends of the beams are securely joined by joining according to the “half-tree” principle. At the ends, a sample is made to the middle of the beam at a length of 25-30 cm .
The elements are superimposed on each other and securely fastened with nails, self-tapping screws and additional staples and overlays. The frame is pressed tightly onto the rods using a hammer.
Horizontality is controlled by the building level. For greater reliability, anchor bolts are sometimes used instead of rods .
Laying the beds
The next step is to create support for the racks of the rafter system. The beds are made from horizontal beams measuring 10x10 cm or paired boards.
They can be installed on load-bearing internal walls . If these are not provided for in the project, then you will have to mount a floor beam, and install a bench on it.
Mounting racks and ridge
Racks are mounted on the bench. First, supports are installed under the top of the mowing legs, and then, between them, racks for rafter pairs are fixed. The installation pitch must correspond to the pitch of the rafter system. The racks are attached to the bench using angles and steel plates.
To fix them until construction is completed, temporary reinforcement is used in the form of slopes (supports) made of boards.
It is important to ensure a clear line for the entire row of posts in the center of the house, as well as absolutely the same height, which sets the height of the roof. The verticality of the racks is controlled by a plumb line.
Next, a ridge beam is attached to the top of the posts . It is fastened with nails, and the joint is reinforced with metal corners and plates. If the roof span is significant, struts are installed. They are located on both sides of the post, and at an angle connect the place where the post is attached to the bed with the ridge beam.
When erecting a hip roof, the racks are installed diagonally. The external rafters are directly attached to them, and therefore the length of the racks must correspond to the angle of inclination of the slope.
Installation of rafters
Installation of rafters begins with the main pairs with a given pitch . The upper end of the beam is cut at the desired angle and attached to the ridge.
The lower end forms an overhang, and the rafters are attached to the mauerlat “on the passage”. To do this, a corresponding cutout is made in it according to the size of the rafters.
Next, the external rafters are installed . They are cut to the required length. The upper end is fixed to the slanting leg, and the lower end to the mauerlat in the same way as the main rafters.
If the rafters are long, a crossbar is installed between them in the upper part. It rigidly connects the bars into a pair with a certain angle.
To secure large external rafters, a sprengel is installed on a triangular slope. It connects the rafters to the floor (ceiling) at an angle, which strengthens the structure. Truss posts are most often used in a tent system.
The rafters can be fastened rigidly or hingedly (sliding fastening) . The first option is used for houses with walls that are not subject to shrinkage (brick, blocks). Sliding fastening is necessary for wooden structures. For this purpose, special corners and strips are used, as well as adjustable anchors.
Lathing
To give final rigidity to the rafter system and create a base for attaching the roofing, lathing is made. It is performed by installing edged boards 2-2.5 cm thick and at least 10 cm wide between the rafters. The joint of the boards should be in the middle of the beam.
The following lathing design is possible:
- Solid. The boards are fitted close to each other. It is used for soft roofing and tiles.
- Discharged. The gap between the boards is 20-25 cm. This is a common option for laying slate and corrugated sheets.
- Rare. The gap can exceed 50 cm. This lathing is only suitable for large and solid roofing sheets.
The sheathing boards are attached directly to the rafter beams using nails or self-tapping screws.
Insulation
A thermal insulation layer is installed on top of the sheathing . For these purposes, mineral wool mats or foam plastic (expanded polystyrene) boards are most often used.
They are installed without gaps. The joint should be filled with foam and sealed with tape. Fastening is carried out with nails or self-tapping screws with a large head.
After insulating the roof, it is necessary to ensure reliable waterproofing. For this, roofing felt or thick polyethylene film is used. The strips of material are laid with an overlap of at least 15 cm. The joint is sealed with tape.
Roof covering
Each roofing material requires an individual approach to installation . All steps for its implementation are specified in the product instructions, and they must be strictly followed. The coating is laid in the direction from bottom to top.
It is important to use the fasteners that are designed for this material. When fastening with other elements, you can cause the appearance of microcracks, which will lead to rapid destruction of the coating.
How to build an overhang?
The eaves and gable overhang of the roof are needed to remove flowing moisture away from the wall of the house . This is the final element of the roof and forms the final appearance. It must have a length of at least 25-30 cm. Most often, the length is increased to 45-70 cm.
To make it attractive, this element should be specially finished. Its aesthetic appearance is given by lining, block house, plastic panels, wooden products, and metal strips. A special design style is provided by ready-made elements for the overhang - soffits.
Hip roof installation technologies
The first step during roofing work is to lay the Mauerlats. For wooden houses, this component is the last segment of the frame. They fasten it with notches. If the walls are made of brick, then the foundation of the entire roof is laid and fixed with mortar and metal studs.
At the same time, in order for the fittings to coincide with the holes, the board is first placed on the surface of the wall with studs, and then hit with a hammer. There will be marks on the wood in which holes will need to be drilled. The hipped roof scheme assumes the presence of mauerlats on all load-bearing walls.
Creation of mauerlats for subsequent installation of a hipped roof Source mojdominfo.ru
A support board is laid perpendicular to the floor beams. A double board 50*200 with a gap in the middle is often used as such an element. To achieve the required distance, bars are placed between the beams, and then self-tapping screws are screwed in or nails are driven in. Its ends should extend beyond the boundaries of the Mauerlats by about 15 centimeters.
Next, three boards, pre-cut to length, are installed on the central beam, using a plumb line. A ridge board is fixed to the upper bases of the posts. The rafter system of a hipped roof can be supplemented with beams made of timber supporting the racks. This is necessary to increase the reliability and stability of the structure.
Construction of the rafter system Source orchardo.ru