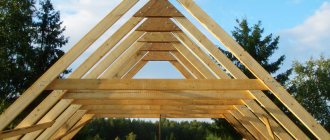
The roof, along with the foundation and walls, is one of the main structural elements of the structure, providing protection to the interior of the building from precipitation, waterlogging, temperature changes, wind loads and other influences. At the same time, the roofing system is the most bulky, difficult-to-build structure in the house, since it consists of a huge number of individual components and connections. For most beginning craftsmen, construction turns into full test, which has no end in sight - it is necessary to draw up a project, carry out many calculations, draw diagrams, manufacture elements and, ultimately, assemble everything into a single structure.
The online construction calculator for roof calculations from the KALK.PRO service allows you to facilitate the process of erecting a roofing structure at the stage of preparatory work, providing a detailed report with the parameters of individual elements and the amount of lumber for their manufacture, providing detailed drawings of the rafter system and sheathing, as well as visualizing the resulting structure in the form 3D models for subsequent evaluation. In addition, our program takes into account all additional structural elements of the roof, including Mauerlat, vapor barrier, insulation, counter-lattice, OSB sheets. It is planned to introduce wind and snow load recording soon.
The 3D roof designer is simple, convenient and does not require special skills to use - you will need to measure the dimensions of the building, select the type of roof (hard, soft) and indicate the characteristics of the materials used. If invalid values are entered, the program will stop the calculation and indicate the cell where exactly the error was made. Also on the tab of each calculator there is a detailed text instruction with a description of all fields and symbols, which are duplicated in the corresponding images for clarity.
Save time and money by using professional roof calculations on the KALK.PRO website - we have been calculating roofs for more than 5 years and have helped implement over 1000 different projects!
Mansard roof calculation online calculator
To calculate the roof using the online calculator, you must correctly fill in all the available fields and click the “Calculate” button.
We recommend taking measurements as accurately as possible and double-checking the entered values several times in order to avoid problems in the future when assembling the structure, since you may have to re-manufacture a large number of elements. Let us remind you that our calculators have built-in functionality to perform:
- calculation of the rafter system;
- lumber calculation;
- calculation of metal tiles;
- roof area calculation;
- calculation of the roof slope angle.
You don't need to look for other tools on the Internet or bother with manual calculations.
Detailed step-by-step text instructions with graphical annotations for each tool are provided on the corresponding calculator tabs in the Help section. We also suggest watching a short overview video of calculating a gable structure, which demonstrates the main capabilities of the roof calculator.
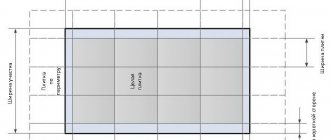
Please indicate the required dimensions in millimeters
X - house width C - overhang size B - roof length
This method of organization can be performed in two forms:
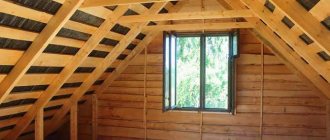
- Attic gable. With this device, the height from the zero level of the roof to the ridge is up to 4 meters, and the angle of inclination of the roof reaches 55 degrees. However, due to the strong slope of the walls, only the space in the middle is useful.
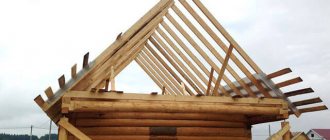
- A mansard sloping roof is a type of gable roof. This roofing arrangement differs from a conventional gable roofing arrangement in the presence of joints on the planes. The plane of each side, descending at a certain angle, is divided into two parts. The second part, lower, acquires an even greater angle of incidence. Visually, the geometry of such a roof turns out to be broken.
The main advantage of the broken attic type is that it allows you to avoid significant financial costs and at the same time significantly increase the usable space of the house.
After all, organizing such a device is easier and cheaper than building an additional floor and then covering it with a roof.
In addition, with the help of a mansard roof, you can significantly transform an existing house with an old roof.
Gable mansard roof
Broken mansard roof
Third stage
The next stage is the construction of a drawing, a planned sketch, where the features of the shape, size and color scheme are approved. Working out every detail requires perseverance and patience; a sketch is a visualization that conveys a picture of what is planned.
After which you should develop a step-by-step plan for constructing the idealized. The final stage of the 3rd stage is drawing up the final estimate. Where information about the formation and expenditure of funds for the implementation of the construction of the project will be indicated.
At this stage, work can already begin, but subject to compliance with all rules and calculations. The Internet can also help with calculations; having special computing and construction calculators, it will not be difficult to calculate each step down to the millimeter. In it you can find out the price that all the work will cost and be included in the estimate.
Why are our tools better?
Close cooperation with roof manufacturers
Highest detail in drawings and 3D models
Final report with a list of required materials
Ready-made estimate for the construction of the structure by the contractor
Technical support helps when working with the calculator
Positive feedback and a large number of completed projects
You can calculate the roof on any website and this is a fact, but you should be aware that, unlike other resources, our project has a long history, positive reviews, prompt technical support and regularly updates its work algorithms, eliminating the occurrence of errors. Feedback with users is established and works flawlessly; any visitor can ask a question, and KALK.PRO will try to answer it.
Designer capabilities
The KALK.PRO service is a universal assistant for beginners and professional craftsmen, with the help of which you can make a truly reliable and safe design. However, it is necessary to understand that the program calculates the roof based on the entered data and does not take into account their correctness, except in exceptional cases when the structure is guaranteed to be unstable.
When building a roof (especially for the first time), we recommend paying attention to the following regulatory documents: SNiP 2.01.07-85 (SP 20.13330.2010) “Loads and impacts”, SNiP II-26-76 (SP 17.13330.2017) “ Roofs", TSN 31-308-97 "Roofs. Technical requirements and acceptance rules. Moscow region", SP 31-101-97 "Design and construction of roofs".
We currently provide calculations for the following roofing structures:
- roof is pitched;
- gable roof (gable, gable);
- hip roof;
- The roof is hipped (hipped).
We also have separate simplified calculators for calculating the rafter system of a gable and single-pitch roof - try it, maybe this is exactly what you need!
Among the main features of the designer, it is necessary to highlight (– only on KALK.PRO):
- Units. You can select the most convenient units of measurement (mm, cm, m, inches, feet), and the program will automatically convert all values in the calculator fields and calculation results.
- Roof type. When using a soft roof, it becomes possible to take into account the substrate in the form of OSB sheets.
- Roof parameters. You can specify the expected height of the structure, side outlet and overhang. In some roof calculators, the extreme position of the rafters (on the edge, against the wall) is also selected.
- Dimensions of the house. You can set the dimensions of the house: width, length of the house box and wall thickness (the latter affects the layout of the rafters, since the thickness of the gables is taken into account). The height of the walls is only needed to create a correct 3D model.
- Mauerlat. Only from us you get a separate calculation of the Mauerlat for the side and end slopes.
- Calculation of rafters. In addition to entering standard values for width/thickness and the distance between adjacent elements, for a more correct calculation of the rafter system, we can also specify the cutting depth.
- Insulation. The amount of insulation is automatically substituted into the results, the thickness of the material is taken equal to the thickness of the rafters and fills all the space between them.
- Vapor barrier. A block for entering the characteristics (width, length) of a waterproofing material with the ability to take into account overlaps from the sides and top.
- Lathing and counter-lattice. There is functionality for taking into account the parameters of the lathing and counter-lattice - you can enter the width/thickness of the board and the distance between them.
- OSB sheets. In the case of using a soft roof, the parameters of OSB sheets are taken into account in the calculations.
- Roofing materials. This block allows you to calculate metal tiles, corrugated sheets, ondulin and any other roofing material using known sheet parameters.
Our professional roofing calculators are used by many professionals - if you want to use them for commercial purposes, you can remove our watermark and upload your logo.
Recommendations and notes on roofing
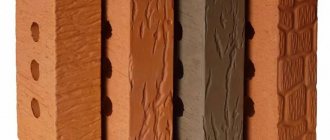
A variety of roofing types are used for roofing: flat and profile, rolled, soft, rigid, piece.
Let's look at the main types of roofing used in the construction of mansard roofs:
- Metal tiles are cold-rolled galvanized steel sheets coated with a polymer coating. Metal tiles are used everywhere - as roofing for private houses, industrial buildings, garages, kiosks, and summer cottages.
- Roofing sheeting. The composition of the material is similar to metal tiles. It is most often used in the construction of industrial buildings, but due to its low cost it can be used for the construction of attics;
- Ondulin. One of the cheapest materials. Consists of cellulose fibers using bitumen and polymer additives. Painted with heat-resistant paint. It is rarely chosen as a roofing covering due to fading in the sun.
- Soft tiles - shinglas. It is made of fiberglass using bitumen, on top of which stone chips are applied, which resists sunlight and protects against fading.
- Ceramic tiles. One of the oldest types of roofing. To make it, clay is fired at high temperatures, as a result of which it acquires hardness and strength.
- Sand-cement tiles. The appearance is similar to clay tiles, but is cheaper to produce. It is made from a solution of cement and sand by pressing. The surface is smooth or textured. Used in the construction of private houses, cottages, dachas.
- Slate roofing. Extremely rare. It is characterized by a very high cost with the highest technical characteristics. Used in the construction of unique luxury houses and cottages. Such roofing can be found on ancient European castles.
READ MORE: Calculator for calculating the amount of concrete for pouring a floor in a garage - with explanations for use
After entering all the initial parameters, you receive a comprehensive report, which contains a ready-made estimate for the manufacture of the structure with detailed calculations of lumber and roofing, a set of drawings of all roof elements in various projections and an adaptive 3D model. The roof area will also be automatically calculated and the angle of inclination of the slope and rafters will be available.
This collection provides recommendations on the construction of roofs and roofs, in particular. We hope you find this information useful for general information and when working with our calculators.
Roof calculation result
After entering all the initial parameters, you receive a comprehensive report, which contains a ready-made estimate for the manufacture of the structure with detailed calculations of lumber and roofing, a set of drawings of all roof elements in various projections and an adaptive 3D model. The roof area will also be automatically calculated and the angle of inclination of the slope and rafters will be available. Unlike other services, we reveal each element of the structure in detail and do not generalize the parameters so that you can use our results as a guide to action .
All online roof calculations are automatically saved in your personal account and stored for six months. You can also download all the results to your device in PDF format, send them by email, save them as bookmarks or share with colleagues on social networks. Drawings in PNG format and a 3D model in OBJ format are available separately.
Roof drawings with dimensions
Drawings are an integral element of the design documentation of any structure, since they represent a kind of “working map” for installation work. Many professionals prefer to make a roof plan with their own hands in specialized programs such as AutoCAD, ArchiCAD, etc., however, for a novice master, independent development without proper work experience usually ends before it even begins, or ends very badly. It must be remembered that any accidental mistake can lead to unexpected expenses and disruption of the structure of the entire structure.
Using the online roofing calculator KALK.PRO you eliminate errors in calculations, since the graphics are built on the basis of actually entered parameters, the correctness of which can be double-checked on an interactive 3D model. Depending on the roof design, we provide a different number of drawings - complex systems are described in more detail. For example, when calculating a bulky hip roof, the kit contains 12 design drawings with a detailed description of the rafter system (in different projections), its elements, sheathing, places of cuts and laying of roofing materials.
When creating the roofing calculator, we made every possible effort to ensure that the subsequent assembly of the structure and the layout of individual elements, in particular, was as fast and comfortable as possible.
3D model
Architectural visualization allows you to visually evaluate the planned structure in real proportions, making sure that the project is completed with high quality and without errors. However, spatial modeling is a painstaking and technically complex process that cannot be performed without special skills, and such services cost quite a lot of money from professional designers.
However, when you perform a roof calculation on our website, you receive a FREE, adaptive, dimensionally accurate 3D model that you can interact with and download in OBJ format to later load into your editing software.
How to calculate a roof using an online calculator?
Before calculating the rafter system, let’s highlight its main system-forming elements:
- Rafters;
- Racks;
- Mauerlat;
- Struts;
- Lathing;
- Skate;
- Roof;
- Connection elements.
You should also remember a few rules:
- For the construction of frame components, it is necessary to use beams with a section of 100 * 100 mm;
- Wood moisture content should be no more than 15%;
- Wooden elements must be treated with an antiseptic.
To calculate all elements, the first step is to determine the permanent and temporary loads to which the rafter system is subjected.
These include: the dead weight of the roof and natural phenomena in the form of wind, rain and snow. Depending on this and the choice of appropriate roofing material, the angle of inclination of the slopes is calculated.
After determining the level of the required slope of the slopes, the total load on the rafters is calculated. To do this, sum up the weight of the rafters, sheathing and roofing to calculate the weight of the element per 1 square meter.
The resulting value is multiplied by a multiplying factor of 1.1 -1.4. The resulting load figure, depending on the roofing material and insulation, ranges from 35 to 50 kg. per 1 sq.m.
This is a constant load value, to which periodic loads in the form of snow or wind are added.
To determine these loads, use the appropriate maps for individual regions. Snow load can vary from 80 to 150 kg per sq.m.
It should be multiplied by 0.7 if the roof slope is from 25 to 60 degrees. This value determines whether double rafters and continuous sheathing should be installed.
After calculating the load on the roof area and per square meter, the cross-section of the rafters is calculated. The number of rafters is determined by the length of the roof span and ranges from 70 to 120 m, depending on the length of the slopes.
Calculation of the rafter system
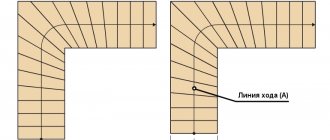
The calculation of the area depends on its design.
When we are dealing with a regular gable roof, its surface is represented as two rectangles, the area of which can be calculated by multiplying the length by the width. Multiplying the value by 2 we get the total area of the roof plane.
How to calculate a mansard roof? In the case of defining an attic sloping roof, the situation is more complicated due to the fact that in such a device, in addition to the slope divided into two parts, there may be additional elements (windows, balconies, terraces, exits to the roof).
In this case, you should divide the roof surface into its component elements and calculate their area separately. The sum of all areas of the elements obtained in this case will be the roof area
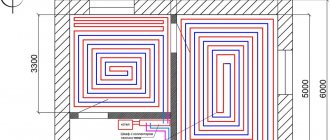
For example: With a base length of 10 m and a base width of 8 m, it is planned to build an attic space with a useful width of 5 m, a height to the edges of the slopes of 2.5 m and a height in the middle to the ridge of 3.5 m. The width of the roof overhang is planned 50 cm. The length of the side rafters is 3.42 m, the length of the ridge rafters is 2.69 m. Now you need to calculate the area of the upper and lower edges.
Multiply the length of the side rafters by the length of the roof base. It turns out 34.2 sq. m. The sum of the two lower edges is 68.4 sq. m. When multiplying the length of the ridge rafters by the length of the roof, we get 26.9 sq. m. Fold the two top edges. We get 53.8 sq. m. Accordingly, the total roof area is 122.2 sq. m.
So, what is a broken type rafter system?
With some degree of convention, it can be classified as a variety of gable. But the main difference is that each of the slopes does not represent a single plane from the ridge to the eaves overhang. Along a certain horizontal line, it “breaks” into two, and the upper part of the slope has a much smaller angle of steepness compared to the lower one.
A characteristic feature of a sloping roof is clear from its name - each of the slopes “breaks” into two planes, differing in angle of inclination to the horizon
Why is this being done? The answer is obvious. If you organize a residential attic under a regular gable roof, too much of the area falls on the “dead zones” - along the edges of the attic along the line of the eaves. Of course, certain measures are being taken to make useful use of these areas, but the possibilities are still very limited, and it is possible to make a full-fledged ceiling that will not create a “pressing” sensation on the head, that is, with a normal height familiar to a person, only in the central attic areas.
It would seem that it is possible to increase the steepness of the slopes - but this leads to a completely unjustified increase in the height of the ridge - such a roof is more difficult to install, requires more materials, and at the same time - excessive height always causes an increase in the vulnerability of the structure from wind loads, a decrease in the overall strength characteristics. In a word, erecting such a rafter system (especially if you plan to do it yourself) will not be a hassle!
And the solution is simple - increase the steepness of the slopes only at the “habitable” level of the attic, to the normal ceiling height, and then move to a small slope angle so that the roof does not turn out to be too high. Let's look at one typical example for clarity.
Comparison of the “useful capacity” of the attic space in houses with a conventional gable and sloping roof
For the “purity of the experiment”, let’s take two buildings with exactly the same dimensions at the base, for example, with a wall width along the gable part of 6 meters (as shown in the illustration). The height of the wall to the ceiling line is 4 meters, and the same distance is set aside vertically from the ceiling to the highest point of the roof - the ridge. The difference is in the roof design: on the left is a regular gable roof, on the right – a broken type.
Let’s assume that our desired ceiling height in a residential attic should be 2.5 meters, and let’s try to “fit” this room into the attic space. Even if you don’t pay attention to the dimensions indicated, the result, as they say, is visible to the “naked eye.”
READ MORE: Review of the Bosch GL 30 vacuum cleaner, characteristics, functions, comparison with competitor models
Well, if you use the language of numbers, you can see that even with a very large steepness of the slopes in a gable roof (and here it is about 53 degrees), the width of the space that satisfies the requirement of a comfortable ceiling height is a little more than 2 meters. It’s a different matter - in the attic with a broken-type rafter system - the width of the “habitable zone” has almost doubled.
So, despite the increased complexity in constructing a sloping roof, such an idea looks quite justified.
Now let's take a look at what elements the structure of a broken-type rafter system consists of. Let us immediately make a reservation that there are many schemes, and it is simply not possible to consider them all on the scale of one article. Therefore, we will highlight two main ones, most often used in self-construction.
Layout diagram of the main parts of a broken-type system with support for attic rafters on the Mauerlat
The walls of the building (item 1) into which attic floor beams (item 2) were embedded during their construction. Please note that in this case they are located even slightly lower than the top edge of the walls, which gives a certain gain in the height of the attic space. But often they are laid flush with the upper end of the walls.
Along the walls (on their eaves sides) a mauerlat (pos. 3) is installed - a beam that will become a support for the main, so-called attic rafter legs (pos. 4). Most often, these rafters are made according to a layered scheme, that is, they have an emphasis on vertical construction in the upper part (item 5). The entire “enfilade” of such racks along the entire length of the roof is connected by a common beam - purlin (item 6).
In the upper part, the opposite rafter legs, fixed to racks with purlins, are connected by a tie (item 7). This tie plays the role of a reinforcing element of the structure, but in addition, it becomes the basis for filing the flow of the attic room. That is, its location in this scheme is usually taken into account the ceiling height that is comfortable for the owners.
The main rafter legs, despite the fact that they are layered, still experience considerable bending and compression loads - simply due to their length and the peculiarities of their location at a large angle. Therefore, they need to be unloaded, that is, reinforced with additional parts. For this purpose, struts are used - diagonally located supports (item and (or) additional tightening (item 9).
As a rule, the steepness of this slope, formed by the main attic rafters, is maintained in the range from 60 to 70 degrees, although it can be even higher. This, by the way, gives another “plus” - on a plane located with such a slope, snow masses will not linger in winter, and they can be ignored when calculating these rafters.
The upper slopes form ridge rafters (item 10). They are, of course, much shorter, and are usually located at an angle to the horizon of 15 to 30 degrees. Here you can also use a hanging rafter arrangement, without a central support. But for reliability, racks or headstocks (pos. 11) are often installed on the ridge with a ridge girder running along them, and then, in fact, the rafters also turn into layered rafters.
Another nuance of this scheme. One way or another, you will have to create a roof overhang over the walls to protect them from direct moisture. This means that the attic rafters must have a certain extension (item 12) to form this overhang of the planned width. Another option is to use additional parts - the so-called “fillies”, with the help of which the length of the rafter legs is increased. This will be discussed in some detail below.
fastenings for rafters
An example of such a roof structure is shown in the illustration below.
An example of a broken-type rafter system with attic rafters attached to a mauerlat and with their extension to form a cornice overhang
Now let's look at the second scheme, paying attention to the fundamental difference.
The eaves overhang is formed by moving floor beams beyond the walls
Design errors
Unfortunately, as in life, so in design, we can make mistakes that are insignificant in our opinion, but already during the construction of what we have planned, this can cost the developer considerable costs.
The first minor mistake may be an incorrectly designed ventilation gap. It seems like a small thing, but it plays a huge role in our life and the life of the roof, the process of its operation.
The gap extends the service life of the entire roofing system. If the gap is designed incorrectly, further consequences occur, such as rotting of lumber, rafters and sheathing.
The second, important mistake is that the drainage system is incorrectly designed, where, unfortunately, many prefer beauty over practicality.
The third mistake is the incorrect angle of the roof. The load of snow must be taken into account, because the greater the load, the greater the angle of inclination of the roof.
The design of roofs and various structures is not an easy job, requiring a serious approach to every detail. And when building it yourself, it takes a lot more effort and nerves, so you shouldn’t always neglect the help of others, especially classified specialists in their field
How to correctly calculate the angle of inclination
The main factors influencing the slope of the roof during its installation are:
- Natural factors - climatic conditions where construction is planned (wind and snow loads);
- Characteristics of roofing material.
The most optimal roof slope is an angle of 20-30 degrees. In snowy latitudes, it is recommended to make a slope of at least 45 degrees.
In this case, the snow will easily fall off the roof. Since the design of the attic roof is gable or broken gable, we will consider the slope angle in this aspect.
The geometric shape of a gable roof is an isosceles triangle, therefore, to calculate the height of the ridge depending on the slope of the slopes, you should use the trigonometric formula for a right triangle.
Therefore, there are two slopes here - the upper one, built in accordance with generally accepted standards; the lower one is steep, depending on the size of the house and the usable attic space.
The angle of inclination of the lower plane is most often 70 - 80 degrees.
It is convenient to install attic windows in a roof located at such a slope, which, due to their location, will be reliably protected from precipitation.
Concept
The coating is the upper enclosing structure of the building, designed to protect against climatic influences and factors. The main function is protection from precipitation indoors. The elements are:
Roofing calculation
We need to calculate the roof area to accurately calculate the required amount of roofing material.
In order to calculate the required material, you should know the dimensions of the material, as well as the method of fastening it together.
Let's look at the most common ones:
- Ceramic tiles. Consumption per 1 sq.m. about 10 pcs.;
- Metal tiles. The length can be any, width - from 1190 mm;
- Profiled sheeting. Any length, width - from 750 to 1100 mm;
- Ondulin. Length 2000 -2400 mm. Width 950 – 1250 mm
- Soft roofing shinglas. Length from 317 mm. Width 1000 mm.
Calculation example for metal tiles
You should buy roofing material with a reserve of 7-8% of the total area.
Information on the purpose of the calculator
The online gable (gable) roof calculator is designed to calculate the angle of inclination of the rafters, the amount of sheathing, the load on the roof, as well as the amount of material required for the construction of this type of roof. The calculation takes into account all popular roofing materials, such as ceramic, cement-sand, bitumen and metal tiles, ondulin, slate, etc.
All calculations are performed in accordance with TKP 45-5.05-146-2009 and SNiP “Loads and Impacts”.
Gable (gable, gable) is a type of roof shape with two inclined slopes from the ridge to the outer walls. This form is the most common and most practical in terms of cost, efficiency and appearance. The rafters rest on each other, and their pairs are connected by lathing.
When filling out the data, pay attention to the additional information with the Additional information sign. .
The following is a complete list of calculations performed with a brief description of each item. You can also ask your question using the form in the right block.
A gable roof is a complex, large-area building structure that requires a professional approach to design and execution of work. The largest costs go to building materials for rafters, sheathing, insulation, waterproofing, and roofing material. Our gable roof calculator will allow you to calculate the amount of material.
Using a calculator saves time when designing a roof, and your money. The final 2D drawing will guide you through the work, while the 3D rendering will give you an idea of what the roof will look like. Before entering data into the online calculator, you need to have an idea about the elements of the roof.
Rafter parameters
To calculate the rafter system of a gable roof, you need to take into account:
- roof load;
- step between rafters.
- type of roofing
- 100-150 mm with a span length of no more than 5 m, and with additional supports.;
- 150-200 mm with a span length of more than 5 m, with a step of more than 1 m, and if the angle is not large.
Important! The distance between the rafters of a gable roof is usually set at 1 m, but with a roof slope of more than 45 degrees, the pitch of the rafters can be increased to 1.4 m. For flat roofs, the pitch is 0.6-0.8 m.
The rafter legs are attached to the mauerlat, which runs along the perimeter of the house. For it, take either a board with parameters of 50x150 mm, or a beam of 150x150 mm (to distribute the load)
Sheathing parameters
For metal tiles, a sparse lathing is created with a board, the width of which is 100 mm, and the thickness is 30 mm. The board is packed in increments that must correspond to the longitudinal axis of the metal tile module - 35 cm (Super Monterrey).
For flexible tiles, the sheathing is done with a large step, since OSB or plywood will be laid on top of it as a continuous carpet.
Important! When choosing materials, pay attention to moisture resistance and minimum thickness.
When installing warm roofs, a counter-lattice is made between the waterproofing and the roof, the thickness of which should be 30-50mm.
- To calculate the roof of a gable roof, you need to know the dimensions of the roofing material and the amount of overlap.
- Metal tiles for hard roofing are produced in a width of 118 mm (working 110), but the length can be different. The manufacturer can cut any length to order.
- Flexible tiles for soft roofing have different sizes, so you need to look at the specific material
- As for the choice of insulation, for Russia the recommended thickness is at least 100 mm, and the correct one would be 150-200 mm.
Requirements
The development of a design solution for the installation of a covering is based on compliance with the design standards of roofs, buildings and structures, safety precautions and labor protection rules. For normal operation, the coating must have the following properties:
- strength;
- waterproof;
- resistance to sunlight, sudden changes in outdoor temperatures;
- durability;
- sustainability;
- fire resistance;
- architectural attractiveness.