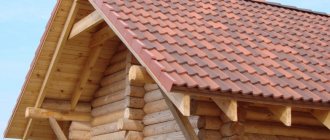
Some country or private houses have a “L” design. Accordingly, the roof of such a house will also be made according to this shape. But if creating a traditional roof is easy and straightforward, then this is how an L-shaped roof is made? Its rafter system is not so simple, and it will take some effort to manufacture. Still, with proper instructions and the right advice, a novice master can try to bring his idea to life.
We will look at the technology for creating an L-shaped roof, learn all the subtleties and tips for construction, as well as the definition of this roof. And thanks to visual photos and videos, the entire work process will be even easier.
“Cutting” roofs into each other. L- and T-shaped roofs. Endovy
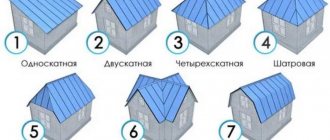
Architects call the roof the fifth facade - it is one of the most expressive elements of the house. However, here it is necessary to maintain a balance between the design solution and the functionality of the roof. From an engineering point of view, the simpler the roof, the less hassle it will cause during construction and subsequent operation. When designing a roof according to a budget option, you should, if possible, avoid a large number of valleys, height differences in the ridge, turrets and arched forms.
The drawings show the main types of simple roof structures, but this is just a sketch. To properly build a roof, a roof plan and main sections must be developed, taking into account the linear dimensions of the building and elevations.
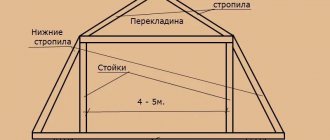
How to build a roof plan? Let's look at this with examples (Fig. 49). Modern country houses rarely have a rectangular plan; most often they are built in the form of the letters G, T or in the shape of a cross. There are other planning solutions; now it is more important for us to understand the basic principles of constructing a roof plan. The layout of the house can be mentally divided into rectangles. We will conditionally call the largest rectangle the main room, and the smaller rectangles - extensions.
rice. 49. Building a roof plan
Having drawn a plan of the walls, step back from the wall lines by 50 cm (normative roof overhang) and draw the outer perimeter of the roof to scale. Then we draw purlins ab on the main roof, and perpendicular to it we draw purlins on the extensions cd. Now if we connect the closing angles of the main roof and the extensions, we will get a valley line - the inner corner of the intersection of the roofs. Here the slanted rafter legs will be made.
With the same height of the roof ridges, the sloped rafters are installed along the entire length of the valley and will rest on the Mauerlat and purlin of the main roof; the angles of the slopes of the main roof and extensions will be different. The slopes will only be of the same slope if the width of the extensions is equal to the width of the main room.
Shortening the purlins cd on the side of point c changes the valley lines. Its location in plan at an angle of 45° leads to the fact that the slopes of the main roof and extensions will have the same slope, but the ridge of the extension will be lower than the ridge of the main roof. By changing the angle of the valley (in plan), you can change the height of the ridge of the extension to the required value. The sloped rafter installed in the valley, in this case, will rest on the mauerlat and the extension girder.
Shortening the purlin on the side of point a or b or on both sides leads to the formation of hips on the roof. The same can be done with purlin cd; shortening it from the side of point d we get a hip on the extension. By the way, you can lengthen the purlins, then on the roof you will get triangular roof overhangs, enlarged at the ridge. If you completely “drive” the purlin, for example, purlin ab, to one point, we get a hip roof in which the slanted rafters will converge and rest on a single post.
In attic roofs, at any ridge height, the purlins of the extensions are joined to the racks of the sub-rafter structure of the main roof and rest on the grooves (Fig. 50). The nail connection of the nails with the racks is calculated by cutting the nails, or the nail is made to the entire height of the rack.
rice. 50. Option for joining two roofs. Endovy
The roof racks, as in the case of hip roofs, rest on a diagonal rafter, onto which support bars are first sewn. The rule for installing splices is the same: they should be installed staggered, and not converge at one point on the rafter.
The roof racks, as in the case of hip roofs, rest on a diagonal rafter, onto which support bars are first sewn. The rule for installing splices is the same: they should be installed staggered, and not converge at one point on the rafter. Rafters in valleys, like all other rafters, can be made in the non-thrust and spacer versions. The spacer rafters, connected to each other in the ridge unit, rest against the sloped valley rafter at the bottom and give a spacer to it. The slanted rafter leg itself receives additional compressive stress, which, when resting its bottom against the Mauerlat, and its top against the ridge knot, gives a thrust to the Mauerlat. This thrust tries to “straighten” the joining angle of the mauerlat beams. The spacer can be removed by gripping the sloped rafters and the post located at the bottom, or, in the case of an L-shaped roof, along the bottom of the sloped valley rafters and the hip located on the other side. If the contraction is located higher, it will be a compressed crossbar and will not remove the thrust. When changing the lower node of the sloped rafter leg of the valley from support to support, the thrust will not go to the walls, and with a grip you can intercept the thrust that occurs in emergency situations when the ridge settles.
In other words, diagonal roof rafters (hip or valley) are no different from ordinary rafters. If we stand frontally to them, we will see the same ordinary rafters, only longer and loaded a little differently. Consequently, they need to be designed and installed according to the same rules as ordinary rafters, only their projection should be considered and the contractions should be installed accordingly.
Source: “Roof structures. Rafter systems" Saveliev A.A.
L-shaped roof of the house with equal gables.
All boxes of houses in the shape of the letter “L” can be divided into two groups:
1 – the width of the base of the pediments is the same;
2- the width of the base of the gables is different.
The L-shaped roof, depending on this factor, is built in different sequences.
So let's go in order. In this article we will look at the box of a house with the same width of gables (see Fig. 1). These dimensions are shown in blue in the figure. Our house is made of timber. The floor beams are already installed. The rafters will be hanging, resting on the upper crown of the box (mauerlat).
Picture 1
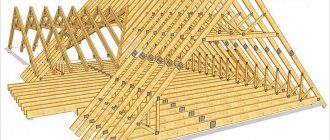
In principle, the rafter system of an L-shaped roof will consist of two gable roofs crashing into each other. We have already seen how the rafters of a gable roof are calculated, so I will not dwell on this.
STEP 1: Install temporary posts and ridge board. They are located strictly in the middle (see Fig. 2):
Figure 2
Temporary jibs supporting the posts in a vertical position are not shown in the figure. We made the racks from boards 50x150 mm, the ridge - 50x200 mm. The rafters will also be made of 50x200 mm boards.
STEP 2: Install the slope rafters. We mark the rafter template in exactly the same way as was described in the article “Hip roof”.
By the way, I will continue to refer to this article further.
First of all, we install the rafters shown in Fig. 3:
Figure 3
These are rafters on the gables, rafters on the ridge break and rafters in the inner corner of the house box with those opposite them.
How the rafters stand in the inner corner of the house box is also shown in Fig. 4. The indicated dimensions (0.5 m) are the width of the cornice:
Figure 4
Next, we install the remaining rafters in increments no greater than those calculated (see Fig. 5):
Figure 5
STEP 3: Install the corner rafter on the outer corner of the house box. How this is done is described in detail in the article on the hip roof, which I linked to above. There you will also find a description of how the spigots are installed.
STEP 4: Install the corner rafter in the valley (inner corner). It will also consist of two sewn boards with the cross-section of the rafters.
To begin with, let’s fix a small equilateral triangular block in the corner, made, for example, from a 100x100 mm block sawn diagonally (see Fig. 6):
Figure 6
Pull the string between points “A” and “B” (see Fig. 7):
Figure 7
Using a small tool we measure the angle ʺβʺ (see Fig. 8):
Figure 8
We make a template from a small piece of board with the cross-section of the rafters (50x200 mm). First, we file the end at an angle ʺβʺ. Then we apply the resulting blank to the top of the head along the stretched laces and mark the second cut parallel to the ridge board (see Fig. 9):
Figure 9
Using the resulting template, we will mark the upper cuts of the corner rafters. And turning the template “upside down”, we will mark the lower cuts.
In addition to this, we need to determine one more size. Again, apply the template to the top of the head and measure the distance shown in Fig. 10. In this example it turned out to be 3 cm:
Figure 10
This is exactly how much we will need to cut off the upper edges of all the boards from which the corner rafter will be sewn (see Fig. 11).
This can be done either with a regular ax or with a chainsaw.
Figure 11
So, to make the first half of the corner valley rafter, we take a board of the required length and saw down the upper and lower ends using a template. We trim our 3 cm along the entire length of the board. Now all that remains is to make a cut in the place where the rafters rest on the mauerlat. To do this, holding the board parallel to the stretched cord, we make markings (see Fig. 12):
Figure 12
The lace in the figure is shown in blue. We measure the distance we need to lower the rafter so that it aligns with the lace. This distance (5 cm) will be the desired cutting depth. Having done it, we put the rafters in place.
The second half of the corner rafter is done in the same way. It is a mirror image of the first. The result is shown in Fig. 13:
Figure 13
STEP 5: To strengthen the corner rafters, we install racks through trusses (see Fig. 14):
Figure 14
Our springs are made of 100x200 timber, as are the floor beams.
STEP 6: We make and install the spouts (see Fig. 15):
Figure 15
STEP 7: All subsequent steps have already been repeatedly described in previous articles, so I’ll simply list them: we install tie-downs (we also tie together the corner rafters with tie-downs), if necessary, remove the racks under the ridge board (the rafters will be hanging, we talked about this in beginning of the chapter), we sheathe the gables, make sheathing and cornices.
Marking
In order for the L-shaped roof to be correct, it is important to mark the Mauerlat and tie rods. This includes marking where certain elements of the skeleton will be located. To apply this marking, a construction pencil, a special measuring ruler and a drawing are used to guide you.
To begin with, a mark is placed on the central part of the end walls of the house in the shape of an G, and straight lines are drawn from the central parts along the walls. A ridge run will be installed along this marking. The length of the two skates is outlined as indicated in the drawing (the location of the support posts too).
The next step is to mark the locations of the rafter legs. The step is indicated in the drawings. The marks are applied on the Mauerlat.
Advice! The joining of corner and regular rafters is carried out using the cutting method. Cuts are made only on the rafters so that they are no more than ¼ of the section. Cuttings cannot be made on the Mauerlat. This will lead to weakening of the structure.
At the end, all that remains is to mark the location points of the corner rafter legs and spigots. Now we’ll find out how to make an L-shaped roof with your own hands.
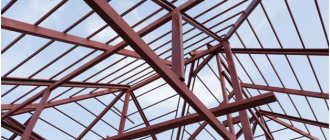
Roof truss system with a valley: characteristic features and installation difficulties
The roof is one of the main functional elements of any structure. Moreover, this is a rather complex structural element, and the more complex it is, the more careful approach it requires. A complex configuration, on the one hand, makes the roof more visually beautiful and interesting, and on the other hand, makes it more vulnerable due to the formation of bends. The roof is one of the main functional elements of any structure. Moreover, this is a rather complex structural element, and the more complex it is, the more careful approach it requires. A complex configuration, on the one hand, makes the roof more visually beautiful and interesting, and on the other hand, makes it more vulnerable due to the formation of bends.
Endows are practically invisible, but they can both spoil the appearance of the facade and emphasize its advantages. The roof truss system with a valley, therefore, not only allows you to solve functional problems, but also provides a unique design.
The endow is the place where the roof slopes meet, forming an internal corner. It is an obligatory element of buildings that have a T-, L- or cruciform shape, or have pronounced slopes. To this list we must also add the bends that form on the dormer or protruding attic windows.
It ensures uniform drainage of precipitation collected at the corner, a kind of analogue of a gutter, that is, they are under significant influence of moisture. This is why the rafter system of a complex roof requires special attention.
The internal corner of the structure is formed by two planks , and each of them performs an important function:
- the lower one (PEN) is a special plate that is bent in accordance with the angle of the roof slopes. It is attached to the underside of the cornice board with self-tapping screws. PEN encloses and protects against the flow of precipitation into the junction of the slopes. Installation of the lower valley is carried out before the installation of sheathing and laying of the roof covering;
- top (PEV) – carries an artistic and aesthetic load and is installed after laying the covering.
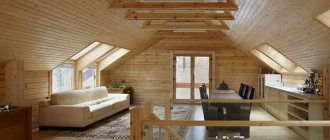
How much does it cost to build an attic
The construction of an attic floor is considered profitable due to the fact that there is no need to spend money on erecting walls. This is only partly true.
Firstly, a lot of money will be spent on creating a rafter system. Its cost depends on the type of mansard roof chosen (see below) and on the price of lumber in your region.
Secondly, you will have to shell out a considerable amount of money. It is clear that roofing material alone is far from sufficient to ensure the required air conditions for residential premises (if the attic is planned for residential use). It will be necessary to insulate, and the layer of insulation should be significant. For example, for central Russia, the layer of high-density mineral wool should be from 200 mm, plus a layer of waterproofing and vapor barrier.
Thirdly, windows are much more expensive. If you make them auditory, you build a special structure from rafters, which complicates the roof topography, and therefore increases the cost of materials and installation. Even on an ordinary gable roof you have to think about constructing valleys and retaining snow above the windows.
The second option - windows in the roof plane - require particularly careful sealing so that precipitation cannot get inside. This makes installation 1.5-2 times more expensive. The windows themselves cost about the same amount: they must have a reinforced frame and reinforced glass that can withstand snow loads. In addition, for maintenance the frame must be rotary, and this further increases the cost.
There are two types of windows in the attic - vertical and in the plane of the roof. Both types can be used in the same project. The photo below is a good example of such a combination. You can’t really say that the house is unmemorable. How many more options could there be?
Attic roofing in several levels is also a common technique
In addition, such popular and inexpensive roofing coverings - metal-based materials such as corrugated sheets, metal tiles, roofing iron - are not recommended to be used when installing the attic roof of a private house. There are two reasons:
- High thermal conductivity. Due to the fact that metal conducts heat very well, it is necessary to lay a large thickness of thermal insulation materials. Otherwise, the attic will be too hot in the summer and cold in the winter. Increased noise level created by the coating during rain. Even an ordinary roof covered with metal sounds like a drum when it rains. The attic room is much larger in area and the “tool” is more powerful. If you can combat the noise level indoors with additional sound insulation, then you can’t do anything to reduce the sound outside. If the neighbors' houses are located at a considerable distance, this may not be a problem, but if the buildings are dense, conflicts may arise.
If you do the math, additional thermal insulation and sound insulation will minimize the cost savings when purchasing roofing material. Perhaps another, initially more expensive roofing covering will turn out to be more profitable as a result. So here you need to calculate your options.
All this was described so that you have a more complete idea of whether building an attic floor is really that cheap. It turns out - not very good. Nevertheless, this solution has its advantages:
- The attic floor turns out to be light. Therefore, the foundation for private houses will require only a little more powerful than when constructing one floor. Since the cost of the foundation is a significant part of the cost, the gain here is tangible. If there is a shortage of funds, insulating the attic and putting it into operation can be delayed for the required period. Moreover, this delay will be useful. That's why. During construction, wood with high humidity is almost always used. If you start insulation right away, moisture will be absorbed into the insulation. If the “pie” is done correctly, it will go away naturally. But if there are violations, problems may arise. If the roof under the roofing material stands for some time without insulation (but with waterproofing installed under the roofing), then the wood will dry well and there will be fewer problems. The attic allows you to make your house original and non-standard. In any case, the building turns out to be more expressive and individual - there are a lot of design options.
We tried to describe as fully as possible the disadvantages of a mansard roof and its advantages. If the difficulties do not frighten you, choose which design you prefer.
Types of valley ↑
Any, even small, error in calculation or error in the installation of a rafter system with valleys is fraught with irreparable consequences, including the collapse of the structure. In winter, for a long time they are under the influence of colossal loads.
Depending on the installation method, there are different:
- Closed and articulated structures - typical for roofs with steep slopes or for certain roofing coverings where the roofing elements are intertwined, as, say, in the case of asphalt shingles. These structures require an additional layer of waterproofing.
- Open . In this case, the slopes are adjacent to each other. This is also taken into account when the rafter system is installed. The gap between the slopes is closed with a special gutter, through which precipitation is effectively drained. In this case, additional waterproofing is not required.
Calculations
To make an L-shaped roof with your own hands, you must first make accurate calculations. In particular, the load on the rafter system is calculated. Moreover, three parameters are taken:
- Constant load. This refers to the weight of the entire roofing pie, which will put pressure on the roof skeleton (insulation, hydro- and vapor barrier, finishing roofing material).
- Seasonal load. This includes precipitation in the form of rain, snow and wind. Moreover, based on the prevailing climatic characteristics of the region, it is advisable to select the roof slope angle. This will reduce the seasonal load on the roof. So, if snow and rain predominate in the region, then it is better to make a roof with a large slope angle. If winds prevail in the region, then it is better to make a flatter roof for a house in a city or countryside. This will reduce its windage and, accordingly, the wind load.
- Additional load. Here additional communication devices are taken into account, such as a water tank located under the roof, a satellite dish, etc.
Important: all calculations for an L-shaped roof should only be carried out by a specialist. In accordance with the received data on all types of roof loads, he will draw a drawing that will indicate the slope angle of the hip roof slopes in the form of an L and display all the parameters of the elements of the rafter system.
Installation for soft roofing ↑
Let us dwell on the basic principles of the structure in the case of a soft roof.
Preparatory work ↑
You can design a negative fracture in a complex roof in at least two ways:
- open;
- undercut method.
The base is prepared depending on the chosen option.
- Open. Along the length of the valley, a valley carpet (KE) is laid on the lining barrier, displaced horizontally by 20–30 mm. From the inside out, along the entire perimeter, it is coated with mastic, say, bitumen TechnoNikol with a strip 100 mm wide. The layer thickness is selected in accordance with the consumption rate. On the front side, the carpet is fixed using roofing nails in increments of 200–250 mm with a distance of 20–30 mm from the edges.
- When using the “undercut” option, KE is not needed.
Open installation ↑
- ordinary tiles are laid on the KE up to the central axis;
- all tiles that cover the inner corner between the slopes are additionally secured to the upper apex using nails.
- the distance from the axis to the fastening element must be more than 0.3 m;
- then, using a coated cord, beat out two lines; ordinary tiles will be cut along them;
- the waterproofing carpet can be damaged when trimmed, so a plank is placed under each tile during work;
- before final fastening, bitumen mastic is applied to places without a self-adhesive layer;
- if the difference between the slopes of the slopes is large and, accordingly, the water flow also differs noticeably, the gutter is shifted in the direction of the lower water flow. Otherwise, water will wash away the joint between the valley carpet and the ordinary tiles;
- The width of the gutter ranges from 50–150 mm. The choice depends on the characteristics of the location of the object. If it is built in a forest thicket, it is recommended to increase the width of the gutter so that foliage can be easily washed away.
Installation using the “undercut” method ↑
- The laying of ordinary tiles begins with a slope that has a smaller angle of inclination. In this case, it is expected to enter the second slope, which is steeper. It should not be less than 300 mm.
- similar to the previous case, additional fixation of each panel in the upper corner is necessary.
- after the first slope, which has a smaller angle of inclination, is covered, a chalk line is “beaten off” on the other at a distance of 70–80 mm from the axis. This is the place where the tiles will be cut.
- This applies to each tile, and before they are finally fixed, mastic is applied to the places where there is no self-adhesive layer on the back side.
Device ↑
The valley rafter system most often consists of slanted rafters. Moreover, since it is assumed that the ridge elements have the same height, the sloped rafters in the valley structure will rest against the mauerlat with the lower part, and the opposite part against the ridge girder.
To form different types of roofs: gable, hipped and half-hip, it is necessary to provide a different geometric shape and height of the ridge, not only of the main structure, but also of the secondary one.
Rafter system with L-shaped roof valleys ↑
- The racks of the main roof truss structure and the secondary roof purlins are interconnected. At the same time, breakers serve as support for the latter.
- The roof purlins of the secondary roofs are connected.
- Whatever the height of the purlin at the main roof, the connection is made through nailing.
- On the slanted rafters, in a staggered position, splices are installed, which are connected to each other in the ridge unit. Similar to a hip roof, they rest on bars, which are previously sewn onto the rafters.
Diagonal rafter legs, depending on the device, can work as either spacer or non-spacer. As already noted, the splices rest against the diagonal rafter. At the same time, they transfer significant compressive stress to it. The rafter, in turn, resting its lower end on the mauerlat, tries to straighten the angle at which the mauerlat beams join. To remove the resulting expansion, you need to connect the slanted rafter and the fixed post with a tie. If it is an L-shaped roof, then the diagonal rafters of the valley and the opposite hip are connected.
If the lower node of the diagonal rafter rests instead of a stop, then there will be no more talk about supporting the walls. As for the tightening, which in this case would be more appropriately called a contraction, it will function as an element that, in the event of a ridge subsidence or other emergency situations, will intercept the thrust.
Conclusion
Now you know how different rafter systems work, and you can start designing them yourself. If you have any difficulties, write comments and I will be happy to help you with advice.
Did you like the article? Subscribe to our Yandex.Zen channel
December 29, 2021
Roofing, Structural elements
If you want to express gratitude, add a clarification or objection, or ask the author something, add a comment or say thank you!