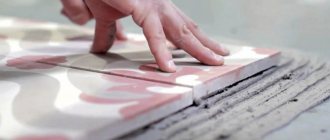
Laying tiles diagonally on the floor is quite a difficult operation even for experienced tilers. Moreover, such a decision should be made with a certain degree of caution if it is intended to be done for the first time. However, the desire to decorate the interior of one of the rooms in an original way leads to bold attempts to try your hand at it.
Laying tiles diagonally on the floor
Having chosen this method of laying flooring, you should prepare yourself in advance for painstaking work that requires patience. In addition, it will be useful to practice cutting tiles. For a beginner, this process can be the most difficult. Especially in the absence of accumulated experience and in the absence of the special tools necessary for its implementation.
Expert opinion: Afanasyev E.V.
Chief editor of the Stroyday.ru project. Engineer.
If you entrust floor tiling diagonally to professionals, it will cost much more than conventional masonry. Therefore, by doing this work yourself, you can save a decent amount. So there is a reason to try!
Advantages and disadvantages of laying tiles diagonally
pros
The advantages of this method include the following points:
- Visual increase in space. If the room in which the renovation is being carried out has a small square area, then it is the diagonally located seams that help visually lengthen the floor. Combining two or three shades will help achieve a greater effect.
- Effectiveness. Because few people risk decorating the space of their rooms in this way, this arrangement looks untidy and quite new.
- Masking of irregularities. It often happens that the location of the walls is not parallel to each other. If in the case of straight laying such a defect immediately catches the eye, then the diagonals help smooth out the effect of unevenness, drawing all attention to themselves.
- Accuracy. This arrangement of plates looks more elegant.
- Zoning of space. When using two different installations, you can visually divide the space into two parts.
Minuses
The obvious disadvantages include:
- Labor intensity. The time and money costs are significantly higher than with the standard installation method. Moreover, precise marking is required.
- Material consumption. Due to the need for constant trimming of tiles, a certain amount of material becomes unusable and is disposed of. Consequently, there is a need for additional expenses.
- Having experience. This means that even skilled craftsmen sometimes find it difficult to lay out tiles without making mistakes, let alone beginners and those who have not previously dealt with marking and cutting slabs.
Types of porcelain stoneware
In order to make the best choice when finishing specific rooms, you should know the features of the manufactured slabs.
| Type of porcelain stoneware | Brief description of performance indicators |
Smalted (glazed) | The front surface of the slabs is covered with glaze using the hot firing method. Due to this, the quality increases significantly, the glaze is firmly soldered to the material. Glazed porcelain tiles are recommended for use in rooms with low load on floor coverings. Disadvantage: the slabs are very slippery, especially when wet. |
Polished | The surface of the slabs after grinding is polished using special equipment. The slabs have a mirror finish and look great in large rooms. Disadvantage - not recommended for use outdoors and public buildings. Micro scratches are noticeable on polished surfaces; they lose their shine and original attractiveness. |
Semi polished | The coating is less slippery and more resistant to difficult operating conditions. The boards are universally applicable and can be installed in both residential and non-residential premises. |
Matte | Special processing technology allows you to create matte front surfaces, the floor does not slip, and micro-scratches are not visible on it. Matte tiles can be used to decorate various architectural elements located outdoors. |
| Raised | The slabs imitate natural stone, wood, brick, etc. They are used to create exclusive interiors and allow new rooms to be organically integrated into existing design styles. |
| Satin | During production, salts are added to the mass; when fired, they burn out and the surface becomes polished. The strength of the material increases, the tiles are not afraid of scratches and shock loads. Universal use, can be installed in large sales areas. |
Rectified | Rectification is a separate stage in the production of ceramic tiles, at which the dimensions of the material are adjusted. During rectification, all linear deviations that occur after thermal firing of the mass are eliminated. Rectified porcelain tiles can be laid without seams, which increases the tightness of the coating. |
Prices for porcelain tiles for floors
porcelain tiles for flooring
When choosing a specific brand of porcelain stoneware, you need to take into account the maximum number of individual factors, including the cost of the material. Only an informed decision will allow you to achieve the desired result with minimal financial losses and in the shortest possible time.
Calculation of the number of tiles
Before you start purchasing the tile you like, you should pay attention to its characteristics. Moreover, it is necessary to compare the sizes of slabs of the same type, attaching them to the same ones, but from different packages.
- Remember, when there are discrepancies of at least a couple of millimeters, it will not be possible to put together a neat drawing, which will entail a violation of aesthetic perception. That is why, when buying tiles, pay attention exclusively to high quality products and a trusted brand.
- When checking the characteristics of the material, look at the purpose of the tile. Yours should be intended exclusively for flooring. The box must have a special icon depicting a foot print.
This requirement is justified by the fact that wall tiles will not last long if used to lay the floor. Plus, the treatment of such tiles should include anti-slip properties. This is evidenced by the image of shoes on an inclined surface.
It would not be amiss to make preliminary calculations of the required amount of material, taking into account that it will be necessary to purchase an additional 20-25% of the material from the total amount due to the higher consumption.
Review the parameters of the tile you like in advance. Then, draw a drawing that takes into account all the protrusions and niches. If you want to combine several different plates, a drawing is required.
There are two methods of calculation:
- Without drawing: the area of the room is divided by the area of one slab.
- With a drawing: the diagram includes a graphic representation of the design that is planned to be applied to the floor, taking into account the dimensions of all elements.
Two tiles should be counted as one when most of them are cut off.
Useful tips from experts
When choosing a material, you must carefully study the characteristics of each type of tile. They must meet the needs of the owners. It is necessary to take into account the degree of strength, thickness, and the need for a glazed coating.
The texture of floor tiles should be moderate. Slight ribbing will prevent slipping. If the patterns and grooves protrude too much, this may make cleaning difficult. The gloss will highlight even the slightest dirt.
It is better to dilute the adhesive composition for installing tiles in small portions. If unforeseen circumstances arise and the installation process slows down, it will not be able to dry. Only cold water is used for mixing. Hot liquid will deteriorate the quality of the adhesive solution.
The material can only be laid on a flat, clean floor; door frames and baseboards must be removed. It's easier to work along guide lines. The resulting gap between the outer row of tiles and the wall can be hidden with a plinth or you will have to glue a ceramic strip.
Choosing tiles for diagonal laying
Materials include:
- Water;
- Cemented glue;
- Grout of a suitable color;
- Crosses.
What to do if you forgot to prepare a place for the hovercraft?
On the day of laying the curb, I had to urgently leave the site (for family reasons) and in my haste I forgot to prepare a place for the hovercraft. I left my work for myself. The issue was resolved with a renovator + a diamond nozzle:
So that after combing the glue you can see exactly where to insert the base of the SVP, mark this place with a marker:
After which I removed the dust.
Tools
To work you will need the following set of tools:
- Roulette;
- Level;
- Tile cutter;
- Cord for marking;
- Wide spatula with serrated edges;
- Spatula 10-15 cm wide;
- Paint roller and related accessories;
- Rubber spatula;
- Glue container;
- Drill with a special attachment;
- Rubber coated hammer;
- Gloves and knee pads.
Modular masonry
Also, tile laying methods also imply the possibility of modular installation. This variation will help to give an unusual effect to the coating and will look quite original. Moreover, it is an almost perfect solution. But the peculiarity here is the calculations, since it is necessary to accurately calculate and create a draft drawing that will be executed.
A good feature and at the same time an advantage of this solution is the wonderful view in small rooms. In addition, there are no templates at all and each drawing is created individually. The main thing is to make an accurate drawing, taking into account all dimensions of both the room and the tiles. In addition, you can use ready-made kits.
Considering the technology, we can note one of the easiest ways to perform finishing, in particular the use of large tiles with images of small ones on it. But don’t forget that you can make the pattern yourself, you just need to take into account all the features of the module grid and that’s it.
Preparing the base for laying tiles
First of all, after purchasing everything you need, the master needs to level the floor. Any tile will look bad if glued to an uneven, lumpy floor.
Moreover, all the elements will look disjointed. That is why, after removing the previous coating, it must be well leveled.
This case consists of 4 steps:
- Dismantling the previous covering. Not only the old tile is removed, but also everything that remains from the glue.
- Cleaning. It is necessary to sweep away all the debris with a special broom or brush, after which cleaning with a vacuum cleaner is allowed.
- Conducting an audit. Using a level, determine how uneven the base is and mark the highest and lowest points of the base. Inspect the floor for various cracks, chips, and so on.
- Elimination of defects.
Once the running surface is in good condition, some measures can be taken to improve traction. In other words, the floor is primed so that the tiles stick better. This procedure is carried out twice.
Master class: pruning
It may be necessary to trim floor tiles during installation. The instructions below will help you do this correctly.
DIY cutting of floor tiles
Step 1 . To trim the end tile that is adjacent to the wall, lay the last row of tiles on it. Place another element on top, retreating 10 mm from the wall, and draw a line for the future cut.
Step 2 . Place the tiles on the tile cutter so that the mark is exactly on the cutting line. Place the knife on the top edge and operate by gently pressing down on the other end of the element.
Step 3 . A similar procedure can be performed using an electric tile cutter. And if you need a figured cut, then first mark its boundaries with a pencil.
Step 4 . Divide the part to be removed into rectangles. For this purpose, use a special scriber for sawing. If the part is large enough, you will need a tile cutter or sander.
Note ! To adjust the shape, experts use parrot pliers.
Marking tiles for diagonal laying
A lot depends on the correct marking, but first of all, how evenly and beautifully the tiles will be laid. A paint cord is used for this.
Do not take into account the walls, as they may be uneven in terms of parallels and perpendiculars relative to each other. If you rely on them, you can get an extremely uneven drawing.
The installation itself can be done in two ways.
Laying from the corner
This method is good for relatively small rooms, when there is very little free space. But at the same time, this method has certain difficulties. For example, it is necessary to re-measure the lines each time. And the installation itself begins with half a tile.
Laying from the center
First of all, you need to decide where the central point of the room is located. To do this, you need to draw two lines connecting opposite corners. The point of their intersection will be the center. This is where the work begins.
Important: the cut slabs are laid out last.
Step-by-step instruction
The diamond-shaped floor cladding is installed in 5 stages:
Preparing the base
According to the instructions of ceramic manufacturers, the subfloor must ensure the creation of an adhesive layer under the tiles with a thickness of 2-15 mm, and under the mosaic covering - up to 20 mm.
The base should be:
- Smooth. According to SP 29.13330.2011 “Floors. Updated edition of SNiP 2.03.13-88" the permissible difference is no more than 2 mm for each meter of surface. All defects, including cracks, bumps and the like must be eliminated in advance;
Checking the foundation.
- Dry. It is better to measure the percentage of residual moisture with a professional moisture meter. At the same time, the permissible level for cement-containing floors is up to 6%, anhydrite - no more than 1.5%, wood-containing floors - up to 12%;
- Durable. According to the above set of rules, the recommended strength level for civil engineering floors is at least 15 MPa;
- Clean. From the surface you need to remove debris, dust, oil stains, bitumen, old paintwork materials, soot and anything else that may interfere with the adhesion of the tile adhesive and the base.
Cleaning the base.
After checking, it is advisable to prime the subfloor with a suitable composition to strengthen, enhance adhesive properties or equalize its absorbency. If necessary, carry out waterproofing measures and be sure to check that all types of communications have outlets to the surface in accordance with the design of the room.
We wrote in detail about preparing the base for tiles here.
Marking and dry laying
The primary task is to build the correct centerlines of the room. Connect the midpoints of opposite walls to obtain a longitudinal and transverse axis. On vertical enclosing structures, mark the expected level of the finished floor, which will help to quickly correct minor defects.
Diagonal marking simple scheme
Since we are laying the tiles in a diamond shape, in addition to the basic center lines, diagonal lines connecting opposite corners will be required. If the area of the room is large, you can stretch the mooring cord along the axes or install so-called lighthouse tiles. At the same time, the manufacturers' instructions recommend laying out from the center, and in small baths and hallways (for single-color or two-color tiles) - from the far corner of the room.
Combined scheme.
Before applying the adhesive composition, it is necessary to lay the ceramic coating on a dry floor. This will allow you to double-check the accuracy of the drawing, as well as make adjustments or trimming.
Preparation of tile adhesive
The tiles can be laid on a homogeneous mortar with a low flow rate. The dry mixture must be mixed with clean water without impurities and stirred with a mixer at the speed recommended by the manufacturer. The finished mass has a short open period - up to 60 minutes, during which it must be completely worked out.
If a polymer adhesive mass is used, it must be mixed with a spatula or an activator must be added and carefully worked with a drill or screwdriver with a small mixing attachment.
How to choose tile adhesive - advice from our expert.
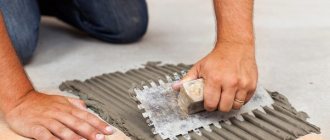
Laying tiles
Installation work begins from a reference point - from the center of the room or from the far corner. The adhesive solution is applied to the base to a width of 1-3 rows or small squares, after which you need to lay down the lining, lightly press it in, level it, and tap it with a mallet if necessary. Excess glue in the gaps is removed and spacer crosses or SVPs are inserted. The evenness of the floor is periodically checked using a hydraulic level.
Checking installation by level.
If the project includes panels, carpets, ornaments and friezes, then installation begins with decorative inserts.
When using large-format materials, adhesive must be applied to the floor and to the underside of the tiles. This information is always indicated in the description of the collection on the packaging or in the manufacturer's catalog.
Photo of laying tiles on the floor diagonally
Materials
Manufacturing companies use various materials to produce corners. Each of them has its own performance characteristics.
Metal
Designers call aluminum products the optimal choice for most stylistic trends. Lightweight and durable metal harmonizes perfectly with sanitary ware, bathroom furniture and a wide color palette. Elements of this type are ideal for working with outdoor tiles.
In terms of strength and hardness, the leading positions are occupied by corners made of stainless material. Due to its special properties, it is ideal for use in rooms with high humidity. As a rule, they are made in gold or silver. Often there are options plated with brass, chrome and nickel.
Chrome elements are an ideal choice for high-tech style.
PVC (plastic)
The products are lightweight and particularly flexible. Manufactured in a variety of colors. Can be used at any stage of gluing. In terms of price, this is the most profitable option, and therefore widespread.
Ceramics
Ceramic models attract attention with their expressive appearance. They stand out from the rest with their decorativeness, patterns and expressiveness. If tiles were used to decorate the bathroom, ceramic corners are ideal.