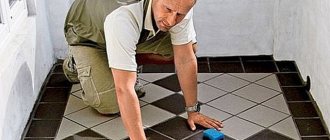
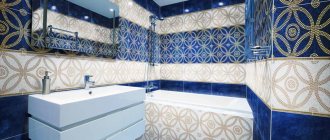
The bathroom is a rather specific room in which tiling work involves some difficulties. Even if you think that directly laying tiles is a fairly simple matter, you should not forget about other things or points that can have a huge impact on this process. It is these things that will be discussed in this article, in which, together with the website, we will deal with the question of how to finish a bathroom with tiles - we will consider the most common problems and ways to solve them.
Options for finishing a bathroom with tiles
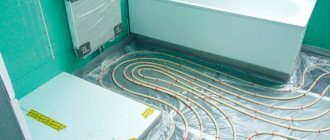
Finishing a bathroom with tiles around the bathtub: nuances of the work
The biggest, but surmountable problem that craftsmen usually face when finishing a bathroom with tiles is the tile itself - its presence in the room affects the technology of laying tiles. If without it the tiles can be laid evenly on all walls, starting from the very bottom of the floor, then with it present the technology changes as follows.
In principle, the presence of such a plumbing fixture as a bathtub causes difficulties only for beginners. Masters are familiar with this whole thing, and they don’t even ask such questions. Yes, in general, almost no one reads articles like this, so if you find yourself here, then draw the right conclusions and take all these nuances into account.
There is another approach to solving this problem, but it is not always possible to implement it - the room can be tiled first, and only then a bathtub can be installed. I will say right away that in small bathrooms, in which the bathtub fits from wall to wall, this option will not work - you simply will not put the bathtub in place without damaging it. The other side of the coin of this approach to business is tightness - by installing tiles on top, you reliably protect the space under the bathroom from possible leaks. Otherwise, the sealing of this gap by any means will be compromised over time.
Finishing a bathroom with ceramic tiles photo
Other publications in the “Question – Master’s Answer” section
Cladding the facades of a building is an important question, the answer to which determines not only the future appearance of the house, but can also solve many practical problems. By separating the functions of cladding, insulation and load-bearing structures of the building facade, it is possible to achieve good protection of the house from destructive air.
The final step in installing the flooring is installing the baseboard. The plinth is not just an element of the interior; in addition, it is assigned both functional and aesthetic tasks. First of all, the main functional purpose of the plinth is to close the compensation gap, etc.
No matter how much chimney protection is installed, some small amount of moisture will still get into the pipe. It all depends on what cross-section the chimney has and what dimensions the “skirt” of the umbrella or deflector installed above it has. It should be noted that the use of a deflector is additional.
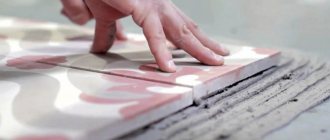
Finishing with ceramic tiles around the bathroom door
To make it easier to understand what awaits the tiler in the process of tiling a wall with a doorway, let’s first understand how serious an obstacle this wall element is. In fact, the doorway is a gap dividing the wall into two independent sections, which during the cladding process must be combined into a single and uniform surface, and the seams on it represent a whole picture. This is quite difficult to achieve if tiles are laid on both sides of the doorway from bottom to top. It is not much easier (one might even say more difficult) to lay tiles on one side of the opening from bottom to top, and on the other, so as not to disturb the seams, on the contrary, from top to bottom. This approach can only be done by an experienced and qualified craftsman.
A non-professional in this matter will need a serious assistant, which is a laser level or level. Using this tool, the precise position of the bottom tile on the other side of the doorway is calculated - when the tile is laid above it, the laser is simply aimed at the edge of the top tile and its beam will automatically indicate the location of the bottom tile.
Bathroom tiling design photo
Another problem that arises regardless of the bathroom tiling option you choose is the upper part of the opening - here you will need to install an additional stop that will keep the tiles from sliding down. As a rule, a metal profile is used as such a limiter - with one side it is inserted into the seam of the tiles already laid on one side, and on the other it is simply nailed to the wall in accordance with the horizon level. After it dries, this profile is removed, and after that the other side of the opening is tiled using the methods described in the previous paragraph.
How to finish a bathroom with tiles with your own hands can be seen in the video.
Why do you need to hide pipes?
The need to seal communications arises when the owner of an apartment or house does not want to disrupt the style of the interior. Masking can perform not only an aesthetic, but also a protective function. It is advisable to close the pipes if children or elderly people live in the house, who could inadvertently damage them.
In the bathroom it is important to hide communications.
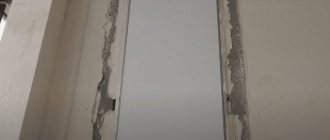
Slopes of niches and doors: how to solve some problems
In most cases, door slopes in a bathroom are not tiled - with almost any option for finishing a bathroom with tiles, craftsmen try to avoid this moment by increasing the thickness of the door frame by any means. But stretching it to the limit, even with the help of so-called telescopic extensions, is not always possible - sometimes it is cheaper, and most importantly more reliable, to finish the slopes with tiles, and the first problem that beginners in this business face is uneven trimming. It is impossible to cut several tiles of exactly the same size using a hand tool (even a tile cutter), and the resulting millimeter or smaller steps greatly spoil the overall picture.
What to do with such steps? This is a matter of technique. First, you need to realize the fact that it is better to direct the cut edges of the tiles towards the door frame - believe me, they look much worse at the corner, but near them they simply overlap. If the differences are within 1mm, then this can be done with colored acrylic, matching this material to match the door or tile. If there are large deviations in cutting, the uneven edge of the tile can be covered with a small corner, which is usually used to connect tiles in the inner corners, or with a narrow strip, which can be cut from the same door frame.
Finishing a niche with tiles in the bathroom photo
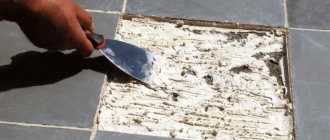
In conclusion, a few words about cutting the tiles itself - it is a real problem for a novice tiler. To learn how to cut tiles efficiently, and most importantly accurately, you will have to ruin more than a dozen tiles - without this, as you understand, high-quality finishing of the bathroom with tiles will not work. There are different ways to solve the problem of oblique, crooked and imprecise trimming, but the most common are installing joining corners, covering the cut edge of the tile with a factory edge, and trimming in the most obscured corners of the room. The first option is aesthetically not very good, the latter is not always possible, but the second is the most optimal - to implement it, the tiles need to be laid in a circle, row by row.
When you are going to cover a large enough area of wall or floor, it seems that there will be no problems. However, this is not the case - in order to foresee possible problems in advance, you need to plan in advance (it is advisable to even make markings) how the tiles will be positioned. It is easy to imagine that there may be obstacles on the surface under cladding, which are extremely important to take into account. For the sake of economy and appearance, it is necessary to think about how to go around these obstacles, if possible, with whole tiles, so that you do not have to split them into an incredible number of halves.
According to the standard scheme, markings should begin from the midline of the wall or floor. On a flat surface without obstacles this will not be difficult. But what to do if on the way there is a kitchen window, a door for the bathroom and toilet, a switch, an outlet, a ventilation vent, or a battery? Theoretically, all of the above-mentioned obstacles claim that the cladding begins precisely from them. It is much more difficult to correctly mark a wall when there are several similar obstacles on one surface. To solve this problem, you need to work through several options in order to then select the most suitable “central point”, acting from which you will not have to use a tile cutter often.
For marking, a special wooden ruler approximately 1.2 m long with the dimensions of the tiles and the gaps between them already marked is best suited. You can check how the tiles will be installed, for example, around a doorway, and whether the cut strips on both sides will be the same width. Follow the same procedure, marking the tiles in height, starting from the baseboard to the top of the doorway and beyond. For each door, it is necessary to take individual measurements - interior doors from the manufacturer for the bathroom may differ in the properties of the frames, trim, etc.
We lay tiles around the doors. Step by step.
- In the case where the door is located close to the corner of the room, you need to start with a full tile from the door frame. We install the bar plumb if the platband is not strictly vertical.
- Lay the tiles over the entire surface area; We cut the tiles to the corner of the room and to the ceiling, carefully measuring the distance.
- We install one plank above the door in line with the tile row, and the second one exactly above the level of the baseboard between the first and the opposite corner of the room.
- We lay solid tiles above the door. We lay cut tiles to the corner of the room and to the ceiling.
- We remove the strip above the doorway and fill the empty spaces with tiles.
- If the door is located in the middle of the wall, take the opening as the center, from where we lay out the tiles. We fix the planks and marking slats in an identical way.
We lay tiles around the window. Step by step.
- First select the center. If there is one window in the wall, then the center of the installation will be a plumb line in the middle of the window opening.
- If there are two windows in the wall, then you will need to center from two lines at the same time, but you need to take into account that between these lines a whole number of tiles must fit.
- Alternatively, we take the line laid through the middle of the gap between the windows as the center of laying the tiles.
- We always lay tiles across the wall and upward, starting with whole tiles under the window sill, and then along the sides of the windows.
- We fix a strip over the window opening to fix the strip of uncut tiles.
- After removing the planks, we cut the tiles and lay them on the wall plane on each side of the opening.
It is laid out inside the slope in such a way that the edges of whole tiles coincide with the edges of the tiles outside the slope. After this, we lay out the remainder of the cut tiles up to the window frame.
Everything in the house should have its own decoration and design. Also, decorative door cladding can be made using a variety of materials. It consists not only in decorating the door leaf, but also the doorway.
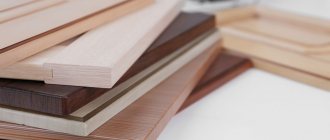
At the moment there are several types of doors that can be made from different materials:
- Input.
- Balcony.
Note. As a rule, the latter type is made either of plastic or wood and special finishing work on the canvas may not be performed. But the first two options should correspond in their design to the interior of the entire room.
Entrance doors are:
- Metal, which may already have a certain lining.
- Wooden, on the canvas of which there is also a design.
Wooden doors are divided into:
- Wooden (pure material).
- Veneered (with elements of veneer and other materials).
- Doors made of fiberboard or chipboard.
Interior doors can be:
- Wooden.
- From chipboard or fibreboard.
- With veneer overlays.
- Glass, which have recently become very popular.
Decorative door cladding is mainly carried out on wooden or metal door leaves.
Which pipes don't need to be hidden?
Communications can be part of the bathroom interior. Decorative elements will be models made of metal-plastic or galvanized steel. The material does not need painting and can be combined with loft, minimalist or hi-tech designs. Copper sewer elements are suitable for classic or baroque styles. Properly selected furniture and tiles will also help create the desired style.
There is no need to mask the sewer or water riser with various materials. Vertical communications can be decorated under a column using small tiles. The riser is lined with a heat-insulating shell, the thickness of which is no more than 2 cm. The outer shell is made of a plastic pipe of the required diameter, cut in half. The space between the inner and outer cladding is filled with polyurethane foam.
The finished structure must be tightened with special nylon clamps. This is required so that when the foam expands it does not lead to peeling of the outer shell. The clamps are left on the riser for a day.
After 4-5 days, a primer is applied to the column, which increases adhesion. Then they begin to line the riser with mosaics. It must be laid on a polyurethane base or cement adhesive mixture. If the tiles are planned to be laid on a reactive compound, there is no need to prime the column. After 1-2 days you can start grouting.
Wooden door cladding
The door leaf also plays an important role in repairs in general. Decorative cladding of a wooden door can be done:
- Varnish or paint using shading agents.
- Self-adhesive sheets.
- Laminate.
- Decorative stone.
- Decorative plastic overlays.
- Small wooden clapboard.
Paints and varnishes for decorating a wooden door
This method of finishing wood has become popular for a long time. Varnish or paint can not only give an original design to the door leaf, but also increase its service life, as it reliably and efficiently protects the surface of the wood from moisture and temperature changes. There are paints for painting wood:
- Oily.
- Acrylic and so on.
So:
- After drying, they can have either a matte or glossy surface.
- The varnish has only a surface with a sheen. Using a special product (stain) you can give the wood a darker, richer shade and thereby increase its strength.
- At the moment, it has become very popular to paint the door leaf in different shades, draw certain patterns and much more. The choice of such design directly depends on the design of the room.
- These products are quite easy to apply. You need to use natural brushes and a roller. The last option is for a flat door surface.
Advice. Before using varnish or paint to decorate a wooden panel, you must first check it for deformation. If there are small cracks on it, then everything can be removed with putty and sandpaper.
Self-adhesive sheets for decorating wooden door leaves
Very often, in order to save money, decorative door cladding is done with self-adhesive sheets, which are called self-adhesive, see photo. At the moment there is a huge selection of such material. There are imitation of various stone masonry, wood carvings, imitation of log houses and much more. The price for this finishing method is very low. And the design of the door leaf itself is quite practical. Characteristics:
- Self-adhesive can be used in any room, since its surface is a film that is not capable of absorbing any dirt or moisture. It is a washable type of wallpaper. Its surface can be cleaned using a mild detergent.
You only need to glue it on a flat surface and for this you will need:
- Scissors.
- Ruler.
- Pencil.
You can cut out decorative elements from it in the form of diamonds, circles and paste them over the door leaf. The whole process of work is done with your own hands very quickly and without much effort.
Instructions for laying PVC tiles (Video)
All you need for installation:
Pencil
Ruler
Construction knife
Start
If you decide to lay the flooring yourself, you must follow a few simple rules. Always check the packaging and PVC tiles for defects in good lighting. Do not use damaged or low-quality PVC tiles. The warranty is void if such PVC tiles are used in flooring installations. If a manufacturing defect is detected in the product, it must be demonstrated to a company representative. PVC tiles should be laid from one batch, since different deliveries may differ in shade and pattern saturation.
Preparing the base
The subfloor must be level, dry, clean and durable. We allow a smooth drop of up to 5 mm per 1 m; if there is a sharp drop (in the form of a step), installation of the coating is prohibited. It must be laid on a rigid base: concrete screed, tiles, waterproof plywood with a thickness of at least 12-15 mm (sanded, calibrated), OSB (at least 12 mm thick), chipboard (at least 16 mm thick).
Laminate on a wooden door
Decorative cladding on the door can be made of laminate. This material can be mounted on any surface except metal. There is a wide choice of laminate surface designs. It has:
- Durability.
- Reliability.
- Practicality.
- Originality.
- Durability.
So:
- The laminate consists of three layers. The top layer is always coated with a protective agent during manufacturing. It will be quite difficult to scratch it.
Advice. Since laminate is produced in even strips, it can only be mounted on a flat surface.
- As a rule, a special substrate is used to install laminate flooring, which creates a cushion for the material. You don’t have to use it on a wooden door leaf. The laminate is installed using nails or wood screws with decorative caps. Sometimes liquid nails or PVA glue are used.
You can cut the laminate with a saw or jigsaw, which will save time and speed up the finishing process.
Preparing the walls
Preparing the walls comes down to plastering and leveling them. The tiles must be laid absolutely level with the wall. If the seams between the bricks are deep, they are sealed with mortar. First you need to decide on the verticality of the walls. If the wall has a deviation from the vertical of more than four centimeters, there is no point in leveling it with plaster. Such walls are sheathed with plasterboard sheets.
Plaster leveling
First you need to remove the plaster that has fallen off the wall and plaster all the cracks. The only tool that can cope with this job and smooth out all the flaws is a rule that is at least two meters long. It is the rule that all excess solution is cut off. If there is no rule, then you can use a flat metal corner or a square pipe of suitable length instead. The applied solution must be removed without sparing.
Decorative stone in finishing works on the door leaf
Door cladding with decorative stone is quite rare. This material has excellent properties and characteristics. It can only be mounted on a flat surface and is lightweight. Peculiarities:
- There are various imitations of natural stone, and a non-specialist is unlikely to be able to identify artificial stone in the decoration.
- As a rule, the door leaf is not completely decorated, but only some part of it. It goes well with paint or varnish.
To install the stone you need:
- Glue.
- Building level.
- Tile cutter for cutting material.
- Pencil and tape measure.
The video shows the process of installing artificial stone on a door leaf.
Junction design options
Now we invite you to see how a hallway can look with tiles around the front door. Next, photos with design variations will be presented, and maybe one of them will appeal to you specifically and will be able to decorate your home:
Types of decorative panels for door cladding
This is also a very interesting and practical way of finishing. Decorative panels for door cladding can be made from:
- Plastic.
- Siding.
- Veneer and so on.
Peculiarities:
- They have a large selection of designs and various imitations. They are massive solid sheets, which are mounted on the surface of a wooden sheet using glue or self-tapping screws.
- The most popular are plastic decorative panels for door cladding, which are called overlays.
They are used not only to decorate interior door panels, but also entrance ones.
Tile for outdoor porch: choosing material
A prerequisite is that the tiles for the porch on the street should not slip underfoot , even if the shoes are slippery (and in snow, rain or humidity, they will certainly be slippery). When choosing a material, its “anti-slip” qualities are a priority. The impact strength of facing ceramics and its resistance to frost can be judged from the accompanying documentation; these indicators should be maximum.
It is equally important to choose the right tile size. Decorating the porch with tiles looks attractive if the cladding is made of solid elements. If necessary, you can “move” the tiled edges beyond the porch area - but no more than a few centimeters. It is important not to make a mistake with the texture. Relief patterns look great on a stand in a store - when installing such tiles on the street, they will definitely become clogged with dirt and will require daily and labor-intensive cleaning. Color preferences when choosing tiles for outdoor work are taken into account last, although they are important for aesthetics and design.
To finish the steps, it is best to choose special ceramic elements with a rounded surface. They not only look beautiful, but are also designed to evenly distribute the load during operation. Regular tiles are less durable and will require careful filling of the entire internal space with mortar. For the riser, any tiles or mosaics are chosen - here you can focus on the aesthetic appearance of the future staircase.
Finishing of metal door leaf
Decorative cladding of steel doors, as a rule, is carried out only with special paints - polymer. They have a large selection of shades and various structures. There are those that, after drying, burst on the surface and thereby create an interesting and unusual design for the door leaf. So:
- It will not be possible to apply such a coating yourself, since there are special instructions for this, according to which the entire work process is carried out in a special chamber and under the influence of high temperatures.
- At the moment, analogues of such a product have begun to appear, which are used independently, but with a spray bottle. It is not possible to paint the surface efficiently with brushes.
On the inside, all work is performed using:
- Leatherette.
- Laminate.
- Plastic or wooden lining.
Note. In the same work, the door is insulated and insulated using expanded polystyrene or polystyrene foam; mineral wool is rarely used.
How to cover a riser with facing tiles
Once upon a time, stoves were common in homes. The house was built “from the stove” and everyone danced “from the stove”. Times passed, and stove heating was replaced by gas, and stoves were replaced by gas boilers and risers. And although the riser does not have the function of heating the room, but is built only to improve ventilation, its design is no less important for the house than the type of stove used to be. I’ll tell you how to make his appearance yourself meet modern requirements without making a lot of mistakes.
Usually the riser is installed in the kitchen. You can paint it or whitewash it after plastering it. But it is best to cover it with tiles. It may be quite expensive and troublesome, but it is strong and durable. Tiles have always been an ideal material for finishing problem areas. It has a lot of useful qualities. This includes thermal conductivity, moisture resistance, strength and beauty of the coating.
No matter how unimportant it is in everyday life, it is very easy to keep the tiles clean. All this allows you to choose this particular material for finishing the riser.
Doorway and its design methods
Must be formatted accordingly. It will complement the decoration of the door leaf. The lining of the doorway can be done:
- Artificial (decorative) stone.
- Ceramic tiles.
- Natural stone.
- Plastic.
- Tree and much more.
The cladding of a doorway with decorative stone looks unusual. It is performed only on a prepared surface.
Preparing the surface for installation of artificial stone
Cladding a doorway with decorative stone begins with surface analysis. If it has visible defects, they must be eliminated using plaster or putty. The choice of product is based on the material of the surface itself.
Note. All work can be performed on the entire surface or on a specific part of it. Depends on the design of the room.
Lining a doorway with decorative stone is done using:
- Adhesive for stone finishing or cement mortar.
- Construction level.
- Tile cutter.
- Tape measures and pencil.
Stages:
- Apply cement mortar or glue to the surface of the wall and to the back side of the decorative stone with a spatula or trowel. Each element is set strictly according to the level, and only then fixed on the surface.
- Cladding a doorway with decorative stone can be done either with large decorative panels of this material or with small tiles. It all depends on the size of the finishing work.
Along with a large amount of finishing material, lining doorways with decorative stone is performed most often. It is practical and durable, can withstand temperature changes and significant loads.
Advantages and disadvantages of a concrete base
This porch design is highly durable and reliable; it does not require waterproofing before laying the tiles, nor does it require any measures to protect against corrosion. Provided that the technology for pouring concrete and laying tiles is followed, such a porch will last for a very long time without the need for repairs.
The use of poured concrete structures allows you to make a porch of various shapes. Here you can use semicircular and oval lines, arrange a wide area in front of the entrance - everything is limited only by your imagination and desire.
Schematic illustration of laying ceramic tiles on steps.
Despite the increased strength and durability, monolithic structures with paving slabs also have some disadvantages:
- the need to perform heavy physical work associated with preparing and pouring concrete;
- requirements related to increased accuracy of work, especially in terms of proportions of mixing the cement mixture;
- a large number of necessary materials, which significantly increases the cost of the structure;
- the concrete mass may be subject to thermal expansion due to changes in external temperatures;
- the need to establish a reliable connection between the porch and the foundation of the building;
- hydrophobicity of concrete, leading to the inevitability of measures to protect the structure from precipitation;
- the design issue is the lack of successful combinations of a monolithic porch with small one-story houses.
What is needed for this
To lay out the tiles as a mat, you will need the following:
- tile;
- mastic;
- mixed mortar for laying tiles;
- putty;
- putty gun;
- putty knife;
- respirator;
- protective glasses;
- gloves;
- thin notched spatula;
- sponge;
- bucket;
- water;
- Grinder;
- permanent marker;
- tile spacer;
- measuring tape;
- hammer;
- insulating tape.
Layout schemes
When choosing a layout scheme for tiles on the walls of a bathroom, it may turn out that in addition to whole tiles in a horizontal row, you need to install trim that spoils the decorative value of the interior. In this case, you can build up one of the adjacent walls or the box with additional layers of drywall.
Losing a working space of several tens of square centimeters in this case will dramatically improve the quality of finishing of the room.
Most tile manufacturers have developed special programs in which it is possible to process a bathroom project. In them, the tiles will be laid out on the walls so that the user can evaluate the quality of the interior before work begins.