We invite you to discuss a hot topic: how to lay tiles on an uneven floor. Yes, many of us know that the technology of laying tiles consists of several stages: preparation, leveling the floor, preparation and installation again. All stages are important in their own way and affect the final result and the service life of the flooring. The most important stage is pouring the shelf. Well, if there is no time for leveling and the area is not very large, can you skip this stage? It is better, of course, to fill the floor, since it is cheaper than leveling it with tile adhesive, and the adhesive solution has a maximum layer thickness. Despite the recommendations, there is a way out and we will share it with you.
Tile comb: subtleties of choice
- What is a notched trowel used for?
- Varieties
- Teeth shape
- Advice from professionals
High-quality tiles can delight owners with their beautiful appearance for many years.
Therefore, it is important to lay the material according to all the rules so that the finish does not become deformed in the future. Finishing work, as a rule, does not take too much time and physical effort, especially if done with the right tools. In addition to a regular spatula, you will need a tile comb, the subtleties of choosing which you need to know before purchasing it.
Tooth shape
- To apply ridges from 6 to 10-12 mm, standard square teeth are used.
- For ridges over 12 mm when working with cement mounting mixtures, semicircular teeth are used. At this thickness, the track combs more evenly and does not fall off if it has a semicircle in cross-section rather than a square. They are also used for applying synthetic adhesives with strong spreadability, regardless of the layer thickness.
- There are also sometimes combs with triangular teeth. They are not suitable for laying tiles; they are used for applying elastic adhesive in a thin layer (up to 4 mm) for PVC tiles.
Depending on the shape of the teeth, the spatula may be marked with letters and numbers. The number indicates a group of size parameters, and the letter indicates the shape:
- A – triangular teeth, without large spaces between them;
- B – triangular with large intervals;
- S – triangular without gaps;
- C – square;
- R – rectangular (including irregular shape);
- M – semicircular.
Tooth sizes
The thickness of the applied glue can be adjusted by changing the angle of inclination. Also keep in mind that after pressing the tiles, the glue will distribute into the voids and settle.
The adhesive layer flattens out after pressing.
Approximate sizes of teeth depending on the area of the tile:
| Tile area, cm2 | Teeth size, mm | Adhesive layer after pressing when applied at an angle of 45°, mm | Adhesive layer after pressing when applied at an angle of 60°, mm |
| 2500 | 12 | 4,2 | 5,2 |
For a floor or uneven base, the size of the teeth is selected larger.
What to do with uneven planes: solutions
As mentioned above, significant relief must be removed, otherwise the tile will
won't lie down. A self-leveling screed is useful for this. This product will make it possible to easily achieve a very smooth surface, although it does not take 1 day to dry. Specialized mixtures speed up the process, but the work stops for two to three days. You need to understand that this will cause the floor to rise and, as a rule, you will have to correct the surface level throughout the house.
Level control example
The screed will also be a lifesaver in case of a significant tilt. Unfortunately, it will also eat up space, but gluing the tiles will become much easier.
In general, the screed has its own positive qualities:
- perfectly aligns;
- fills open voids in the rough base;
- has an antifungal effect;
- makes it possible to hide the heated floor system;
- provides additional noise and heat insulation.
If this option is not very suitable, then it is possible to do without alignment. In this case, the tiles are laid on the floor according to special rules that differ from traditional tile laying options. Otherwise, you don’t need to count on a solid and good result: the first flaws will appear in the first month of operation. However, when implementing the recommendations, even on such a poor base, the tiles
will serve for more than a dozen years.
Tiles are cut before use
What to look for when choosing?
There are different types of combs for laying tiles. So what should you pay attention to when purchasing so that the tool does not fail during operation?
In order to be able to lay tiles efficiently, you must take into account the size of the tool and the shape of its teeth:
- A product with square teeth is typically used to apply 5 to 10mm thick mixture.
- Semicircular teeth are perfect for working with mixtures that have a synthetic composition. In addition, they can be used for better glue distribution. It is best to apply a compound with a thickness of more than 12 mm using a tool with semicircular teeth.
- In stores there are also specimens with triangular teeth. This type of comb is perfect for working with very liquid mixtures. It can also be used if it is necessary to apply a layer of no more than 5 mm. Thanks to its triangular shape, this type of tool ideally distributes the liquid mixture over the surface.
- There are also universal spatulas on sale that are suitable for laying standard tiles and mosaics, so before you pay attention to the shape of the teeth and choose the right tool, you must know exactly the size and thickness of the tiles that you are going to use for finishing work.
- Consider another important fact: the width of the tool itself must correspond to the width of the tile or be slightly larger, otherwise installation difficulties will arise.
- It is important to pay attention to the size of the teeth. If this parameter is less than a millimeter (0.6-1.2 mm), then this option is perfect for applying a very thin layer of the mixture.
- The 0.3mm size is ideal for working with mosaics.
- For installation of various types of ceramics, a size of 0.4 mm is needed.
- Teeth measuring 6 mm are excellent for installing larger tiles and wall laying.
- To install large floor tiles (thickness more than 12 mm), you need a comb with teeth of at least 10 mm.
Often, several different tools are required for repairs, since the owners plan to install tiles on both the wall and the floor. Moreover, the material comes in different formats and thicknesses.
If you choose a tool solely for applying glue, be sure to read the instructions on the package. As a rule, manufacturers give clear recommendations on the selection of construction equipment. The size of the comb and its features will be indicated on the packaging, which will facilitate the selection process.
Before you decide on a particular tool, be sure to hold it in your hands to make sure that it is comfortable and that the handle is comfortable and holds securely. Professionals prefer varnished holders - they are practical, do not slip, and do not leave splinters.
Another important point to consider is the price. In fact, high cost is not a guarantee of high quality, so pay attention not to the cost, but to the quality of the product.
Notched trowel
A type of spatula that has specially shaped teeth on the blade.
Such tools are intended mainly for applying adhesive mixtures - the shape of the blade ensures uniform distribution of the mixture over the surface being treated. Spatulas of this type can vary in the size of the teeth: the thicker the layer of glue applied, the larger the teeth should be. What is it and what is it for?
A notched spatula, called a “comb,” has a handle like a regular spatula and a working surface, one or more sides of which are in the form of teeth. You can use the comb:
Notched spatulas appeared relatively recently. Previously, to lay tiles and other coverings, it was necessary to manually level the adhesive or cement, which took a lot of time and effort. In this regard, the transformation of a conventional spatula into a serrated one occurred.
- for laying tiles on the wall;
- for laying tiles on the floor;
- to create a mosaic;
- for placing linoleum;
- to create a self-leveling floor.
Thanks to a notched trowel, the adhesive mass is evenly applied to the surface, allowing you to carefully lay out the tiles. Due to the different sizes and weights of tiles, it is important to choose the right tool for working with them. For floor glue, it is worth using a comb with large teeth, since more adhesive composition will be needed; to work on the wall, you can take a spatula with smaller teeth to distribute the composition in a thin layer. A tool with the largest teeth will be needed for aerated concrete or heavy tiles.
The façade version of the spatula depends on the size of the finishing materials and their weight: the smaller and lighter they are, the thinner the layer of adhesive composition will be, and vice versa.
The teeth can have a gradation of size from 2 to 20 mm, the shape can be rectangular, semicircular and triangular. The spatula itself can be rectangular or trowel-shaped, depending on the material – metal or plastic.
Thanks to the use of a notched spatula it is possible to:
- lay out the tiles or other building material as evenly as possible, evenly distributing the adhesive composition;
- carry out the work as quickly as possible;
- achieve good adhesion to the surface thanks to the optimal amount of glue on it;
- reduce glue consumption for work.
Using a comb
The notched trowel is selected:
- Environment of use of tiles (interior or facade)
- Vertical or horizontal surface (floors or walls)
- Type of facing material (ceramics, porcelain stoneware)
Notched trowel for façade (interior)
The comb for the facade and interior does not have any fundamental differences. The difference between them is the thickness and area of the working blade . On a façade trowel the area slightly larger ; the metal of the sheet is usually thicker and stiffer . Often they make a rubberized handle on the tool. Although the definition of “facade notched trowel” does not prohibit its use indoors, on the contrary, it is often more convenient to work with a facade trowel than an interior one.
Comb for laying tiles on the floor (walls)
The notched trowel for floors and walls has a difference in the size of the teeth . As a rule, tiles that are larger and thicker than wall tiles are used for the floor, based on this we select the adhesive mixture and, accordingly, the comb; for floor tiles the layer of the adhesive mixture is often more than 12 mm , which means the teeth should be larger (see Shape of the comb teeth above) .
Comb for ceramics (porcelain tiles)
The peculiarities of installing porcelain tiles force you to approach the work with great responsibility. Porcelain tiles practically do not absorb moisture, so only glue marked “for porcelain tiles” on the packaging is used. For porcelain stoneware slabs, the following rule applies: the adhesive layer must be no less than the thickness of the tile . So, for example, if the porcelain stoneware slab is 10 mm thick , then the tooth on the comb should be at least 10 mm.
A notched trowel for ordinary ceramic and tiles is selected based on the size of the tile, the base, and the operating environment.
Mosaic comb
For mosaic , use a comb with minimal teeth . The height of the teeth is usually less than the thickness tile itself . This is due to the fact that with a large layer of adhesive mixture, the glue fills the space between the tiles, and as a result, it will take more than one day to clean the seams. So, for example, for a 3-4 mm mosaic a 2-3 mm comb is used , sometimes the height of the comb teeth is even cut down to 1 mm.
Preparation of the main surface
First of all, furniture, plumbing fixtures and other things that interfere with installation are removed from the premises. The room should be ventilated in advance, because during the work the entry of fresh air into the room is unacceptable, as well as increasing humidity and cooling the air to negative temperatures. Therefore, while leveling the floor, all windows in the house must be closed.
To ensure the best quality flooring, the subfloor must be thoroughly cleaned. All dust, construction debris, dirt, and oil stains must be removed. To get rid of dust, it is better to use a construction vacuum cleaner.
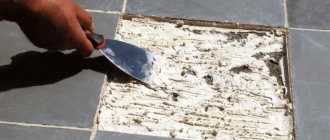
It is extremely important to remove all remnants of the old coating
Defects in the concrete base - chips, cracks and other surface defects, as well as cracks in the joints of floor slabs - must be repaired with putty yourself. After the putty has dried, the floor can be covered with two layers of primer, which will saturate the floor, clog all the pores in this material, smooth out minor surface imperfections and ensure the best adhesion of the leveling mixture to the base.
After cleaning, repairing defects and priming, the floor can be measured and marked. It is most convenient to use a modern laser level for this, which will provide the best accuracy. This device creates a zero level projection on the walls and floor. You need to install it at the highest point of the base, and then screw the screws into the floor to mark the desired level. A thread is stretched between these screws, which will make it easy to navigate.
Before leveling the floor under the tiles, it is worth laying a metal reinforcing mesh on the base to strengthen the leveling mixture. Laying is done overlapping, the individual sheets are connected with ordinary wire. This mesh is usually used when leveling differences in height exceeding two centimeters, since in this case it is necessary to improve the adhesion of the floor covering to the base slabs. If the unevenness is minor, there is no need to reinforce the floor.
Recommendations from tile adhesive manufacturers
One of the important characteristics of masonry mortar is adhesion to the base. It shows how tightly the glue holds. The adhesion strength depends on parameters such as:
- mixture composition;
- layer thickness.
And the last indicator depends precisely on the size and shape of the teeth. Therefore, manufacturers indicate on glue packages not only the dimensions of the tiles, but also which spatula is best to use, for example:
- for tiles with a side up to 7 cm - you need a comb with 3 mm teeth;
- up to 10 cm - 4 mm;
- 10-20 cm - 6 mm;
- 20-30 cm - 8 mm;
- 30-50 cm - 10 mm;
- more than 50 cm - 12 mm.
Attention! If the cloves are too small, the solution will be less than necessary. The tile will stick worse and will come off over time. And if they are too large, more mixture will be needed, in other words, repair costs will increase.
Different types of glue differ in composition, setting time and shrinkage coefficient. The manufacturer's recommendations regarding one of them may differ from the average. Tips for choosing combs for the most common brands of tile adhesive are given in the table.
| Name | Tile size (cm) | Teeth height (mm) |
| Ceresit CM11 Plus | up to 5 /10 /15 /25 /30 | 3 /4/ 6 / 8 /10 |
| Ceresit CM12 | up to 30/60 | 10 /12 /18 |
| Ceresit CM 14 Extra | up to 15 /25 /30 /45 | 6 /8 /10 /12 |
| Ceresit CM17 | up to 10 /15 /25 /30 /45 | 4 /6 /8 /10 /12 |
| Plitonite A | up to 10 / 20 /25 /30 | 4 /6 /8 /10 |
| Plitonit B | up to 10 /20 / 25 / 30 / more than 30 | 4 /6 /8 /10 /12 |
| Plitonit Superpol | 10-20 / 20-25 /25-30 /from 30 / from 40 | 6 /8 /10 /12 /15 |
| Lithoacryl Plus | 5 /15 / 25 / 33 /45 | 4 /6 / 6-8 / 8 /10 |
| LitoGres K44 ECO | 10 /20-25 30 | 6 /8 /10 |
| Litoelastic | 5 /10 /15 /25 | 4 /6 /6 /6-8 |
Frame wall alignment
The weakly adhering finish is removed from the wall, the bulges are cut off, primed, and then the depressions are roughly rubbed. If gypsum plasterboard is used for leveling, even moisture-resistant, it is better to waterproof the wall, easier - penetrating. To make the frame, wooden blocks are used after antiseptic and hydrophobic impregnation, or better yet, a thin-walled steel profile for gypsum plasterboard, galvanized or painted.
To ensure that the base for tiling is sufficiently rigid, the pitch of the profile or bar in the frame is no more than 40 cm, and the coating is often made of two layers of plasterboard.
Laying tiles on gypsum board, fiber board or flat slate is done in the same way as on any stone base. The disadvantage of this alignment is the loss in room dimensions due to the use of a frame.
Categories
- Apartment design
- All about repairs
- Doors
- Window
- Ceiling
- Walls
- Plaster and putty
- Drywall
- Furniture
- Other about repairs
- Floor
- Leveling the floor
- Cement strainer
- Dry floor screed
- Semi-dry screed
- Self-leveling floor
- Flooring
- Warm floor
- Electric floor
- Water heated floor
- Floor coverings
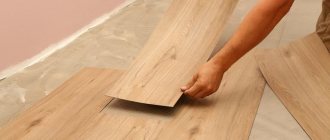
- Tile
- Laminate
- Everything about plumbing
- Water pipes
- Bath, shower
- Faucets
- Toilet
- Heating
- Everything is electrical
- Wiring
- LED in everyday life
- Ventilation
- Construction materials
- Tools
- Materials
- Construction calculators
- Repair of a country house
- Miscellaneous articles
- Top review
- Question answer
- News
- Repair video
How to apply glue correctly
The main thing in this work is not to leave a void between the cladding and the base. The grooves that the comb forms help squeeze air out of the adhesive composition. However, novice tilers may make mistakes when finishing, which can lead to the material peeling off from the base.
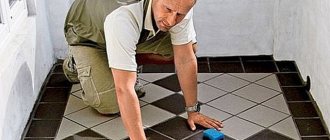
So, the sequence of work:
- We take a spatula for laying tiles with smooth edges and apply a lump of glue to the product.
- Using a toothed comb, level the mixture over the entire width and 2/3 of the length.
- We tilt the tile towards the container with glue and distribute the mixture along the entire length, discarding the excess.
- If the working solution is not enough, add another lump of glue.
- Next, apply the working solution to the wall/floor and press the cladding.
What is a notched trowel used for?
The process of laying tiles begins with applying adhesive to the facing surface. These manipulations are carried out with a regular construction spatula, but to remove the excess amount of adhesive solution, you need a special comb with teeth. This tool allows you to distribute the required volume of joining solution over the surface. After pressing the decorating plates to the place of installation, the glue evenly fills the required space.
Thanks to these actions, the material is securely fixed to the surface.
If the installation is carried out on the wall, you can be sure that the tiles will not fall off. If the installation is done on the floor, then if heavy objects fall, holes will not appear on it, although cracks may form on the top layer of tiles.
Using a tile comb has many advantages:
- The installation is reliable and of high quality, since the adhesive mixture is distributed in an equal layer over the entire surface. The main condition is that the base should not have defects.
- The pace of work is significantly accelerated, since additional time is not wasted on displacing the glue and removing its excess.
- The adhesive solution is consumed in the optimal amount. A notched trowel helps to use exactly as much glue as the instructions indicate. Therefore, you don’t have to worry about over-consumption of the mixture and, accordingly, about unnecessary material costs.
↑ List of required materials and tools
These materials, equipment and tools will be needed to cut, lay and sand floor tiles:
- building levels 1 and 2 meters long;
- tape measure, marker;
- regular trowel, trowel and trowel with teeth (7 mm);
- pliers;
- for mixing mixtures, a construction mixer with an attachment;
- brush, pieces of cloth for cleaning tiles;
- Bulgarian;
- electric tile cutter or tile cutter;
- core;
- mallet;
- crosses of the required size;
- glue that matches the material of the floor surface;
- grout of the desired color or white with the color of the required shade;
- primer;
- floor tiles.
It is advisable that before starting work you have all the material on the list, and do not have to interrupt work and run to the hardware store.
Uneven planes: what's the problem?
It is important to understand that tile is a material that initially needs a flat surface. Just like for parquet or laminate, unevenness provokes unwanted deformations. By flat we mean a plane on which there are no reliefs or slopes.
Mounting on a slightly inclined surface
The biggest problem is the relief, since the tiles will not lie on such a surface even with a thick layer of glue. In this case, you will have to take leveling measures, otherwise it will not be possible to lay the selected tile. Even if this succeeds, then soon:
- cracks will appear;
- depressions may occur;
- chips form;
- ceramics will come off.
The costs of work will not be justified if you do not take care of a quality base. Moreover, savings on rough preparation sometimes result in large costs for repairs or complete replacement of the tile covering. And this is problematic when the premises are already in use.
Diagonal installation example
The situation is considered much more favorable when the only problem is the slope of the surface. Laying floor tiles on it is much easier, since the glue in this case acts as a screed. Sometimes tiles are laid at an angle, for example, as a drain in showers or baths. But in domestic conditions such unevenness is undesirable, since at best they will provoke the accumulation of moisture or dust, and at worst they will cause injury to people using the room. The last danger is especially relevant for bathrooms.
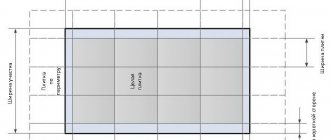
Marking before laying tiles on the floor
Before laying tiles on the floor, mark the surface. To do this, use a laser axle builder. But only professional builders have such a tool. A budget option is to use a tape measure, cord, nylon thread and pencil.
It is recommended to start marking depending on the design idea. The optimal solution is to take the center as the starting point. Initially, the starting point of the tile (border) is marked, then this area is divided into 2 parts and a line is drawn. The first slabs are laid on both sides of this mark (direction to the left of the center) - then the parts of the tile will be identical in size. The first row is placed along the line, after which they move to the second.
The tiles are cut using an electric tile cutting machine (it guarantees a high level of cutting accuracy) or a manual tile cutter. In the absence of such tools, use a regular grinder. But when working with it, keep in mind that there will be a lot of noise and dust.
If it is necessary to cut round, square or other tile configurations, first draw a layout (use cardboard or a sheet of paper) then cut out the tiles according to the drawing. For this manipulation, use a grinder, and use pliers to bring the hole to the desired shape. When performing such work, be sure to wear special safety glasses.
List of required tools
Tile laying tools
High-quality cladding depends on the chosen tool for laying tiles. Porcelain stoneware, glue and a hammer are not enough for the work. Professional tilers use special equipment. If you are planning one-time work and need to reduce the burden on your budget, rent a tool.
To cover an uneven floor, you will need basic equipment: a hammer drill with a whisk attachment or a mixer, a tile cutter, a grinder and wire cutters.
- rubber hammer for tapping;
- trowel and notched trowel;
- ladle for adding glue;
- scraper, construction knife;
- a set of plastic crosses or SVP;
- extension cord and pencils;
- roller for applying primer.
Auxiliary tools: tape measure, squares, water or laser level (spirit level), aluminum rules 2.5 and 1.5 m.
Grouting kit:
- bucket 2 l.;
- grout spatula;
- rubber and felt gloves;
- hard washcloth;
- foam rubber and 10 liter capacity.
When performing construction work, follow safety precautions. When using an angle grinder, wear glasses. A respirator will prevent dust from entering your respiratory tract. Use gloves to protect your hands from minor injuries.
SVP is an innovative scheme that allows you to level the tiles on the floor when laying. The system is suitable for ceramics and porcelain tiles with a thickness of 3-20 mm.