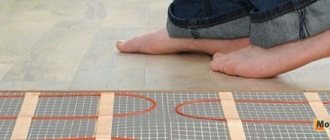
A water floor refers to a comfortable heating system, and in order for a heated floor scheme for a home to be correctly selected, it is necessary to know the area of the room and the number of rooms.
Compared to a traditional radiator heating system, in which warm air rose to the ceiling and the floor remained cold, the underfloor heating system evenly heats the room over the entire area, and the air temperature near the floor is higher than that at the ceiling, which has a beneficial effect on people.
Compared to a traditional heating system, a warm water floor is 25% cheaper to operate.
What is the beauty of heated floors?
Due to the fact that the underfloor heating pipes are laid out over the entire area of the room, the most uniform heating of each area is achieved. Wherever you are in your home, you will be equally comfortable.
With water floors, in most cases you get rid of heating radiators, which previously took up extra space in your home. For all these features, water-heated floors are loved in private homes. Let's take a step-by-step look at laying a water-heated floor with your own hands.
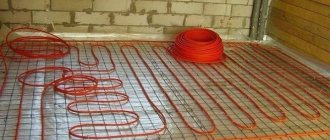
Rules for calculating pipe footage
You can calculate the footage of elements for assembling heated floors after drawing up a diagram of the entire system.
When calculating, the following nuances are taken into account:
- Pipes are not laid in places where furniture, large floor equipment, and household appliances are placed.
- The length of contours with different cross-sectional sizes must comply with the following parameters: for 16 mm it should not exceed 70 m, for 20 mm - no more than 120 m. The location of each circuit corresponds to an area of 15 m2. If you do not follow these recommendations, the pressure in the heating network will be low.
- The discrepancy between the length of the lines is no more than 15 m. For a large room, several heating branches are installed.
- Provided that effective heat-insulating materials are used, the optimal pipe spacing is 15 cm. If the house is located in an area with harsh climatic conditions, where the temperature drops below -15°C, the distance should be reduced to 10 cm.
- If the installation option was chosen in 15 cm increments, the material costs are 6.7 m per 1 m2. Laying pipes at intervals of 10 cm - 10 m per 1 m2.
Warm floors can only be equipped with a solid pipe. Depending on the footage, several or one coil with pipes for the water circuit is purchased. Then it is divided into the required number of lines.
When laying pipes, it is necessary to take into account hydraulic losses, which increase with each subsequent turn. It is considered that contours exceeding 70 m should not be used
Work on installing heated water floors always begins on the coldest side of the room. The issue of choosing the optimal route for the coolant is very important - the water temperature decreases closer to the end of the circuit.
Cost of installing heated floors
Many people are interested in the cost of installing heated floors. Let's share some numbers. If we take into account everything described above, then without pouring the screed and without taking into account the boiler room, the cost of components will cost approximately 1000-1200 rubles per square meter. You add the cost of the installer’s work in your region and get the final cost per square meter. If the areas are large, then in some cases this amount includes collectors for heated floors.
Taking into account the boiler room, turnkey installation of heated floors will cost approximately 2,500 rubles per square meter. This cost takes into account a boiler room with one boiler, an indirect heating boiler and related equipment. The figures are relevant for houses from 150 square meters. With a smaller area, the amount may be slightly higher due to the high cost of boiler equipment.
Collector connection diagram
The choice of a ready-made mechanical or automatic collector model depends on the characteristics of the heating system.
The first type of control module is recommended to be installed for heated floors without a radiator, the second can be used in all other cases.
Valtec collector groups are the most popular. The manufacturer provides a 7-year warranty on its products. The installation diagram for the liquid circuit manifold is already included in the package of the finished mixing unit
According to the diagram, the assembly of the distribution comb for heated floors is carried out as follows:
- Installation of the frame. The following can be selected as the installation area for the collector: a prepared niche in the wall or a collector cabinet. It is also possible to mount directly to the wall. However, the location must be strictly horizontal.
- Connection to the boiler. The supply pipeline is located at the bottom, the return pipeline is located at the top. Ball valves must be installed in front of the frame. They will be followed by a pump group.
- Installation of a bypass valve with a temperature limiter. After this, the collector is installed.
- Hydraulic test of the system. Check by connecting to a pump, which helps build up pressure in the heating system.
In a mixing unit, one of the required elements is a two- or three-way valve. This device mixes water flows of different temperatures and redistributes the trajectory of their movement.
Shut-off valves and fittings are installed on both pipelines, return and supply, connected to the manifold installation, designed to balance the volume of the coolant, as well as to block any of the circuits
If servo drives are used to control the manifold thermostats, then the mixing unit equipment is expanded with a bypass and bypass valve.
Can the outline be of different lengths?
The branch of a warm water floor should not exceed 120 meters. Otherwise, you should make several separate loops. Ideally, they should all be approximately the same length. Then there will be no need for additional work on balancing and setting up the system.
If we consider an apartment with three rooms, one of which is a bathroom, then it is natural that the length of the pipeline in this room is much shorter than in the rest. The question arises: is it necessary to divide the coil in other rooms into parts so that it is equal to the size of the pipes in the bathroom?
This is not necessary; there is an acceptable discrepancy along the length of the pipeline of up to 30 to 40%, in rooms of different sizes. In addition, by using different pipe diameters and varying this by changing the laying step, you can reduce the area of a large room.
For your information! Do not forget to exclude from the area of the largest room the places where large-sized furniture will be installed.
Regardless of the chosen scheme, you should first prepare a drawing for laying the pipeline, taking into account the size of the contours and the intervals between the branches of the warm water floor.
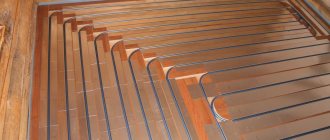
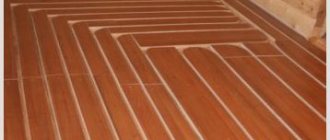
Basic methods of pipe installation
There are only two methods of laying pipes for arranging a heated floor - flooring and concrete. In the first method, ready-made materials are used for the base: polystyrene insulation and modular or slatted panels. There are no wet jobs that require a long drying time, so installation is quick.
When using the second option, the heating network is walled up with a screed. Depending on the thickness of the concrete, the time it takes for it to dry completely is calculated. It will take 28 days to harden and only after that is it possible to install the selected floor covering. This is the most labor-intensive and financially expensive method.
#1: Laying on profile thermal insulation boards
Arranging a warm floor system using this method is the simplest. Polystyrene insulation mats are used as the basis here.
The standard parameters of such slabs are 30*100*3 cm. They have grooves and low posts on which the finishing material is laid.
Polystyrene mats are not hygroscopic, so they do not lose their original characteristics when exposed to moisture. Even though this material is a polymer, it does not contain any components harmful to health.
In this case, pouring a concrete screed is not necessary. If tiles or linoleum are used for flooring, gypsum fiber sheets will initially be laid on the base. The thickness of such plates should be at least 2 cm.
#2: Device using modular and rack panels
In most cases, such panels are used in houses built from wood. Fastening of pipes for arranging a heated floor is carried out on a rough foundation.
The modular system is equipped with chipboard panels 2.2 cm thick, on which the heating lines are laid. These modules are equipped with channels to accommodate aluminum fixing plates. With this installation method, the insulation layer will be located in the wooden floor.
All strips are placed with a distance of 2 cm. Based on the applied pitch between the pipes, strips of the appropriate length (15–30 cm) and width (13–28 cm) are used.
To reduce heat loss, pipe latches are installed on the plates. If linoleum was chosen for the final floor covering, one layer of gypsum fiber boards is laid on the pipes; if laminate or parquet boards are used, they are dispensed with.
The installation of a modular floor is carried out using ready-made elements, which are chipboards. They are equipped with grooves for fixing coolant pipes
The slatted flooring system is almost identical to the modular one, however, it does not use panels, but strips, the minimum width of which is 2.8 cm.
Laying is done directly on the logs in increments of 40-60 cm, and the distance between the slats is at least 2 cm. For thermal insulation, extruded polystyrene foam or fibrous mineral wool is chosen.
Laying of heat-conducting lines is carried out by placing pipes in intermediate holes between chipboard sheets on aluminum plates equipped with grooves
Both methods are more suitable for wooden floors. In other cases, a more complex option with a concrete screed is chosen.
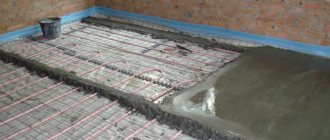
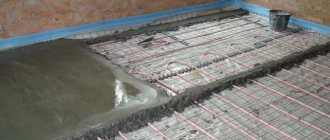
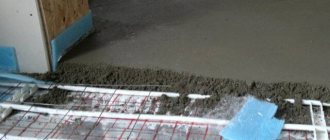
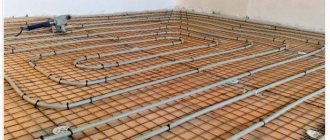
#3: Installation of pipeline with screed
Despite the labor-intensive process, installation of a heating network with a concrete screed is the most popular.
The process consists of the following steps:
- First of all, the base is prepared. Irregularities in the subfloor are eliminated using a hammer drill.
- The first layer is waterproofing material. It is spread in strips so that the edges overlap each other by 20–30 cm. The film should also extend to the base of the walls by 15 cm. The joints are glued with construction tape.
- Thermal insulation is laid over it.
- A damper tape is glued between the future fill and the walls. This action is required to compensate for the expansion of the screed when the floors are heated.
- Laying reinforcing mesh. It helps to increase the strength of the screed.
- Pipes are attached to the fittings according to the chosen pattern using plastic ties.
- A control check of the heated floor system is carried out by filling it with liquid and pressing it.
- Next, the guide beacons are installed.
- The final stage is pouring the cement screed.
For rooms with a large area, the sector division method should be used, with cells no more than 30 m2. For each of them it is necessary to arrange an individual circuit.
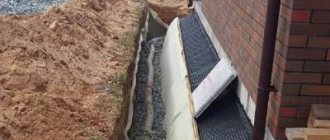
If the lower floor is heated, then polystyrene foam with a thickness of 20–50 mm is used as insulation. When there is an unheated basement floor or basement below, the thickness of the thermal insulation should be 50-100 mm. Pouring heated floors with a concrete-sand mixture can be done with or without a reinforcing mesh.
If polystyrene foam boards with connectors for the contours act as insulation, the use of a mesh is not necessary.
When standard thermal insulation material is used, a thin polymer or metal mesh is used to fix the heat-conducting line.
On our website there is a series of articles devoted to the design, installation and connection of water heated floors.
We advise you to read:
- How to make a water heated floor with your own hands: a step-by-step guide from design to assembly
- Connection diagram for water heated floor: design options and device manual
Pros of plinth
The technology, which is fundamentally different from traditional heating systems, looks like an ordinary decorative element from the outside. She received nationwide love thanks to her filling:
- A warm do-it-yourself plinth is equal in thickness to its traditional counterpart, but the height is slightly larger - 12-15 cm. This is done for the convenience of installing the heating system inside the element.
- The finishing is mounted at the junction of the floor and walls along the entire perimeter of the living space, organically fitting into any interior.
- The principle of operation is simple - electricity or coolant heats the tubes, and they, in turn, give off heat to the outer aluminum casing.
The benefits don't end there:
- Installing a warm baseboard allows you to get rid of inconvenient radiators - the dream of many owners. Nothing will stop you from turning any idea of an interior designer into reality. You don’t have to hide ugly batteries in closets, behind screens or curtains.
- This system allows you to increase the service life of your furniture, because, for example, a cabinet standing next to a conventional converter quickly dries out due to hot air.
- A warm baseboard with your own hands can be either a full-fledged heating method or an auxiliary one. This element can not be placed along the entire perimeter of the room, but only where additional heating is needed. This reduces energy costs without reducing the efficiency of the device.
- The innovative heating system can be installed not only in a new apartment, and not only during renovation. Its installation is possible even months after the completion of construction and repair work.
- You can use a warm baseboard with your own hands in any room. They are suitable for living rooms, bedrooms and offices; they perfectly warm glazed verandas, terraces, winter gardens, balconies and loggias, can be installed in the bathroom and toilet, and are safe even for a child’s room.
Another great advantage of a warm baseboard with your own hands is that it does not create a “thermal cushion” under the ceiling. The entire space of any room is heated evenly:
- Standard heating systems work in such a way that hot air inevitably rises. In this case, drafts on the floor are possible. If the room is small, then this is not so noticeable. But, for example, in country houses this difference is quite large.
- The skirting system works in such a way that heat is transferred not only into the space, but also into the walls. This advantage will be useful for owners of private houses whose walls often freeze, and for residents of corner apartments in high-rise buildings.
But many people prefer this system rather than a warm floor, because to install a warm baseboard you do not need to prepare a concrete screed; the modular design of the system is very mobile. At any time you can pick it up and move it to another room.
How to determine the area of a room?
Before installing a heating structure, you need to calculate its power depending on the area of the room, so that the structure can heat the rooms evenly. In order for the pipeline to function optimally, you need to install a circulation pump. When choosing power, you need to pay attention to some factors:
- tube diameter;
- number of additional branches, connecting fittings, pipeline footage;
- required pressure;
- amount of coolant.