What is paving stone and what types does it come in?
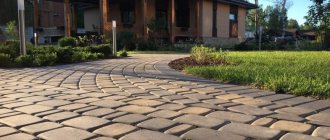
A parallelepiped made of stone is called a paving stone. The coating is strong, durable, laid out on the surface block by block, and is intended for beautifying the external space. It can be clinker, granite, concrete. The elements are different in shape, decor, color. There are many installation methods and technologies for performing work.
Laying granite paving stones is suitable for sidewalks and roads. Natural material is environmentally friendly and does not require constant maintenance. Concrete blocks are also popular; they are distinguished by high levels of stability, but it is worth considering the material’s susceptibility to acids. Clinker paving stones are durable, do not deteriorate from chemicals, and do not fade.
For a budget option, you can make paths using vibro-pressed cement-polymer paving stones. The material tolerates loads well and is moisture and frost resistant. The low price is due to the replacement of cement components with polymer ones.
There are several tips when choosing. In addition to the type and shape of the elements, it is worth paying attention to the technical characteristics of the compositions. Frost resistance is important, which takes into account the freezing-thawing cycle (for the climatic conditions of Russia this is 10 cycles). Water absorption capacity should be no more than 2%. There are 3 strength indicators for paving stones: compression, bending and abrasion. Average weight of material per 1 sq. m - 100 kg.
What are the advantages and disadvantages
The advantage of paving stones is strength, high performance characteristics, high load-bearing capacity, and resistance to temperature changes. The material is easy to install, so you can make the paving yourself. Paving stones are environmentally friendly, have high maintainability, and do not require high operating costs.
Paths made of paving stones do not retain water; the safety of people's movement is ensured by the rough texture of the elements. A geotextile separator, which is laid in the base, prevents soil subsidence and deformation of the sidewalk.
The disadvantage is the high cost of paving stones, which is why concrete-polymer block options are used in budget projects at the dacha. Paving stones are also difficult to process.
On some soils, with a high level of humidity, the base can be washed out, then the masonry sags and individual elements fall out.
What does landscape design consist of?
When landscaping a site, owners of country houses take into account not only their financial capabilities, but also their personal needs and wishes. But at the same time, some nuances must be taken into account so that the result of the work done is truly pleasing to the eye.
Landscape design of a summer cottage
Pay close attention to what types of element groups exist and how they are arranged. In particular, these are:
- buildings (both commercial and residential);
- paths, platforms;
- lawn;
- technical elements (for example, irrigation system, lighting, etc.);
- green spaces;
- decorative elements, small architectural forms;
- artificial reservoirs.
Paving slabs in the landscape
Wooden gazebo with barbecue
The main function of garden paths is to provide access to certain objects; They also allow you to walk around the site. If the path is properly arranged, then you can move along it comfortably, without the risk of getting your shoes dirty. As a rule, paving stones and paving slabs are used for the installation.
Note! When choosing a coating, take into account the area of the site, what the walls of the buildings are lined with, and the characteristics of the material itself. Often different materials are combined, which allows you to show your design abilities.
Types of garden paths
Marking paths and platforms
The technology for laying paving stones on sand involves marking the area. First, the paving area is calculated. At this stage, it is necessary to measure the width of the road so that the bars lie evenly and do not require modification. The thickness of the seams is also measured. For marking, pegs are installed in the corners of the future sidewalk. Beacon cords are needed to check the level of the road surface. Adjustment is also necessary for laying rainwater drains.
Some important points
If you take into account the important points below, you will be able to create a durable and reliable coating.
- As for the width of the path, it can vary between 60-150 cm. In order for people to disperse freely when meeting, at least 90 cm is needed. But the most comfortable path will be one whose width is more than 120 cm.
- Curbs located on the sides will prevent deformation of the coating and the appearance of dirt on it.
Curbs must be installed - Place the path away from trees (at least 2 m) so that their roots do not destroy the covering.
- When choosing a substrate, take into account the purpose of the path, the type of soil, and the characteristics of the material from which the paving stones are made.
Main types of substrates
Calculator for calculating the amount of paving stones of the selected size depending on the paving area
Go to calculations
Calculator for calculating the amount of paving stones of any size in a given area, taking into account gaps
Go to calculations
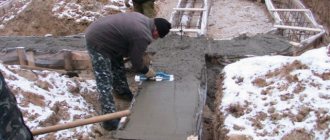
Excavation
Laying paving stones yourself involves excavation work. To create a trench, soil is removed, since the top layer of earth is often unstable and will not be able to withstand massive elements and operational loads.
The volume of soil to be lifted depends on the project, but there are general rules. The paving stones should be located 4 cm below the area adjacent to the sidewalk. The total depth of the trench for the blocks and fastening mixture is from 20 cm. If the tiles are placed on a platform for transport, it is necessary to increase the depth of the trench by 10 cm. The bottom of the earthen structure is leveled and compacted with a manual tamper or a vibrating plate.
Laying technology
Options for laying paving stones are determined by the use of different materials and block shapes, and the purpose of the road. The elements are placed on a base made of sand, concrete or cement-sand. The rectangular classic layout of sidewalk fragments allows you to combine colors and textures.
The herringbone laying technology is performed by laying tiles at an angle of 45° or 90°. When laying out a checkerboard pattern, square bars of contrasting shades are used and the elements are placed in a checkerboard pattern. The “random mixture” technique allows you to design a path with a random arrangement of bars of different sizes and colors.
On a crushed stone base
The technology of laying paving stones on a crushed stone base includes a complex of works. A geogrid is placed on the cleared space, a layer of crushed stone of 10-20 cm is applied on top. A slope is created on the leveled mixture, and the surface is compacted. Then the curbs are installed and secured with a dry cement-sand mixture. Also, in areas of high loads, installation of a road mesh will be required. Stone bars are installed according to the sketch, gaps of up to 3 cm are left between the blocks. The seams between the bars are filled with a dry mixture.
Made from concrete
A concrete base for the blocks is required to strengthen the base. The bonding mixture is necessary when working with thin tiles and constructing sidewalks on moving soil. Laying paving stones over concrete involves installing formwork into which concrete is poured. For large areas of coverage, it will be necessary to install expansion joints every 3 m.
After grouting the joints and installing curbs, pour a 3 cm layer of cement-sand mixture. The elements of the road surface are laid out on the surface. Concrete paving stones are not damaged by strong weight and mechanical loads.
On the sand layer
To form a sidewalk from paving stones on a sandy base, you need to prepare the surface: level it, cover it with geo-textile, form a sand cushion up to 15 cm. It is important what kind of sand is used in the work. Experts recommend formulations without impurities.
The embankment is leveled and a slope is created for water flow. The base is watered and compacted with a vibrating plate. The curbs are fastened with a mixture of concrete, then the laying of paving stones begins according to a given pattern. The gaps between masonry elements should be 2-3 mm. The seams are filled with sand, then the sidewalk is compacted with a vibrating plate and cleaned with water.
Nuances
Methods for installing bars and materials are determined by the purpose of the road. For pedestrian sidewalks, 40 mm tiles are sufficient. A road with constant vehicle traffic is paved with thick paving stones. To create pedestrian paths, a pattern of blocks is laid out on a sand base or a mixture of sand and cement. The methods of laying paving stones also determine the types of loads on the road surface. The coating can be strengthened using a concrete screed.
Excavation of excess soil
After clearing the area of the path and laying out its coordinates on the ground, we begin to remove the soil. The first question: how deep to dig? The distance between the plane of the path (stretched string) and the lower level of the removed soil consists of: a bearing layer (crushed stone) - about 15 cm, a leveling layer (sand) - 3-5 cm, and the tile itself.
For information: in this case (with a tile thickness of 7 cm) this distance is 25 - 27 cm. Do not forget that the top mark is a string, and from it we measure 25 cm in depth.
When removing soil, use both bayonet and shovel shovels. Part of the removed soil will later be used for sprinkling curb stones on the outside, part for land leveling, and part is to be removed from the site.
After excavating the soil to the required depth, it would be a good idea to walk over the entire surface of the path bed with a tamper (the most affordable option is a wide log with a cross-shaped handle).
Installation of curbs
Installation of curbs occurs according to pre-made markings. Then a cement-sand mortar is mixed in a ratio of 1:3 and applied to the surface along the laying of the blocks. The curbs are placed on the bonding mixture and adjusted to the level. The finished slabs are left for 1 day so that the solution holds the elements together. In some design solutions, blocks are laid without a border.
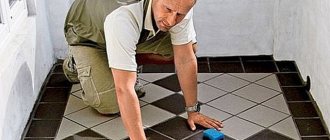
Caring for paving slabs
It is not enough to know how to lay paving slabs; you also need to provide them with constant care so that they last the estimated period. Simple maintenance consists of periodically sweeping and washing the paving slab path (to ensure that the colored tiles remain as beautiful). In winter, you should not use metal shovels to clear snow, and do not use crowbars or ice axes to remove ice, and also sprinkle the path with anti-ice compounds containing salt.
Water repellent for paving slabs
The porous structure of concrete acts like a sponge - it absorbs water. Hygroscopicity plays its detrimental role precisely in winter, when water penetrates the pores of concrete, freezes, expands and destroys the structure of the concrete base. As a result, the appearance of microcracks, dents, cavities, and color changes.
Water-repellent compounds (materials, additives, liquids) do not protect the tiles from fading in the sun and abrasion, but only saturate the surface of the concrete and thereby prevent “saturation” with water (provide water-repellent properties).
How to treat paving slabs
Some people want the sidewalk path to shine and use the effect of wet tiles. And others, on the contrary, like matte tiles. On the question of what to impregnate the tiles with, opinions differ. According to reviews, Tiprom M, U, Neomid H2O Stop, Neogard, Penetron are used.
A budget option is an organosilicon water repellent GKZh-11 (cheap does not mean bad). The principle of application is simple: diluted with water in the proportion of 1 kg of concentrate per 25 liters of water, poured into a sprayer and sprayed over the surface of the tiled path. This volume is enough for 50-70 sq. m. tiles for processing in two layers. Spray until absorption stops and droplets appear on the tile. As a result, the tiles will always be wet (wet effect), and during rain they will not absorb water, plus their frost resistance will increase. But keep in mind that treatment with GKZh water repellent does not have a reverse effect, i.e. it cannot be removed later. The principle of operation is shown in the “before and after” photo.
Video showing the difference in water absorption of concrete treated with a water repellent.
Users recommend Enesal MP for impregnation of concrete tiles - a liquid that creates a hydrophobic barrier (membrane) in the concrete structure (in the pores) that repels water, reagents and salts.
To create the “after rain” effect (wet stone), as well as to increase the resistance of paving slabs to abrasion, a protective composition for impregnation (processing) of concrete is recommended - Eneclad CFS. And if you add bronze or aluminum powder to it, you can permanently fix the desired color shade on the surface.
The method by which the tiles were made – vibration casting or vibration pressing – is of decisive importance. Homemade tiles made by vibration casting are less stable and wear out faster, while industrial (vibration-pressed) tiles will last about 100 years.
Advice. Keep in mind that a concrete (or brick) surface treated with any water repellent cannot be changed, i.e. After this, you won’t be able to paint or glue it!
Practitioners argue that the treatment of laid tiles with impregnations is carried out from above, but water penetrates between the seams and penetrates into the “body” of the tile from the sides and lower (rear) part.
Cost of laying paving slabs
There is one more point that I would like to draw your attention to. After all, everyone is interested in how to lay paving slabs inexpensively
The cost of the work will include:
The table does not indicate prices for materials, but only for labor.
For your information, a team of four people can lay 30-50 square meters per day. area, and a machine for laying paving slabs from 300 to 800 sq.m.
As you can see from the article, laying paving slabs is not that difficult
It is important to adhere to the rules and perform each stage as efficiently as possible
Tags:
Tiles Paths Facing material Finishing material Paving slabs
- https://derevyannie-doma.com/materialy/tehnologiya-ukladki-trotuarnoy-plitki-svoimi-rukami-kak-pravil-no-klast.html
- https://bouw.ru/article/ukladka-trotuarnoy-plitki-svoimi-rukami
- https://obustroen.ru/stroymaterialy/otdelochnye-materialy/plitka/ukladka-trotuarnoj-plitki-svoimi-rukami.html
- https://stroyday.ru/stroitelstvo-doma/landshaftnyj-dizajn/ukladka-bruschatki-svoimi-rukami-poshagovaya-instrukciya.html
- https://moydomik.net/dvorov/dorozhki-i-trotuary/349-ukladka-trotuarnoy-plitki-technology.html
Geotextile layer
Preparation for installation of tiles includes laying a waterproofing layer, which is placed above the drainage as a substrate. This prevents moisture from reaching the top load-bearing layer and improves the quality and integrity of the coating. A layer of geotextile is lined on the bottom and walls of the earthen structure. The artificial material does not rot from prolonged exposure to water, does not decompose even with prolonged use, and provides the road with protection from water.
Sealing and finishing work
To maintain the integrity of the coating, it is necessary to grout the joints that separate the blocks from each other. There are three main methods for sealing paving joints. The distance between the elements is filled with sand, poured with concrete mortar or rubbed with a concrete mixture. For pavements made of natural granite, sand and concrete mortar are suitable. For roads made of ceramic paving stones, it is better to use sand. The seams between the concrete blocks are rubbed with concrete mixture. Marble blocks can only be held together with sand-cement mortar.
After filling the masonry joints, excess material is removed with a broom or broom. Then the sidewalk is hosed down with water, the mixture hardens and firmly holds the blocks together. Cement-sand mortar is poured between the coating elements and left for bonding.