Nowadays it is common to combine a kitchen with a living room, a kitchen with a dining room, or even an office. This became possible as soon as people learned to cope with kitchen odors, smoke and steam using kitchen hoods. All dirty air immediately goes into the hood and is discharged outside the home - brilliant! The hoods themselves become an important part of the interior, and sometimes even take on the role of “first violin”.
Requirements for a kitchen hood in a private house
When choosing a hood for the kitchen, you need to pay attention to the air pressure that the blower creates. The higher it is, the greater the performance of the product. A good hood has several fans that pump air at different rotation speeds.
The performance of the hood is determined by the volume of air that the device can remove from the room. Some devices are capable of outputting 180-700 m³/h. Please note that the higher the performance, the louder the fan will make noise.
To determine how much exhaust hood power is needed for the kitchen, you should determine the volume of the room and multiply it by 10. According to sanitary standards, complete replacement of air in the room should be done 10-12 times per hour, so the volume of the room is multiplied by 12 (air exchange rate). The result is multiplied by 1.3 (safety factor). It is necessary to consider how the calculation is made using the example of a kitchen with an area of 6 m² and a height of 2.5 m: ((6*2.5)*12)*1.3=234 m³/h. To effectively ventilate a room, you need a hood with a capacity of 230-240 m³/h.
The dimensions of the device must correspond to the dimensions of the gas stove or exceed them by 10-20 cm. Failure to comply with these conditions will lead to fumes and combustion products rising past the hood and hanging furniture will begin to deteriorate. Treated aluminum has proven itself to be the best material.
You can also make a hood in a private house with your own hands. Without fans, the device must be connected to a vertical natural ventilation duct. However, this method does not remove all odors in the room well.
Need ventilation in a wooden house
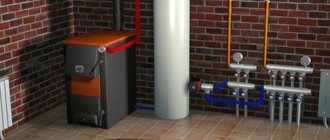
In a wooden house that is built using the latest technologies, a ventilation system must be installed. This is due to the high tightness of the building. Exhausting dirty air through windows and vents is not a sufficient condition.
A natural ventilation system is attractive due to its low cost, but it is not able to quickly remove odors from the kitchen or moist air from the bathroom. For effective air exchange in the kitchen in a wooden house, you need to install a special device of appropriate power.
A supply and exhaust ventilation system is only sufficient to ensure fresh air enters the house and eliminate excess carbon dioxide and unpleasant odors. For high-quality air purification in the kitchen, this, like a natural system, is not enough.
You can use a high-quality ventilation system for natural kitchens, provided that it was initially included when designing the house and carried out by specialists.
Is a hood necessary and why does it not always work?
A hood can not only make it possible to combine the kitchen with other rooms, but also create a comfortable microclimate in the kitchen. With a hood, the air is cleaner, odors do not accumulate, and mold does not form.
The hood is one of the links in the ventilation system, performing the work of removing polluted air from the room. Unfortunately, in apartment buildings, kitchen hoods often do not work for a long time, leaving recycled air in the room. This is due to the fact that the channels are dirty and require cleaning. In private houses, polluted air is also often not removed, but for a different reason - due to the lack of a ventilation system.
They may forget about the hood at the construction stage, but then they often remember during operation - in such rooms it quickly becomes stuffy, you have to breathe processed heavy air (they say “stale air”), the humidity is exceeded, which leads to the appearance of mold.
Exhaust air must be removed from the room. If this was not provided for earlier, it is never too late to correct the situation. You need to install a hood. A range hood will help turn a stuffy kitchen, which is impossible to stay in, into a cozy and comfortable room where you don’t want to leave.
Let's find out what, in what order and how to do it to install the hood yourself.
Which hood to install in the kitchen of a private house
Before you learn how to install a hood, you need to determine what types of devices there are and what filter system they are equipped with. In order for the cassettes to not only eliminate unpleasant odors, but also to collect oily particles, their design must include padding polyester or non-woven lining. Filters of this type are disposable. Reusable cassettes are made of aluminum or steel; special fat solvents are used for cleaning them.
There are also carbon filters that not only trap soot and fats, but also neutralize unpleasant odors. The disadvantage of such products is that they are disposable. According to the design features, hoods come in the following types:
- hanging;
- dome;
- built-in;
- island;
- retractable.
Flat
Hoods of this type attract buyers with their small size and simplicity of design. Since they do not have a chimney, they can be attached to the bottom of a wall cabinet. If the size of the device is not enough to cover the stove, you should pay attention to retractable models. Such products are suitable for rooms with small areas.
Flat hoods work on the principle of air recirculation. They absorb it using fans, clean it, and then return it to the room. As a rule, such products are equipped with carbon filters.
Built-in
This type of hood is also a recirculation type. Since the device can be installed inside a wall cabinet, it is unobtrusive and blends harmoniously into the interior. The body has a cubic shape with a retractable panel for greater air capture. First, the hood is installed in the wall, and then the cabinet is hung.
Dome
A device of this type is distinguished by a large volumetric shape resembling a hemisphere or trapezoid. The design allows you to install powerful fans and several filters. Therefore, experts believe that hoods of this type are the most effective. Cleaning can be recirculation or through a connection to a ventilation shaft. Such products are installed in rooms where there is no access to fresh air.
Creating a box to mask air ducts
There are two materials for making the box - plastic and plasterboard.
The plastic box consists of ready-made elements. Install it under the ceiling or above wall cabinets. The box is durable and weighs little, so you can install it without outside help.
Attention! Before masking the duct corrugation, the system is checked for leaks.
A plasterboard box is a complex structure that requires skills in working with this material. A frame is made from a metal profile, sheets of plasterboard are sewn onto it, then the structure is covered with putty and decorative finishing is performed.
It is better to install at least two inspection hatches in a plasterboard box. This will make it easier to access the air duct if necessary.
Standards and requirements for kitchen exhaust systems
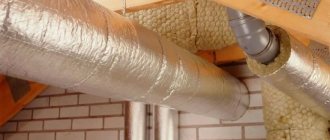
The air duct of the kitchen hood ventilation system has a square or round cross-section with a width or diameter of 130 mm. If the exhaust equipment is installed away from the ventilation shaft, the air duct in the room is mounted using a corrugated pipe, which can be steel, aluminum or plastic. The most common choice is aluminum.
Important! The corrugated pipe connects the hood to the ventilation shaft, so its diameter should not be less than the air duct on the unit itself.
Aluminum corrugation has an aesthetic appearance. It is cheaper than the steel version and much stronger than its plastic counterpart.
Recommendations for choosing a hood:
- Depending on the length of the ventilation duct, the required fan power is determined. An axial device mounted on hoods of a low price category is effective only when connected to a short ventilation duct through the wall. If the channel is long and has several turns, the power of such a fan will not be enough to remove polluted air outside.
- The type of exhaust unit - flow-through or recirculation - is selected depending on the distance from the stove to the ventilation duct (or its presence). However, even if the ventilation duct is far away or absent, a flow-through type can be installed.
- The required power of the unit is calculated taking into account the cross-section of the corrugated pipe connecting the hood to the ventilation.
- Pay attention to the noise that the device will produce. The noise level of the exhaust system should not exceed 58 dB. The noise level of such equipment, which does not disturb comfort, is 44-46 dB.
The color, design and shape of the equipment, as well as the type of control, are chosen according to personal preferences.
Remember! The efficiency of the hood depends not only on the engine power, but also on the diameter of the ventilation duct.
If you do not take into account the rules for choosing the power of the unit, the device will consume a lot of resources, producing low efficiency. The power of the exhaust device is measured in m³/h. Many are sure that the more power the hood has, the better, but this opinion is wrong.
The purpose of the unit is to remove unnecessary odors and impurities from the air, and not to ventilate the room. Since the capacity of a pipe with a diameter of 130×130 mm is 400 m³/h, a hood with a higher power will be useless.
On a note . When the fan operates at medium or low speed, the hood's performance increases.
The height of the hood above the stove depends on the type of hob. SNiP standards for hoods: above gas stoves - 750-850 mm, above electric stoves - 650-750 mm, above combined stoves (where there are gas and electric burners) - 700-800 mm. The inclined hood is mounted at a distance of 550-650 mm from the working surface of the gas stove, 350-450 mm from the countertop with an electric stove and 400-500 mm from the combined hob.
To install a kitchen hood through a wall, you will need a device with certain characteristics. A hood that is too powerful makes a lot of noise, leaving some of the combustion products inside the room
For your information. The noise level in accordance with SNiP should not exceed 55-60 dB.
When using any hood, the exhaust shaft must be anti-corrosion painted every three years.
Air removal system parameters
To determine the most important dimensions of pipes and air intakes, you will need to perform a small calculation in the following order:
- We determine the amount of air flowing through the kitchen ventilation per unit of time;
- Knowing the cubic capacity of the kitchen air space and the recommended air speed values, we calculate the cross-sectional area and the recommended diameter of the air duct.
This is enough to build simple ventilation in the kitchen. As a rule, a kitchen ventilation system is assembled from two independent subsystems - natural and supply and exhaust. Both schemes are calculated based on the maximum air exchange rate in the isolated kitchen space. For a private home, according to SanPiN 2.1.2.2645-10, the air in the kitchen atmosphere should change from 3.5 to 5 times per hour, depending on the type of stoves and ovens used.
If the kitchen is planned in the form of one large studio or pavilion, or a semi-open veranda, the gas exchange rate can be reduced to 2.5-3 times.
Easy way to calculate
In theory, the dimensions of the supply ventilation window in a kitchen in a private house for calculations are taken to be 70% smaller than the cross-section of the exhaust pipe. In practical work, adjustable gate valves are installed for air flow, with the ability to change the flow area from 70% of the calculated value to 150%. In this way, you can effectively and accurately regulate ventilation performance and the level of gas exchange in the kitchen, without using noisy electric exhaust systems.
In a situation where the room is divided into several sectors or levels, the ventilation system in a private house in the kitchen is calculated based on building regulations No. 60.13330.2012, 62.13330.2012, 7.13130.2011. But there is one problem. The longer the air duct pipes, the more difficult it is to take into account the influence of turns, elbows, splitters, valves, filters on the resistance of the air ducts and the loss of flow energy.
Therefore, the design of a kitchen ventilation system for two- to three-story private houses is traditionally calculated in several stages. Initially, calculations are performed using air flows under ideal conditions, without taking into account friction. In the second pass, the air speed values are checked, taking into account losses in elbows and turns, joints and branching of pipes. Speed reduction coefficients have long been calculated and tested experimentally; their values can be taken from reference tables in SNiPs.
The work is not difficult, but requires accuracy. If you don’t want to bother with calculations, you can use pipes that are obviously larger than 10-15% of the cross-section accepted for a standard kitchen. A small reserve of throughput will allow you to reduce the flow speed to 0.8-1.0 m/s, which will make the operation of the ventilation system less noisy, but more cumbersome.
You cannot arbitrarily choose the cross-section of pipes used in the kitchen ventilation layout; there are limitations here. In pipes of small diameter, usually 90-110 mm, at a speed of more than 2 m/s, the air flow begins to hum at joints and turns, especially in windy or frosty weather. For the kitchen, this limitation is especially relevant, since hot air is removed from the room. As it moves through metal air ducts, the flow quickly cools and loses its energy of movement before it rises to the roof and is thrown out through the vent pipe.
Making air ducts with a large cross-section, especially if one central exhaust pipe is used, is also dangerous. The slow and at the same time massive air flow after turning off the hood can easily tip over and return to the ventilation system of a private house. Even if there is a check valve in the kitchen, kitchen fumes and odors easily flow through the air ducts into the bedroom and living room.
Installation of the supply valve
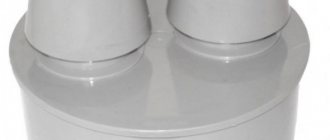
The supply valve is needed to replenish the air reserves that are removed during operation of the exhaust system. The valve can be autonomous (wall) or additional (window).
During installation:
- Disassemble the valve.
- Mark the outline on the wall.
- Drill a hole and insert the sleeve.
- Place the insulated valve tube into the hole.
- The body is attached to the dowels.
Next, install the filters and check the operation of the damper.
Preparatory work for installing a kitchen hood through the wall
Connecting the hood to an outlet through the wall is an option for private houses or apartments where ventilation is not provided for by the design or is in poor condition. In such cases, for the normal functioning of the exhaust unit, the outlet is made directly to the street, punching a through hole in the wall, providing a channel of minimum length. For the air duct, it is recommended to choose a round pipe.
Note ! The fewer turns the air flow makes on its way to the exit, the more efficiently the entire system will work. Do not plan to install the stove too far from the vent.
To prevent the external channel from freezing and leaking, a check valve is installed in the hole inside the wall.
At the preparation stage, the exact installation location of the unit is determined and materials are purchased: a galvanized pipe with a canopy for arranging external ventilation, a corrugated aluminum pipe for the air duct, clamps and a check valve. You will also need hardware.
When preparing the room:
- remove kitchen utensils, textiles and decorative items;
- cover furniture and equipment;
- cover the floor in the installation area with thick fabric;
- clear the wall where the unit will be installed.
Equipment location and dimensions
The location for installing the air purifier is selected taking into account the location of the exhaust unit and the area of the kitchen.
On a note. In a kitchen with high ceilings, even the most modest hood will turn out to be an attractive piece of furniture.
According to the location of installation, exhaust units are divided into:
- Island - above the stove located in the center of the room.
- Wall-mounted. The dome is attached to the wall on one side, and the opposite side is located above the slab.
- Corner ones are installed above the hob in the corner of the room.
The shape of the hoods is flat, inclined and dome. The size of the suction surface should not be smaller than the area of the hob, otherwise the hood will be ineffective.
For your information. Ideally, the area of the hood should be 50 mm larger than the size of the hob on each side.
According to the rules of SNiP, the socket for powering the hood is installed above the wall cabinet, inside it or in the casing of the device at a height of 1900-2200 mm from the floor.
Selection of materials for the exhaust duct
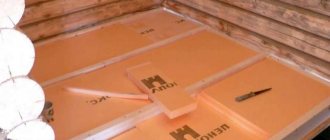
When choosing a check valve and an outer pipe for the air duct, they are guided by the thickness of the wall and the material from which it is built. The best option is a galvanized round pipe with a canopy. Any moisture-resistant material is suitable as insulation for such a pipe. Most often, penofol with a thickness of 100 mm is used.
On a note. It is better to place two valves in the channel - internal and external. This creates an additional air gap between the valves, preventing condensation from forming.
The check valve for the hood is made of:
- PVC;
- polypropylene;
- polyurethane;
- vinylurethane;
- plastic;
- polyethylene.
Plastic valves are easy to install, lightweight and affordable. Most often, such products are used in apartments.
Important! When heated to temperatures above 120°C, plastic releases chlorine, and at a temperature of +5°C it loses strength and becomes brittle.
The most durable valves are made of polyethylene and reinforced vinyl urethane. The latter is almost impossible to damage.
Creating and preparing a ventilation hole in the wall
The hole for the air duct in the wall should be located at a distance of 200-300 mm from the ceiling on the outer wall as close as possible to the slab. Ideally, directly above the hob.
Before starting work, empty the kitchen of decorative items, utensils, small accessories, and cover furniture and appliances with film or cloth. The location of the hole is measured on the wall and markings are made for the air duct.
A through hole in the wall and installation of a ventilation duct are done in several stages:
- Drill a hole in the wall to install the frame.
- Hammer a dowel into the hole and screw in a pin to secure the frame.
- Attach the frame to the wall and install the hammer drill.
- Install a coolant drain for the crown made of foil or tin cans.
- The drill bit of the hammer drill goes through the finishing layer inside the room.
- The crown is freed from the building material and the inside of the wall is passed.
- The front part of the wall is drilled out, after which the frame with the tool is dismantled.
- Prepare the hole for installation of the ventilation duct, freeing it from debris and dust.
Next, a system of check valves is assembled, which will prevent dust and debris from entering the channel and will not let cold air from the street into the room. After installing the valves, the hood body is attached.
Air duct laying
The duct pipe can be made of corrugated plastic, steel or aluminum. These materials have different characteristics. The most common is aluminum. It is quite durable and not as expensive as steel.
The air duct is placed on the protruding socket of the exhaust unit and tightened with a clamp. Similarly, the corrugation is attached to a pipe with a valve system. The corrugation is secured to the wall in several places with a clamp and dowels and covered with a wall cabinet or casing.
Important! Before tightening the clamp in the right place, the connection is treated with silicone sealant.
If there is no casing included with the hood to mask the air duct and there is no wall cabinet provided, use a special rectangular plastic pipe or install a plasterboard box. The main condition: the box must withstand the load of its own weight and the weight of the air duct.
Algorithm for installing an air duct:
- Mark the position of all structural elements up to the attachment points.
- Holes are drilled in the wall and hangers are attached.
- Install the air duct elements.
- Seal joints.
- The pipe is attached to the wall and connected to the system.
A practical solution is to wrap the air duct with a layer of soundproofing material before hiding it behind the walls of the duct.
How to properly install a hood in a kitchen in a private home
Preparatory work for installing a hood in the kitchen begins with measurements of the room (the installation was discussed in more detail in this article, and how to choose the right one - in this one). After all, the obtained values will affect the choice of device model.
First of all, the cubic volume of the room is calculated by multiplying the length, width and height of the kitchen. The result is then multiplied by a factor of ten. This value determines the number of air changes per hour established by current regulations. The result obtained will be the minimum power required for the measured kitchen.
Since all exhaust devices require electricity, the installation locations of the devices are equipped with sockets.
Preparing a niche for a kitchen hood is also an important factor. After all, a centralized gas pipe can be installed in such a way that in the future it will interfere with the installation of equipment on the wall. The way out of the situation is to install brackets that will allow you to leave the necessary space between the wall and the hood. In addition, the wall should not have obvious defects and should be strong enough to support the kitchen exhaust system.
To install the equipment you will need:
- building level;
- roulette;
- perforator;
- Screwdriver Set;
- jigsaw;
- hacksaw for metal;
- silicone sealant.
Installing a kitchen hood over a gas stove
How to properly make a kitchen hood over a stove with your own hands in a private home depends on the shape and size of the device. At the same time, the installation of an electrical appliance is also influenced by the location and dimensions of the kitchen unit modules.
There are three installation options:
- built-in;
- with fastening to the bottom of the cabinet;
- with wall mounting.
To install the device in a cabinet, the lower shelf of the kitchen module must first be removed. Subsequently, it may either not be installed at all, or a hole is made in it using a jigsaw that is suitable in size with a hood.
On the shelf located in the middle of the cabinet, holes are made for the electrical cable and air duct. Then the body of the device is applied to the shelf to be fixed and the fastening points are marked with a pencil. Next, the hood is attached using self-tapping screws.
The device mounted under the kitchen cabinet differs from the built-in version only in that the hood body remains outside. If desired, it is covered with a false panel or any other finishing material using double-sided tape or glue.
When attaching the hood to the wall, first of all, mark the mounting points through the rear panel of the device. Holes are drilled along the marks, dowels at least 5 cm long are inserted into them. Then self-tapping screws are screwed into the two upper holes so that the hood can be hung freely on them. After checking the reliability of the structure, without removing the device, screw in the remaining screws and tighten the top ones.
Duct connection
Before connecting the air duct to the hood, you need to decide on the choice of material. There are two types of pipes for removing exhaust air from the room (read more here):
- corrugated, which are made of aluminum. Although the installation of this type of pipe does not require additional adapters, the sound insulation properties of corrugated products are very low. However, noise during operation of the hood can be reduced by tensioning the pipe.
- plastic, having a cross-section both rectangular and round. In the latter, much less contaminants accumulate during operation, and the resistance is lower than in rectangular pipes. To install this class you will need L-shaped adapters.
But regardless of the material of manufacture and cross-section, the diameter of the air duct must coincide with the inlet of the hood. With a smaller pipe size, the kitchen hood will work in increased mode, which will lead to rapid engine failure.
The installed air duct should not completely block the opening of the natural ventilation shaft. To do this, a special grille is purchased and installed, the valve of which closes when the hood is turned on, and opens after the device has finished operating. This mode of operation allows the natural air circulation system to operate fully.
Ventilation in the bathroom and toilet
The task of installed ventilation in the bathroom is to clean the room from various odors and eliminate high humidity.
Since the operation of a natural hood is completely dependent on external climatic factors, it will not always be able to cope with its task. In addition, the absence of special grilles on the outside of the ventilation ducts makes it possible for small rodents and insects to enter the house. However, the natural air circulation system has its advantages, which include simplicity of design and relatively low price. The absence of complex mechanical elements in a natural hood predicts long and uninterrupted operation.
Ventilation ducts for the bathroom are selected with a diameter of at least 50 cubic meters per hour, and for the toilet an air duct with a width of 30 cubic meters per hour is suitable. The ability to remove odors and moist air from the bathroom is provided by a forced ventilation system. Its operation is carried out using installed fans, which can be with bearings or bushings. Devices with bushings are much cheaper than fans with bearings.
Forced exhaust fans installed in the bathroom can operate either from a light switch or have a separate power point. Device manufacturers also offer fans with built-in humidity sensors. In this case, the system begins to operate when the humidity in the room reaches a certain level. There are also models that are equipped with motion sensors that allow you to activate air circulation when a person enters the room.
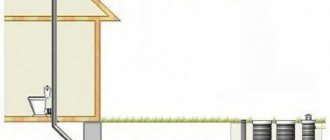
Basement ventilation
To ventilate the basement, you can limit yourself to installing several holes in the basement of the house.
The openings should be located in opposite parts of the room. In addition, the openings must be equipped with special meshes or gratings. This method of ventilation is quite simple in its organization, but like the entire natural ventilation system, it is directly dependent on weather conditions.
A more effective method is a system that uses two pipes, 8–15 cm wide. In this case, the supply channel is mounted so that the lower part of the pipe is located at a height of 20–40 cm from the floor. The upper end should be fixed on the street so that the gap to the ground is 40–60 cm.
The lower end of the exhaust pipe is mounted directly under the ceiling, and the outer part is led through the ceilings to the roof and fixed 30–60 cm from it.
How to make a duct box
Some air duct models do not fit into the overall design of the room. The way out of this situation is to hide the channel in a special box. Read more…
Depending on the material used, decorative designs are:
- plastic;
- wooden;
- steel;
- made of MDF, chipboard or plasterboard.
However, when installing the box, it is taken into account that it will constantly be exposed to burning, fat and other by-products that arise during cooking. It follows that the structure must be washed and cleaned well. Only in this case will the decorative box fit into the overall design of the room.
DIY hood installation. Work order
Once the hood has been selected and the location for it has been determined, you can begin preparatory and installation work.
To install the hood, you need to purchase pipes. Experts recommend opting for round plastic ones with a diameter of 125 mm. It is important to understand that square and rectangular ones look more attractive and are easier to install, but the most important thing for which the work is being done is a good exhaust air outlet, and the best draft will be in a round pipe. You can also purchase metal pipes, but they:
- It will cost more.
- They will be more difficult to install.
- They will be noisier during ventilation operation.
Also be careful with corrugated pipes. They are noisy and unattractive. You should not choose sewer pipes either - they do not meet the diameter requirements for the exhaust system.
In addition to the pipes you will need:
- Platform with grid, elbows, adapters and couplings, as well as holders.
- Sound insulation products: insulation from isolon, penofol, ultraflex.
- The outer grille for the air duct is plastic or metal.
- 3 check valves to prevent backdraft. Choose from the same material as the pipes.
- Fasteners (dowels with self-tapping screws).
Also prepare the following tools:
- Roulette and level.
- Hammer.
- Grinder or hacksaw for cutting pipes.
- Screwdriver.
- Cement mortar for filling the hole after installing the pipe.
- Please note that reinforced concrete panels can only be drilled using diamond drilling.
Getting ready for installation. First of all, we determine where the electrical wiring is and make sure that there is no cable running where we planned to install the hood. Your home will usually have a wiring diagram that will show you where the cables are routed. If the circuit is not found, use a hidden wiring detector.
Before starting work, cover the furniture so that less dust gets on it.
First we make the markings. The diameter of the hole for the air duct should be 132 mm if the pipe is 125 mm in diameter. The gap that remains will be closed by the outer grille.
The hood must be positioned strictly above the stove. Maintain the clearance requirements from the stove to the hood depending on the type of stove and hood. When marking, take into account the height of the hood itself.
Installation can begin by drilling the wall according to the markings.
If it is important to maintain cleanliness while drilling, you will need an assistant who can collect dust directly from the hammer drill with a vacuum cleaner.
If the house is wooden:
- In the center of the hole marking, we drill a hole with an ordinary thin wood drill bit.
- Outside, we draw a circle of the required diameter around the hole.
- Use a jigsaw to cut out a hole.
- We clean the resulting hole from construction debris and align the edges.
- We install a pipe and check valves inside.
- We install a grate outside.
The following steps are aimed at installing the hood and connecting pipes to it. These tasks can be done in any order that suits you.
Fastening the hood itself is carried out strictly according to the instructions for it.
Typically, an exhaust hood is attached in one of two ways - to the wall or by mounting it in a wall cabinet.
If the installation is carried out inside furniture, then the connection is organized inside the cabinet, and the electricity for it is supplied to a common terminal, from where both the lighting above the table and, if necessary, an outlet are connected. This way, wiring, switches and sockets are hidden. If wiring for other tasks is not provided, an autonomous installation of the outlet is carried out.
How to install?
Installing a fan on a fireplace is quite simple and does not require any special theoretical knowledge. The first step is to calculate the direction of air flow. This information is available on the packaging with the device or in the instructions for it.
Installation is carried out from above at the mouth of the chimney pipe. Please note that it is easier to install the device on brick chimneys than on stainless steel chimneys. You should also think about the power supply system to the smoke exhauster and correctly position the wire with the switch and speed mode switch.
Expert advice
Tips from experts on equipment selection and installation:
- If you choose a strong and durable hood, take a closer look at models made of stainless steel and aluminum.
- If you choose a fan with high power and too much air flow, this may lead to blockage of the air duct. This will cause all the smell and smoke to spread to other rooms.
- Ventilation ducts and air ducts should be cleaned periodically. Please consider this before choosing.
- If the kitchen is more than 15 square meters, two ventilation ducts are installed. One will serve to fill with fresh air, and the second will serve for exhaust.
- It is important to consider that the decorative grille and valve sometimes reduce the speed of air movement by 10 times. In this regard, do not opt for a device with minimal power.
- When choosing a hood, take into account the volume of air that needs to be purified within an hour. We take the volume of the kitchen, multiplying the area by the height, multiplying by the air exchange rate (12) and multiplying by 1.3 (minimum reserve coefficient). This way you will get the performance of the hood.
- When determining the dimensions of the hood, take into account that the area of the air intake should correspond to the area of the working surface of the stove, or better yet, exceed it.
- How to take into account a comfortable noise level? 20 decibels is like the rustling of pages, 25-35 is about like a loud whisper, 50 dB is the noise level like during a normal conversation, 89-90 is like the noise of a passing motorcycle or a hair dryer when drying, 110 is like how it works drill or hammer drill, 130 dB is already exceeding the pain limit.
- When choosing a hood, the question may arise: do you need lighting? They are automatic, touch-activated or with a button. Experts believe that the presence or absence of lighting does not in any way affect the main tasks of the hood, so when choosing, be guided solely by your budget and your own taste. Focus on how the hood design will fit with the interior design.