During the renovation process, sometimes there is a need to level and concrete the surface. Prepare the floor for laying linoleum, laying parquet, laminate. There are various types and technologies of screeds, differing in varying degrees of complexity and labor intensity.
In the selection process, you need to take into account not only your financial capabilities, but also the characteristics of the room in which this work will be performed.
The essence of the screed?
Perfectly level the surface;
- Provide rigidity and good strength to the base coating;
- Give the floor the required slope;
- Correct unevenness;
- Hide open elements of engineering and technical communications;
- Make a hard, stable coating in production areas.
It will not be amiss to familiarize yourself with photo illustrations and videos that explain in detail the entire process of screeding the floor with your own hands. How it is done, what you need to purchase for this.
Advantages and disadvantages
About two years ago, I already prepared a material where I considered the strengths and weaknesses of semi-dry technology (you can see it here). Practice has made its own adjustments: something had to be removed, something had to be added.
The advantages include:
- strength. A number of experts claim that it is higher than that of concrete due to the absence of cavities (voids) that remain after the evaporation of excess, unbound water. This point of view is refuted by the density of the material: it is higher in concrete. And at school they taught that the higher the density, the stronger the material. You can easily check: stand on a thick layer of foam rubber and 2-3 mm metal. What is deformed? That's it. Therefore, such statements can be explained by advertising of semi-dry technology. However, a little less strength is enough for residential premises. The exception is a fireplace (not all types) and a stove;
- durability. Experts talk about an operational life of 50 years or more. It has not yet been possible to test it in practice - the technology found application in the mid-90s of the last century (not even 30 years ago);
- a smooth surface after the solution has set - obtained after grouting by machine or manually;
- the ability to walk directly on the screed. You can walk, but only in special shoes: concrete shoes;
- there is no risk of spilling water on neighbors below. It simply isn't here;
- The installation process does not leave any dirt. After the completion of the work, literally in 10 minutes the auxiliary premises were restored to their original condition;
- high speed of work completion - the three of us, although what kind of assistant am I, in a room with an area of just over 24 m2, the work was completed in about 6 hours;
- installation can be done on any floor surface: be it concrete, rough wooden floor or soil. My doubts about the soil (as it subsides, concrete collapses) were dispelled by the foreman. Concrete is brittle, which is why it cracks under low bending loads, while cement stone has much higher bending strength. Tested in practice. I understood this in my own way: a thicker, yet reinforced screed is naturally more stable. Analogy with reinforced concrete floors;
- There is no shrinkage or cracking of the surface. I agree about shrinkage, there is practically no shrinkage (at least I haven’t seen it) if the solution is well trampled (compacted), but cracks appear in the absence of fiber reinforcement. The mesh doesn't help either. By the way, she has completely different tasks;
- compatibility with “warm floors” - all operational characteristics allow this;
- You can hide communications in the leveling layer. No problem;
- repairs can be continued after 72 hours - ceramic tiles and porcelain tiles can be installed with glue without any questions; other types of flooring will have to wait. In some cases, laminate, up to a month.
disadvantages , but they are contradictory:
- Experts unanimously say that without knowledge, experience and the presence of small-scale mechanization, laying a semi-dry screed with your own hands is extremely difficult, or rather, impossible. I wrote about this too. I repent. From personal experience I was convinced that, if desired, everything lends itself to skillful hands and a bright head;
- Another expert statement: the slightest errors in the amount of water in any direction negatively affect the strength of the solution. But what do we mean by the slightest mistake? In one team, 17 liters of water were poured onto a bag of cement, in another - 20. The result was the same. In passing, I note that with the mechanized method of preparing the solution, 15 liters of water are taken per 25 kg of cement;
- continuity of the technological process. This applies only to mechanized pouring - you need to have time to distribute the supplied solution throughout the room within an hour, tamp it down and rub it in at the same time. When working manually, you can smoke, but only between batches;
- strict requirements for sand - it must be of a certain fraction (therefore river sand is not suitable) without clay and stones.
Classification
There are different types of screeds that have different functionality, suitable for a specific floor covering. In the process of compiling the classification, the following screed parameters are taken into account:
- Laying method;
- Coupling method;
- Composition of the material.
- Purpose.
Materials and tools for work
For high-quality and quick installation of the screed, you will need a certain set of materials and tools. In addition to the components included in the tightening layer, you will need to use:
- Roulettes;
- Level - ruler;
- Reiki - rules;
- Knife;
- Hydraulic level;
- Spatula and trowel;
- Roller;
- A construction mixer and a container of sufficient volume.
Necessary tool for working with screed
Clutch method
Cohesive wet screed. Without heat and waterproofing. It is applied directly to the work surface itself and bonded to it. Large warehouses, premises with equipment and large items are its scope of application.
Screed with a separating layer. Durable mineral slabs are its basis. Used in bathrooms, bathrooms, and basements.
Floating. It is used for quick installation when sound, hydro and thermal insulation is needed, the room has a heated floor.
Let's sum it up!
Gypsum composition
- quite durable, but fragile material that produces dust.
For an inexpensive floor used in a dry room, the thickness of the fill can be within 30 mm. When choosing, take into account poor adhesion to cement-based tile adhesives. These disadvantages of gypsum casting are partially compensated by its relatively rapid hardening.
Cement-polymer
self-leveling floor is a more expensive material, characterized by excellent strength, ideal self-leveling properties, and a smooth, wear-resistant coating surface.
The composition is not picky about preparing the base, so it saves time and money by eliminating multi-layer priming.
Self-leveling floors can be used without problems in rooms with high humidity.
Laying method
Manual continuous with subsequent leveling.
Self-leveling. Apply to a sealed base. Due to its weight and fluidity, an ideal surface smoothness is achieved.
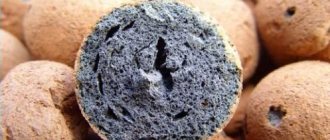
Dry, semi-dry. Expanded clay is used. The most economical, less labor-intensive and complex option. Ideal for do-it-yourself floor screed.
Prefabricated screed - from parts ready for laying. Large sheets of plywood or fiberboard are used. Easy to assemble, disassemble, does not require drying. Mounted on top of the sheathing.
Why are gypsum and cement-polymer self-leveling floors so popular?
Self-leveling mixtures, such as those produced by one of the leaders in the global construction market WEBER, in the basic version are focused on thickness
fills from 5 to 35 mm. Some cement mixtures can be used to fill a layer up to 70mm thick. This filling is carried out in several stages in thin layers, and a high-quality solution is used only for the finishing coating. For intermediate layers, a budget, coarse-grained fill is used.
- The self-leveling effect of pouring is achieved by introducing a small amount of polymer components into the solution. The hardening time of the gypsum solution is several days, the readiness of the cement pour is within 28 days.
- An important advantage is that a wear-resistant cement-polymer floor can be used without a floor covering. And the relatively fragile gypsum structure requires the installation of a laminate or other fairly durable cladding.
- The cost of cement pouring is much more expensive than budget gypsum material. Therefore, in private construction, cement mortar is used more to level the floor microrelief with a thin-layer coating, followed by laying decorative flooring material.
Material composition
Cement-sand screed. It is considered the best among all existing ones. Many floor coverings are suitable for it. Its structure provides ideal waterproofing.
Plaster screed. Practical, environmentally friendly. Maintains humidity and temperature well. Available for a beginner when everything is strictly followed according to the instructions.
Industrial concrete, with mandatory reinforcement. Able to withstand increased power load.
Screed with plasticizers. Increases strength, viscosity, adhesion, and thermal conductivity.
The use of synthetic fiber fibers to achieve hardness and rigidity of the surface.
Private questions
There are many questions on the forums with conflicting answers. I will answer some of them using my experience.
How long does it take for a semi-dry 7 cm screed to dry? A semi-dry screed dries according to slightly different rules than a regular CPR. In the latter, with increasing thickness of the poured layer, the amount of time for full strength gains increases. A semi-dry mortar has one standard: it takes about 10 days to gain 70% strength, and 28-30 days for maximum strength.
Minimum and maximum thickness. The minimum thickness is 4 cm. With a smaller layer, the water will leave faster than the solution gains strength. The maximum is limited by the following factors:
- weight - must withstand the ceiling;
- speed of pouring - the entire thickness must be laid and compacted in several layers within one day;
- financial capabilities of the owners - a screed thicker than 7-8 cm is ruinous.
In fact, the maximum thickness is 10-15 cm. The most common is 7 cm.
Does it need to be reinforced? A mesh on a floating screed is a must. Fiber fiber - optional. In extreme cases, it can be replaced with a “helicopter” (iron coating of the surface with cement dust).
In what cases is a semi-dry screed not suitable? Weak floors are not suitable for semi-dry screeds due to their high specific gravity.
How long will it take to dry? Full strength gain lasts 28-30 days. But you can start working much earlier:
- walk after 12 hours;
- lay the tiles after 3 days;
- lay linoleum every other week;
- Laminate and parquet work in a month. Previously this was not possible due to the high humidity of the screed.
Semi-dry or regular screed. Semi-dry and “wet” screeds have their own strengths and weaknesses. It is difficult to give preference to any method. Even the comparative analysis carried out (can be viewed here) did not allow us to give an unambiguous answer. Recommendations only.
Classification by purpose
- Leveling.
- Thermal insulation.
Basic technological steps during installation
As mentioned above, working with this building material requires some experience. The master must be able to knead the mixture exactly in those proportions that will reveal all the advantages of such technology.
Preliminary work before installation
The preparatory stage of work begins with preparing the foundation. The main operations are:
- cleaning the base from dust;
- removal of chips;
- removal of delaminations;
- jointing and sealing cracks.
This will prepare the base for the load that the screed will put on it.
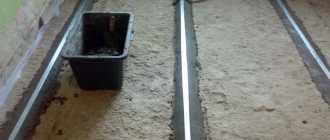
After this, the surface is checked for the level of differences in area and the highest point is found. The required thickness of the screed is added to it and a zero level is obtained. Metal beacons are not used in semi-dry screeds, but are made directly from the solution.
The process of installing a semi-dry screed, namely installing a beacon Source prestigehouse.ru
Preparing the mixture
Despite certain difficulties in preparing semi-dry screed, this does not stop craftsmen from actively using it. When preparing the solution, the following materials are used:
- polypropylene fiber;
- coarse washed sand;
- plasticizer;
- Portland cement grade M500.
Mandatory equipment when installing a semi-dry screed is a pneumatic blower/mortar pump. All materials for the screed are mixed in it (cement, sand, fiberglass and water) and the finished solution is supplied through special hoses (up to the 30th floor).
The result should be a composition that, when compressed, slightly releases moisture and retains the shape of a ball. Reaching this consistency signals that the mixture is ready for use.
Preparation of the mixture Source prestigehouse.ru
Step-by-step instructions for performing a wet floor screed
The entire work process is divided into preparatory and main stages. It is important to strictly follow the instructions so as not to redo everything again or spoil the existing material.
Let's start screeding the floor in an apartment with our own hands with some necessary preparations:
- Clean and prime the base. We form a layer of expanded clay and sand 100 mm thick, moisten it with water, and compact it tightly.
- We carry out thermal insulation work. We use rigid, solid material (for example, polystyrene foam).
- We install waterproofing.
- We stretch the reinforcing or steel mesh.
- We carry out installation of additional elements and structures (warm floors or wiring).
Preparation of the solution
Now you can start preparing the solution for pouring the floor screed.
Sand, cement and water are used to prepare the mixture. To mix the components, it is better to use a concrete mixer or drill with a special attachment.
Use cement grade M400 or M500.
The required proportions of the screed mortar are 1 part cement, 1 part water and 4 parts sand. First mix cement with sand and then add water.
To increase the strength of the solution, add plasticizers. They prevent cracks from appearing on the screed.
Basic technology of floor screed
We use slats as beacons for distribution to areas of the floor surface. At a distance of 200 mm from the wall, self-tapping screws are screwed in parallel to it. Step – up to 800 mm, height – up to 10 mm. We get a line. We “draw” the next line at a distance of 1000 mm from the first. We carry out the activity until we install all the beacons. You can make a floor screed without them. But this way it’s more convenient to control the entire process.
Prepare the filling mixture. We use concrete or sand-cement mortar. You can purchase it ready-made or prepare it yourself in the required proportions.
Fill the strips between the beacons one by one and align them. We pierce the solution in several places with a thin wire (let out the air). It takes an hour for the solution to begin to harden. During this time we try to completely fill all the areas between the beacons.
We wait for the surface to dry completely (24 hours). We carry out grinding work and smooth out minor irregularities.
In the process of choosing the optimal screed for our conditions, we be sure to take into account the load on the surface, the temperature and humidity level of the room. We also strive to ensure that the material used is environmentally friendly.
Preparatory work
Like any other repair work, pouring a floor screed begins with preparatory work. First, the surface should be cleaned of dust and dirt.
Fill cracks in the floor with cement-based mortar.
It is advisable to maintain the room temperature in the range from 10 to 25 degrees.
Damper tape
To prevent cracking of the screed due to thermal expansion, a damper tape is used. Most often it is made of foamed polyethylene.
It also acts as a sound insulator and reduces shock loads transmitted from the floor to the walls.
Photo of do-it-yourself floor screeds
Quality control
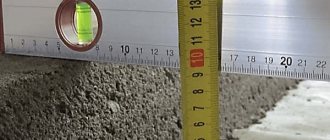
There are certain building codes that the work performed must comply with. The resulting cement leveling screed should have a uniform gray color and look like a smooth surface.
The building level, tightly attached to the floor, should have a gap of no more than 2 mm. After dynamic impact on the surface with a metal hammer, a small author's mark is allowed.
Why is alignment necessary?
Nowadays people often do indoor renovations on their own - why overpay when you can find a lot of tutorials on how to carry out the work and just follow step-by-step instructions? But sometimes the technology can be violated by novice craftsmen - somewhere they neglected to add a component to the building composition, and somewhere they skipped a whole step, considering it unnecessary. The result can be sad - for example, when pouring a new screed, you end up with an uneven base, on which you should never lay tiles or laminate flooring, as this will cause them to deform very quickly. And the result is wasted money and time.
Cracks in floor tiles
Attention! To prevent this from happening, it is important to always strictly follow the installation instructions, including those for arranging the floor. This will save both money and time, and as a result, the finish coating will delight its owner for many years and will not require replacement for a long time.
Also, wooden floors may require additional leveling of the base if there are cracks and gaps between the floorboards, but in general the floor is quite strong, does not creak and does not require disassembly and repair.
How to Measure the Curvature of a Wooden Floor
Finishing leveling is also used when installing the floor on an old but reliable screed. It’s just that over time, the rough base may become rough, cracks will appear on it, and finishing leveling will help get rid of these irregularities.
Old screed after sanding
Is the need for leveling justified or can it be done without it?
Now, when carrying out repair work, the owners strive to do it themselves. But due to lack of experience, it is more difficult to keep track of everything and complete the work with excellent quality.
It is easier to work with a finishing screed and, following all the instructions, it is easier to get closer to a perfectly smooth surface. If this is not done, then the presence of defects may then have a bad effect on the finishing materials. If you plan to lay tiles, then it will be easier to do it on a flat surface and will not crack in the holes. If soft materials are used, for example, linoleum, then it will erase on uneven surfaces much faster.
So, any material requires a good and high-quality base. Therefore, you can almost never do without a final screed, and we will learn further how to make it with your own hands.
Consumption calculation
To calculate the amount of mixture required for the perimeter of the room, you need to take into account the order:
- Calculate the coverage area. The length of the room is multiplied by its width.
- Determine the final thickness of the screed. A zero mark is applied to the walls using the level, and the distance from the horizontal level to the base in opposite corners of the room is measured. The difference in distances is divided by two, resulting in the average height to which it will be necessary to level the coating.
- Calculate the average thickness of the screed. To do this, add the previously calculated average height to the minimum layer thickness indicated on the packaging.
Average consumption of mixtures based on gypsum or cement per 1 sq. m area is 1.5 kg. To calculate the total weight of the mixture, multiply the average consumption by the thickness of the screed and the total area of the room.
Typology
The most important characteristics by which designers and builders choose the type of screed are the structural design of the multilayer floor pie and the technology of execution.
According to the design, the type of connection with the base and walls is distinguished:
- Bonded screeds form a rigid adhesion to durable (concrete, brick, etc.) adjacent surfaces.
- Screeds on a separating layer - separated from a solid base by a layer of hydro-, noise-, or thermal insulation, but connected to the walls.
- Floating screeds are located on the dividing layer and do not have rigid contact with the walls.
Rice.
1. Laying damper tape for a floating screed Among the installation technologies, the following screeds are most widely used:
- Wet - a solution of high plasticity is applied to the entire plane and leveled manually or using mechanized means (pneumatic spreaders, vibrating plates, vibrating rules, trowels).
- Dry (prefabricated) - a combination of a filling bottom layer of bulk material (for example, expanded clay) with gypsum fiber boards/sheets (GVL) of a special series laid on top.
- Semi-dry - made from a solution of minimal plasticity (the proportion of water is sufficient to hydrate the cement with a small margin). More often than other methods, it requires mechanization.
- Self-leveling screeds and self-leveling floors are solutions of increased plasticity intended for final leveling.
Rice.
2. Distribution of solutions of wet, dry, semi-dry screeds and self-leveling floors. The components of the mixtures used are standardized according to the proportions of the cement-sand mixture, as well as the granulometric composition of the sand, modifiers and other additives. One floor pie can have from 1 to 3 ties. Sometimes it is necessary to perform the first (lower) leveling of the surface before laying a vapor barrier.
Each technique involves working with certain solutions. However, sometimes when discussing types of screeds, the emphasis is not on technology, but on the composition of the mixture:
- Cement-sand.
- Concrete (in addition to sand and cement, the composition includes crushed stone).
- Lime - not recommended, but sometimes used in economy-class construction.
- Gypsum is less durable than cement-sand, but dries faster.
- Expanded clay.
- Arbolite (with organic filler, for example, sawdust) - are outdated due to the availability of slab insulation for floors such as high-density polypropylene polypropylene.
How to prepare a concrete base: sequence of actions
The concrete base is prepared as follows:
- Checking the moisture content of the concrete. If it is less than 4%, you can abandon the waterproofing device. The optimal level of humidity is indicated by the absence of condensation on a plastic film that has lain for a day on a concrete surface.
- We control the strength characteristics of the screed. If you run a glass cutter across a durable surface, the scratch left will be no wider than the thickness of the blade.
- We dismantle the old facing covering.
- We remove existing cracks and chips using adhesive or building mixture.
- We level the base and control its geometric parameters using a level.
To level the base, we use a vibrator and a vacuum cleaner.
From the following video, you can learn how to prepare a concrete base with your own hands before the self-leveling floor is poured: