Many residents of big cities are looking forward to the weekend to escape the hustle and bustle to the countryside. There is nothing more beautiful than a comfortable holiday in nature, especially if one of the components of comfort is a real Russian bathhouse.
Perhaps every summer resident or owner of a private house dreams of having their own bathhouse, even if the home is fully equipped and has a bathroom. Nothing can compare with a hot steam room and fragrant brooms. The bathhouse cleanses not only the body, but also the soul, relieving stress and uplifting your mood. The easiest way would be to order the construction of a bathhouse from builders, but you can do it yourself, arranging it to your taste and significantly saving money. You just need to purchase the material, prepare the tools and get acquainted with tips and tricks on how to make a bathhouse with your own hands.
Before starting construction, you need to choose a suitable project and decide on materials. Many will agree that the ideal bathhouse should be wooden, but in some regions wood is considered a rare and expensive option, preferring to build bathhouses from brick or foam blocks. After this issue has been resolved, preparations for construction can begin.
Brief overview of the article
- Planning a bathhouse
- Selecting a location
- Construction materials for baths
- What material to choose for walls
- Bathhouse made of timber
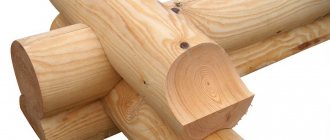
- Log sauna
- Frame construction
- Block sauna
- Brick bath
- Construction stages
- Preparing the site
- Construction of the foundation
- Construction of walls and installation of roofing
- Interior decoration
- Oven and shelves
- DIY bath photo
Planning a bathhouse
The simplest, but most expensive option is to choose one of the many ready-made projects. You can also order a drawing, but this will also cost money. Therefore, many of the craftsmen who decide to build create drawings of a bathhouse with their own hands, relying on advice, recommendations and certain standards.
The plan for the future bathhouse should be as accurate as possible. On it you need to draw the locations of windows, doors, stoves and internal wooden structures: benches, shelves, steps. You should also determine the area of the premises and indicate communications.
In summer cottages, simple-type bathhouses are usually installed, containing a relaxation room, a steam room and a washing room. It is advisable to have a dressing room that will not let in the cold from the street and will serve as a storage place for firewood.
The most popular and simplest project is a 3x3 or 3x4 structure. In this case, you get a compact building with a steam room combined with a washing room and a dressing room as a rest room. Two people can steam in such a sauna at the same time. It is not suitable for constant use, but as a summer cottage option it will be very convenient.
Recently, when constructing baths, the steam room is separated from the washing room, choosing a layout of three rooms. In this case, the dimensions of the building should be 4x4 or 6x4.
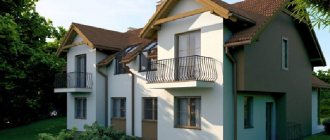
Modern bathhouses with complex layouts, including up to six interior rooms, a terrace and even an attic floor with a balcony, are often built on sites for private houses and cottages.
But for them it is better to purchase ready-made projects that are designed for building sizes of 8x8 or 10x10. These options are good for frequent use by large companies.
Method #2. Complete replacement of the lower crowns
A complete replacement of the crowns can be performed not only in the manner described above (with the gradual removal of all parts of the damaged log). The new crown will be more durable if it is made from whole logs rather than from pieces. To do this, the walls of the log house are raised using jacks, the damaged lower crowns are removed, and new logs are installed in their place.
This method involves displacing the entire structure of the sauna log house, and therefore requires preparation.
Preparatory work before raising the frame
- Window glass and frames, door frames are removed so that they do not crack during the lifting of the frame.
- All heavy furniture is removed from the bathhouse; ideally, the log house should remain empty.
- If the floor joists are embedded in the lower crown, then they are dismantled. In structures where the logs are laid above the lower crown, the floor can be left untouched.
- The chimney is separated from the ceilings and roof. Otherwise, in the process of raising the log house, they may be damaged by the heavy chimney pipe.
- Those crowns of the log house that will not change are secured and fixed. To do this, at a distance of 50 cm from the corners of the log house, on each wall, boards (bars) 40 mm thick are nailed vertically. The lower edges of the boards should end at the level of the end of the logs of the crown that is not subject to replacement (second from the bottom). The upper edges are fixed on the logs of the uppermost crown. The boards are nailed both on the external and internal walls (across the entire log house - 16 boards, 4 on each wall). From below and from above, each board is secured with through dowels. Such fixation is necessary so that the walls of the log house do not move when they are lifted on jacks.
Once all the preparatory work is completed, the walls can be raised and the repair of the lower crown can begin.
Progress of work on replacing the lower crown of the log house
If the log house stands on a strip foundation, proceed as follows:
- A log frame consists of two logs (top and bottom) connected in a corner joint. The first step is to determine which logs in the crown being replaced are the top ones. Jacks will be installed underneath them. Here, retreating 0.7 - 1 m from the corner of the house, an opening 40 cm wide is knocked out in the foundation. Opposite the opening, a part of the lower crown log is cut out. The overall height of the resulting niche should allow a jack to be installed there.
- Two such niches are cut out on two opposite walls, at equal distances from the corners.
- Install jacks, from 2 to 4 pieces. The available quantity will allow you to either lift the entire frame at once, or each wall one at a time. Less distortion can be achieved if you lift all the walls at the same time - by installing 4 jacks under two opposite walls (2 pieces on each).
- Using jacks resting on the upper logs of the crown bandaging, the frame is raised by 7 - 10 cm.
- The lower logs of the dressing are released and removed. Temporary supports (logs, concrete blocks, bricks, boards, etc.) are installed under the opened lower logs of the second crown.
- The jacks are lowered. The upper logs of the crown being repaired are also lowered along with them. They are also removed. Instead, new logs are installed and immediately pressed with jacks.
- Temporary supports under the lower logs of the second crown are removed. New logs are laid on the foundation (the lower ones are tied).
- The jacks are lowered slowly and synchronously, placing the upper logs of the dressing on the lower ones. The gaps between the new logs and the second crown are sealed with tow, moss or jute (caulking is performed).
This completes the replacement of the lower crown.
If the log house is on a columnar foundation, replacement is easier:
- Jacks are installed between the foundation columns on which the upper logs of the lower crown frame rest. 2 pcs. on the wall. In this case, the jack must be installed on a solid base, for example, on a board made of boards (dimensions about 50x50 cm). The head of the jack rod should rest on the log through the metal plate.
- The jacks are lifted. Next, perform the same steps to replace the lower crown as in the presence of a strip foundation. That is, the difference in replacing the crowns of log houses with strip and column foundations is only in the method of installing the jacks. To do this, the strip foundation must be partially destroyed. There is no need to destroy the columnar foundation. It is “intermittent” in design, so there is enough space between the posts to install jacks.
See the diagrams below for more details.
Selecting a location
It is better to choose a flat area for construction so that you do not have to make a solid foundation. The place should not be too damp, otherwise the bottom of the building and the floor will begin to rot.
If there is a body of water nearby, it is better to build a bathhouse closer to it, in this case you can plunge into cool water after the steam room. The entrance to the dressing room is usually made from the south side so that snow does not accumulate in front of the door.
Preparatory work
A properly carried out preparatory stage creates the basis for high-quality repairs. It includes the following activities:
- Visual inspection. It must be carried out periodically so as not to start a destructive process. The above-ground part of the foundation, the filling element and the 3-4 lower crowns of the frame are inspected with special care. An obvious reason for repair is the appearance of visible defects - cracks in the wood, deformation of individual logs (including bulging in one direction or another), discoloration, traces of insects and pests. A pronounced sign may be the presence of a specific smell of rotten wood.
- Checking the internal condition of the wood. Superficial signs do not always indicate the need for major repairs - sometimes they just need to be cleaned off the logs and covered with a protective layer. Things are much worse if the process goes deeper into the material. The first sign of this is established by the dull sound heard when the logs are tapped with a hammer. To create a more accurate picture, you need to use a chisel and carefully remove the top layer of the tree to assess the condition of the core.
- Assessing the scope of work and drawing up a repair plan. At this stage, the types of defects and the distribution of damage are identified - local, i.e. on a small area of logs; damage to individual logs; destruction of almost the entire basement area (on one wall or along the entire perimeter of the house). Accordingly, repairs can have the following types: replacement of a small section of a log; replacement of one log with or without lifting the entire frame; complete replacement of the entire basement part of the frame.
Construction materials for baths
Before starting construction, you should prepare all the necessary materials. In addition to what you need for the walls, you need to purchase everything you need for the roof, foundation and finishing. You will definitely need:
- batten;
- ceiling boards or lining 20 mm or slightly thicker;
- lining for wall decoration;
- vapor barrier film for roofing;
- waterproofing film;
- mineral wool for ceiling insulation;
- asbestos sheets for insulating walls near the stove and chimney;
- sand-gravel mixture and cement for foundation work;
- roofing material;
- insulation for walls (if the bathhouse is made of timber or logs).
The constructed bathhouse cannot be used immediately, as it must settle. Therefore, it is recommended to begin construction in early spring.
Inspection of the structure
The purpose of the event is to identify faults, determine a method for correcting them and compile a list of necessary materials and work.
The audit is performed as follows:
- inspection of external walls - the condition of the insulating material, the presence or absence of cracks, crevices, gaps, rot, the integrity of corners and other wall structures is checked;
- inspection of the base - checking for the presence or absence of flaws;
- inspection of the roof and ceiling - the general condition of heat, water and thermal insulation materials is checked, as well as the presence or absence of defects;
- inspection of the stove and chimney - the presence or absence of certain damage or burnout is checked, as well as the condition of the lining, if any;
- inspection of doors and windows - checking the presence or absence of distortions, cracks, chips, gaps, cracks, as well as tightness;
- inspection of the floor - the general condition of the insulating materials is checked, the presence or absence of fungus, termites, cracks, crevices and other defects, as well as the “health” of the finish, if any;
- inspection of internal walls - the presence or absence of cracks, cracks, chips, gaps and other defects is checked, as well as the condition of the facing material, if any;
- inspection of interior items;
- inspection of water supply and drainage systems;
- inspection of electrical wiring.
After assessing the condition of all elements of the structure, an estimate is drawn up, materials are purchased, and repairs are made.
What material to choose for walls
The modern building materials market offers various options suitable for building a bathhouse to suit every taste. The most common: wood, concrete blocks and brick.
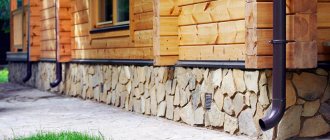
Since ancient times, construction has been carried out from wood as the most environmentally friendly material that does not require additional finishing. Wooden walls delight with a pleasant aroma and aesthetic appearance.
Old log house What to do with him? Reconstruction or demolition?
Thanks to the new trim, we straightened out all the sides and corners of the house. The sunken logs and distortions disappeared. The old log house was treated with antiseptics. We installed additional communications into the house. Due to the lathing on which the house block was mounted, the walls were strengthened, placing the house, as it were, in a frame. The updated façade has sparkled with new colors, and the owners of the house can still live for a long time in such a home without investing in new construction.
And it seems like there is a house, “No breaking, no building,” but finances still may not allow it. Is the game worth the candle?
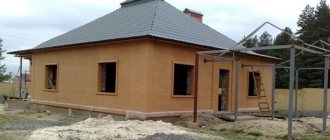
The photo below shows our customer's house.
Is he thinking about reconstructing or demolishing?
old log house of our customer old log house of our customer
Here the question arises in this way. If the existing quadrature is enough for you and you have no desire to increase the height of the log house or add an attic floor, then you will not have to strengthen the foundation or definitely change the lower crowns, but it will be enough to make cosmetic repairs inside and out.
Quick installation and a presentable appearance for the facade can be achieved by covering it with wooden siding
Using our work as an example, we show how beautifully and adequately you can transform an old log house.
Customers contacted us with possible options for updating the log house. At the beginning, the option of resurfacing and repainting the log house was discussed. And having considered the option of finishing the facade with a new block house and painting it on site in the desired color, it turned out to be about the same. But! There are many more benefits.
The block house allowed us to keep the appearance option - a house made of logs.
Coniferous wood (pine with Christmas tree Kirov Forest). We chose the largest profile diameter. This makes him look more massive.
pine siding pine siding finishing with wood siding finishing with wood siding
We left the work of caulking the log house. And for example, the price for such a service starts from 80 rubles per linear meter. We cleaned and refinished all the trim around the windows with white paint. We also installed new trim and decorated the corners of the house.
The new façade provided additional insulation for the house
Thanks to the new trim, we straightened out all the sides and corners of the house. The sunken logs and distortions disappeared. The old log house was treated with antiseptics. We installed additional communications into the house. Due to the lathing on which the house block was mounted, the walls were strengthened, placing the house, as it were, in a frame. The updated façade has sparkled with new colors, and the owners of the house can still live for a long time in such a home without investing in new construction.
Frame construction
The most inexpensive and simplest option is a self-built frame bathhouse. Even a person with no construction experience can assemble it. This method of construction is the fastest, since in this case there is no need to wait for shrinkage, but to immediately begin interior decoration and installation of windows and doors.
But it should be remembered that the walls of the frame structure require additional insulation.
Inspection of the structure
The purpose of the event is to identify faults, determine a method for correcting them and compile a list of necessary materials and work.
The audit is performed as follows:
- inspection of external walls - the condition of the insulating material, the presence or absence of cracks, crevices, gaps, rot, the integrity of corners and other wall structures is checked;
- inspection of the base - checking for the presence or absence of flaws;
- inspection of the roof and ceiling - the general condition of heat, water and thermal insulation materials is checked, as well as the presence or absence of defects;
- inspection of the stove and chimney - the presence or absence of certain damage or burnout is checked, as well as the condition of the lining, if any;
- inspection of doors and windows - checking the presence or absence of distortions, cracks, chips, gaps, cracks, as well as tightness;
- inspection of the floor - the general condition of the insulating materials is checked, the presence or absence of fungus, termites, cracks, crevices and other defects, as well as the “health” of the finish, if any;
- inspection of internal walls - the presence or absence of cracks, cracks, chips, gaps and other defects is checked, as well as the condition of the facing material, if any;
- inspection of interior items;
- inspection of water supply and drainage systems;
- inspection of electrical wiring.
Construction stages
Detailed step-by-step instructions, which consist of several stages, will help you answer the question of how to build a bathhouse yourself:
Construction of the foundation
When building a bathhouse from timber, it is recommended to build a simple columnar foundation, which is low cost and suitable for light buildings. Holes are dug in the corners and then after a certain distance of several steps. The depth of the pits ranges from one to one and a half meters.
A small amount of ASG is poured onto the bottom, then an asbestos-cement pipe is installed. The fittings are placed inside and the cavity is filled with mortar. After the mortar has hardened, the spaces between the pillars are filled with bricks.
How can you increase the service life of timber?
The service life of the lower crowns, and therefore the entire wooden house, can be achieved in the following ways:
- Application of high-quality and reliable waterproofing. Such materials include modern euroroofing felt. It is laid on top of the foundation and protects the frame well from below.
- Cover board. If there is no financial opportunity to manufacture lower crowns from larch or oak, you can increase the reliability of the base by installing boards made of these materials. It is attached on top of the foundation waterproofing and has a width of 25-30 cm and a thickness of 6-8 cm.
- Impregnation of wood with folk remedies. It is recommended to use the following substances: copper sulfate, “Finnish mixture” (slaked lime, copper sulfate, table salt, flour); natural wax; spruce resin or birch tar; bitumen; drying oil; oils
- Modern, synthetic, impregnating compounds. The following antiseptics are popular: Pinotex, Sadolin, Senezh Ognebio, Tikkurila, Belika.
You can replace the lower crowns in a wooden frame yourself in different ways. It is important to correctly assess their condition and determine the scope of work.
To prevent rapid rotting of wood, it is necessary to protect it from moisture and pests. Preventive measures will help eliminate the need for labor-intensive major repairs.
Construction of walls and installation of roofing
The most common material for bathhouse walls is 150x150 timber. The first crown is treated with special antiseptic substances and placed on waterproofing.
More often, the timber is connected “into the paw”. The first crown is checked for the presence of right angles, then the assembly of the walls begins. Each crown is laid with a layer of thermal insulation and connected with iron or wooden pins.
After the walls are erected, the rafters are mounted using metal brackets. The roof of a bathhouse most often has a gable shape. In this case, the rafters rest on the walls and are connected at the top into a ridge. Lathing is installed on the rafters, then steam and waterproofing layers, and insulation. Finally, the roof is installed.
When is the best time to do the work?
Repair of the basement of a wooden house must be carried out immediately when damage is detected. In this case, it is possible to do without major repairs and complete replacement of the lower crowns. The work itself cannot be carried out in high humidity and windy weather.
When planning the timing of repair activities, it is necessary to take into account some features of the behavior of wood. In summer, moisture moves deeper into the log, which can cause cracking when drying.
In winter, the humidity of the tree is minimal, and the moisture is frozen, which ensures uniform shrinkage. In addition, in summer, wood is more sensitive to temperature differences between night and day.
The choice of repair timing should be made taking into account the recommendations given for the construction of a wooden house:
- It is better to carry out foundation repairs in the fall, when the air temperature has not yet dropped to sub-zero values. After 2.5-3 weeks, the concrete will gain the required strength, and you can start building the log house.
- It is better to carry out work with a wooden frame in winter.
- During spring, maximum shrinkage occurs. It is better to wait out this period.
- Summer is the best option for finishing work.
Important! If the major repair of a wooden house involves raising and strengthening the foundation, as well as replacing the lower crowns of the log house, then work should begin at the end of October-November, taking into account that the completion of the log house repair will take place in December-January.
Interior decoration
First, communications are carried out: electricity, water, sewerage. A drainage well should be dug next to the bathhouse, into which water from the washing room will flow.
When making a floor in a bathhouse with your own hands, you should remember that it must be leaky, that is, have gaps for the passage of water.
Then the walls are insulated and finished with clapboards and electrical appliances are installed.
Comments: 19
oooh ksm
Year(s)/Years ago: 4
- Like | 1
- Save
Denis Abrarov thanked: ooo ksm
zamolotskikh
Year(s)/Years ago: 4
Good afternoon, Denis.
I partly agree with Vladimir.
It is necessary to conduct an examination of the object’s structures in order to understand whether reconstruction makes sense or not.
Best regards, Stanislav.
- Like | 1
- Save
Denis Abrarov thanked: zamolotskikh
Denis Abrarov
Year(s)/Years ago: 4
The house was completely dismantled, the “bowl” frame itself and the entire rafter system are in excellent condition.
- Like | 1
- Save
Laboratorio Creativo di Vladimir Lamfadel
Year(s)/Years ago: 4
So it was necessary to post a real photo... now everything is clear)
- Like | 2
- Save
oooh ksm
Year(s)/Years ago: 4
If you want to get a modern bathhouse, then timber 150x150 or 200x200 will suit you
- Like | 1
- Save
Design studio "Strekoza Design"
Year(s)/Years ago: 4
Denis, hello! Please tell me where the object is located?
- Like | 1
- Save
Denis Abrarov
Year(s)/Years ago: 4
50 km from the Moscow Ring Road along Leningradka
- Like | 1
- Save
Design studio "Strekoza Design"
Year(s)/Years ago: 4 Last changes: Year(s)/Years ago: 4
Denis Abrarov, excellent, Denis, we will be happy to cooperate with you, we specialize in turnkey projects, until the end of May when ordering repairs, a design project in The gift comes very handy for you since you just need a full cycle of work.
We have been on the market for 11 years already, we have all our own suppliers of materials, and as a result, the project comes out several times cheaper than the average market cost. We work officially, we conclude an agreement, we are financially responsible for the deadlines. For any questions, you can contact us by phone or you can leave us your contact information, the designer will contact you personally. ____________ Strekoza Design +
- Like | 1
- Save
Laboratorio Creativo di Vladimir Lamfadel
Year(s)/Years ago: 4
The main thing, Denis, is not to be fooled by the “gifted design”! Professional designers never give away their work.
- Like | 1
- Save
Design studio "Strekoza Design"
Year(s)/Years ago: 4 Last changes: Year(s)/Years ago: 4
Laboratorio Creativo di Vladimir Lamfadel, professional designers make a name for themselves with their work, and not with gossip about other designers on forums)
- Like | 2
- Save
Hildebrandt group
Year(s)/Years ago: 4
Good afternoon, Denis!
Ready to take on your project.
The cost of the project with 3D and a full set of drawings will be 1000 rubles/sq.m. We can carry out turnkey implementation without any problems; we have our own teams of builders and finishers. The project duration is from 10 to 20 days depending on the terms of reference. The implementation time and cost will depend on the materials.
I will be glad to cooperate!
Best regards, Andrey Hildebrandt.
- Like | 1
- Save
zamolotskikh
Year(s)/Years ago: 4
Good afternoon, Denis.
The cost of the project is 1,050 rubles. / sq. m.
You can see examples of work and contacts in our profile.
Best regards, Stanislav, ZS-ARCH.
- Like | 1
- Save
Denis Abrarov
Year(s)/Years ago: 4
The composition of the drawings of the project documentation section of the AR is needed: 1. General data sheet 2. Floor plans of the building and structure 3. Marking floor plans of the building and structure 4. Facades of the building and structure 5. Sections of the building and structure 6. Roof plan of a building and structure 7. Specification for filling window and door openings of a building and structure. 8. General plan for the development of a land plot for the placement of buildings and structures.
Builders are already there
- Like
- Save
zamolotskikh
Year(s)/Years ago: 4
Good evening, Denis.
The above price includes everything you listed (even a little more).
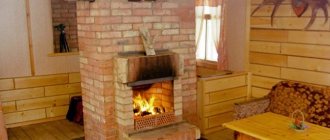
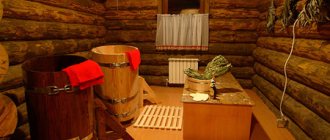
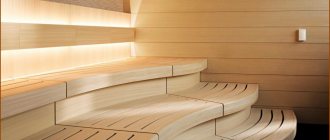
Oven and shelves
The shelf is made of hardwood and mounted on a frame. The stove is installed in compliance with fire safety standards and insulation of the nearest walls and chimney. It is installed on a special monolithic foundation. More often, metal stoves or heaters are installed in bathhouses.
After construction is completed, you can install a table and benches in the dressing room. Place ladles, buckets and basins in the washing room. Prepare brooms.
You can also make many parts for arranging a bathhouse yourself. The best sauna is the one you create with your own hands. It is in it that it will be most pleasant to steam and relax.
Preparation for restoration
Before starting work on restoring the premises, you should carefully inspect it and check the condition of all systems and parts. The most important part of preparation is the foundation inspection. If cracks or other serious damage are found on its surface, reconstruction of the bathhouse does not make sense. In this case, it is easier to build a new building; you can also consider the option of moving it to another base.
Interior of the bathhouse Source arma.ks.ua