Sliding glass doors have a number of advantages: they save space, have a beautiful appearance and are easy to maintain. They visually increase the volume of the room and have good aesthetic qualities.
Sliding glass systems are ergonomic, functional, and original. They can be made according to an individual project, but standard ones are cheaper. Glass doors give a modern look, lightness to the room, and improve lighting. They fit well into the interior of the gazebo, creating comfort, convenience and coziness.
DIY plywood doors
If you have the necessary skills in working with plywood, you can make interior doors with your own hands. Firstly, it is cheaper than buying a ready-made structure or ordering a door from a manufacturer. Secondly, you can make a door that exactly matches the required dimensions, choose your design and decoration. Thirdly, you will be 100% confident in the quality and reliability of the design.
Glazing with plastic structures
Plastic windows are usually installed by the same companies that specialize in their production, so when purchasing structures, you can immediately arrange their installation. If it is not possible to invite craftsmen to carry out the work, then the installation is carried out with your own hands. Glazing a veranda using metal-plastic structures is a little more complicated than with wooden frames.
Full glazing option.
It will not be easy to carry out glazing work alone, so the best option is to have 1-2 partners who will help maintain the accuracy of the installation. Installation is carried out in the following sequence:
- First, you should take care of selecting plastic structures for the veranda at the dacha that are suitable in size. Most likely, you will have to make an individual order from a specialized company. At the same stage, you need to choose the type of fittings: sliding, turning, tilting, tilt-and-turn windows. Sliding windows are the most convenient to use - they can simply be moved to the side, while when using tilt-and-turn systems, the open sash will take up space in the room (interestingly, sliding systems are usually less durable than tilt-and-turn systems).
- The most difficult thing is to mount the metal-plastic frame into the veranda opening, which requires the help of several partners. Before starting installation, it is recommended to temporarily remove the window sashes from the frame so as not to damage the glass during work. The frame is fastened using reliable fasteners recommended by the manufacturer (the choice of fasteners will depend on the type of material from which the veranda at the dacha is made).
- After installation work, gaps will necessarily form between the structure and the walls, which must be closed using construction foam. Soft rubber seals are used to eliminate gaps. Only after this is the installation of the sashes with glass carried out.
If the glazing of the veranda was made with a metal-plastic window structure, then it is recommended to insulate the room and install heating elements to ensure its year-round operation.
In what cases is it better to install
Sliding doors and sliding doors are installed between rooms. They are especially relevant in the following rooms:
- Kitchen where there is never enough space
- Interior space when two rooms are separated from each other
- Toilet and bathroom
- Dressing room, mirrored doors are often installed here
Doors can be made not only from plywood, but also from solid wood. However, plywood is preferable if you need to make a door leaf of a curved shape. Such designs are in demand mainly for dressing rooms. Plywood bends well, so giving it the desired shape will not be a problem. Radius doors are attached to the same curved profiles.
In addition, plywood is lightweight, it is resistant to high humidity and temperature changes, and is not afraid of direct sunlight. Plywood is easy to care for, as the material tolerates synthetic detergents well.
Difference from swing
Doors with a sliding mechanism have many more advantages than similar swing models. Let us list the main differences between these two types:
- Space saving.
This factor is the key difference. When planning the installation, you won't have to add a few extra square meters to ensure that the door can be opened freely, so this door option is ideal for small spaces. You will be able to use the space as rationally as possible. - Guaranteed tightness.
Sliding systems will not open due to a sudden gust of wind or strong draft. Such structures will be securely closed at any time of the year, regardless of the weather. The doors are securely fixed in any given position.
- Convenience and practicality.
Unlike swing doors, doors with a sliding mechanism do not scratch the floor or nearby furniture. Even curtains and blinds will retain their original appearance much longer, since the material will not constantly touch structural elements when opened. - Style and beauty.
Of course, there are also attractive models among swing doors. However, sliding structures look much more modern. There are design options without frames and lintels, which means that nothing will block the view. Such doors add grace and lightness to the facade, making its appearance more attractive. They can be installed even on the second floor. The variety of models will also please buyers. On sale there are options made of polycarbonate, with glass, as well as aluminum and wooden doors and even soft PVC doors. You can easily find a design that suits your design.
Some may think that glass doors are very fragile and have a short service life. But this is absolutely not true. The structures are made of high-quality, thick impact-resistant glass. The design is resistant to temperature changes and mechanical stress. Do not be afraid of the established opinion that glass is a very fragile and impractical material.
Thanks to modern developments, glass sliding doors will serve you for many years.
Sliding
The sliding door opening mechanism has the following advantages over standard swing structures:
- Doesn't take up extra space
- Do not accidentally open when there is a draft
- They do not slam shut on their own, which is important in families with small children
Plywood sheets are also lightweight, so the load on the walls is minimal.
Coupe doors
A sliding door is one of the options for sliding doors. Before you begin its manufacture and installation, you need to study the main features. The structure consists of the following elements:
- Door leaf
- Rollers for moving the web along the guides
- Profile
- Stoppers limiting door movement
Sliding doors have all the advantages of sliding structures. The difference is that the sashes remain outside and move along the walls, rather than being “recessed” inside. The main advantage compared to swing models is the saving of space in the room by using the usable area that is usually left for opening the door.
Compared to sliding structures, sliding doors are easier to install. For those who plan to install doors on their own, this is an important advantage. For such doors, only guides and rollers are needed. Complex work on installing the box, which is usually planned at the repair design stage, is absent here.
Kinds
Today, there are three main types of structures with a sliding mechanism:
- Tilt-and-slide.
In its specificity, the method of opening such a structure is very similar to bus doors. The movement of the canvas is carried out in two directions: towards itself and to the side. The design of such a system includes a special device that allows you to fix the door in any position, as well as turn it into a window to ventilate the room. This design is ideal for terraces, balconies and verandas. However, it should be remembered that such a mechanism is not resistant to excessive loads. You can extend the service life of the canvas by purchasing special threshold covers that protect it from external damage.
- Lift-and-slide.
To open a door with such a mechanism, you need to slightly lift the leaf and move it to the side. When closing the structure, the seals press the frame at the bottom and are securely fastened. This way the heat will be reliably retained inside the room. A similar system is installed in wardrobes.
- Folding and sliding.
This is the most unusual-looking system. The design consists of several doors, which, when closed, completely open the doorway. In terms of external characteristics, such a system is very similar to an accordion. This door looks original and stylish, while being very functional. If necessary, you can completely free up space and make the door almost invisible, or open the doors not completely. If you like this model, you should remember that it has very low thermal insulation properties, so it is only suitable as an interior structure or a door for warm weather.
Polycarbonate is positioned as a building material that has been used relatively recently. Despite this, it is in great demand in the market and this popularity is constantly trending towards growth. In most cases, polycarbonate is used for the construction of gazebos, terraces, greenhouses and other buildings. In addition, such material is also used in the construction of individual building elements.
We are talking about doors or windows. And if previously polycarbonate doors were relevant exclusively for small street buildings, today this material is used for installing residential doors.
Required materials and tools
Installation of sliding plywood doors begins with preparatory work. You need to stock up on the necessary materials and tools so that nothing later distracts you from your work. To create a simple door you will need the following materials:
- Beams in the amount of 5 pieces, length 3 m and cross section 45 x 20 mm.
- Waterproof plywood, coniferous varieties are suitable. The dimensions of the sheet depend on the size of the door leaf.
- Insulation or filler. For a regular interior door, you can choose an inexpensive option that does not have noise and heat insulation properties. But even in interior structures, inexpensive mineral wool or expanded polystyrene can be used as insulation.
- PVA construction adhesive
- Rail
- Profile to be used as guides
- Rollers
- Wood putty
- Acrylic sealant for wood
The tools you need to prepare are:
- Circular saw, hand or electric
- Jigsaw
- Sandpaper
- Spatulas of different sizes
- Screwdriver
- Electric drill
- Fraser
- Ruler
- Pencil
- Masking tape
- Tassels
If you are planning decorative surface treatment, then a milling machine and a miter box will be useful to you.
Frame panels
The polycarbonate design with a frame will be more noticeable and will be perceived as a full-fledged door. The frame will serve as a frame, which will give rigidity to the panel.
The compartment version is most suitable for making a sliding door made of polycarbonate. The frame made of profiles for a sliding polycarbonate door is assembled using self-tapping screws; there is no need to install additional fittings on the door leaf. Polycarbonate with a thickness of 4 and 10 mm can be installed in the frame. Thin parts are installed in the profile using a special seal. In this option, you can make a combined fabric, with inserts made of monolithic, cellular, transparent or colored polycarbonate.
Sliding mechanisms with frame panels can be supported or hinged. In the rooms, hinged systems are installed, in which there is no bottom guide, and the door is held in place using U-shaped flags installed on the floor to the side of the opening.
In support mechanisms, the leaf moves along the lower guides, and the upper roller serves to balance the sash. Support structures are installed in openings with low traffic.
The rollers in structures with a frame are attached to the upper and lower horizontal crossbars of the frame frame. Each manufacturer produces its own range of profiles, which differ in shape and type of coating, but all standard sizes are the same.
DIY plywood doors. Step-by-step instruction
If you follow the detailed instructions for installing a sliding door, then installing it yourself will not be a problem. It is quite possible to do without the help of specialists to make a plywood door yourself. This does not require extensive experience; basic repair skills and the ability to handle tools are sufficient.
Making a single-layer plywood door
- A sheet of plywood with a thickness of at least 1 cm must be cut according to predetermined parameters
- Slats or wooden planks are attached along the perimeter of the sheet. This is necessary to give rigidity to the door leaf. You can fasten the planks with screws, small nails or using wood glue.
- To increase the strength of the structure, horizontal jumpers are needed, for which the same rail is used. First they are installed on one side of the sheet, then on the other.
- To give the door a more aesthetic appearance, you can smooth out the transition from the slats to the main panel using glazing beads.
- Next, the door needs to be sanded, putty and painted in the desired color. You can simply coat the plywood with varnish.
- Fittings are installed on the finished door
Making a frame door
This product will require two plywood sheets, which will be attached to a frame made of bars and planks. The frame is made according to the dimensions of the doorway. Wooden parts are fastened into one structure with self-tapping screws or metal plates.
The first sheet of plywood is fixed on one side of the frame using self-tapping screws. Then a layer of thermal insulation material or simply filler is laid so that the door is not hollow. Next, a second plywood plate is attached to the other side of the structure. All that remains is to treat the canvas with putty and paint it in the desired color, fasten the fittings - and the sliding door is ready for installation.
Installation of the structure
- Attaching the rollers to the door leaf depends on the system used. Manufacturers' recommendations must be followed. Most of them recommend retreating a certain distance from the edge and attaching the plates under the rollers there. They are fastened with self-tapping screws, the length of which should not be less than 70 mm. They need to be screwed strictly perpendicularly. Supports for the rollers are installed in the plates, and the platforms themselves with wheels are already attached to them.
- The guides are installed from above the doorway. The best option is to first hang the profile on a dry beam using self-tapping screws, and then secure this structure above the doorway.
- Hanging doors on guides. It is important to leave a distance between the floor and the door leaf so that the door does not shuffle across the floor when opening and closing.
- Installation of stoppers. They are mounted from above directly into the profile, starting from the sides. At the bottom, the stopper is needed at the same level as at the top.
Related article: How to make a sliding door into a wall
The final work is finishing. The top beam can be covered with a strip that matches the color of the door.
Profiles for polycarbonate
Several types of profiles are produced for mounting and covering the edges of polycarbonate sheets. They are made of aluminum and polycarbonate. When making a sliding door, only end profiles may be needed to decorate the frame and create a rigid frame. This depends on the design of the door, the selected type of sheet of material and the technical capabilities of the master in terms of the quality of cutting the material at home. Such a profile may be needed to stiffen the panel and make a door edge that will hide chips.
The end profile closes the honeycombs of the cellular sheet, which are open at the ends, from moisture and dust getting into them. If you do not cover the ends with a profile, then over time the material will lose its transparency. Particular care must be taken when closing the ends of the polycarbonate when installing a bathroom door.
The end profile, which acts as a frame, will give the door an aesthetic and finished appearance.
For any purchased sheet there are end profiles of the appropriate thickness: from 2 to 16 mm. The length of the profile is the same as the width of the polycarbonate - 2.1 m.
Advice from professionals
- If the doorway is smooth, then the canvas can be measured strictly according to size. When opening with a curvature, take the canvas with a margin so that it covers all deviations.
- Sliding doors are hung after renovation, that is, the walls must be covered with wallpaper, and the opening itself must be plastered or painted.
- When installing the decorative beam, place it so that it covers the rollers. The design will look more beautiful and neat.
Thus, even a non-professional builder can make and install a sliding door with his own hands. The main thing is the ability to work with the tool, strict adherence to instructions and the desire to make a truly high-quality product.
An example of sliding door installation can be seen in the video.
Advantages
The advantages of polycarbonate are as follows:
- lightness, feeling of airiness;
- higher reliability compared to glass;
- safety - if cracked, it does not crumble into small fragments;
- ease of care.
Taking into account such features, sliding doors made from polycarbonate will serve for a long time and will delight the owners with their durability.
Doors can be built in two versions: hanging and sliding. The second option is the most common. Sliding doors have a compartment design. Those. their doors move apart along the wall. To make such doors, you need to decide whether they will have a frame or not. Metal, wood or plastic structures are often used as a frame. With the frameless type, no other materials are used to create the door, with the exception of polycarbonate itself.
Required Tools
To figure out how to make a polycarbonate sliding door on your own, you need to understand that creating a door without a frame will take a lot of material costs than creating a frame door, but it also looks much richer. There are no difficulties in manufacturing, but the material you need is basic:
- electric drill and drill bits;
- screwdriver (screwdriver);
- tape measure and level;
- cutting machine (jigsaw);
- square
If the door is framed, then you must have:
- polycarbonate sheet (you can use pieces ready-made according to the size of the openings);
- corners made of metal or polymer (for the opening);
- self-tapping screws and angles for attaching frame sides;
- fasteners for the box.
Doors without a frame are secured using one fastener and polycarbonate sheets.
Stages of creating a polycarbonate sliding door
- The opening is measured taking into account that the frame is made one to one and a half centimeters smaller than the opening in order to close tightly and not touch the box.
- The rectangularity of the wooden opening is measured with special care using a square. If you make mistakes at this stage, the door simply will not fit into the opening. For metal and plastic, this is not necessary.
- The frame of beams is assembled using metal corners.
- The assembled frame of their wood is sanded and treated with varnish (or stain) for an aesthetic appearance.
- Keep in mind that the frame can be made using an old canvas, on which the bars are placed around the perimeter and the necessary measurements are taken. Then, using a jigsaw, the frame is assembled and the polycarbonate sheet is attached with self-tapping screws.
- For greater aesthetics, self-tapping screws with decorative caps are used.
- Afterwards, canopies are attached to the frame and frame to install the door and, finally, the structure itself is mounted.
Thanks to the lightness of the material, this work can be done even by one person. The frameless option is even simpler: a polycarbonate sheet is applied to the old door leaf and cut to the desired size.
Assembly
To assemble sliding doors you need the following tools:
- the polycarbonate sheet is five to six centimeters larger than the opening;
- metal guide tube, twice the width of the opening;
- fasteners and anchors;
- list of previous materials.
Installation begins with a retractable structure - a guide. The tube is attached at a height of five or ten centimeters above the opening. One half is attached above the door opening, the other is shifted in the direction of movement of the door along the plane.
Afterwards, rings are attached to the polycarbonate sheet. For this, fasteners are used. They are screwed to move the door along the guide. The door should be one to one and a half millimeters from the floor. If there is a threshold, the canvas is lowered slightly below it. This will allow the door to close more tightly.
Restrictions are set on the guide at the ends. In this case, the rings with the polymer are hung on the guide. If necessary, handles are attached to the sheet. Once the door handles are installed, you can say that a modern and stylish door that is also durable and safe is now installed in your home! In addition, you can be proud that the doors are made by yourself!
Polycarbonate material today is one of the best, if not the best, option for bringing the most daring ideas to life. At the same time, the costs of installing the door and purchasing materials are minimal! Feel free to grab your tools!..
Category: Doors.
Instructions with photos and videos on how to make plywood doors with your own hands
Making plywood doors with your own hands is not as difficult as many people think. And this activity is very inexpensive and will save the family budget on purchasing ready-made doors. Both entrance and interior doors, including sliding ones, can be made from plywood. How to do this will be described and shown in this article.
Plywood door
Preparing tools
Anyone can make a door out of plywood with their own hands, but to do this you need to acquire not only sheet material, but also special tools and equipment. To create a simple panel version of doors you will need the following materials:
- Bar 3000x45x20 mm (5 pcs.).
- Rail 50x30 mm.
- Waterproof plywood grade FSF 3/3 (can be coniferous). Sheet parameters 1220x2440x9 mm.
- Insulation (for the entrance structure) or simply filler (expanded polystyrene).
- Self-tapping screws 30x3 mm (about 200 pcs.).
- PVA construction glue.
- Putty for wood products or acrylic-based sealant for wood.
- Dye.
You will also need various tools:
- Sandpaper;
- Spatulas;
- Brushes;
- Masking tape;
- Hand or electric circular saw;
- Jigsaw;
- For decoration you may need a miter box and a milling machine;
- Screwdrivers, screwdriver.
- Ruler, pencil.
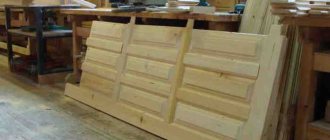
Creating an entrance door from plywood
First of all, you need to create a drawing, then make a door casing, for this you will need a block. The easiest way is to make a U-shaped structure for the doorway, the diagram of which is presented below. After this, you can proceed to creating a frame for future doors from the slats. It is also possible to make connecting jumpers for plywood sheets.
Slat door frame
You can connect all the sections of the rail using screws - this is the easiest way and does not require much time. Then, using centering, we make a countersunk hole and screw the prepared plywood to the frame with screws. Each fastener is located at a distance of 20 cm from each other.
Tools for screwing in self-tapping screws
Note!
The hole under the putty is made in such a way as to hide the head of the self-tapping screw to a depth of 1 mm, but if a wooden plug is intended, then 3 mm.
We cut the plywood for the frame with a saw (manual or electric).
Now we need to insulate our door. To do this, you need to put mineral wool or other insulation inside. This will also eliminate extraneous sounds from outside and keep you warm.
Insulating a plywood door
We screw a second sheet of plywood on top, thereby covering the insulation. The door as such is ready. Decoration can be done using a hand router.
Decorating a plywood door
Now you can sand the surface with a machine and then with sandpaper (120 grit). The drawing is sanded entirely by hand.
All possible defects and holes must be filled with putty.
Puttying cracks and other holes
All that remains are decorative measures, cutting in locks and handles, priming the structure and painting it.
Embedding a lock with a handle and the finished door
How to make such doors from plywood with your own hands is demonstrated in more detail in the video.
Creating a sliding interior door from plywood
As an internal partition in the house, you can make a sliding door from plywood with your own hands. To do this, you will need guides, which can be purchased at a hardware store. Choose the length you need for your room and doorway. Mostly they already come with the mechanism, but if not, then you need to purchase the mechanism as well.
Sliding door kit
Note!
Rollers in a steel mechanism are more durable than rubber ones.
A plywood partition will be lightweight and to create it you will need, in addition to sheet material, wooden slats and glazing beads. From the slats we make a frame for the future partition, which is connected using glue and spikes. In the finished frame, you need to fix the plywood sheets using glazing beads and that’s it, the structure is ready.
All that remains is the decorative side of the process. Here, whatever you want, you can glue a special decorative film over the plywood, cover it with fabric, or simply varnish it, and paint it. You can create a more complex design with inserts from other materials: plastic, glass, etc.
Important! When calculating the materials for creating sliding doors, you must remember that it is recommended to make the canvas wider than the opening by 5-7 cm, and also 10-15 cm higher in height, unless of course the opening is the entire height of the room. This is necessary to avoid the appearance of large gaps around the perimeter.
Manufacturing a single-layer interior door
This design is suitable for residential premises and utility rooms where sound and heat insulation is not needed. It is a timber frame structure with slats nailed across a plywood sheet. For a single-layer door, any brand of grade 1-2 plywood is suitable so that there are fewer defects and chips on its surface.
Related article: How to make a sliding door with your own hands
You can also choose the thickness of the plywood at your discretion from 3 to 21 mm. If the room has high humidity, then you can purchase moisture-resistant sheets. Laminated material will not require subsequent decorative finishing. The main thing when choosing is not to take plywood that is made using phenol-formaldehyde adhesive mixtures.
The creation of the structure itself is similar to a combination of the two previous procedures, that is, the frame and the door itself are made like a sliding one, only a lock and handle are also embedded into it, and hinges are hung, as is the case with the entrance structure.
There is also an option for a multi-layer plywood door, an example would be the entrance structure presented above, where thermal insulation material is also laid between the layers of plywood. This door can also be installed in a steam room. But in this case, it is necessary to use moisture-resistant material.
Popular types of doors to the gazebo
There are many options for doors that can be equipped with a gazebo. They differ in designs and materials.
Did you know?
The oldest door still in use today is in England.
It is not known for certain who made it and when, but according to measurements made by scientists, it was produced in the 19th century. Example of the most popular:
- Sliding (sliding) doors with aluminum profile.
Mainly used for large buildings, but can also be installed on small structures. It is assembled from several sections that move to one side. - Accordion folding doors.
Not to be confused with sliding ones, they do not move apart, but fold. Each leaf consists of several sections that move from top to bottom. - American
. It is made in the form of hinged wooden doors in the style of American saloons from the times of cowboys. Suitable for a non-glazed version of the gazebo. - Polycarbonate door.
This material is usually used in greenhouses. This is a budget option, but if you approach this with the right skill, you will get a decent design that you can make with your own hands. - Radial
. Mounted on gazebos shaped like a circle. Made from glass and curved rails. This option is expensive and they are placed on a curved door portal.
Sliding
This type has recently begun to gain popularity. It is mounted on glazed gazebos, as it has the ability to close tightly and not let in cold air.
There are several types of such portals:
- Tilt sliding
. The functionality of this design is similar to that installed in trolleybuses. The canvas moves towards the opening one and to the side. This door is equipped with a special lock that can lock it in any position convenient for the owner. - Shifting along the rise.
To open such a door, you must first lift it slightly up. It differs in that when closing, sealing mechanisms are activated that reliably close the portal. - Foldable
. It has 2-3 doors that fold like an accordion. The good thing is that when closed it completely clears the passage. The downside is poor thermal insulation.
The price of sliding portals depends on:
- material;
- size;
- installation (on your own or not);
- Scenery;
- types of structures.
Accordion (folding)
Folding portals differ in types and design options. By type of device they are divided into:
- consisting of narrow lamellas and a panel base;
- having two guides.
If the first type of device has rollers at the bottom, thanks to which it opens and closes, then the second is equipped with synchronizers that have the ability to move more smoothly and close better.
Important!
Accordion-folding doors have one big advantage - their compactness, which is why such products are best used in small buildings.
Varieties of such doors are divided according to the materials from which they were made:
- Wooden
. The most environmentally friendly variety. In its manufacture, oak, veneer or pressed shavings can be used, it all depends on the financial capabilities of the owner of the gazebo. - Plastic
. Plastic products have two advantages: low price and large selection. They can be any color and decorated in any way. In addition, they are quite durable and not subject to weather and mechanical influences. But the sound and heat insulation of this material is not up to par. - Glass
. Used to close wide portals. They look rich, can be matte or mosaic. You can also apply a colored film or sandblasting pattern to glass surfaces. They transmit light well, making them suitable for gazebos located in a shady place. They are not fussy to care for, but they have two disadvantages: high price and heavy weight. - Textile
. Gazebos serve a purely decorative function. Even if the fabric in the sections is very dense, it performs noise and any other insulating functions poorly. The only thing it is good for is keeping flying insects out of the glassed room in the evening. This option can be used as a “temporary” option until something more suitable is purchased.
Plywood doors: design, tools and materials, production of frame and single-layer products
Nowadays, beautiful doors are quite expensive, however, you can make them yourself from plywood, and thereby save money. The only thing is that you should first familiarize yourself with all the nuances of this work. Therefore, next we will look in detail at how to make a door out of plywood with your own hands.
Related article: How to seal a doorway in a wooden house
How to assemble an interior door?
To begin making interior doors with your own hands, you should begin by determining their sizes. To do this, you need to measure the doorway with a tape measure. In this case, you should take into account the required gap between the door leaf and the installed door frame of at least 3-5 millimeters.
At the bottom, the gap between the door leaf should be larger, within 10 mm or slightly less
When measuring a door, it is important to take into account factors such as:
- Does the floor have finishing and will it be changed soon?
- Is the door frame itself in good condition?
Once the necessary dimensions for making interior doors are ready, you can take a piece of plywood and draw a rectangle on it, strictly according to the existing dimensions. To make the frame of an interior door with your own hands, use a wooden beam.
To connect the elements of the door frame, tenons are made along the edges of the cut bursa on one side and grooves on the other, which are coated during the assembly process with wood glue or ordinary PVA glue.When assembling the door frame, be sure to use a square and a tape measure, which is used to measure its evenness diagonally. In order for the frame to be as strong and strong as possible, and not to warp during operation, it is necessary to install stiffening ribs made of timber and slopes inside it, which will give the frame of the interior door additional strength.
Finally, the frame is covered with plywood, which is processed along the edges and ends with a sanding machine. Finally, you should putty all the cracks and gaps that exist after assembling the door elements, and after the putty has dried, treat the interior door again with a grinder.
At this point, do-it-yourself plywood interior doors are completely ready. All that remains is to hang them and install the fittings. The finished door can be painted with regular paint or covered with leather, which will give them an elegant appearance.
Making a door
Project
The process of making a door is not as complicated as it might seem at first glance. The most important thing is to prepare the project correctly. It will serve as a kind of instruction for further work and will prevent errors during work. The only thing is that you first need to decide on the type of construction.
Most often, plywood doors are made of two types:
| Construction type | Peculiarities |
| Panel | They are a frame structure, which is sheathed on both sides with plywood. As a rule, insulation or stiffeners are located between two sheets. This type of door can be used in cases where good noise and heat insulation is required. |
| Single layer | They consist of one sheet of plywood, which is reinforced along the contour on both sides with strips. This design resembles paneled doors, however, it has low noise and thermal insulation rates. Therefore, it is usually used as interior furniture. |
Frame door design
Having decided on the type of construction, you should measure the door frame and indicate the size of the future product. After this, you need to draw its main details on paper and indicate their dimensions.
Note! The size of the doors should be slightly smaller than the size of the frame, otherwise they will not close well.
Tools and materials
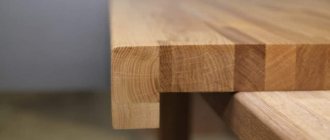
When choosing plywood, first of all, you should pay attention to its brand. If you plan to manufacture an external door, you need to purchase material with increased moisture resistance, for example, FSF brand. True, its price is quite high, so for the manufacture of interior doors you can use cheaper FK plywood.
If you plan to open the product with transparent varnish, you should also pay attention to the type of sheets. It is desirable that they correspond to the first or, in extreme cases, second grade.
Plywood sheets FSF
In addition to plywood, you need to prepare wooden planks 100-150 mm wide. The thickness of all materials is selected taking into account the fact that the total thickness of the product should be 35-40 mm. To make a frame structure, you will also need insulation, which can be mineral wool or expanded polystyrene.
Advice! You can increase the moisture resistance of plywood yourself by impregnating the sheets with PVA glue, drying oil or other protective compound.
As for the tools, you will need the following set for work:
- jigsaw or regular hacksaw;
- electric drill;
- screwdriver or screwdriver;
- tape measure and pencil;
- sandpaper;
- wood glue;
- varnish or paint.
In addition, it is advisable to have a router that will allow you to make tenons and grooves for connecting frame parts, as well as a socket for the lock.
Option for connecting bars to a wooden floor using tongue and groove
Making a frame door
After preparing the project, you can proceed directly to the manufacture of the product. First of all, let's look at how a frame door is made.
So, the instructions for its manufacture are as follows:
- First of all, the frame is made, which is a frame with several jumpers. There are several ways to connect the frame strips. The most reliable is through tenons and grooves using wood glue. You can also use metal corners and screws;
- the locations of the locks should be reinforced with additional bars;
Door frame with insulation
- Next, you need to cut a sheet of plywood to the size of the door leaf and secure it with self-tapping screws to the frame. In this case, the caps must be recessed below the level of the sheet;
- then you need to lay heat-insulating material into the space in the frame and cover the second side of the door with plywood;
- The next step is to mortise the lock. To do this, you need to mill out a socket for it and drill holes for the handles;
- At the end of the work finishing is done. The product must be sanded, the screw heads and other defects must be filled, and then the surface must be varnished.
This completes the process of manufacturing the frame structure. It must be said that the product can be decorated at your discretion in different ways, for example, by gluing false panels or a wooden figure cut out with a jigsaw. You can also apply a design with a router or come up with your own version of decoration.
Single layer plywood door
Making a single-layer door
A do-it-yourself single-layer interior door from plywood is made in the following sequence:
- work should begin by preparing a sheet of plywood according to the size of the door. It is advisable to use a fairly thick sheet, at least 1 cm;
- Then, along the perimeter of the sheet, strips are attached, which can also be made from plywood. To fix them, use self-tapping screws and wood glue. It is also necessary to secure the lintels like a paneled door. To connect the planks to each other, you can use a tongue/groove or furniture tongues;
- Next, you need to attach the strips on the back side of the door in exactly the same way;
The photo shows the finished door leaf
- then you should mill out the space for the lock and the holes for the handles;
- to give the structure a complete and attractive appearance, the transition from the planks to the plywood should be decorated with profiled glazing beads;
- Now the product needs to be sanded and puttied. If you plan to open the door with varnish, then putty should be used to match the color of the wood;
- To complete the work, you need to open the product with varnish or paint.
Advice! To give the structure a certain color, but at the same time preserve the texture of the wood, it should be treated with stain before opening the varnish.
Here, in fact, are all the most optimal ways to make a plywood door yourself.
Types of doors by design and filling
Installation of doors in a gazebo
According to the design, they are distinguished:
- Single doors
- Single-leaf with side parts or with a fixed component
- Bivalve
- Double-leaf with movable or fixed leaves
- Radial.
Radius sliding glass doors fit perfectly into gazebos with round shapes. This is an expensive option, because you need to make curved rails and a curved door leaf. This sophisticated option impresses with its originality and comfort.
Various glasses are used for doors: tinted, frosted, stained glass, decorated. Canvases with patterns are also used, which are applied using various methods. A unique design can be created using a stencil or decor. An original decoration element: doors with mosaics and voluminous decorative elements. Sometimes a film is glued that differs both in texture and in a variety of colors.
Acrylic, tempered, impact-resistant, triplex are the types of glass used depending on the strength characteristics. The use of special glass, which shatters into small fragments upon impact, saves you from serious injuries. Durability and safety are important advantages.
Glass doors are framed in aluminum, wood, plastic, or can be frameless. An aluminum profile is used for the gazebo to enhance strength.
The aluminum sash has good load-bearing qualities. With its help, you can make structures of significant size and different colors, because painting is possible. Glazing without a frame: stylish, original, fits into a gazebo of any architecture and offers an excellent view.
Advantages and principle of operation of sliding doors
Self-installation of doors in a gazebo
The main advantages of glass doors:
- Space saving
- Easy opening
- No thresholds (if there is no bottom guide)
- Self-opening resistance
- Versatility
- Safety.
Sliding glass structures operate on the same principle as sliding wardrobes: they are held on top by carriages and moved apart in different directions. A sliding door is perfect for a gazebo. Reliability, practicality, and original design ensure comfort and safety.
The door structure consists of a roller mechanism, glass and guides. There may be several of them. The kit also includes fittings, decorative panels, trims. The fittings are used of a certain type: they should not protrude above the surface so that the structure can move to the side or into a niche. The guides and roller mechanism are selected taking into account the number of leaves, weight and type of door.
Glass doors are quite heavy and you need to choose a durable and reliable mechanism. The guides for the gazebo must be secured at both the top and bottom so that the structure ensures safety.
Conclusion
Making plywood wooden doors is beneficial from an economic point of view, and in addition, doing something yourself is always interesting. However, for this you need to stock up on time and patience, since the work must be done carefully and slowly. Only in this case the product will turn out beautiful and durable.
The video in this article contains some additional information on the topic discussed. If after reading the material you have any questions, you can ask them in the comments, and we will be happy to answer them.
Other interesting ideas
Finally, I will make a small selection of options that evoked pleasant emotions and associations in me.
I would not say that it is very advisable to spend a lot of money on an ordinary summerhouse, especially if there is nothing of particular value inside. But for the sake of interesting impressions on guests, this can be done. I am sure that the summer residents whose doors were included in our selection succeeded