Today, owners of houses and apartments are massively replacing old wooden windows with practical and durable PVC structures. And this choice is quite justified for a number of reasons:
- Due to increased thermal insulation, material costs for heating are significantly reduced.
- High functionality and modern materials make it possible to avoid additional window maintenance work: tinting the frames to give them an aesthetic appearance; caulking cracks to insulate windows for the winter; removing the insulation from the window in the spring; pulling gauze over the sashes to protect against mosquitoes and other midges and other work that is implied in the operation of wooden window structures.
- A sealed double-glazed window well insulates the room from noise, allowing you to maintain home comfort and protect the peace of the owners.
- The structures have a long service life while maintaining impeccable functionality and aesthetic appearance.
- The cost of a plastic window is lower than a similar wooden product. For example, the price of an unpainted double wooden frame without glass measuring 120x90 cm is 3,600 rubles, and a plastic window is 5,500 rubles. However, a wooden window will still need to be glassed and painted, which means additional time and materials. Whereas the plastic window is already ready for installation.
Those who are going to take on the task of installing plastic windows with their own hands often lack basic knowledge of how to do it correctly. That’s why we present this article here in the form of instructions to help owners who want to carry out the installation themselves.
Installing plastic windows has a number of nuances. For example, PVC windows are not such universal designs. And their use has a number of limitations. Thus, it is not recommended to use plastic windows in cold rooms without heating (verandas, canopies, attics, garages, bathhouses, etc.). By the way, window production and installation companies prefer not to talk about this. In addition, problems may arise when installing PVC window profiles in multi-storey buildings above the 4th floor.
When choosing a contractor to replace windows in your house, you may encounter the fact that the craftsmen simply will not delve into the intricacies of this issue. There are only a few people who have control over the situation and can comprehensively cover it.
Dismantling plastic windows stages of work
The first thing to do is to free the window from the slopes.
Start by clearing the seams of caulk and adhesive. Using a chisel, remove the decorative trim corners located at the junction of the slopes with the wall. Then you need to remove the decorative trim from the top hinge of the window sash. Next, pressing the hinge axis from above with a screwdriver or pliers, you need to move it from the latch. After this, we completely pull out the axle using pliers.
We also remove the decorative trim from the bottom loop. After that, opening the sash with the handle, we swing it open, and lifting it up, remove it from the lower hinge.
It is convenient to dismantle the glass unit using a spatula. Insert the tool into the joint of the glazing bead, the strip securing the double-glazed window to the frame. Smoothly push the bead out of the groove
It is important not to overdo it with the pressing force of the spatula, so as not to damage the leg of the bead and the glass unit itself. Be careful when using a chisel, because... it can push through the bead and leave a mark on it, while a spatula with rounded edges will avoid this
Once all four beads have been removed, you can carefully remove the glass unit from the frame
it can push through the bead and leave a mark on it, while a spatula with rounded edges will avoid this. Once all four beads have been removed, you can carefully remove the glass unit from the frame.
Now you need to remove the ebb and window sill. As a rule, the ebb on the window is secured with several self-tapping screws. After unscrewing them, remove it with a light tug. The process of removing the window sill is also not difficult, and depends more on the material from which it is made. PVC window sills are removed by hand by jerking upwards, because attached to the window using mounting foam. If it is long, jerks are made from the middle, gradually moving towards the edges.
Wooden window sills are cut in several places with a hacksaw and then removed by hand or using a crowbar. Concrete window sills can only be removed using a hammer drill or grinder. If these tools are not available, then the concrete window sill can be removed using ordinary brute force, using a crowbar or a hammer and chisel.
Dismantling a plastic window ends with removing the frame. To do this, using a hacksaw, you need to carefully cut through the mounting foam along the entire perimeter of the plastic window. If the frame was secured using anchor plates or concrete screws, you need to unscrew them or simply tear them out. After this, the frame is carefully removed from the opening, cleaned of mounting foam, and the fasteners are removed from it.
This completes the dismantling of plastic windows. To protect the dismantled windows during transportation, you need to remove the old anchor plates and the handle from the sash. Turn the cover, unscrew the mounting bolts and pull out the handle.
As you can see, in order to dismantle a plastic window it is not necessary to resort to the services of professionals. By following our recommendations at every stage, you can easily do it yourself. However, if you don’t have the desire or time, you can contact a specialized company, because the cost of dismantling plastic windows is low, and the order completion time is usually no more than two hours.
Preparation
First you need to provide free access to the window - move the furniture away.
Dismantling a window will inevitably entail a certain amount of construction waste, so it is recommended to remove small and valuable items from the room and cover the furniture with film. Next, you need to check that you have all the tools necessary for the job:
- a set of necessary screwdrivers;
- chisel;
- screwdriver;
- hammer;
- work gloves and clothing.
If all this is available, then you can proceed directly to dismantling the plastic window.
This is the movable part of your window. It is the sash that is removed first. It is attached using a special rod. On old-style windows it is not closed with a plastic plug, as on new ones. Just pry the plug itself with a knife and remove it, after which you need to pull out the rod.
At this stage it is important to be very careful so that the sash does not fall. To do this, experts recommend performing all work together with a partner.
If you do the work yourself, then pay special attention to the fact that all movable sashes must be dismantled (sometimes there may be 2 or more of them, depending on the type of window you have). Naturally, if there are no movable sashes, then this step must be skipped
Glazing beads are a so-called rubber coating that ensures a tight fit of the window to the frame. In addition, the fastening mechanisms are closed with glazing beads, so they must be removed. In this case, a knife, chisel or spatula is used for work - any tool with a flat blade. First, the long bead is removed, then the top one, and lastly the bottom one. To avoid damaging it, it is necessary to guide the tool used from the beginning to the very end of extraction.
Stage 5. Installation of a plastic window
Installation of a plastic window
Step 1. First, wooden wedges are placed around the entire perimeter, a window is installed on them (this will make it easier to level the structure), only after this is it fastened to the wall. You can leave the backings - they will serve as additional fasteners.
Installation diagram of a plastic window
An example of connecting a window from below to an opening
Step 2. The absence of a support profile can be considered a gross violation of GOST standards, since it is not only needed for stability, but also makes it possible to install a low sill with a window sill. In the absence of a profile, they are attached directly to the frame, which violates its tightness.
The correct location of the stand profile is shown in the diagram.
Window installation diagram
Step 3. Next, the evenness of the window is checked in three planes, for which a mounting level and plumb line are used. It is typical that traditional bubble levels are not suitable for this due to insufficient measurement accuracy, so it is better to use a laser one.
Seals
Level check
Frame attachment
Foaming
Step 4. If the window is level, then it is secured with anchors. To do this, a wall is drilled using a hammer drill through pre-prepared holes in the structure (approximately 6-10 cm). The lower anchors are fixed (not completely), the evenness of the package is checked again, after which the remaining points are attached.
Features of the procedure
In a wooden house
Peculiarities
- In a wooden house, frames and glass are dismantled, and then a check is made for the presence of additional fasteners (for example, fastenings with anchor plates).
- It is necessary to determine which of the old frame posts is the closing one. Disassembly should begin from this rack.
- The opening is cleared.
- The casing frame is being inspected. If it is damaged (rotting, fungus, defects), then such casing is dismantled and a new one is installed in its place.
Read our other articles about repairing fittings, about the intricacies of window maintenance, about installing a valve, about repairing windows and mosquito nets, about how to do micro-ventilation, cashing on windows, and about lamination, how to install a comb and a lock.
In a panel house
Dismantling the old frame in a panel house is carried out in the following order
- The sashes are removed using the standard method. If the glass does not hold well in the frame, it is removed.
- A block measuring 15–20 cm is cut out on the lower frame.
- The block is removed with a nail puller or claw crowbar.
- The remains of the old frame around the perimeter are removed.
In what cases is it permissible to replace glass alone?
The above recommendations do have exceptions. It is unprofitable to completely replace the glass package in three cases:
- There is stained glass in the window. Replacing one sheet is much cheaper than replacing several expensive glasses;
- A three- or four-chamber package is mounted in the frame;
- An expensive thick triplex was installed in the door from the street, and the internal glass was broken.
In these cases, the cost of repairs is cheaper than the price of a finished double-glazed window.
How to disassemble a double-glazed window
A double-glazed window is an integral part of any metal-plastic or plastic window. During operation, situations arise when it is necessary to disassemble the window in order to adjust mechanisms, repair or clean. Most people are faced with this task for the first time, so many questions arise about how to disassemble a double-glazed window. Disassembling a double-glazed window may seem difficult only at first glance, but if you follow the recommendations and follow certain rules, it will turn out that it is not at all difficult.
How to disassemble a plastic window
Before removing the glass unit from the window frame, it is necessary to disassemble the entire window. This event does not require any additional preparation; all you need is patience and a few tools:
- sharp knife;
- thick fabric gloves;
- flat and Phillips screwdrivers;
- an ordinary spatula with a width of at least 10 cm;
- if possible, rubber suction cups for transporting glass;
Disassembly should begin with the window sashes. The rod that holds the window sash is removed from the top hinge. While leaning out, you must hold the window so that it does not fall down.
It is worth paying attention to the fact that the entire sash has quite a lot of weight, so work must be carried out with extreme caution. The removed element is lowered to the floor and carefully, in a vertical position, leans against the wall
The next stage of disassembly is dismantling the fittings. The window handle is removed by unscrewing 2 screws, which are hidden under the plastic casing. The locking device can be removed using a shaped screwdriver. All removed parts must be placed in a separate place so as not to lose a single bolt, since it is quite difficult to find a replacement for it.
The beads are detached from the sash by prying them off with a sharp knife, spatula or chisel, but in no case with a flat screwdriver. Plastic is a very soft material, and the thickness of the screwdriver will not allow you to perform this procedure, since this must be done carefully. By inserting a spatula between the profile and the bead, you need to lift it a little at a time and move it to the side where it has not yet opened. If you lift one part and pull it out with your hands, you can break the bead itself. The process of removing the bead begins with the longest one.
How to disassemble the glass unit of a plastic window
It is recommended to disassemble the glass unit in cases where it is very necessary. After removing all the beads, you can easily remove the glass unit. If there are rubber suction cups, you can place the sash on the floor and remove the glass while holding the frame. Without rubber suction cups, the process may take longer, as it is a little more difficult to do, but it is quite doable. The principle of dismantling is the same as with suction cups. Only in this case you need to be very careful not to drop the glass unit.
It is quite difficult to disassemble glass from a plastic window without proper preparation and tools. In addition, it is even dangerous at home. Each double-glazed window consists mainly of 2 - 3 energy-saving glasses. During the production of double-glazed windows, a moisture absorber is poured into a special frame, and the whole thing is hermetically sealed with a layer of sealant. Using a sharp knife, cut the top layers of sealant.
Each action must be carefully controlled so as not to accidentally insert the knife into the depth of the glass, as a result of which cracks may form. With each step, gradually removing the sealant, you need to get to the thin aluminum frame. This means that the disassembly process is at its final stage. This frame is cut using a regular knife. The cutting process should be carried out on the floor to prevent possible falling glass. You must always remember that each element is very fragile. Therefore, any action in relation to windows must be premeditated and unhurried. The process of assembling glass is more complex, since making a double-glazed window at home is almost impossible.
How to disassemble a plastic window with your own hands
When starting work, you need to understand what a plastic window consists of, since this complex system differs from old wooden windows.
The basis of a PVC window is a metal frame, quite heavy, this must be taken into account when dismantling. The frame, like a frame, holds the double-glazed window and all the protective and decorative fittings. A double-glazed window consists of several glasses that fit tightly together and are connected with a special sealant.
All work on dismantling a plastic window is divided into 4 stages:
- Removing window sashes,
- Removing glazing beads and removing double-glazed windows,
- Removing handles and other fittings,
- Removing the window frame.
The diagram shows the arrangement of plastic windows
About the important thing: don’t miss out
In general, replacing a double-glazed window is not as scary as you initially think. The procedure will take a couple of hours (excluding drying of the sealant). The main thing is to wait for the glass unit to be manufactured. Here are some useful tips that will definitely come in handy when replacing:
- make replacements during daylight hours - if the panel breaks, the fragments will be in your field of vision;
It is better to replace glass in a plastic window during the day, then all inaccuracies will be visible immediately
- when replacing at the breaking stage, be sure to lay something under the structure, preferably fabric. Let it be an old sheet that you don’t mind throwing away later. Further use of the product for its intended purpose is undesirable.
- It is better to break glass when replacing it with a rubber hammer - it produces much less fragments. It is also convenient and quick for them to put glazing bead parts in place.
- Call an assistant to replace it if the glass itself is very large and it is extremely difficult to hold it alone.
- Try to touch the glass as little as possible with your bare hands - only touch the edge protected with tape and use special suction cups to hold the system.
- Before replacing, carefully inspect the “fresh” glass to see if it has any cracks, bulges, or holes. If there is even the slightest suspicion of imperfection, refuse the installation so as not to have to redo it again in a month.
- Your own safety should come first - do not work with the frame suspended, be sure to protect your face and body from small fragments.
- If one of the cameras on a two-chamber or three-chamber glass breaks, you will have to replace the entire glass, otherwise the structure will quickly break again.
The main mistakes when installing plastic windows with your own hands
If you install plastic windows incorrectly, this can lead to the fact that the house will be cold; water will flow into the room through improperly installed ebbs. And the expensive structures themselves will quickly become unusable. And if professional installers sometimes make mistakes when installing PVC windows, then, of course, an amateur who installs plastic windows with his own hands is not immune from them.
Let's look at the 10 most common mistakes made when installing plastic windows.
The window size is incorrect
This is usually a consequence of incorrect, careless measurement of the window opening, and, accordingly, the manufacture of an unsuitable window structure. And in case the window is too large in size. And if the size is very small, it is simply impossible to install such structures.
Poor preparation of the window opening
If the surfaces are poorly cleaned, there is construction debris, dust, potholes left on them, or, on the contrary, parts of the wall protrude on the surface of the opening, the polyurethane foam will not fit as tightly and evenly as is necessary for high-quality installation of plastic windows with your own hands. In addition, this kind of pollution absorbs moisture very well, and it will soon end up inside your apartment.
Ignoring wall insulation
If a plastic window is installed without taking into account the thermal insulation of the wall, then cold air will penetrate into the apartment at the joints. Therefore, it is imperative to take into account the layers of walls when installing plastic windows. If the wall consists of one layer, the window should be placed exactly in the middle of the wall. If the wall is double-layered, the window should be installed at the very edge, as close to the insulation as possible. And if the wall is three-layer, then it is necessary to install a PVC window directly in the plane of the wall insulation, in order to avoid heat loss.
Incorrect distance between the window frame and the slope
If the window frame is located too close to the slope, the seal in this place will be of poor quality, and moisture will begin to appear and accumulate in these places. If, on the contrary, the frame is located too far from the slope, then there is a risk of deformation, since the load on the anchors or metal plates is too great.
Incorrect size of window sill
The window sill should be slightly narrower than the window frame itself. If it is a different size, or they decide not to install it at all, then water will penetrate under the window frame due to the lack of a normal seal in this place, and as a result, the wall will constantly be wet. Metal parts can simply corrode after a certain time.
Poor quality fastening of PVC window to the wall
If you skimp on dowels or anchors and there are too few of them to attach the window structure to the wall properly, over time the position of the window will change, the frame will become deformed, and it will be difficult for you to tear off and close the window.
Not enough polyurethane foam
Polyurethane foam is practically the only material for insulating a window structure and the wall itself to which it is attached. If there is not enough foam, the heat will escape. Therefore, the gap between the slope and the window frame must be filled properly, not sparing the mounting foam.
No insulation tape
If you decide not to use the insulating tape required by GOST on the inside and outside of the window structure, be prepared for the fact that the thermal insulation will gradually become worse and worse. Accordingly, the windows will deteriorate much faster than you would like.
Therefore, if you decide to install a plastic window with your own hands, try to go through all the necessary steps and perform all the necessary actions efficiently, carefully and slowly. Then your beautiful plastic windows, installed by yourself, will delight you and your household for many years.
Handle breakage
This problem occurs quite often and is easily fixed. First you need to buy a new handle for the window. This can be done at a home improvement and building supplies store. To replace it, you will need to find the decorative plate, which is located directly under the handle, then turn it so that you can see the screws that will need to be removed outward.
After this, the old handle will be removed without any problems, and you can put a new one in its place. Screw the screws back; At the same time, you can install an opening limiter. To do this, you need to install a regulator plate for ventilation into the base of the element, after which the handle can be screwed on.
Repairing window fittings is not that difficult even if it becomes jammed. To do this, you will need to find and disable the blocker. The procedure depends on what accessories you have installed. If it is an AUBI brand, you will need to find a metal plate with a spring: it is usually located near the handle. Press it against the seal and try to turn the handle smoothly. Fittings from other brands, such as Maco, GU, Winkhaus or Roto, have a metal tongue located at the bottom. It needs to be pressed, forcing it to stand parallel to the sash.
Sometimes this method does not help, and then it is worth checking whether the blocker is caught. To fix the problem, you will need to open the window and find the place where this element touches. After this, you must remove the fastenings of the blocker, install a plastic spacer between it and the clinging structural element and put the part back.
Don’t be afraid to repair plastic windows yourself. The window doesn't close - that's not a problem. This usually happens because the handle does not turn due to a lack of lubricant in the fittings or sagging of the sash itself. The latter can be determined visually by carefully examining the window. The product can be adjusted by tightening the bolts that hold it in place. If everything is in order, it is worth checking the lubricant. You will need to purchase a special product, and it is advisable to lubricate all parts of the mechanism that are driven.
Timely maintenance of plastic windows will help avoid many problems. However, if the product does not sag and lubrication does not help, you will most likely need the help of a specialist.
Video: How to replace the handle on a plastic window
Conclusion
Now you know how to disassemble and how to set up plastic windows. I am sure that the proposed instructions will be useful to you when using glazing in an apartment or country house.
Be sure to watch the video in this article, and if you have any questions, ask them in your comments.
If you want to express gratitude, add a clarification or objection, or ask the author something, add a comment or say thank you!
Today, plastic windows are an integral attribute of most apartments in both big cities and small towns. New houses are no longer built with wooden frames, but with plastic double-glazed windows - they retain heat better and protect from any bad weather. However, few people know that only timely maintenance can ensure the long service of these seemingly eternal windows. To do this, plastic windows must be periodically dismantled. You can do this yourself.
Troubleshooting locks
The use of window units equipped with locking mechanisms becomes relevant when there are small children in the room who need special safety measures. The lock, which is installed on the window fittings, serves as reliable protection against accidents. The need for system repair arises in the following cases:
- mechanical failure;
- identifying manufacturing defects.
Replacing the locking system is less expensive than reinstalling window hardware. At the same time, timely repairs return the product to its original functionality. The lock provides security and eliminates the anxiety that reigns in the house.
Cost of seals for metal-plastic structures
Manufacturers offer different options to add functionality to Euro-windows.
The most common methods:
- Replacing a single triplex with glass with two chambers will improve the thermal insulation characteristics.
- Anti-resonance glazing improves noise insulation in the room.
- Energy-saving “stained glass” windows allow you to retain heat.
- Triplex – reliably protects against noise and cold.
This material is used for glazing private households, apartments, country cottages, gazebos and open verandas.
Important advice from professionals on caring for plastic windows
In order for the window to be beautiful for a long period and not require replacement or repair, it must be cleaned of dirt in a timely manner. In this case, take into account the advice of professionals:
Remove the protective film after installation. It is better to remove polyethylene immediately from new windows, since it is only necessary during transportation and installation. In the future, the coloring pigments of the film may change the shade of the plastic, and the connecting agent will become so ingrained that no solvent can solve the problem. Avoid harsh household chemicals. For cleaning, a soap solution and a soft fiber cloth are sufficient. The content of alcohol, acid, alkali, abrasive, chlorine, and acetone in the products is unacceptable. Use professional care products offered by the developers. When purchasing windows, it is more convenient to immediately purchase additional cleaning mixtures designed for this model, taking into account all its features. Sand minor damage. Even careful care of PVC windows does not exclude the occurrence of scuffs and cracks. Such defects must be eliminated at home in a timely manner by selecting the appropriate compounds and tools. For colored plastic, purchase pencils containing varnish and retouch
A feeling of uncertainty about the quality of the procedure with your own hands is a sign that it is better to entrust the restoration of the surface to a master. It is important not to forget about systematic ventilation. Under the influence of excess humidity, the structure will begin to deteriorate and become loose
It is necessary to ventilate the room, improve the ventilation system, and not fill the window sill with flowers or an aquarium, which will humidify the air.
Required set of tools
You will need the following tools:
- Gloves;
- Special suction cups;
- Set with screwdrivers;
- Thin spatula or thin knife.
Always remember safety precautions. It’s like the joke: “A milling machine operator with three fingers has two very funny incidents in his life...”. Therefore, before starting work, you need to take care of protecting your hands.
To do this, you need to wear thick gloves that will protect your hands from possible cuts. Window disassembly begins with removing the sash. The sequence of actions is as follows:
- The sash opens in a rotary rather than tilted state.
- The rod is removed. This must be done carefully, trying to prevent additional damage.
- It is necessary to monitor the retention of the glass unit. It is heavy, and the strength of one person may not be enough.
- The sash should be placed so that it is more convenient to work with it.
- The main advice is to avoid distortions so that problems do not arise later.
Useful tips
And now about what you need to consider before disassembling a plastic window:
- First of all, you need to draw up a consistent action plan and make sure that you have all the necessary tools to complete the work.
- At each stage of dismantling structural elements, it is recommended to record the sequence of your own actions. After all, remembering the next morning what was done yesterday and how it is sometimes difficult.
When starting work, it is recommended to take care of safety in advance. In particular, you should wear cotton gloves on your hands, which will protect your limbs from all kinds of damage during interaction with sharp objects and traumatic structures. Before you decide to independently dismantle double-glazed windows and dismantle plastic windows, you need to think about how sound insulation and sealing of joints will be carried out after the structure is returned to its original place. To cope with this task, specialists resort to the use of professional adhesives and sealants. Those who do not understand all the intricacies of installation technology may encounter significant difficulties in the process of reinstalling windows.
Video window service:
Important information
If a contract is not concluded at the site, a specialist visit will cost 800 rubles in Moscow
Preface
We begin work on dismantling old windows by preparing the room. It is necessary to remove carpets, household appliances, small furniture and valuables, ensuring unhindered access to the place of work.
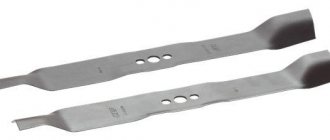
Required tools and materials
Grinder Nail Pull Drill Hammer Knife Hacksaw Hammer Level Screwdriver
Expand
Contents
In recent years, plastic windows have confidently taken a place in the arrangement of premises. This is due to their strength, reliability and lightness, and most importantly, in harsh winter conditions, properly installed windows eliminate the penetration of cold air into the house.
As such, the material from which plastic windows are made has a long warranty period (up to 50 years). Therefore, if you decide to renovate your home in order to install new windows (you are not satisfied with the color, size, etc.), then after dismantling the old windows, you should not write them off as trash. If you are not satisfied with the window elements, then you can successfully add them. You can also use them in other rooms, even sell them or do a good deed for your friends.
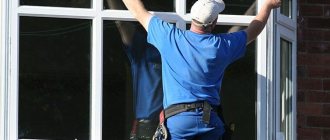
Naturally, first of all you should remove them correctly and carefully. Of course, you can invite a specialist to do this, but the work is not difficult, so you can successfully dismantle plastic windows yourself.
In this material we will try to describe step by step how to dismantle plastic windows.
Before you begin, first, as with all work, you should definitely prepare.
How much does a service cost in organizations?
The final price of the work is determined by many factors. Therefore, we present the average lower and upper limits of the price lists of several companies in St. Petersburg and Moscow as of December 15, 2021:
- Replacement of a two-chamber double-glazed window - 2,000-4,200 rubles/m2 (delivery included);
- Repair of double-glazed windows - from 1,000 rub./m2 to 2,300 rub./m2 - work only. This does not include transport costs and the cost of glass.
For reference: the cost of a new double-glazed window starts from 1,300 rubles/m2 from little-known companies. For recognizable brands it starts from RUB 2,050/m2.
Required Tools
To replace the fittings, you will need to purchase the required new part,
- Lubricating hardware oil, which can be replaced with WD-40 aerosol or machine lubricant.
- Mounting handle – may be required if the hinge pin is removed from the fittings.
- Marker or special pencil for making marks on plastic.
- Tape measure or long ruler. Due to its flexibility, it will be more convenient to use a tape measure within a window opening.
- A stationery knife for removing and changing the seal.
- Pliers - they are used to disassemble mechanisms for changing smaller parts. In some brands of plastic windows, the sashes are adjusted in height or horizontally.
- A screwdriver with a shaped tip or a screwdriver with a set of bits that are used to loosen and unscrew the fixed parts on the profile.
- A set of hex and star keys with a key set to “4”.
Tip Above are all the possible tools you may need. Most often, the problem arises local, less significant, and does not require complete disassembly of the PVC window.
Is it possible to change?
You can increase the number of chambers in a sheet structure if the features of the system allow and the structure can withstand the increase in load.
Single-chamber to double-chamber
This can be done if two conditions are met:
- The width of the rebate is sufficient for a double-glazed window. If a package of several glasses is similar in width to a single-chamber one, then there will be no problems with installation. If it is slightly wider, the glazing beads may need to be replaced.
- The aluminum window structure can withstand the weight of the sash. It is possible to strengthen the plates and hinges.
Before making a decision, it is advisable to consult with a specialist.
Double on triple
For the installation of a three-chamber double-glazed window, similar conditions must be met. However, the difference in mass is insignificant, reaching only a quarter of the total weight of the structure. Therefore, reinforcement is not necessary.
Three-chamber package
What to do if the glass structure is damaged during the operation of PVC windows? Restoration will require restoration or replacement. When one sheet is damaged, it is enough to replace only that one. However, if several layers are damaged, you should purchase a new window. You can change the design to a more powerful one if the plastic and hinges can withstand it.
Sources
- https://StroyGuru.com/okna/zamena-steklopaketa-v-plastikovom-okne-svoimi-rukami/
- https://www.ivd.ru/stroitelstvo-i-remont/okna/zamena-steklopaketov-v-plastikovyh-oknah-svoimi-rukami-7-otvetov-na-glavnye-voprosy-i-instrukciya-54661
- https://www.oknamedia.ru/novosti/kak-nedorogo-obnovit-okno-i-podarit-emu-vtoruyu-zhizn-50108
- https://okna-dom.net/zamenit-steklopaket-v-plastikovom-okne/
- https://mezhdveri.ru/29119-kak-pravilno-pomenyat-steklopakety-v-plastikovyh-oknah-mozhno-li-sdelat-eto-v-domashnih-usloviyah.html
- https://oknologiya.ru/kak-pomenyat-steklopaket/
- https://DomZastroika.ru/okna/plastikovie/kak-pomenyat-steklopaket-v-plastikovom-okne.html
- https://stroimdom44.ru/zamenyaem-steklopaket-v-plastikovom-okne/
Removing double glazed windows
This operation requires some skills. Therefore, you are advised to carefully read this section and strictly follow the recommendations described in it.
The first thing you need to know is that when removing the window beads that hold the glass unit in place, it is better to start with the longest of them, due to the fact that they have less rigidity and will be easier to remove. To remove the bead, you need to place the tip of the chisel in the groove between it and the window frame.
Use a rubber hammer to strike the end of the chisel with medium force until a gap forms between the bead and the frame.
Please note that during this operation the tip of the chisel, sharpened with an edge, must be kept in the direction away from the window.
After a gap has appeared between the bead and the frame, we widen it using a chisel, striking its side surface with a hammer. At the same time, be sure to rotate the chisel around its axis 180 degrees, and rest the flat part of the tip against the glazing bead.
It is necessary to strike with a hammer until the glazing bead completely comes out of the groove. Then you need to start dismantling the next bead, and this will be much easier, since now the beads do not form a single structure.
It is more convenient to dismantle each subsequent glazing bead from a free corner by placing a chisel there, as shown in the figure, and turning it around its axis with force.
After this, the bead can be easily removed by hand.
Dismantling all subsequent glazing beads is no different from what was described above. Having removed them all, carefully remove the glass unit from the opening
At the same time, we pay attention to the plastic gaskets between the double-glazed window and the rebate of the window profile and keep them in the form in which they were in the old double-glazed window
Glazing beads
Now you need to remove the glazing beads. You will not get a complete understanding of how to disassemble a plastic window without removing it from the frame. To do this, use a thin spatula or knife. You need to insert them into the gap between the frame and the bead to remove it from the groove. This should be done in the middle of the glazing bead, in no case near the corners. The longest bead should be chosen. The bead is flexible and elastic; it will pop out of the groove in the middle of the frame along with the seal
Carefully, without using excessive force, remove it from the corners. Longer it will go easier
All the rest can be removed from the free end. Watch the seals so that they do not fall out of the grooves of the glazing beads; they may not be glued.
Double-glazed window
Now double glazed. This is the most difficult job in the task of disassembling a plastic window. It's good if you have rubber suction cups. The glass unit is very heavy, be careful with it
You probably noticed. That this is a warning we repeat constantly
Caution is key in this job. It's still not easy with suction cups
You need to remove the inserts that secure it to the frame. Now carefully insert the knife into the vacated slot and try to rip it out of place. It can be held in place by a sealant. It must be removed strictly in the direction of the grooves in the frame. The glass unit fits its dimensions very accurately. It won't work with skew. You deform the frame and that's it! Consider that you don't have a window. The frame itself without glass is quite light. If you were able to remove it without effort or distortion, then you can continue further.
Answers to frequently asked questions
The seal is quite easily pulled out of the groove. To do this, you need to pry the end of the cord and carefully pull it completely around the entire perimeter. Reinstall the seal in reverse order. From the corner we insert the cord into the groove and, pressing, install it around the entire perimeter.
Is it possible to drill the profile, and how to drill it for the cable?
A standard television coaxial cable has a diameter of 6 mm. I am sure that a hole with a diameter of 6 mm will not affect the strength of the window structure in any way. Even if over time the need for a cable disappears, the hole on both sides can be sealed with a piece of tape or plastic plugs inserted, which are widely used when assembling furniture.
Considering that the frame consists of a PVC profile reinforced with a metal strip, when drilling I recommend using sharp metal drills and a powerful drill. We drill a hole in the frame using normal drilling mode without perforation, so as not to damage the glass.
The photo shows how to pull the handle with one hand and move the sash away from the frame with the other hand.
If the closed window is blocked and the handle does not lower or rise completely, proceed as follows: pull the upper edge of the sash next to the hinge toward you and, at the same time, try to raise the handle to the open position. As a rule, you can unlock the fittings the first time.
What is the reason for hardware jamming?
The previously described case is most often caused by an overtightened axle. That is, to avoid jamming, turn the trunnion to summer mode so that the connection to the strike plate is minimal.
One way or another, to prevent hardware jamming, I recommend applying VD-40 fluid to moving parts once a season, which works as a lubricant and as a rust neutralizer.
What should you do if there is a draft from the window and a large amount of condensation appears on the glass in winter?
The temperature difference due to poor sash pressure is one of the reasons why windows leak
Such symptoms indicate that you need to increase the pressure on the axle by rotating it around its axis
If the trunnion is already set to maximum pressure, I recommend paying attention to the condition of the seal
You may need to degrease or even replace the rubber cord if it is worn out and does not provide an optimal seal.
How to cover the gaps between the slopes and the frame?
To fill such gaps, I recommend using a special acrylic sealant or baguette glue. Both products are white, fill gaps well and are simply applied from a special tube.
Taking measurements, purchasing a new product
On the spacer frame there is a marking with the thickness, width, height of the metal profile, and information about the component parts. If there is no information, you will have to take measurements yourself by measuring the removed module.
To take measurements without dismantling the frame, you need to take measurements between the metal profile of the sashes: from one outer edge of the bead to the other on both sides. Subtract 2 cm from the received data for adjustment.
Important parameters during repairs are the ratio of the gap and glass thickness between adjacent frames. If there is no information on the product, you will have to measure it yourself. To do this you need:
- use a tape measure to measure the thickness of the metal profile;
- measure the thickness of the external and internal fastening;
- Subtract the dimensions of the glazing bead from the thickness of the metal profile to obtain the thickness of the package.
Taking into account the number of chambers, calculate the distance between the glasses (in Euro-windows, the canvas is usually installed - 4 mm).