If the master’s tools are in order, then the work moves quickly and easily. No need to look for where the bolts, pliers or hammer are, everything is at hand. Factory-made organizers offer ready-made storage solutions, but they are not always convenient, and the cost of high-quality models is not the cheapest. If you have the desire and leftover materials after repairs, making a tool box with your own hands will not be difficult, and it will cost much less than the factory equivalent.
Varieties and materials
There are many types of organizers:
- The simplest designs where all the tools and small accessories available in the house are stored. If the work is performed periodically, this is a completely convenient option.
- For storing a certain tool, for example, an angle grinder or a drill, especially if the device is not included in the factory configuration.
- Spacious and versatile, with numerous compartments and even wheels for easy movement.
- With advanced features, including workplace organization. For example, the structure unfolds and transforms into a small table with equipment attached to its surface.
Each craftsman can make a tool box “for himself”. If you don’t have to do repairs too often, then limit yourself to a simple drawer with a handle. It is advisable to provide several compartments or external “pockets” in which all the necessary items would be placed.
When there is a lot of equipment and you have to use it regularly, you will need a professional organizer. The location of compartments, cells or containers in this case must be carefully thought out in order to quickly find what you need.
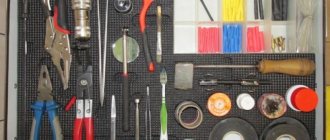
When making a tool box organizer, the following are used:
- Metal - sheet aluminum, stainless steel, galvanized steel. Structures made from them are resistant to mechanical stress and corrosion, reliable, and durable.
- Wood - plywood, chipboard, fiberboard, MDF, bars, boards. The material is easy to process; you can use any scraps remaining from the repair.
- Plastic - for storing and carrying heavy tools, it is better to use impact-resistant polypropylene. It is not as fragile as other types of polymers, can withstand fairly high loads and is not afraid of frost. To keep small items of light weight in order, you can use any sheet of plastic.
Devices are often made in combination - a body made of durable metal or plywood, plastic filling, fiberboard. Small containers, containers, and cuttings of polymer pipes are suitable for small items.
To make materials last longer, you need to use protective equipment. Wooden parts are painted or impregnated with linseed oil. Aluminum, stainless steel, galvanized steel or plastic are themselves resistant to moisture and corrosion, so they do not require additional processing.
Important decisions
However, on the market you will find a huge number of models made of various materials, branded and non-branded, large and compact. So how do you choose the one that suits you best?
Design
For manual production, you can limit yourself to a simple design or “swing” at a more complex option. This will depend on the functions assigned to the organizer, as well as on the type of stored devices and materials:
- A simple box with a handle is often used for carpentry, construction or painting tools. It is easy to make, quite versatile and easy to carry.
- Case - a suitcase-type design, closed with a lid with a lock. In such an organizer you can keep small tools, fragile devices, and consumables.
- A container with a lid is a very popular option. The internal space is organized according to the needs of the user. Large tools are placed on the bottom, and containers for storing “small things” are installed on top. They can be either fixed or removable.
- Folding accordions. When folded they are very compact, and when unfolded they provide a complete overview of everything that is inside.
- With retractable compartments - they are a cabinet-type structure. Each compartment is separate, all items are neatly folded and do not come into contact with each other.
- On wheels - a convenient modification of any heavy organizer. The problem of carrying it over long distances disappears by itself. For professional craftsmen or teams performing a wide range of work, this is a significant help.
- A box stool is a functional option that can be used as a seating area or a small work surface.
Making boxes
A set of small drawers for holding fasteners and other woodworking odds and ends is an optional but very useful option in a carpenter's closet. By making and gluing together a series of simple wooden pieces, you can make the inside of your closet look neater and more organized. To speed up the work process, parts are cut out serially, placing the workpieces in a small stack.
The project cannot be considered complete until the method of hanging the cabinet is determined. Our article on choosing hanging accessories will help you do this simply and without errors.
Operating principles and manufacturing requirements
Craftsmen quite often encounter the breakdown of a purchased organizer. Flimsy structures cannot withstand loads, accidental impacts, crack and become unusable.
The weak point of factory boxes is the handles and locks. As a rule, in inexpensive models they are made of plastic or very thin metal, which quickly fail under heavy operating conditions.
All these nuances can be provided for in a DIY toolbox. Durable material, reliable fastenings, and high-quality fittings will ensure not only comfortable use, but also an unlimited service life.
The organizer manufacturing process includes:
- development of a design drawing;
- preparation of materials;
- cutting parts to size;
- assembly;
- installation of accessories;
- protective and decorative treatment.
When preparing the drawing, the type of storage, the dimensions of the tool, the number of compartments, the method of opening and carrying are taken into account.
Working drawing with dimensions
Metal tool box
The metal is highly durable and durable, but working with it requires skill, as well as special processing tools.
Required:
- sheet of galvanized sheet or aluminum;
- metal scissors;
- riveter;
- handles, locks, hinges.
Most often, case structures or folding “accordions” are made from metal, where the ribs form a rigid frame. In this case, a sufficiently thin sheet does not deform under load.
Step-by-step production of a metal tool box:
- On the sheet mark the main elements of the organizer - side parts, bottom, lid, taking into account an allowance of 1-1.5 cm for connection.
- Cut out the elements using metal scissors.
- Fold in the seam allowances along the edges.
- Rivet the joints with a riveter.
- Connect the compartments together using strips or special springs.
- Install locks and handle.
If there is no riveter, you can connect the parts with bolts, nuts and washers. This is a more labor-intensive job, but is also used on thin-sheet structures. The fasteners are chosen to be stainless or galvanized so that when paired with the metal of the organizer, it does not quickly begin to corrode.
Plastic tool box
A modern plastic L-boxx can be made from foamed PVC or any other polymer sheet material with sufficient mechanical strength. You will need glue for the plastic and transparent plastic for the lid.
Making a plastic tool box is easy. The parts are cut out with a regular knife, the joints are glued, and cured until they gain strength.
The top of the device is closed with a transparent lid, through which all the contents are visible. Drills, screws, nuts, soldering supplies - everything will be in separate compartments in plain sight.
The procedure for making a plastic box:
- Mark the contours of the bottom, walls and partitions on the sheet.
- Cut out the elements with a knife.
- Carefully glue the parts together.
- Make a lid.
- Clean the edges with fine sandpaper.
Such a box is not intended for storing heavy equipment, but it is quite useful for organizing all the “little things” necessary for work.
Wooden tool box
The simplest and most affordable option is to make a tool box from plywood or thin planed boards. Surely there are scraps of suitable sizes in the house. Cutting and drilling wood materials is not difficult, so even a beginner can handle the job. You will need a jigsaw or hacksaw, a screwdriver, and wood fasteners.
Part connections can be made in various ways:
- half a tree;
- dovetail;
- with dowels;
- with tongues and grooves;
- on self-tapping screws.
To neatly connect the boards into half a tree, select half the thickness of the element on each of them. The parts are glued together at the sampling site. If you choose the dovetail method, you need to file a trapezoidal cutout at one end, and a protrusion of a similar shape at the other.
To connect dowels, blind holes are drilled in two adjacent structures, glue is applied around them, then dowels - pieces of wooden rod - are inserted. When tightly joined, the structures are held together. The joint with tongues and grooves is labor-intensive and requires precise cutting of parts in the form of a toothed comb at the joint.
Joints between wooden structures are strengthened by gluing. To perform this operation correctly, you need:
- Carefully sand the joint area.
- Remove dust and degrease.
- Apply glue to both surfaces.
- Let the composition stand for some time (the duration is indicated in the instructions).
- Press the elements together and secure with a clamp.
- Remove excess glue and leave until the composition is completely polymerized for about a day.
It is recommended to load the adhesive joint no earlier than after 24 hours. The junction is neat and invisible. If the toolbox does not have any decorative requirements, it is easier and faster to fasten the elements with ordinary self-tapping screws. Pre-drilling of holes is not required.
Rating of quality organizers
STANLEY 2/3 FMST1-75779 Fatmax 43.2×26.7×6.4 cm
A simple model with 14 compartments and a plastic retainer. The design is made with high quality and ensures a tight fit. In addition, there is one feature that makes it possible to fasten up to 9 organizers together, which is also an advantage.
The average price is 1,560 rubles.
STANLEY 2/3 FMST1-75779 Fatmax 43.2×26.7×6.4 cm
Advantages:
- Durability;
- 14 trays for storing parts;
- Tight fit;
- High quality plastic.
Flaws:
- Not found.
BLOCKER BR3728 38x31x6.5 cm
A good product that will help you keep up to 18 different connecting tools safe. The design is a special case, with a lid with plastic clips. There is a carrying handle.
The average cost is 415 rubles.
BLOCKER BR3728 38x31x6.5 cm
Advantages:
- Low price;
- Not bad quality;
- Tight fit;
- Long service life.
Flaws:
- Not detected.
Hammer Flex 235-017 51×32.5×6 cm
A beautiful organizer that is distinguished by its price-quality ratio. In addition, the product will allow you to store up to 22 different fasteners, and all partitions are removable. This solution makes it possible to increase the space to accommodate large elements.
The average price is 620 rubles.
Hammer Flex 235-017 51×32.5×6 cm
Advantages:
- External execution;
- Removable compartments;
- Low price;
- Strength;
- Convenience.
Flaws:
- Not found.
How to make an open box: step-by-step instructions with drawings, dimensions and photos
The simplest tool organizer is a box-shaped design with a handle. You can arrange several compartments inside, and attach “pockets” of various capacities to the outside.
For a medium sized box you will need:
- plywood, board, MDF or other wood sheet material that can be easily fastened with self-tapping screws;
- fasteners;
- electric jigsaw;
- screwdriver;
- pencil, ruler;
- linseed oil for wood processing.
Mark the details:
- A - bottom of the box 35x20 cm;
- B - 2 side parts 22x22 cm;
- C - 2 long side elements 35x10 cm.
A handle 35 cm long is prepared from the block with a small margin. Then you can adjust the dimensions accordingly. You can use steel or aluminum tubes, scraps of smooth fittings.
Cut out the marked parts with a jigsaw. The bottom and sides are alternately connected using self-tapping screws, which are screwed through the part into the end of the other element. The approximate step for installing hardware is 7-10 cm. You can additionally glue all joints with wood glue.
To avoid misalignment during fastening or hardware breakage, self-tapping screws must be installed correctly:
- do not screw into places with knots and other wood defects;
- install fasteners perpendicular to the surface;
- the axes of the screwdriver and the self-tapping screw must strictly coincide;
- increase the twisting speed smoothly, without jerking.
Some craftsmen recommend pre-rubbing the screws with soap. After this they enter the wood very easily.
The handle block is sanded until smooth. When attaching it to the sidewalls, you first need to drill a hole through the part, and then screw in the self-tapping screw.
The handle can be made folding - cut holes in the sides, thread a strong cord and tie a block to it. The box is carried in the usual way, then the handle is placed to the side. In this form, it does not interfere with access to tools.
For small parts, side pockets are made of plywood or fiberboard. The plates are cut out to appropriate sizes and screwed to the sidewalls through narrow linings.
Partitions are cut out for internal compartments. They are secured using overlays or inserted into pre-cut grooves.
Under the containers to be removed, stops made of bars or scraps of plywood are installed inside the box. You can make removable containers yourself from sheet plastic, tin, wood, or take ready-made ones of a suitable size.
After assembly, the organizer is coated with linseed oil. You can paint the wood with acrylic varnish for external work or treat it with stain or antiseptic impregnation.
Cabinet assembly
- Sliding doors are fastened using long piano hinges. For internal sashes, two cuts of 760 mm are used, for external sashes - 600 mm each.
- The long and short hinges inside the body are centered, as shown in the diagram “Detailing the body” (side view). A gap of 3 mm is left at the top and bottom, and the edge of the hinge itself is moved outside the body by 3 mm.
- The hinges are screwed with screws or self-tapping screws through pre-drilled guide holes. The inner doors are installed first, and then the outer ones.
Stool box: drawings and description
This is a carpentry product of a more complex level of manufacture than a simple box. For a stool on which you can sit or stand, a durable frame is built from a bar. The interior space is used to store tools.
You will need:
- board 20 mm thick;
- block 50x50;
- plywood 8-10 mm;
- wood glue;
- cutting tool;
- screwdriver or drill;
- block, fine sandpaper or sander;
- hinges, handles, lock.
First prepare a drawing with dimensions
Now you need to assemble the stool:
- Trim the blanks to size.
- Connect the bars with tongue-and-groove fastenings and dowels.
- Cut out the bottom and sides from plywood.
- Sand all the details.
- Lubricate the contacting surfaces with glue.
- Insert dowels and connect the elements, remove excess lei
- Tighten with clamps for 24 hours.
Aging in clamps
While the glue is setting, a seat is made from the board. The parts are polished and the edges are rounded. Glued to the frame and connected with an “oblique” screw.
The sides and bottom are fixed to the stool. The opening part is secured with overhead hinges. To prevent the lid from opening spontaneously, install a latch. The functional box-stool is ready.
Plywood tool storage box with lid
The lid design is very practical. Tools become less dirty and are not subject to accidental exposure to snow or rain outdoors.
The lid can be hinged or removable. If the handle is attached directly to it, the hinge and lock mechanisms must be as reliable as possible. The entire load will be taken by these parts; how long the organizer will last depends on their quality.
Before starting work, you need to prepare a drawing of a tool box, where you indicate the dimensions and numbering of parts. Such a simple operation will help during assembly, you will quickly find them and dock them correctly.
For an organizer with a lid you will need:
- plywood 12-18 mm thick for the frame, 6-10 for non-load-bearing parts;
- self-tapping screws;
- wood glue;
- overhead hinges (mortise, hinged or other type as desired);
- a pen (buy ready-made in a store or take from an old suitcase);
- ruler, pencil;
- hacksaw or jigsaw;
- screwdriver;
- clamps;
- a block for sanding edges.
Step by step execution:
- Transfer the markings from the drawing to the plywood and number them.
- Use a jigsaw or hacksaw to prepare the parts.
- Using glue and self-tapping screws, assemble the body. Tighten the structure with clamps until it dries completely.
- In a similar way, make internal removable trays.
- Secure the bars for stops parallel to each other in the box.
- Assemble the cover and secure it to the body with hinges.
- Install locks.
- Attach the handle to the lid.
- Sand and treat with a protective and decorative agent.
After installing the removable containers, the organizer is ready for use. This box is not only durable and convenient, but also looks quite solid.
The best manufacturers
There are now a huge number of companies on the market that supply tool boxes on wheels. Let's look at a few of them. The market leader, according to research, is Stanley . They produce two types of tools - electric and manual. The first type of tools will be useful to builders, auto mechanics, and home craftsmen. There are also a lot of measuring and marking tools in the catalog. Power tools come in the form of drilling and metalworking tools.
Keter brand is also popular . Keter is one of the world's leading manufacturers and suppliers of garden and home products. They are located in Israel, but are known for their products throughout the world. The main advantages of the company: their products do not require maintenance, are environmentally friendly and resistant to weather conditions. The undoubted advantages are the durability of the product and the ease of care.
Another representative, Zarges, offers its clients lifting and transport equipment from a well-known German company. The company's product range includes a huge selection of equipment that is actively used in construction, repair and maintenance of premises. It has been on the market for about a hundred years. Also, one of the company’s production areas is the creation of aluminum structures, stairs, and shelving. DEWALT brand is one of the most innovative construction power tool brands in the world. Products are manufactured in many countries around the world, in particular in the USA, Brazil, and Mexico. Thanks to worldwide recognition, the company has become the No. 1 brand in selling power tools and related products.
Portable box with drawer
This is almost a mini-version of a workshop. The top panel can be used to work with various equipment; inside is an excellent place to store tools, accessories and consumables. If you put the organizer on wheels, you get a mobile Toolbox.
The interior of the box has a compartment for large tools and pull-out compartments for small items. Additionally, you can install a panel for rulers, screwdrivers, knives, etc.
The structure is made of plywood, connecting the parts with glue and self-tapping screws. For strength, you can fasten the organizer with stiffening ribs from a 50x50 mm bar.
There is nothing complicated about assembling the box itself. The drawer design requires the most attention. It is expected to be loaded, so if it is not positioned correctly it can bind when moving and slip out of its mounts.
To install a retractable compartment, you will need guides, which can be roller or ball. The sliding of the runner occurs due to the torsion of the rollers in the grooves or the movement of the guide parts themselves relative to each other in special tracks.
Roller mechanisms are inexpensive, but less reliable. Ball ones are stronger and more durable, they move silently and allow you to open the drawer all the way. You can use reinforced versions of products that can withstand heavy loads.
To install a drawer, mark the fastening line of the guide on the wall, and the mating part on the side element of the compartment. Here it is important not to make a mistake and to connect the structures correctly in height so that the box fits tightly, but there is a small gap left for free movement. Even the slightest misalignment between parallel sides should not be allowed.
Assembly sequence:
- Cut out parts from plywood and sand.
- Assemble the frame and box using self-tapping screws and glue.
- Let it stand until it gains strength.
- Mark the guide lines on the internal side posts and sides of the drawer.
- Secure the runners with self-tapping screws.
- Insert the compartment until it clicks, slightly lifting the edge. After this, the box should move freely along the guides.
- Arrange the organizer space as you wish.
- Attach carrying handles.
- Carry out final protective and decorative treatment.
If desired, you can make several drawers of the same or different sizes. This will allow you to make maximum use of the organizer’s space.
Option with shoulder strap
Internal equipment
In some cases, you can buy a whole set of tools, including a briefcase, in an online store. This is an ideal situation because the internal division, including possible upholstery, matches the equipment 100%.
However, if you are purchasing tools and organizers separately, your first concern should be the quantity and type of stock parts. It should be possible to buy as many of these parts as possible.
Likewise, the interior space must be ready for modular division and the insertion of partitions.
Tool Chest Ideas
In the hands of a true craftsman, any thing that has outlived its useful life can become a useful and functional device. Various ideas that are implemented from improvised means arouse interest and become an impetus for one’s own creativity:
- A tool box made from cable ducts and sofa springs is an economical lightweight device for storing small accessories.
- Plastic canisters are record holders for generating various ideas. If you cut out a window in the upper part, such a container can be used to store screws, nails, drills and anything else that may be useful in your work.
- A shopping cart, if obtained legally, can be transformed into a convenient Tool-box through some transformations. It is enough to arrange compartments or shelves, and the handle and wheels are already there.
- Old "diplomacy" bags are strong and durable, and reliable locks have worked properly for more than 20 years. Inside the case you can arrange small pockets for storing small items, and the suitcase itself can easily withstand the weight of a drill or screwdriver.
Removable additional tray
It happens that the design of a tool box contains an additional tray that is not secured in any way. It is simply placed in a box, which is closed with a lid, or taken out of it when work is required.
Typically, such a tray contains the tools most often used in work, because... The presence of such a tray implies quick use of the most necessary tools.