To finish the floor with high quality, it is necessary to reproduce the most even surface of the base, since there are often a huge number of unevennesses there. Unfortunately, this is often very difficult to do, since elevation changes can be more than significant. One way to remedy the situation is to pour a concrete screed, but this method of action is not always possible. As an alternative, it makes sense to use the method of laying plywood on pre-assembled logs - wooden structures that can be built directly on the base.
Dimensions and thickness of sheets
The thickness of the plywood for the floor is important because the load-bearing capacity of the slabs depends on it.
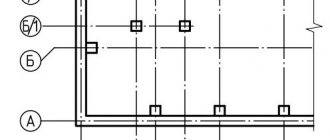
When laying, the logs are placed in increments that are tied to the width of the cotton insulation tape. For the frequently used basalt type, this distance is 600 mm. Taking into account the thickness of the log, the span is 650 mm. It is not enough to cover it with panels 22 mm thick; it needs to be installed in 2 layers. Standard sizes of plywood sheets in millimeters:
- 3050 x 1525:
- 2440 x 1220;
- 3000 x 1500;
- 1525 x 1525.
The thickness of the slabs depends on the veneer and the number of layers. Panels of 4 – 30 mm are produced as standard.
Plywood thickness for laminate and linoleum
Thin sheets do not level the base well and do not resist loads sufficiently. The thickness of the room does not affect the height of the room; the change is considered insignificant.
Other factors when choosing thickness :
- the possibility of additional insulation and sound insulation of the surface due to a thick plywood layer;
- the degree of rigidity of the resulting base.
Valera
The voice of the construction guru
Ask a Question
The thickness of plywood for linoleum is at least 18 mm; a two-layer coating of 10 mm panels with alternating seams and sealing joints is allowed. For the upper layer, an environmentally friendly variety is taken (FBA, FK, FKM). Sheets with a thickness of 10–16 mm are placed under the laminate; grade II or III is taken, since defects will not appear under a thick layer of decorative material.
How to calculate the required quantity
The size of the sheet is taken according to the log pitch and the length of the room so that there is less cutting. Take into account the possibility of climbing to the floor using stairs.
Calculation procedure:
- calculate the square footage of one sheet, multiply the width by the length;
- determine the area of the room by multiplying the length by the width;
- The square footage of the room is divided by the area of the panel to obtain the number of sheets of plywood.
A factor of 1.05 is used to take into account cutting to size along the length of the sheets and the formation of the last strip. If the result is a fractional value, it is rounded up to the nearest whole number.
A little about plywood
Before proceeding directly to installation, I would like to tell you more about such a material as plywood. As a rule, it contains an odd number of layers of wood, glued and pressed together. In this case, the material is divided into medium and high levels of moisture resistance. The latter, as the name implies, can withstand greater amounts of moisture while maintaining its technical characteristics.
Important! At the same time, moisture-resistant plywood cannot be used as a finishing material in the bathroom and other rooms with high humidity levels. The adhesive contained in this material may release toxic substances upon contact.
As for the material of manufacture, there are usually two options - coniferous species and birch. The former have a high cost against fungi, however, such sheets are glued together using a very toxic composition, and it is better not to use them in interior work. Birch options are particularly suitable for both interior decoration and furniture work.
Advice! When choosing a material for laying a floor, it is best to focus on the FK-2E1SH1 marking. It has a very smooth surface for effective further finishing, and in addition, its cost is quite reasonable.
Preparation for installation
Sometimes plywood panels are cut into pieces along width or length to reduce stress from loading - in smaller pieces it is reduced.
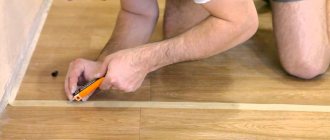
For cutting use:
- electric jigsaw with wood saw;
- circular saw with a circle for wood.
The cutting is carried out in an adjacent room to reduce the amount of dust on the base. This is especially important if the concrete or cement base is impregnated with primer. The layout of the slabs on the floor is specified; for this purpose, they are temporarily placed, adjusted, and numbered. The material is removed and stored before work begins.
Acclimation of sheets
For acclimatization, the sheets are laid strictly horizontally.
It is recommended to bring the panels into the house and keep them there for at least a day . The period can be extended up to a week - it all depends on the conditions in which the plywood was previously located. If the difference between the temperature in the store warehouse and the room is 5 - 8 ° C, you need at least three days. Increasing the difference to more than 8°C extends the period to a week.
Content rules:
- if there are deformed (curved) sheets, they are laid out in a stack on a perfectly flat surface and wait until they dry;
- The slabs should not be laid on a freshly primed floor, as they can absorb moisture.
Do not install acclimatization sheets in a vertical position.
Preparing the base
The plywood is laid on a flat, clean floor.
Leveling the plane before installing the boards is important, because with the glue method the sheets will bend and become deformed. Cracks in old foundations are opened and sealed with repair mortar. If the dowel gets into a crack during installation of the joist, the wooden supporting elements may become loose.
Alignment rules:
- a screed made of concrete or cement-sand mortar is made strictly according to the beacons, so that unevenness on the surface is no more than 1 - 1.5 cm (for gluing panels);
- if plywood is placed on joists, such unevenness can be up to 3 cm.
The area is cleaned of dust (use a vacuum cleaner) and treated with a deep penetration primer.
Preparing fasteners
For adhesive installation, compositions are prepared for joining plywood to the base. The products used depend on the base material. For example, water-based glue is used for old boards; concrete will require special one-component and two-component compounds.
Water based adhesive:
- polyacrylic;
- polyvinyl acetate PVA;
- latex rubber.
For fixing to the joists, prepare nails 45–50 mm long; self-tapping screws are used of the same length. The diameter of the screws is 4 – 5 mm. The logs are fixed to the concrete with dowels 120 - 150 x 10 mm, fastened to the wood with self-tapping screws of the appropriate length, and metal corners are used.
Question to the expert
The room was being plastered and the floor screed was being primed. There is increased humidity and dampness in the air, although the plaster and primer have set. Is it possible to install plywood on joists?
Ideally, the temperature in the storage room will be +18 - 22°C, humidity at 45 - 55%. To reduce dampness, through ventilation is recommended until the required conditions are achieved. Only after this can the plywood be attached.
Plywood, OSB, chipboard, fiberboard or fiberboard?
Not every sheet material can be used on the floor.
Plywood, DSP and OSB are best suited for leveling the floor.
- Plywood is the best option. It consists of glued sheets of veneer, with each new sheet laid perpendicular to the grain of the previous one, which increases rigidity. Moisture resistance, durability and environmental friendliness depend on the binding material used (it can be distinguished by its markings). Most often, the FC brand is used for flooring. It is made on the basis of urea glue, and has lower moisture resistance and easily swells from moisture. Suitable for rooms with normal humidity, as it is safer for health.
The FSF marking has increased moisture resistance, but is not very environmentally friendly; it is made on the basis of phenol-formaldehyde glue. It is better not to use it indoors due to phenol emissions.
To level the floor, you can buy grade 3-4 plywood; the presence of knots will not affect the final quality; they will be covered by the floor covering. Laying tiles on plywood is not recommended as wood has a high coefficient of expansion and may fall off as the season changes.
- DSP - ideal for leveling wooden floors under tiles.
- OSB is a completely environmentally friendly material; theoretically, it can be used for leveling, but it is undesirable, because it bends more easily at the same thickness as plywood. In addition, OSB is usually slightly more expensive than plywood.
- Chipboard – has poor environmental friendliness and low strength.
- Fiberboard is not suitable for leveling, because it is too flexible a material and it will bend around all the irregularities.
Methods for laying plywood on the floor
In old houses, a screed is made if the base is concrete or prefabricated slabs. Sometimes plywood can be laid on old floorboards if they have not dried out and are holding tightly.
The joists are placed on a concrete base or fixed to the floor beams to create a frame for installing the plywood layer.
On a concrete base
Insulation and waterproofing
can be laid between the concrete and the plywood layer . In this case, the sheets are fixed directly to the concrete using dowels.
Installation features:
- the base must be level;
- the panels are positioned so that there is no cross crossing of the seams;
- the joints are shifted relative to each other by half the sheet.
Glue is the main method of fastening or a secondary one. In any case, hardware is used to fix the position of the slabs until the composition dries. In the case of water-based adhesives, this time is about 2 – 3 days.
On wooden boards
The surface must be leveled using fiberboard pads. Noticeable bulges in the plank floor are planed with a plane.
Procedure:
- a flexible substrate is laid on the surface, often foamed polyurethane foam or polystyrene foam is used;
- plywood boards are placed on top with a minimum distance between the edges of 1 - 2 mm (so that creaking does not appear later);
- screws are screwed in along the edge in increments of 15 - 20 cm, the inner rows are placed at a distance of 25 cm from each other.
Dry and warped base boards are replaced with new elements. When laying the second layer, the joining seams are alternated.
On the logs
The logs are placed on a concrete, plank base, or floor beams. Sometimes a connecting beam for foundation columns is used as a support. The logs are installed under all panel connections: longitudinal and transverse seams. It is impossible to connect the edges of the slabs without support beams - a crack in the decorative finish will certainly appear in this place.
Self-tapping screws along the edges of the sheets are placed in increments of 200 - 300 mm. Sometimes, for rigidity, glue or sealant is used to lubricate the upper plane of the joists. The procedure will add rigidity and eliminate possible squeaking.
Advantages and disadvantages of such a solution
- Plywood is a fairly durable material, owing its parameters to the gluing of several layers together;
- The material is relatively environmentally friendly;
- The ability to compensate for even large differences in floor topography by creating an even frame of timber for the flooring;
- Wooden floors are warm, unlike concrete screeds. For this reason, this installation method should be chosen on the first floors;
- The design does not exert much pressure on the ceiling, unlike the screed, which can sometimes be filled with a large layer.
Important! The environmental friendliness of the floor is not complete, since plywood contains the toxic substance formaldehyde. It will not be possible to completely get rid of it, and therefore for interior decoration it is better to use a version containing 10 milligrams of this substance per 100 grams of weight.
- The disadvantage in this case is its susceptibility to moisture. The layered structure of plywood is not only an advantage, but also a disadvantage, since penetrating water can destroy the material;
- In the case of low ceilings, such a design may be unnecessary, since in this case the floor rises quite strongly;
- In the case of small differences in floor heights, it is easier and cheaper to pour a screed to correct the situation.
How to straighten plywood sheets
Straightening plywood is similar to bending it, since the goal of these two processes is the same - changing the original shape . To straighten one sheet:
- Moisten it by wrapping it in a damp cloth and leave it for a day. Moisten the fabric periodically to keep it wet.
- Place the sheet on a flat surface. The best option is a concrete screed. An undeformed plywood board must be placed between the concrete and the material to be straightened.
- Place another straight sheet on top of the plywood.
- Press down the resulting “pie” with a weight. The main load should fall on the deformed area.
- Leave the “pie” for a day, and then disassemble it.
If the material needs to be straightened quickly, iron it. And if you need to level several sheets of plywood at once, stack them on top of each other. This must be done so that the deformed areas of adjacent sheets do not coincide.
Attention! When straightening FC plywood, at the moistening stage, prevent its direct contact with water. It will lead to delamination of the sheet, which can no longer be restored.
Prices for FOF plywood (laminated) 1500x3000 mm
| Product name | The price of the product |
| Plywood 4 mm laminated FOF 1500x3000 mm | RUB 1,900.00 |
| Plywood 9 mm laminated FOF 1500x3000 mm | RUB 5,300.00 |
| Plywood 12 mm laminated FOF 1500x3000 mm | RUB 3,500.00 |
| Plywood 15 mm laminated FOF 1500x3000 mm | RUR 6,700.00 |
| Plywood 18 mm laminated FOF 1500x3000 mm | RUB 8,000.00 |
| Plywood 21 mm laminated FOF 1500x3000 mm | RUB 8,700.00 |
There are a number of brands of plywood that differ in additional properties (FBA, FB, BS, BV, FSK, FKM...), but they are not particularly widespread in the construction industry.
Main Dimensions
Today plywood is produced in different sizes. Thickness may vary. The minimum thickness of plywood is 3 mm, the maximum is 30 mm.
Standard plywood dimensions are 1220 or 1525 mm.
Plywood is great for cutting or burning paintings, panels, boxes, dishes, etc.
The length of the plywood can be 2440 mm - in this case the sheet will be rectangular - and 1525 mm, this sheet will be square. The maximum length of plywood sheet that manufacturers can produce is 3660 mm.
Main advantages of plywood:
- smooth surface of the plywood faces;
- practically does not deform or crack;
- for complex structures can be bent;
- the dimensions of the sheets allow for maximum comfortable transportation;
- Through cracks never form.
Made a reliable subfloor. Not OSB or board: saved a lot of money
The story was shared by our subscriber and author of an interesting blog about repairs - Andrey Miloserdov
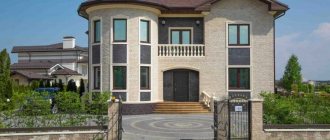
I decided to build a two-story house on a limited budget. When the box of SIP panels was ready, it was necessary to make a ceiling, for which I began to look for materials. Preference was also given to SIP panels, but due to limited finances, I had to abandon this option in favor of frame technology. For implementation, it was necessary to select a section of the forest that would correspond to the loads on the openings.
I calculated the project, purchased the necessary materials, and built a ceiling from wooden beams impregnated with fire and bioprotection. I chose each board myself: I carefully examined it so that it was perfectly flat, without signs of warping, cracks or chips. It was easy to install and there was almost nothing to cut. The next step was to insulate the ceiling around the perimeter with polystyrene foam using foam.
There wasn't enough money to cover the floor. So I decided to raise the walls with temporary flooring and leave the flooring for last.
Finding flooring material
All developers used either OSB or inch for these purposes. I had no time restrictions, so I took the selection of material seriously and thoroughly, choosing between the two proposed. I wanted the floor to have properties similar to concrete: it would not allow sound to pass through, and would have high strength and wear resistance. And for me, the most important criterion was the cost, accordingly, the lower, the better.
I remembered that my friend had recently built a private house, and decided to go visit him. On the advice of the developers, he made the overlap between floors using 22 mm OSB , which costs significantly less than boards. The board is shavings from sawmill waste, which makes it low cost and lightweight.
At that time, OSB was the first choice for me, so it was a joy to get to know it better. When my friend and I walked along the second floor, the furniture literally shook from vibration. The doors of the tall cabinet opened wide during the jumps. I had to abandon this material and continue my search, since I didn’t have enough money to buy an inch of adequate quality.
An unexpected solution - countertops
The new acquaintance whom fate brought me together turned out to be an employee of the furniture warehouse of a company that sells countertops and chipboards. By a lucky coincidence, he told me that for safe transportation, tabletops are replaced with exactly the same tabletops, only defective ones, on top and bottom for reliability, and also notified me that there are companies that sell defective ones at several times cheaper.
This material, which has a moisture-resistant impregnation, is three meters long and 40 mm thick, cost about three hundred rubles per sheet. This is much cheaper than the options I previously considered. Moreover, countertops are at least 2 times thicker and significantly heavier than OSB. In my case, this is only beneficial - they will press down the beams better and will not move or creak when people move.
The idea captured me, I started looking at information on the Internet, but I couldn’t find anything about the ceiling made of countertops. At my own risk, I decided to conduct an experiment using my own home experience. From that moment on, a lengthy purchase of cheap countertops began. It was impossible to immediately purchase the required amount of material, because it was not available, and I began to buy defective boards whenever possible. I called all the furniture companies and found out if they had defective countertops.
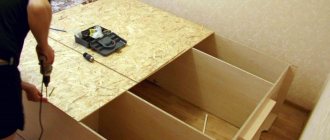
After a positive answer, I rushed to make a purchase. Thus I traveled around the whole city, fortunately, time allowed me. The procurement process lasted about a month. I brought the boards and immediately laid them on the joists without fasteners, just to be on the safe side. Still, I managed to completely lay out the ceiling from the countertops, which I was incredibly happy about.
The installation of the subfloor did not end there. Since the countertops were simply laid and not attached with fasteners, the thought of improving the performance of the flooring was on my mind. To increase the sound insulation parameters, I came up with the idea of stuffing glass wool between the joists and laying a soundproofing gasket. No sooner said than done!
I removed the countertops, installed soundproofing, and then firmly attached the subfloor. In the end, the flooring turned out the way I wanted. You can dance, run, jump, gallop, do whatever you want, but he stands still, doesn’t creak or move. No sounds can be heard on the first floor, like a friend's. You can speak loudly, but you won’t be able to hear.
When I invited a friend to test drive the new floor, he was, to put it mildly, shocked by my idea, but after walking around the entire perimeter of the second floor, he was even upset that he had not done this himself.