Everyone loves laminated floors - they are beautiful, affordable, and they are not difficult to install. Infrared film can also make the floor warm, which will add comfort and coziness to the room during the cold season. This heating method is best suited for laminate flooring as it does not require much labor. . In addition, infrared heated floors under laminate do not have a detrimental effect on the coating material. The room can be maintained in the same way as before before installing the heating system. Installing a heated floor under a laminate is easy to do with your own hands, using step-by-step instructions and a video. It's easier than installing an electric floor.
Operating principle and advantages of infrared film heated floor
The main methods of heat transfer are:
- convection - heat is transferred by air from object to object;
- rays - when a body heated to more than 60 degrees emits electromagnetic waves up to 100 microns.
Most heating systems operate on the principle of heat exchange; heat is transferred to the air, which in turn distributes it further throughout the room.
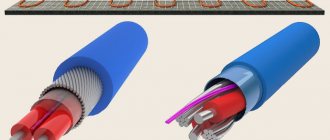
Film infrared floors work differently. They have a main layer - conductive strips (with copper and silver plating), a carbon emitter and laminating films. A current is applied to the carbon paste, and it begins to emit rays that reach the solid body (laminate) and heat it. Laminate heats the room by convection.
The rays have different lengths, part of them, passing through the floor covering, heats the objects around. Therefore, it is not allowed to install furniture above heating elements.
Film systems are produced in rolls of 50, 60, 80 and 100 cm, different lengths are allowed, a special strip passes every 20 - 25 cm, and a film cut is made along it. The power of such film heated floors is from 150 to 440 W/m2.
This heating system has both positive and negative qualities, although there are many more advantages.
Let's look at the advantages and disadvantages
- In heat release, the floor surface where people are located is heated: passages, places of rest and work. No heat is wasted on heating the furniture from below, which reduces energy costs. The material itself is used more economically, since it is not placed under furniture.
- Film heated floors are not expensive, despite the fact that the price for a film heating set itself is high, unlike other types of floors. The minimum cost of components is 2000 rubles, which includes: temperature sensor, temperature regulator, electrical wires, contacts, tape. In addition, a square meter costs 650 rubles. meter of film. But the high price of the material is offset by the inexpensive installation cost.
- Infrared film is not afraid of subzero temperatures, and can work even at minus 70 degrees. The system remains operational even after prolonged exposure to a cold room. This is a definite plus when using the system in country houses and cottages.
- Possibility of installation in any type of premises - private houses, apartments or offices. There is no danger of flooding neighbors, as with a water floor model. The rooms can be anything - children's room, living room, kitchen, bathroom.
- Easy to install and dismantle. No experience is required to connect the elements, the main thing is attentiveness and accuracy. At the same time, laying film heated floors is done quickly.
- Infrared radiation coming from carbon elements is similar to solar heat.
- Doesn't need renovation. The power supply connection is parallel, so if one of the strips fails, the system continues to operate. And if there is a need to replace the entire structure, it can be easily dismantled.
- Uniform heating of the room. It is important that heat is concentrated below, which is beneficial for human life.
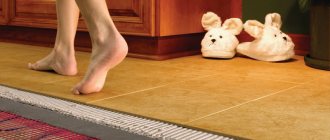
- The floor is warm, you can walk barefoot and let your children down on the floor without fear that they will catch a cold.
- Infrared heated floors last a long time, even with constant use, and do not require maintenance.
- There is no invection or convection movement of air flows inside the room, which means there are no drafts and dust does not rise upward.
There are also disadvantages to such floors, but they are much fewer.
- High energy consumption (find out how to reduce electricity consumption), although carbon emitters have high efficiency.
- Risk of short circuit due to water penetration.
- The system depends on the supply of electricity.
- It is impossible to rearrange furniture without changing the floor plan. The laminate will need to be dismantled and the heaters laid out according to a new layout.
Is additional thermal insulation necessary or not?
Additional thermal insulation when installing an infrared floor is aimed at:
- Protection of the heated room from the penetration of cold air flows from outside;
- Saving heat indoors and preventing it from escaping outside.
The need for additional insulation depends on a number of factors:
- In what room is the floor installed? If it is located on the ground or above the basement, then the thermal insulation layer should be thicker.
- What kind of substrate is laid - that is, the type and its thickness. When using a thin foil product as a flooring, insulation made of expanded polystyrene foam, cork or polystyrene foam is required.
If you do not adhere to these rules, the floor will not work efficiently (heat will be wasted), and this will entail additional costs.
Floor configuration and structure
The film heated floor set consists of:
- Heating elements with an average width from 500 to 1000 mm. The length varies, but no more than 8 meters is recommended. The canvas is cut to the required size using special strips.
- Terminals for circuit connections.
- Thermal sensor - it is responsible for the heating level.
- Thermostat (control unit) - can be electronic or electromechanical. It has a different design and display system, but the connection to power, heating elements and temperature sensor is similar.
- Often the kit contains a cable of the required size.
- Be sure to have insulation material in the form of bitumen tape.
When choosing a heated floor for laminate, it is necessary to take into account the power level. The standard is 150 or 220 W/m², not often, but sometimes 440 W/m². For laminate flooring, power above 150 W is not required; this is enough to heat the floor up to 40 ºС, especially since temperatures higher than this are contraindicated for laminate flooring.
You will need a flooring underlay with a thickness of at least 3 mm. Ideally, it should have one foil side that reflects infrared radiation from the base, thereby all the heat goes upward. It is important that it does not conduct current. You will need tape, single or double sided.
An infrared film floor is a narrow sheet equipped with heating elements; a floor covering (laminate) is laid on it. For these models, carbon strips serve as heating sources; they can be solid or coated, which are covered on all sides with lavsan or polyurethane material. The thickness of the structure is from 0.2 to 2 mm.
When laid, the structure of the infrared heated floor consists of the following layers and looks like this:
- Laminate flooring.
- Backing - vinyl or polyethylene is suitable. It allows heat to pass through and retains water, which is important.
Preparing the foundation
The subfloor must be smooth and clean - litter and large debris are not allowed, it is also important to remove pebbles, sand, and dust. It is recommended to check the floor for strength, repair cracks and gaps, and level them to acceptable parameters.
Advice! To make the concrete base less dusty, it is recommended to treat it with a primer mixture, although this procedure is not necessary.
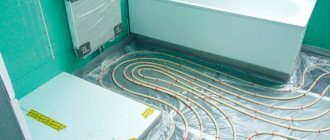
Also, thermal insulation material should be laid on the subfloors. It is recommended to use foil. The shiny side should be up. The strips are laid end to end. The thickness of the foil material should be about 2-3 mm. It is most convenient to secure the material using double-sided tape, and the gaps between the individual strips can be closed with ordinary tape. Then small recesses will be cut out of the material into which terminals, wires and other communications are placed. Then the base for the capricious laminate will be optimally smooth. It is also recommended to lay a layer of waterproofing material on the base of the floor.
Laying foil insulation
Heating elements are the very “heart” of a warm floor.
- Heat-reflecting material - its purpose is to reduce heat loss. A prerequisite is that it must be non-conductive. Polyethylene foam insulation or cork backing with a reflective layer is suitable.
- The base of the floor is solid and level. To do this, the concrete base can be filled with a leveling compound, and plywood can be laid on the wooden base.
Why do you need a thermal insulation substrate?
The substrate is a heat-insulating material that works like a “thermos”, and a waterproofing layer that protects against moisture. It is located between the base and the coolant, thereby softening the pressure that is exerted on the base. The main task of the substrate is to retain and transfer thermal energy upward, and not allow heat to escape into the floor.
The quality of heating is influenced by a well-equipped lining. The operation of the most powerful and expensive heating system will be ineffective if the insulation is incorrectly chosen, because the heat will be wasted.
Please note : according to technology, a heated floor system must transfer heat to at least 80% of the floor surface.
To achieve this result, it is necessary to use a heat-insulating material with low thermal conductivity in this layer of the cake. This quality allows you to reflect heat and direct it upward. That is, the underfloor heating, which is hidden under a concrete screed or located in the middle of the structure, is a key factor in effective heating.
Choosing a good substrate is not easy; you should pay attention to its practicality and manufacturability, it must be easy to use and have the necessary rigidity. Such a product will not be cheap, but it will last a long time and significantly increase the efficiency of the floor.
You can determine the best substrate by the presence of:
- good hydro- and thermal insulation properties;
- increased reflective properties;
- resistance to temperature changes, if it can withstand heating up to 90 degrees;
- resistance to deformation;
- fire resistance.
In addition, it must be environmentally friendly.
Making a diagram
Before purchasing a kit for a film floor under a laminate, you need to thoroughly think through and draw a diagram for laying the heaters and connecting them to the power supply.
When drawing up a diagram, you need to consider the following points:
- Do not completely cover the floor with film. It is not installed under furniture, as normal heat exchange is disrupted. In addition, heating will cause deformation of furniture and laminate. It will also reduce the service life and increase the cost of electrical energy.
- Place heating elements at a safe distance (250 - 300 mm) from walls and heating sources.
- Rolls of film flooring should be rolled out along a large wall of the room, this will reduce the number of contact connections.
- The distance between sheets should be 50 mm. They cannot be overlapped.
- In order for the room to warm up well, it is enough to cover 60 - 70% of the area with heating elements. It is permissible to plan areas of increased comfort - this is a children's room and a place to relax.
In addition, you should consider the location of the system’s cable communications:
- Choose the optimal location on the wall for the control unit; it should be at a height of at least 500 mm from the floor, and be convenient for connecting wires.
- It is forbidden to connect a “warm floor” to an ordinary outlet, since the total power of the system is high. It is necessary to plan a separate power line of the appropriate cross-section. For maximum safety, it is recommended to provide an RCD device in the circuit for protection.
- Most thermostats can be installed in a standard outlet on the wall. It is enough to make grooves from it to the floor measuring 20 by 20.
- When planning the wiring, crossing the wires is not allowed. Connection schemes vary, but the most common is when the cable is connected to the heating elements at one end.
There are cases when it is more convenient and profitable to connect the phase and neutral cables from different sides.
- It is necessary to provide on the drawing the area where the sensor will be installed. It is placed in the center of the film heater. It is recommended to make a distance from the walls of at least 500 mm. The ideal location is the coldest area in the room.
An accurately drawn up diagram will allow you to correctly calculate the need for material and components, and will facilitate the installation of heated floors under laminate.
What does saving on insulation lead to?
For example, let's take a room with an area of 50 square meters.
Usually they use polystyrene foam with bosses, the cost is 1 sq. meter on average 600 rubles, thickness - 2 cm. In most cases, this thickness is not enough for insulation, with the exception of the southern regions. Additional insulation up to 4 cm will cost another 150 rubles per square meter. The total amount will be 7,500 rubles. Saving this amount is what we are talking about when choosing insulation. The owner of the house strives to cut costs and often chooses the cheapest option - underlayment for heated floors, instead of the insulation itself. Ultimately, the thrifty home owner heats the outdoors and spends even more money to maintain a comfortable indoor temperature.
Calculation of the cost of water heated floors
We have two rooms in front of us:
- the first with normal, high-quality insulation of the required thickness;
- the second - with a substrate for a warm floor under insulation and a “thrifty” owner.
| Characteristic | House No. 1 | House No. 2 |
| Floor area | 50 | 50 |
| Pipe temperature | 40 | 40 |
| Pipe diameter | 16 | 16 |
| Insulation | 60 | 20 |
| Heat flow upward | 73,76 | 65,81 |
| Heat flow down | 18,88 | 58,72 |
| Maximum floor temperature | 26,82 | 26,18 |
In the first house, with 4 cm of insulation, the heat flow into the room exceeds the heat flow down three times. All the heat that the owner of the house pays for is used to heat the room, not the street! In the house of a “frugal” owner, the heat flow upward (to the room that needs to be heated) is almost equal to the heat flow downward (to the street, to nowhere). Forty watts per square meter go down the drain.
- On 1 square meter with underfloor heating we lose 40 W, on 50 square meters - 2000 W.
- 1 cubic meter of natural gas provides 10 kW of thermal power and costs 4.5 rubles (the price depends on the region, from 4 to 8 rubles).
- 10 00 W/2000 W = 5 hours – this is how much 1 cubic meter of natural gas is enough for heat loss.
- The boiler operates on average 12 hours a day. 12/5=2.4 cubic meters of gas are spent per day on heating the street.
- 2.4 (cubic meters) x 4.5 (rubles) x 30 (days) x 7 (months of the heating period) = 2,268 rubles per year.
They paid 7,500 rubles for the insulation / 2,268 rubles = 3.3 years - the payback period for the insulation. When using underfloor heating, heat losses will increase! These materials are not insulation!
DO NOT USE UNDERWARMING FLOOR INSTEAD OF INSULATION!
When using insulation materials with insufficient thickness for complete thermal insulation or when using foil insulation, isoline (they are also a substrate for a heated floor), the owner of the house loses a lot of heat in the lower direction. This is either unreasonable savings or a serious misconception of the homeowner. Heat losses in this case are comparable to the heat flow entering the room. The use of high-quality insulation of the required thickness pays off in an average of 3-3.5 years of operation of a heated floor, when using natural gas as an energy source. Natural gas is the cheapest source of energy. If we talk about other sources, then insulation can pay for itself in 1 heating period (i.e. in 7 months).
Which laminate to choose
The choice of coating model is important for the normal functioning of a heated floor under a laminate. Parquet that is not suitable for the type will be deformed, poorly transmit heat and emit formaldehyde above the permissible norm.
Laminate flooring with heated film must meet the following requirements:
- have a locking connection, it is not recommended to use glue for installing slabs, it creates a rigid seam that breaks when there are temperature changes;
- have high heat-conducting properties, for infrared heated floors the coefficient is 0.05-0.10 m2 x °K/W;
- the optimal thickness of the slabs is 8 - 9 mm; if they are thinner, the locking joint is destroyed when the temperature changes, and thick ones do not transmit heat well;
- do not emit formaldehyde when heated above the permissible limit; floor coverings of class EO and K1 are suitable;
- be wear-resistant, not lower than class 3, the higher this indicator, the higher the strength of the floor.
Based on these requirements, it is necessary to buy laminate flooring. In addition, there must be a special icon on the packaging or in the instructions for the product; it indicates the ability to combine this laminate with heating elements.
Reviews
Oleg, 39 years old, Tomsk
I bought film heated floors about 7 years ago. I regretted spending money on an expensive option and chose something from the middle segment. For the first few years everything worked well, the floor was warm and it was pleasant to walk on. But every year the effect became worse. When I disassembled the laminate, it turned out that out of two dozen modules, only five were working. Over the course of 7 years, the system became unusable, although the packaging indicated a service life of 15 years.
Olga, 44 years old, Moscow
I decided to install laminate flooring in the bedroom a few years ago and put a warm infrared floor underneath it. I like it – it’s nice to get up in the morning, you can walk barefoot. I turn it on on a timer for several hours a day, so I don’t have to pay much more for electricity. 3 years have passed and so far everything is fine.
Irina, 29 years old, Novosibirsk
When we bought laminate flooring, we were advised to install infrared heating underneath it. Since we had a small child at that time, we decided to try it. Everything, of course, is not cheap, but my husband installed the system himself literally in the evening after work, everything is simple, the instructions are clear and detailed - with photos and diagrams. We usually turn it on for several hours a day, everything warms up quickly, the room becomes hot if the warm floor is running constantly. So far there are no complaints.
Kirill, 42 years old, Leningrad region.
I decided to put a couple of strips on the passage in the hall to heat the floor in winter. It would be better not to take it - a year later a persistent burning smell appeared in the room, when I dismantled the laminate, it turned out that several mats had already turned yellow and even melted a little. This miracle heating almost burned down the apartment. But here it’s my own fault - I bought a cheap option, although the seller advised me to take something from well-known companies. Therefore, it is better not to save money - it is unsafe.
Infrared heated floors are well suited for installation under laminate flooring. The main thing is to choose high-quality products and carry out the work strictly according to the instructions, not forgetting to prep the surface.
Laying technology
The main advantage of infrared film flooring over other types is its simplicity and the possibility of self-installation.
And laying the finishing coating will not be difficult for home craftsmen without experience in this work.
Preparing the base and laying thermal insulation
Before installing an infrared heated floor, you need to carry out the following work: prepare the base and carry out waterproofing.
Important! The base must be level and solid, with a slope of no more than 2 mm per 1 meter.
It is necessary to carefully check the base for cracks and irregularities. If found, they should be puttied and allowed to dry. After this, the surface must be thoroughly cleaned of debris and dust (sweep or vacuum).
If there are significant differences in the concrete base, it is easier to fill the screed with a leveling compound.
The next stage is laying insulating and heat-insulating material. It is laid along the entire perimeter right up to the walls, even where the heating element will not be located.
The insulator can be polyethylene foam or cork with a reflective layer. Aluminum foil should not be used as it conducts current. The insulation is spread with the foil side up.
The substrate for the film should have a thickness of 3 - 4 mm, this is important, since grooves will be made in it for laying the cable. To ensure that it does not move during subsequent actions, you should secure it with a stapler and connect the strips with double metallized tape.
Next, a recess is cut into the insulating material for the temperature sensor.
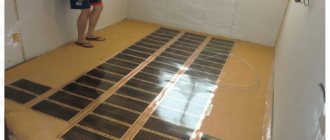
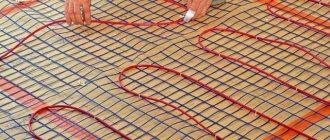
Laying film infrared emitters
The heating film must be laid out in accordance with the existing diagram. Installation should be done carefully so as not to damage the integrity of the heating fabric. It is recommended to cut the film with scissors along the strips intended for this purpose.
The heating elements are located at a distance of at least 20 cm from the wall and furniture, and 1 meter from the heating devices. This is necessary to avoid overheating of the floor and its failure.
The film elements need to be placed with the copper busbars facing down, and then secured with tape. The permissible length of heating strips is no more than 8 meters.
You cannot lay the film on a whip, the distance between the strips is 50 mm. To minimize wiring costs, lay the film towards the thermostat, along a large wall.
Then you need to carry out actions to isolate the areas where the current-carrying bus was cut, in places not intended for cable communication. For these purposes, it is necessary to use bitumen tape; it is better to press it tightly on all sides for good sealing.
Connecting the temperature sensor
The temperature sensor should be placed in the center of the canvas, on the black carbon strip. In this place, in the substrate, at the time of laying it on the base, make a recess for it, as well as cable channels.
The housing should be fixed with bitumen tape. When the sensor is installed and the wires are routed to the thermostat, the film is put back and secured with tape. Now you can install the terminals.
Terminal Installation and Cable Connection
Terminals are installed at the points where the floor is connected to the power supply. To do this, the top should be inserted into a special slot, and the second plate should be left at the bottom of the film outside. Using pliers, gently but firmly compress the clip to ensure contact connection with the silver part of the copper bus bar.
There are some models of film floors that provide a different method of connecting the terminals - rivets, this is indicated in the instructions.
The next step is to connect the cable. The conductive wires must be stripped, inserted into the terminal and clamped with pliers. It is necessary to insulate the terminals; for this, strips of bitumen tape must be glued on top and bottom, and carefully connected. To ensure a good seal of the assembly, remove all air bubbles.
Note! The bitumen tape has the properties of heating up at the moment of first connection to the electrical network, and taking the shape of the protected unit, thereby creating maximum sealing.
Connecting the thermostat
The flooring is laminate and requires precision when adjusting the temperature, so it is better to take an electronic device rather than a mechanical one. The thermostat has a control unit, which is equipped with special connectors for connecting wires. The technology for installing underfloor heating means that all wires must converge at one point where the device is located.
To eliminate errors when connecting wires, the instructions have developed a pictogram that indicates areas with grounding, load and voltage.
Important! Twisting of the wires is not allowed, as this may cause overheating of the structure.
After connecting the cables, they are laid in specially prepared grooves. The thermostat is attached to a planned location that is convenient for use. Now you can begin testing the floor for functionality.
For your information! Electronic thermostats have two devices, one for determining the air temperature, and the second for determining the floor temperature.
There are the following options for underfloor heating:
- Using only the floor sensor readings. For example, heating is turned on at a temperature of less than 25 degrees, and shutdown is set when 29 degrees is reached.
- Using readings from two devices. It is planned that the heating will turn on at 23 degrees in the room, and turn off when the air reaches 26 degrees, or according to the readings of the floor device - 30 degrees.
If the floor sensor breaks down, it needs to be replaced; to do this, you will have to disassemble the floor covering. In order not to resort to such time-consuming processes, it is better to stock up on an additional device and attach it during installation, as a backup option, leading the wires to the thermostat.
In case of failure of the main sensor, simply disconnect the broken one from the thermostat and attach a spare one.
First system launch
Before laying laminate flooring, you need to make sure the floor is functioning correctly.
First, you need to check the integrity of the system and then start it. The test temperature may be low, since the main purpose of the test is to check the connections of the infrared floor. If there is no overheating of the elements and no sparking, we can say that the film is of high quality and the connections are made correctly. If any problems are identified, then after eliminating them you need to repeat the launch.
Then, the system is disconnected from the power supply, and the laminate can be laid.
How to lay laminate
Before installing the laminate, to prevent water from getting on the heating elements, they should be covered with insulating material. To do this, it is enough to put a 200 micron plastic film, it will protect from moisture, but will not block IR radiation. Since the waterproofing is not very thick, it will not change the surface topography.
Cut the material into strips of the required length, and place on top of the heating film, making a slight overlap. It should protrude 10 - 20 cm along the edges. Be sure to tape the seams with tape so that shifting does not occur when laying the laminate.
After the waterproofing has been laid out, you can begin laying the laminate. Installation of laminate flooring on a film floor must be done carefully, wearing soft shoes, so as not to accidentally damage the film.
Place laminated panels directly on polyethylene film; no additional backing is required. Each board has a locking mechanism, so you need to connect the panels at an angle, then lower them until they click. If a gap appears, just tap it with a rubber hammer. The boards are connected to each other with their narrow sides, and then the laid strips are fastened together. After complete installation of the tiles, a plinth is installed around the perimeter of the area, all wiring is hidden under it.
Important! When laying laminate flooring, it is necessary to make gaps at the walls, since the laminate will expand due to temperature changes.
Once you have finished laying the laminate, you can turn on and check how the infrared film floor works. However, to adapt the laminate to new conditions, you should not immediately turn on the heating at full strength.
First, it is worth setting the indicators in the range of 15 - 20 degrees, and adding 5 degrees every day until the system reaches full capacity.
First start of the heating system
Do not immediately turn on the heating at full power. First, the temperature is set at 15-20 C and increased every day by several degrees, gradually bringing it to the calculated level.
IR film is a comfortable modern heating method. With proper installation and operation, they can maintain comfort and warmth in the house for a long time and even replace central heating.
Tips for installing film flooring
Experts advise laying film flooring following a number of rules:
- do not connect rolled film to the network;
- Installation of heated floors should be done at a humidity of no more than 60% and a positive temperature;
- if damage is detected on the graphite surface of the film, the hole must be insulated on both sides;
- Installing a film floor under a laminate cannot be done on a damp surface;
- if the heated floor is flooded, you need to quickly unplug it and let it dry naturally;
- install the temperature sensor in free access so that it is easy to change if necessary;
- save the layout of the film floor.
Infrared film is very popular today, as it can heat both an apartment and a house. By adhering to the installation rules, you can easily and quickly install this heating system with your own hands. In addition, if she has the right attitude, it will not be financially costly.
Alignment
The very first stage is leveling the floor. Naturally, the old coating must be completely removed, the surface washed and dust removed. If small holes remain in the floor slab itself (they can form during the construction of the house), then they can simply be filled with sand.
If the floor is flat, then it is necessary to lay a special material directly on it to reflect thermal radiation. The underlay for film heated floors is inexpensive and is laid over the entire area - close to the walls. To avoid shifting, this material can be attached to the floor with double-sided tape - just glue it around the perimeter. The presence of a heat-reflecting surface increases the efficiency of the heated floor and significantly reduces heat loss through the bottom. If the floor had holes, then this material will completely cover them.
Connecting IR films to the regulator
All cables should converge near the temperature controller. Twisting of cables is prohibited when connecting several sections of a heated floor to the thermostat. Certified terminals must be used for connections.
To install a heating system, you need to take a flexible wire with non-flammable insulation. Its cross-section is calculated based on power (divide power by voltage).
For example, 4.1kW/230V/10 = 1.7mm, you need to round this value to a larger size that is on sale in order to have a reserve. We obtain the required wire cross-section of 2 mm.
With a total system power of 4.1 kW, a sufficient cable cross-section is 2 mm. With a power of 8.3 kW, a cable with a cross-section of 4 mm is required.
Basic steps when connecting a heated floor:
- The cables are connected to the regulator block in accordance with the technical documentation for the film insulation. L - corresponds to the phase wire, N - zero. Together with the designation of the resistor, the permissible load value is usually indicated.
- After communication, the wires are removed into special grooves, and the thermostat is fixed to a predetermined place.
- All connections are carefully checked again and a test run of the system is performed.
- Before installing the laminate, it is necessary to improve the safety of the infrared film, protect it from breaks and other damage. You also need to protect the film heater from moisture. For these purposes, polyethylene with a thickness of 200 microns is laid on top of the film sheets, through which infrared rays can pass unhindered. The film is overlapped and secured with tape to seal.
- Laminate is installed in the traditional way, depending on the recommendations for a specific type of panel.
It should be noted that when connecting, it is necessary to install a circuit breaker. It will turn off the power to the heating system if there is even the slightest current leakage.
Before laying the final floor covering, you should check how the system functions. All sheets of IR tape must be at the same temperature. Cold areas indicate a lack of contact. You should make sure that there is no overheating or noticeable sparking in the components.