Very often, additional recreation space is added to country houses, cottages, and private houses.
Namely, various covered verandas or terraces are being built. As a rule, such an extension has the same base as the house and is an additional room. But the terrace is built on a separate foundation, so it can be built after you build the house. If you understand what this structure is, then drawing up a project and erecting a veranda near a brick house or near a timber house will not be difficult for you. What is needed to get started? How to attach a veranda to a house made of timber or brick? Let's look further...
House with a veranda: advantages and disadvantages
The veranda can be very different. If desired, the extension can be turned into a full-fledged living space, which will serve as a living room, hall or additional room. But still, in most houses the veranda is open or glazed, representing a recreation area or summer kitchen. The closed veranda is reliably protected from precipitation and wind, which allows you to set up a greenhouse or winter garden on it.
Advantages of a house made of timber with a veranda or terrace:
- attractive appearance of the building;
- wide possibilities for using space;
- increasing the usable area of the cottage;
- profitability - the cost of 1m2 of veranda is affordable for everyone.
Another advantage of a timber veranda is the ability to attach it to any building. The veranda can be built as an extension to a brick or foam-, gas-block house, provided that the extension is correctly linked to the main building.
The disadvantages, as a rule, are open, unglazed structures, which are covered with snow in winter. This problem can be solved by installing removable glazing: the glass is installed for the cold period, and dismantled for the summer.
Stylish housing from the manufacturer
Manufacturing companies transport, produce and assemble wooden objects of any level of complexity. The production uses excellent wood, which is obtained mainly from Kostroma forests. Forests from Kostroma are famous for their long service life, which is praised even abroad.
Thanks to professional employees, work in large companies is carried out:
- within the agreed period;
- Full construction;
- with a high level of quality.
Leading manufacturers on the market actively use:
- the best innovative ways to build residential premises;
- new equipment;
- transport for project delivery;
- working technologies.
This creates truly stylish housing. Thanks to these advantages, the designs are not only beautiful and practical, but also durable.
Important: when purchasing a set of timber housing from the manufacturer, people have a guarantee on all materials.
Materials for the veranda
The construction of a timber veranda for a house can be carried out during the construction of a cottage or at any time when the building is already in use. The first option is more preferable in terms of financial costs. The second allows you to wait for the building to completely shrink, which is especially important for timber houses.
Modern verandas for houses are built in one of two ways:
- From the same timber that is used to build a cottage.
- Made from a timber frame, followed by finishing with imitation timber.
As a rule, the first method is used when the veranda is built during the construction of a house made of timber. The second method allows you to make an extension for any house. When choosing wood for a veranda, experts advise giving preference to coniferous varieties.
Possible mistakes
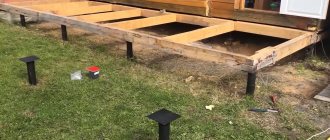
Non-professional builders often make mistakes when constructing the base of the veranda.
An obvious defect of the columnar base is the unevenness of its subsidence. This can occur if the foundation depth calculations are carried out incorrectly.
The base also sags when the load on the platform supports is unequal.
Experts do not recommend making a foundation different from the foundation of the common object. The foundation supports must have the same depth of depth.
Beginners in construction may not take into account the terrain features when working, however, the depth of freezing and the height of groundwater are very important. The monolith must be waterproofed and insulated, and before shrinkage, the height of each column must be carefully measured.
It would be a miscalculation to miss the grillage, because it is this that ensures the stability of the extension. If you immediately make a wooden frame from timber, the supporting beams may break, especially in the case of log options.
Attention ! A columnar foundation is not intended for heavy buildings. If this rule is neglected, the foundation will require repairs or even replacement.
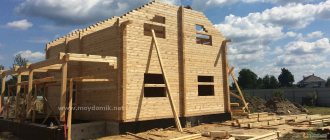
DIY veranda: step-by-step instructions for each stage
Before you start building a house made of timber with a veranda or making an extension to an existing building, it is recommended that you familiarize yourself with the regulatory documentation. Separate standards for the veranda have not been developed, but the technology for its arrangement, as well as the requirements for materials, are mentioned in the following documentation:
- SNiP 2.07.01-89, 02/31/2001 - on the construction of residential private houses.
- SP 53.13330.2011 - features of planning and development of private buildings.
- SanPiN 2605-82 - on sanitary standards in private housing construction.
If the construction of a veranda is carried out with the involvement of professional builders, then the specialists must be guided by the standards described above and are responsible for their compliance.
Step-by-step instructions: building a veranda with your own hands
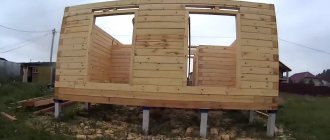
Foundation installation
The construction of the veranda begins with the installation of the base. If a veranda is erected during the construction of a house, then the foundation is made taking into account the veranda. To attach a structure to an existing house, a separate foundation is required. The choice of foundation type for an extension depends on the following factors:
- area and weight of the attached structure;
- type of foundation under the main building;
- soil properties on the site;
- economic expediency.
If the cottage is built on a pile foundation, then the extension must be built on stilts. In this case, the best option would be a pile-screw foundation with a wooden grillage. If the house rests on a strip foundation, it is better to use a monolithic strip foundation of a shallow or shallow type for the veranda. A column foundation is the cheapest and is perfect for the lightest, smallest verandas.
The foundation installation technology depends on its type. For a pile-screw foundation, the algorithm will be as follows:
- Screw piles are screwed into the ground in increments of 0.5-1 m.
- The pile heads are connected to each other with a grillage using coating waterproofing.
- The lower floor beams of the future terrace are installed on the grillage, which are the frame for the pile supports.
For a monolithic strip foundation, the instructions are more complex:
- A trench 20-35 cm deep is dug and backfilling is carried out.
- The bottom of the trench is lined with waterproofing and formwork is installed.
- A pre-prepared reinforced frame is placed into the formwork.
- The formwork is concreted and dismantled after the concrete has hardened.
When using ready-made reinforced concrete foundation structures, there is no need to wait for the concrete to harden and you can immediately begin building the walls and fencing of the future veranda.
Veranda floor installation
Logs are placed on the lower crown and cut into the grillage beam. For the logs, choose a strong, good quality timber with a cross-section of at least 40x150 mm. The logs are installed in increments of 0.5-0.7 m. For an unheated veranda, in order to save money, the finished floor is laid directly on the logs, between which it is recommended to put inexpensive but effective foam insulation and a vapor barrier.
Rough or finishing floor - atmospheric drying boards 20x100 mm, laid after the construction of the end walls and installation of the railings. It is advisable to choose boards from larch or other moisture-resistant types of wood. A deck board or other finishing coating is installed on the subfloor.
Construction of walls and railings
To build an open veranda, as a rule, 2 end walls are erected.
The walls of a veranda or terrace are made using one of two technologies: frame or frameless. Frame technology means that after laying the first row of beams, which can also serve as a grillage (frame), logs are cut into them and racks are installed. To construct the frame, timber 100x100, 145x145 or 195x145 mm is used. Metal corners are used to attach vertical load-bearing frame beams to the bottom frame. The walls between the beams are filled with thick plywood or OSB sheets. To protect the veranda from freezing, insulation is attached to the frame filling and installed between the battens.
When constructing veranda walls from profiled timber, the same material is used as in the construction of timber houses. Assembly is carried out using standard “warm corner” technology. Inter-crown insulation, for example flax-jute fiber, is laid between the beams.
All wooden materials used must be treated with antiseptic and fire protection!
Railings for an open veranda can be made independently or purchased ready-made. Manufacturers offer various options for railings for timber terraces: wooden, metal, plastic, glass. For houses made of timber, owners most often choose wooden railings that fit into the ergonomics of the building. For a timber terrace of a brick or block cottage, you can use wrought iron railings that do not violate the overall style of the building.
The railing technology is simple and clear:
- Balusters of the desired shape and size are prepared or purchased.
- The supports are mounted on the floor joists using anchors and fasteners.
- Belisin racks are installed at the selected interval.
- The timber railings are installed and the end elements are fixed.
The height of the veranda railings should ensure safety. Products must be high enough and withstand a load of at least 120-150 kg per 1 m2. The railings should not be too sparse, the optimal distance is up to 10-12 cm.
The fencing of the veranda is its decoration, therefore the structure must be painted or varnished. When choosing a paint coating, preference should be given to moisture-resistant compounds for outdoor use.
How to make a radius wardrobe
Let's consider the manufacture of a built-in radius sliding wardrobe. To do this, you need to measure the height of the ceiling and the width of the walls between which the cabinet will be located. Next, decide on the type of radius cabinet: convex, curved, wavy or concave. Design the cabinet, using a special program or manually. Prepare your tools for the job.
Tools for making radius sliding wardrobes:
- pencil,
- square,
- drill,
- screwdriver
Materials for the manufacture of a built-in radius sliding wardrobe:
- drawings of the future cabinet,
- furniture board 18 mm thick,
- doors, pre-made or ordered,
- internal contents: drawers, hangers, handles and guides,
- accessories: wheels, profiles, guides, screws and dowels,
- side, top and bottom trim panels.
Instructions for making a radius sliding wardrobe with your own hands:
- Using a pencil and a level, we take measurements and draw the future location of the built-in wardrobe. On the wall we mark the place where the vertical posts will be located, and on the ceiling - profiles;
- Mark the height at which the shelves will be fixed and drill a hole for the dowels. Using a hammer, hammer in the dowels;
- Shelf profiles are attached to the wall. For reliability, install lower shelf holders;
- Apply markings for installing the mezzanine shelf. Attach the shelf using self-tapping screws;
- measure the distance from the ceiling to the floor where the side wall is installed and cut the part according to size;
- start installing the side profile;
- According to the cabinet drawing, install the filling for the radius sliding wardrobe: shelves, drawers and clothes hangers;
- when the installation of the internal filling is completed, proceed to the installation of false panels;
- false panels should be prepared in advance; their shape fully corresponds to the radius of the cabinet;
- using a screwdriver, attach the false panels to the side wall, ceiling and floor;
- cut and bend the lower and upper profile. When installing the lower profile, insert one positioner or stopper on each door;
- attach the lower and upper profiles using screws to the false panel;
- The cabinet door is made according to the radius of the profile fastening. It is better to entrust this matter to professionals;
- if the door is not decorated, use self-adhesive film or other suitable material for decoration;
- Attach vertical profiles to the sides of the door using screws. Install a silicone or rubber seal;
- then secure the upper and lower door frames;
- install the upper and lower rollers;
- First insert the upper guide and then the lower guide rollers onto the rails;
- check that the door slides correctly. Use a hex wrench to adjust the slide;
- If desired, stick on pile to protect the doors from impacts.
Veranda roof installation
When constructing a veranda at the same time as the house, the roof can be shared. If you decide to attach a veranda to the cottage, it is cheaper and easier to make a separate roof for the extension. The same materials are used to construct the roof as to cover the house. In terms of design, the most popular option is a single- or gable roof, but in some cases, owners choose more complex options: hip, multi-slope.
When installing a common roof for a house and a veranda, the rafter legs are attached to the upper rim of the frame vertical beams. When installing a separate roof, the rafters are connected to the supports on which the extension frame rests.
The roof installation algorithm for a house with a veranda is no different from traditional technology:
- The Mauerlat is installed along the top frame of the frame supports.
- The rafters are installed with a selected pitch, which depends on the area of the veranda.
- The sheathing is carried out and waterproofing is laid.
- The insulation is attached.
- The roof covering is being installed.
For the rafters, edged boards of 150x150 mm are taken, which are laid in increments of 0.5-0.6 m. The lathing is made from boards with a cross-section of 20-22 mm. The gables are sheathed with clapboard or small false beams. Lastly, the cornices are hemmed and the drainage elements are installed.
Accessories
Do-it-yourself gluing of ceiling moldings, master class with photos
Locks of this type are distinguished by the type of bolt, made in the form of a hook, which in this case is pulled out by turning the key. The sliding door handles are made in the form of “shells” that form a recess in the door leaf.
Due to their unique design, sliding portuns require only a strictly defined type of fittings. Handles and locks for such planning solutions differ in many ways from standard ones. A characteristic feature of the handles is that they are recessed into the canvas. This is done so that the doors can slide to the side without any problems and, if necessary, enter the designated niche. Castles, in turn, are also interesting. If you compare them with standard locks that everyone is used to seeing on many doors, you will notice that their mechanism is designed for vertical latching.
The fittings are usually supplied complete with the canvas
However, if there is a need to install locks and handles yourself, then you should pay great attention and carefully select them. The best option would be to contact a specialist so that the latter can help you or search using the catalog number
Installation of windows and doors
Numerous projects of houses made of timber with a veranda offer options with a glazed or unglazed extension. Windows increase the cost of construction by an average of 20-30%, but at the same time protect the building from precipitation, dust and wind. A glazed veranda is more functional, but many owners of country houses like to be in the fresh air, so they prefer the option of an open terrace.
Windows for a timber veranda can have the following design:
- Hinged windows are an inexpensive and versatile option. Window structures can consist of 2.3...5 segments, depending on the length of the window. Such windows provide excellent heat retention.
- Sliding windows are an ideal option for narrow small verandas. The cost of sliding windows depends on the material: aluminum frames are the most affordable. PVC windows are a little more expensive. If finances allow, it is better to order environmentally friendly wooden windows or ergonomic frameless glazing.
Doors for the veranda are selected taking into account the overall style and functionality. For large glass areas, it is advisable to install glass portal doors. For an open veranda with a wooden fence, ordinary wooden doors are best suited; for metal railings, doors with forged elements are best suited.
Aluminum windows
A very practical option for a country house or city house is windows with aluminum frames. These are often installed on unheated verandas. Among the advantages of aluminum structures:
- Long service life. A properly installed structure will not require replacement for 50 years.
- Attractive appearance. Windows do not need to be painted every 2-3 years; they do not fade or become deformed.
- Easy installation and maintenance.
- Light weight, which does not create additional load on the foundation.
Despite numerous advantages, aluminum windows also have disadvantages. The design will not be cheap; the first generation profiles quickly heat up in the heat and freeze in the cold. The tightness of the windows provides warmth and protection from noise, but requires frequent ventilation of the room. Aluminum windows are best installed on verandas made of materials that allow air to pass through: wood or brick.
There are 2 options for aluminum profiles on sale: cold and warm. The first is suitable for unheated verandas, which are used only in summer. They provide single glazing without additional insulation. Windows with a warm profile are suitable for houses where people live all year round. Such windows are equipped with special gaskets and inserts that guarantee excellent sound and heat insulation. It is not necessary to make all windows sliding. A more convenient option is a combination of fixed and sliding glazing.
Finishing a veranda or terrace
Finishing can be done using any materials. For walls, imitation timber, narrow and wide lining, siding, etc. are most often used. If the walls of the structure are made of profiled timber, then it is enough to simply apply varnish or other paint coating for wood on them. When finishing the veranda, it is important to consider the following nuances:
- the finishing in color and texture should be in harmony with the entire house;
- the materials used must be intended for outdoor use;
- paint coatings must be environmentally friendly and safe for humans.
Separately, it is worth mentioning various decorative and functional elements, which include: pergola, swings, barbecues, stoves, steps, flower beds, etc. All these elements can give a home coziness and increase the comfort of a summer vacation or permanent residence.
Two-story house with a veranda and balcony
A log house with an attic or a two-story cottage, as a rule, has at least one balcony. If desired, the owner can make a two-level extension with his own hands or order a developer company: the first floor of such an extension is a closed or open veranda, and the second is a balcony. A rooftop balcony is an easy and inexpensive way to expand your space and create additional entertaining space.
Features of the construction of a two-story extension:
- A veranda made of timber with a balcony on the roof can be attached to a house made of any building material.
- When calculating the foundation for the structure, it is necessary to take into account the weight of the balcony.
- Frame support columns are made to the height of the balcony.
- The overlap between the first and second levels is done in the same way as the veranda floor.
- The roof of the balcony can be shared with the house or separate.
- Balcony railings must meet safety requirements.
Gazebo projects
Before deciding how to build a veranda from timber, you need to draw a competent drawing of the project. It must indicate the exact dimensions of the extension, the materials of its construction and other details.
You can make a project in different ways:
- draw it yourself by hand. To do this, you need to understand this area;
- find a suitable option on the Internet;
- order individual production of a drawing from a specialized company.
Attention : when designing a terrace, it is necessary to take into account the type of soil, climatic conditions and other important nuances.