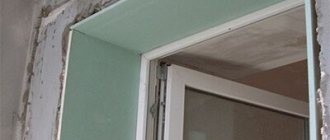
window slopes in the bathroom. can it be tiled?
the master refuses to lay out the slopes and the window sill of a small window in the bathroom with tiles.
photo of the window: [ ]( ) please tell me, is this really impossible to do (as the master says) or is it still possible to lay out the window sill and window slopes with tiles?
it won’t be beautiful, the craftsman couldn’t make the cut like that, the window was installed later
Yes, we already have a window. Now I’m fooling myself with the question of how to refine it.
I still don’t understand, was the window installed before the tiles were laid or after?
no words, decorate with wall panels
FARAON7575, maybe tell me, stupid, why I should decorate the window with wall panels and not tiles? will the tile fall off?
I judge from what I see in the photo that you have a tile undercut on both sides, there will be a slope due to this.
that is, it was necessary to cut the tiles differently? with a small margin for the slope seams?
everyone makes mistakes, I'm not a saint either
That is, in my case, I just tear off the tiles near the window, then lay out the slopes, and then cut the tiles again and lay them around the window?
if my eyes don’t deceive me (are the seams already worn out?) everyone has their own methods, I would shoot down
The seams are not yet worn. Even the tiles are not completely glued yet.
Terribly unlucky with the tiler. Already a jamb is coming out. at least completely demolish everything he has already done and do it again.
I made a mistake, it happens, the holes are cut well, you just have nothing to compare with, the master is definitely not bad
Source
Installation of doors to the bathroom and toilet
We are going to do major renovations in the bathroom and toilet.
Should the installation of new doors to replace the old ones be done before or after the renovation? Masters online: 111 Orders per week: 1,507 Offers per day: 953
installation of doors is done after preparing the walls (leveling, priming, waterproofing), but before laying the tiles
It doesn't matter at all. If I were to do this, I would first set out the pot. Then I would do the finishing. And then I would hang the canvas itself. And he screwed up the cash.
after leveling the walls and before the tiles, definitely
Last is best
doors are installed before wallpapering the walls and preferably after laying the laminate.
Sequence: walls, floor and wall tiles, frame installation, door slopes, plumbing installation, door leaf hanging.
The main thing is to decide on the type of door and prepare the opening for the door. The installation is carried out after repairs.
the box is placed before the plaster, and the door at the end, because the box will be a kind of beacon, and not only for the slopes, but also for the entire wall.
First, you can expose the door frame and calmly make the walls (leveling, panels or tiles). Then lay the tiles on the floor. And finally, hang the door itself and install trims.
better after renovation
The boxes can be placed when the old doors have been dismantled and plastering and tiling work can be done by first closing the boxes with construction tape so as not to get dirty
Install the doors last, after all work is completed. Firstly, there will be no risk of getting dirty and scratched during work. Secondly, the walls need to dry out as much as possible because after 2-3 weeks the frame may swell and the door will not close.
Installing doors is also part of the renovation; this work must be done after laying the tiles, grouting them, and installing all the plumbing. All finishing work on the walls on the corridor side must also be completed. Be sure to check the dimensions of the washing machine before installing the door, because... It may happen that after installing the door, you will not be able to bring the washing machine into the bathtub or take it out.
The installation of doors refers to the final stages of finishing; accordingly, it is logical to install new doors after completing the rough stages of work, in order to avoid damage.
When you invite a specialist and consult with him, it is possible both before and after repair. You can install the door before repair, then remove the panel and cover the frame with paint.
before repair and you have a master
Afterwards, tell the master the full size of the opening along with the box. Having installed before, by the end of the repair you will get the same as the old one.
Strictly after. I recommend contacting specialists -
I always install doors after all the finishing. Both tiles and wallpaper. last but not least.
to make slopes and level the wall where the opening is. Yes, you need a door. You can remove the canvas and cover the box with tape.
Of course after, if according to the regulations. If they use Dzhamshut technology, they do a lot of interesting things. Pliz
Bathroom window
Window Prof >> Everything about windows >> Design of a bathroom with a window: how to design a window in the bathroom, in the bathroom
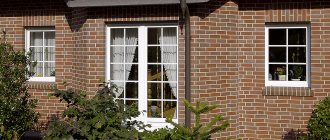
A window in the bathroom is an original and functional idea for a city apartment or your own home.
If there is no possibility of installation in a standard apartment, but you want to make the room brighter, you can decorate the space with a false window.
It is easier to implement the idea of equipping a bathroom with a window opening in a private house. It is better to provide for the presence of a window at the planning stage, but it is also acceptable after completion of construction work. Ideas for renovation, decoration and plans for installing a lighting structure may appear later, when a unique style has been formed in the house.
The choice of the type of lighting design, the arrangement of furniture and plumbing fixtures depends on the area, shape of the room and interior style.
Cheap and easy way - finishing with PVC panels
First, the installation of a wooden frame is required, which is made from beams with a cross-section of 2x4 cm. Four side planks are fixed on the wall slope perpendicular to each other.
Nails are used as fastening. Three planks are attached at the top. Prepare plastic panels, cut them slightly wider than the bevel, since the edges are bent inward. To give shape, the plastic edges are trimmed from the inside out with a sharp knife. The prepared profiles are applied to the bevels and secured with self-tapping screws.
Mounting is simple, but requires the following sequence:
Slopes in a plastic bathroom near the door are easy to install. They have a light, elegant design. The only drawback is its short service life.
Bathroom design with window
The opening can be rectangular or square. This design is characterized by its low cost, simple installation process, and is suitable for interiors in the styles of minimalism, hi-tech, modern, oriental, and Provence.
There are other types of windows:
The round window allows daylight to pass through well, which is distributed throughout the room, leaving no darkened areas. A porthole is not only a source of light, but also an interior decoration. The sophisticated design will make your washroom look stylish.
Full wall
A bathroom with a full-wall window will be filled with daylight. A washbasin can be installed next to the opening. This option is suitable for a room size of 6 square meters. m. with an attractive view of nature and the city landscape.
It is important to take care of tightness. You can decorate a large opening with thick curtains or install glass with smart glasses technology. At the right moment, the surface will become matte or transparent.
Ceiling
A window embedded in the ceiling will provide a good level of lighting in every corner. Owners of this design do not need to worry about privacy. The main thing is to carry out high-quality installation so that there are no leaks.
False window
The decorative design can be designed as a real window. The window sill, doors and curtains will create the impression of a real opening. There is a huge variety of photos to create views: natural and city landscapes, animals, birds. A virtual false structure is an LCD screen with moving objects.
Types and scenes can be changed according to your mood. There are also products with realistic lighting. But, for a room with high humidity, it is better to choose a mirrored window. This design will visually expand the space and fill it with light.
Mosaic slopes
To install a mosaic covering on the slopes of windows and doors, you can use special soft canvases on which ceramic pieces are glued. The base can be paper or in the form of a mesh. Their convenience lies in the fact that you can cut the canvas to the required size.
The installation process is simple. The surface of the slope must be dry, clean and level. At the preparatory stage, preliminary markings are made on the slope, according to which the mosaic canvas is then glued.
- the glue is applied with a notched trowel;
Use a notched trowel to apply the glue. - When gluing the mosaic canvas, you do not need to put too much pressure on it so that the adhesive does not squeeze out through the seams;
It is necessary to glue the mosaic canvas without strong pressure - It is recommended to use epoxy resin-based grout for sealing joints;
Epoxy resin is used to grout joints - Using a rubber spatula, spread the grout in an even layer;
To distribute the grout evenly, use a rubber spatula - After the grout has dried, its excess is removed with a damp sponge.
Window and door slopes, finished with one of the listed materials, will decorate any interior and retain their original appearance for many years.
Bathroom with skylight
The bathroom can be located throughout the attic or adjacent to the bedroom.
But, a room for water procedures cannot be organized above the living rooms. Below you need an area with pipes, a kitchen or another bathroom.
In the attic there is a slope on the ceiling, so the layout and design of the space will be unique. The ideal distance from the top of the bathroom, washbasin, toilet is 190 cm.
A window embedded in an inclined surface fills the attic with light, gives space, and decorates the interior; Provides ventilation of the wet area, which prevents the formation of condensation and mold.
You can decorate a roof window using blinds. If there is no window on the sloping surface, you can make a mirror or false window with lighting. The light design or its imitation can have a standard shape with right angles, but rounded shapes look more original.
How to choose the right one
To choose the right edging for the bathroom, you need to follow some rules:
- This design element should be in harmony with furniture, plumbing equipment, and accessories.
- Natural stone or ceramic tiles will only go well with a cast iron or metal bathtub. Acrylic construction and plastic panels on walls with this finish do not look good.
- For bathtubs with rounded shapes, only flexible borders are suitable.
- Before purchasing a product, you need to analyze all its characteristics: water resistance, strength, resistance to mechanical and chemical influences.
Curb made of natural stone.
Decor
After choosing the type of window and installation, you should think about the decorative design of the structure.
The materials used to decorate the window in the bathroom must protect and reliably close the opening. Curtains and other design elements also serve as decoration and complement the interior.
Window decor should be combined with the style of the entire room. To create harmony and unity of style, every detail is important: shape, decor of the lighting design, fittings on devices, finishing materials, colors.
Blinds
Blinds are used to design light openings in washrooms.
Options for rooms with high humidity:
Roller or pleated blinds will reliably protect the opening from direct sunlight and prying eyes. You can choose a material that allows daylight to pass through even when the curtains are closed.
Roman or roller blinds
Owners of bathrooms with windows often choose Roman blinds.
During hygiene procedures, roller blinds can be tightly closed, and when rolled up they will be invisible. Roman models are combined with all interior styles.
Translucent tulle will help fill the space with comfort and romance. Through the structure covered with a weightless fabric, diffused daylight enters the room. But, in the dark, with the electric lighting on, such material does not protect from prying eyes.
Roller blinds or curtains made of dense materials will help correct the situation. These types of curtains can be combined in the same way as when decorating a window in the living room or kitchen.
Textiles intensively absorb moisture, so curtains need to be dried and refreshed regularly. A bathroom with a window decorated with fabric curtains should be ventilated more often.
Glass blocks
Replacing transparent fabric with glass blocks is an interesting design solution. The material does not prevent daylight from entering the room, but protects the space from possible views of passers-by. The blocks come in different colors and shades, with fancy patterns and voluminous relief.
But such a window is blind and does not open, so it is necessary to take care of ventilation. It is also important that the joints of the structure are hermetically sealed. The bath can be installed next to a glass structure.
Stained glass
Installation of stained glass and frosted glass is an effective design technique for decorating a room. Outlandish patterns made up of many multi-colored elements can be admired both from inside the room and when looking at the facade of the house.
The design with stained glass does not need to be supplemented with curtains; through such glass you can only see the silhouette of a person.
Frosted glass allows natural light to pass through well. A window in the form of an elegant stained glass window can become the main decorative detail of a washing room and a source of light. The opening may be blind or have a mechanism for opening the doors for ventilation.
A window is a decoration for a country house bathroom and an important functional detail. The light design allows you to ventilate the room and use natural light from morning until dusk. The type and shape should be chosen in accordance with the design style of the room. The bathroom is a place of comfort, so the window must be installed with high quality, not allowing cold air or moisture to pass through.
Source
Rough finishing stage
Rough finishing of slopes includes several points, each of which must be taken into account by the home craftsman. Let's look at this process step by step. The beginning of the rough finishing is the application of a primer to the surface of the walls. Before doing this, you must clean the surface.
Plastering a door slope
Note! Slopes are often insulated with foam plastic. It is worth saying that this layer is optional. Decide for yourself whether you need to insulate the door or not. This solution is relevant for apartments located on the lower floors of multi-story buildings.
Next, you need to plaster the surfaces. Plaster is applied to level the walls. This process requires care and is quite labor-intensive. If desired, you can simplify the work and build a plasterboard structure, which also allows you to level the doorway.
Then special reinforcing corners are installed, which are also needed to align the corners of the doorway. After installing the corners, all places are carefully puttied. This finishing material must dry. Then you need to sand it. To do this, you can use sandpaper.
Finally, you need to apply the primer to a flat surface. This ends the rough part of the work. When choosing a finishing material, you should focus on its cost and personal ideas.
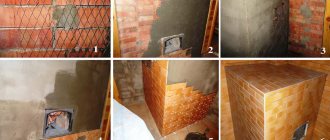
Finishing the entrance door slopes with ceramic tiles
The most primitive option, when the wall crosses the window sill area at a certain angle, does not suit the master (Nikolai Bozhefatov channel). A full-fledged one with take-out will be produced.
I took a 5 centimeter strip. I screwed the guide profile. Further to the wall. I attached a shelf and formwork stops to the profile. They set the thickness of the visible part of the solution to 2 centimeters. The near edge is clearly level. If you look closely with the laser on, the window is skewed by 5 mm. The far edge should be made along the window. When it looks visually beautiful. There will be an illusion that the surface is smooth. There are 6 tiles per 5 millimeters. This means that you have to unscrew the tiles almost one millimeter at a time. This is a lot, so the master raised the edge by 2-3 millimeters and compensated for the skew of the window.
The polyethylene will be laid so that the moisture of the solution does not wet the end of the gypsum plaster too much and does not have to dry for a long time. Everything is sealed with a good solution. At the bottom there is a mesh from the builders, it does not reach the edge, the master added his own. Slightly recess the pieces of mesh into the surface and the solution will protrude 2 centimeters on the plane of the tile. There are scraps, it’s easy to drown them in the poured screed.
Why beacon mounts? There is no confidence in reliability. If moisture comes in, then gypsum pads will do a good job. The master does not use plaster - the window sill is eternal, it will last as long as a house.
Plasterboard finishing
Holes are drilled along the perimeter of the door bevel at a distance of 20 cm from each other. Then insert the dowels and screw in the screws (not all the way).
Cut slats of the required sizes according to the dimensions of the opening. A guide strip is screwed along the width of the doorway with self-tapping screws.
Apply glue to the back side of the drywall strips, apply it to the wall, and press down. Excess glue is immediately wiped off.
The gaps between the wall and the bevel are sealed with excess glue. After complete drying, you should proceed to finishing work.
Modern bathroom interior with a window: design, layout, photo
A bathroom with a window in an apartment is very rare and lucky. Even modern developers, especially in economy versions, prefer not to fool themselves with arranging window openings in bathrooms. But, you must admit, it’s so nice to wake up in the morning and wash your face without looking at the mirror, but to watch the rays of the rising sun and feel them on yourself...
CONTENTS 1. What are the advantages of a window in the bathroom 2. View of the window opening in the bathroom 2.1. Window from the bathroom to the kitchen or toilet 2.2. Window to the street 2.3. Falshokno 3. Layout 3.1. Bath under the window 3.2. Sink under the window 3.3. Toilet under the window 3.4. Window as an architectural element 4. Materials for finishing the opening 5. Curtains or blinds 6. Photos of bathroom interiors with a window
But a window in the bathroom is found not only in luxury apartments, but also in cramped Khrushchev and Stalin buildings - at that time it was customary to make a window opening into the toilet or kitchen, which was intended to improve the lighting of the sanitary room. In the 90s, when renovations were done in such apartments, the windows were sewn up, but not everywhere. If you are lucky enough to become the owner of such an apartment, do not rush to mortgage it. Try to play with this architectural element, it’s not difficult, but the result is worth it.
How to make slopes on doors - slope design
The modern installation of door slopes is like a multi-layer cake - behind the decorative layer there is a base, under the main one there can be insulation, sound insulation, vapor barrier, vibration protection, lathing, and only under it there will be a brick or foam block. The doorway is no exception - do not forget that in addition to external beauty, we must take care of the protective function.
The simplest and fastest finishing option is to install door slopes made of sheet material, which are sheathed on the sheathing or glued to the rough surface.
However, this option is best used when arranging interior openings, where safety issues are not so pressing. If you need to decorate the slopes of metal doors, or increase moisture and heat insulation, the best option would be to plaster the slopes.
However, this is only one layer of the “pie”, apart from the obligatory primer.
- Insulation is a desirable, but not mandatory layer. Most often it is made of foam plastic (in the case of plastering) or mineral wool (lathing and plasterboard covering).
- Reinforcement - at a minimum, is the installation of reinforcing corners over the external corners of the slope. The corners have a special perforation, with the help of which they reliably “cling” to the layer of putty.
- Putty is a finishing, leveling layer. In some cases, it may be absent if further finishing with durable materials follows.
- Decorative layer - can be made from a variety of materials. The simplest way is to apply a layer of paint; complex options are not limited by anything except the imagination of the customer and designer. In each specific case, the method of attaching decorative elements may differ.
Do-it-yourself finishing of window slopes with decorative stone
Finishing window slopes with decorative stone gives them an unusual look, and the original design of such windows is remembered for a long time. There are two types of stones used for facing slopes, natural and artificial.
Each of them has its own advantages and disadvantages:
The stone can be laid closely, monolithically, or while maintaining the seam. Before you start work, you need to prepare:
Beautiful frame
Now you can get to work:
View of the window opening in the bathroom
Small bathrooms and toilets rarely have window openings, but bathrooms with an area of 4.5 square meters or more may well have even a tiny window. A modern bathroom interior may even initially assume the presence of a window, so designers consciously choose to install a false window, because it is not only a source of light, but also a decoration for the room.
Only owners of private houses can afford a variety of fantasies regarding the shape and size of the window in the bathroom. These can be round openings, such as portholes, square, rectangular or irregularly shaped, dormer or French floor-to-ceiling windows. But apartment owners can hardly boast of a variety of shapes and sizes.
Nevertheless, there are three types of window openings in the bathrooms of city apartments. The lighting, ventilation, layout and design of the room depend on the location. We will consider them.
Window from the bathroom to the kitchen or toilet
We are talking specifically about apartments in Khrushchev or Stalinist buildings, where all bathrooms, without exception, were equipped with such windows. They were located at a height of at least 1.7 m and served an important function - natural light penetrated into the sanitary room during the day when the electricity was turned off (and in those days, this happened quite often). In addition, during construction no one paid due attention to the ventilation systems, and the additional window was intended to improve this situation.
In the 90s, during renovations, such openings were often sewn up, since they did not carry a functional load (the situation with power supply had improved). But still, any window can be beautifully decorated. Moreover, if it is located high, the bathroom will be better ventilated, eliminating the appearance of mold on the ceiling.
It would be better to replace the old wooden frames with which all apartments without exception were equipped with opening plastic ones, and use stained glass instead of ordinary glass. Or you can go even further and, during renovation, enlarge the window opening, expanding it downward, for example.
If, however, the design does not provide for an opening window in the bathroom, then you can leave at least the second function - additional lighting - by installing glass blocks in the opening - they are mounted like brickwork, but let in enough light.
Window to the street
This option for the location of the opening is much more convenient and functional than the interior one, as it provides a number of advantages in terms of the location of plumbing fixtures and ergonomic capabilities: the bathroom is better ventilated and illuminated. Depending on where exactly the window faces, it uses either plain glass or grooved glass to reduce visibility from the outside. But you can arrange furniture and plumbing equipment in such a bathroom in different ways:
Viewing the street from the bathroom, however, is only possible if the size of the window opening allows it.
Bathroom corner: types, advantages and disadvantages, installation
Bathtub installation, even if done by a professional, cannot guarantee a perfect fit of the plumbing fixtures to the wall. In any case, there will be a gap, even a small one. Water will seep into it, flow down the surface, and stagnate. As a result, sooner or later an unpleasant odor will appear in the bathroom, and then mold colonies will begin to develop. In addition, the humidity in the bathroom will always be high, which is uncomfortable and unhealthy. A bathroom corner will help avoid this.
Convincing advantages
A corner for a bathtub is considered by professionals to be the best solution to the problem, much more effective than traditional putty.
- Installing the plinth is quite simple to do. Anyone can handle the installation, even those without relevant experience.
- All types of bathroom corners offered by the industry are resistant to all influences that can affect them: humidity, temperature changes, ingress of relatively aggressive substances.
- It is easy to care for any of the bathtub corners: they are made of materials that can be easily cleaned of dirt with the simplest detergents and cleaning agents.
- Bathroom corners are reliable and will last you a long time.
An additional bonus when installing such a border will be the finished appearance of the bathroom.
Please note that bathroom corners are available in different types and designs. You have the opportunity to choose a border option that will ideally match the overall design of the room, fit within your budget and not force you to turn to repairmen for help.
Self-adhesive borders
The simplest corner for a bathtub is a tape equipped with an adhesive layer. Its installation is simple, which is why many home craftsmen prefer this type of bath skirting board.
Installation can be divided into the following stages.
- Calculation works. The joint between the bathtub itself and the bathroom wall is measured. The width of the gap is determined.
- The joint is cleaned of dust and degreased.
- Surfaces are thoroughly dried. To speed up the process, you can use a hair dryer.
- If the gap is large (3 mm or more), the tape corner is mounted on the bathtub only after filling the gap with sealant. Mandatory clarification: the sealant must be neutral. Acid-based silicones are strictly prohibited, as they will subsequently corrode the baseboard.
- The tape is cut into pieces of measured length plus 2-3 cm of margin.
- Pasting is carried out starting from the long side. The protective layer from the curb is removed gradually so that the adhesive layer does not have time to dry.
- In the corners the strip overlaps. The excess is cut off with a stationery knife upon completion of installation.
When installing, do not tighten the tape. It is not recommended to use a hairdryer during the gluing process: the baseboard begins to stretch. The final touch of the installation will be to seal the corner joints with sealant and check the contour as a whole. If somewhere the fit is considered not tight enough, these places are additionally strengthened with the same sealant.
You can use the bathtub no earlier than 4 hours after installation. If the room is humid, it is better to wait longer.
About plastic corners for the bathroom
The strip plinth is quite modest in appearance and is not suitable for all owners as a border. Plastic corners are the most popular. They are made from polyvinyl chloride, which is considered an ideal material for the manufacture of products that are intended to be used in conditions of high humidity. The plastic corner has several significant advantages.
- Wide color range. You can easily choose a border to match any bathroom decor, make it a key design element, or beautifully fit it into an existing harmony.
- Good flexibility. This characteristic makes it possible to install a protective skirting board even on a bathtub with a non-standard configuration.
- Affordable price. A plastic corner will cost more than a tape corner, but not so much as to force the average consumer to save up to purchase it.
At the same time, gluing the product is simple, the border tolerates temperature fluctuations indifferently, is not afraid of moisture, does not become infected with fungus, and is highly resistant to acids and alkalis included in cleaning products.
The only drawback of plastic skirting boards is their loss of appearance, which inevitably comes with time. The surface may become scratched, and some types of corners may turn yellow. However, this minus is relative: the low price and ease of installation allow you to replace the curb at any time. If the plastic corner is installed correctly, is not subjected to special physical influences, and is properly cared for, the product can serve the owners of the house for 4-5 years.
Plastic corners are divided into three classes according to their configuration:
- cast molding;
- plinth “swallow”;
- a composite type of corner.
Any of the options can be fixed either to tiles or to any other wall finish.
Installation rules
The beginning of installation is the same as when using strip plinth: the tiles on the wall are washed, degreased, and dried. The same work is carried out with the edge of the bathtub, on which the plastic border will be mounted. If the gap is wide, it should be filled with cement or sealant and wait until the filler dries completely. Further actions will be as follows.
- The edge of the tile and the edge of the plumbing fixtures are taped with masking tape. This is necessary to ensure that the finishing material and the bath itself are not contaminated with glue or sealant.
- A plastic corner is applied to the joint; The required length is marked, after which the required fragment is cut off.
- A layer of glue is applied to the junction of the bathtub and the wall. What composition to use is a matter for the master. You can also buy special adhesives, but practice shows that inexpensive and reliable “liquid nails” do the job perfectly. Please note: if the purchased border has been stored for a relatively long time, it may be necessary to clean and degrease the inside of the border before applying the composition.
- The corner is pressed evenly and tightly against the surfaces and held for some time to set. The required time period is specified in the instructions for the glue.
- Excess composition squeezed out from under the fixed element is immediately removed. In about a third of an hour, it can be easily removed with a knife or a special tool.
- Upon completion of installation, the tightness of the circuit is checked. Even small cracks should be filled with transparent sealant. Lastly, the construction tape is dismantled and the remaining working mixtures are removed (if you did not notice them in time).
The plastic border can also be joined using precise trimming. But corners decorated with fittings look more aesthetically pleasing, and it is better to cover the ends of the border with caps.
Layout
The role of the window in the sanitary room will directly depend on the layout you choose: either the entire design will be built around it, or it will be just one of the decorative elements. Considering that the windows in ordinary city apartments are quite narrow or located near the ceiling, we can offer different options for placing the necessary plumbing equipment and furniture.
Bath under the window
Most often, this placement of the bathing bowl has to be resorted to in the case of a very narrow room, on one side of which there is a window opening. By placing a bathtub here, we will give the room a more regular shape. But this layout is not without its drawbacks.
Firstly, the wall, slopes and the window itself will have to be insulated so that you don’t inadvertently catch a cold while taking a bath or shower. And any, even the highest quality double-glazed windows, are still cold in the winter season. But you don’t need to worry about drafts if the window “looks” into the kitchen.
Secondly, the glass in such windows will have to be frosted or corrugated in order to get rid of prying glances from the street. Conventional glazing can only be used if you live on the top floors of a high-rise building.
Thirdly, you need to provide convenient access to the window frame for ventilation. Otherwise, the window can only be opened by climbing into the bowl itself. A high window opening will complicate the situation. In this case, you might consider installing a shower instead of a bathtub.
Perhaps a corner bath model will help you get out of this situation - it does not take up much space and will provide proper access to the opening. And water procedures will become much more pleasant, since there will be less wind from the window.
Sink under the window
Installing a washbasin under the window may seem like a rational solution. If the window is not located high under the ceiling, in this case it is important to think through some nuances:
It will help to move the sink slightly away from the opening by inserting it into the window sill-tabletop, if the height of the lower part of the window allows. Another modern solution will be an overhead bowl, and the tabletop will be one with the window sill. In this case, you can place all the necessary little things around: soap dishes, glasses, containers with toothbrushes.
If you can’t do without a mirror in front of the sink, try moving the washbasin a little away from the window: to the right if you’re right-handed, to the left if you’re left-handed (this way you don’t have to block the light from the window with your hands while shaving or applying makeup. And you can put it under the opening a regular laundry box or storage cabinet.
If there is free wall space on both sides of the window, then it is advisable to place pencil cases or storage shelves in these places.
Toilet under the window
If your bathroom is combined with a toilet, you might consider placing the toilet under the window. Modern designs of toilets with installation allow them to be placed even under windows. However, this option is eliminated if central heating radiators are located directly under the opening, and it is not possible to move them to another wall.
The only condition is to supply the necessary communications to this place; you will have to think especially carefully about the installation of the sewer pipe.
You can get a completely different interior by moving the toilet a little to the side, or turning it towards the wall adjacent to the opening. But in this case, there should be at least 70 cm of free space in front of the white friend to make it convenient to use.
Tile profile classification
There is a profile division for finishing rooms with tiles according to several criteria:
- material of execution – plastic, metal (aluminum, brass), ceramic;
- purpose – external, internal, ceiling fillet, floor plinth, bath border;
- profile section – one-sided, two-sided, flat, L-shaped, volumetric;
- decorative properties - white, colored, chrome-plated, gold-plated, silver, gloss, matte;
- functionality – compensatory, connecting, decorative and protective;
- fastening method - sealing, gluing, overlay.
Overhead corners for porcelain stoneware and tiles are almost never used.
Vinyl external/internal white corner is used to design corners between walls finished with MDF and PVC panels; it is not used for tiles. There are several names/designations for the profile in the documentation, in the slang of finishers:
- “corner” – according to purpose;
- “layout” - elements allow you to increase the decorative value of the layout of tiles on the walls;
- “trim” - comes from the transcription of the word trim - finishing.
Tiled compensation profile.
The expansion profile is mounted along the expansion joints separating large screed blocks in large rooms. It is never used in the bathroom. The connecting profile is mounted at the joints of different claddings in the same plane.
According to the requirements of SP 29.13330, the floor covering of the bathroom must be lower than the level of the finished floor in the adjacent room, or separated from it by a floor. But in practice this is inconvenient, so a connecting profile is usually used between the bathroom and the adjacent room.
Let's consider the classification according to the material of manufacture.
PVC profile
Among other structural materials for tile profiles, polyvinyl chloride polymer has the lowest production cost. PVC is easily painted in bulk, does not collapse, and does not fade from solar ultraviolet radiation or detergents. A vinyl corner can be used to cover tile cutting defects on external and internal corners.
Interior
Manufacturers produce two types of inner corner:
- one-sided - the tile is inserted into the groove on one side of the profile, the second side is pressed against the cladding on the adjacent wall;
One-sided PVC profile internal. - two-part - the fittings are embedded in tile adhesive along the inner corner, and later a strip with a flexible element in the middle is snapped into it.
Two-component PVC profile internal.
Important: A one-sided corner is always on sale and costs much less than a two-part profile. However, it is only suitable for acute and right angles; at obtuse angles, one of its edges protrudes above the cladding surface.
A two-piece trim is more expensive, but it makes joining ceramic cladding on surfaces at obtuse angles greater than 90 degrees easier.
Outer
The industry produces external PVC corners of several types:
- L-profile - one edge is put on the tile, the second is pressed against the first row of tiles on the adjacent wall;
Single-sided external corner PVC profile. - C-profile - both edges of the tile are tucked under the outer semicircular surface;
Double-sided PVC corner profile for external tiles.
In the first trim, the decorative surface has a semicircular sector of 90°, in the second, 180°. However, most often only the L-profile is on sale, which allows you to hide defects in the cut edge of only one tile.
The “layout” is held at the corner due to the fact that one internal strip is wide and perforated. It is recessed into the tile adhesive during installation; after the solution has dried, dismantling without damaging the cladding becomes impossible.
Metallic profile
The main differences between metal trims and PVC trims are:
- in addition to the semicircular shape of the front side, there are box-type profiles with two flat edges;
Rectangular corner for tiles. - the presence of additional elements for the junction of three planes (outer, inner corner);
External corner for three planes. - an assortment of two-piece profiles with a snap-on anti-slip strip, used for steps.
Metal profile for two-piece tiles
Metal profiles are made from steel (stainless steel), brass, and aluminum alloys. Manufacturers use decorative coatings matt/gloss silver, brush effect (worn denim), gilding, bronze, champagne, ground, polished brass, chrome, pewter.
Aluminum is a corrosion-resistant material with fairly high decorative properties. We use our own metal texture, plating with copper, gold, silver, and film lamination to obtain the texture of wood.
To separate areas of different colors, three types of metal profiles are used:
- C-shaped border - has stiffening ribs on the reverse side, mounted on walls;
Decorative aluminum border. - U-shaped – for installation on the floor;
U-shaped decorative profile. - T-shaped - with a wide top bar.
Separating T profile for the joint between rooms.
In the bathroom, steps, podiums, and blind screens are sometimes made. The upper edge of these tiled structures is refined with a special F-shaped profile.
F-shaped profile for steps.
Unlike the outside corner corner, there is a shelf that additionally protects the riser at its top. It is in this area that tiles usually break off from concrete or masonry. Its middle strip is embedded in tile adhesive, and the upper tread tile is inserted inside the profile.
The Y-shaped outer profile looks very nice and neat. To install it, you will need to pre-cut the edges at 45 degrees.
The brass and stainless steel profiles have similar cross-sectional configurations. Options for finishing the front surface, its shape is similar to the aluminum corner.
Ceramic profile for steps
For cladding steps, clinker is considered the most durable material. In addition to clinker tiles for treads and risers, manufacturers have developed additional elements - a corner for the outer edges of the steps.
Clinker tiles with corner for steps.
The same steps. For some collections of tiles, they are also made from porcelain stoneware.
Less commonly used is a ceramic corner, which has shades of red and brown. There are protrusions at the bottom to increase adhesion with tile adhesive.
Ceramic stepped profile
The best offers for tile profiles in your city: