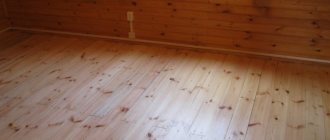
One of these days the workers will have to fill the floor of the entire apartment. New building.
In the hallway we will have tiles at the entrance. A few meters, and then there is parquet throughout the entire apartment. I would like to know in advance the technological features of joining boards and tiles.
Is it possible to do this without thresholds so that they are on the same level? How to achieve this? Is it better to buy parquet and then tiles underneath it, or vice versa?
In addition to the board, there will also be a substrate underneath. How to take all these factors into account? Question for the guru! Please tell me!
Vladimir KozhinForeman, the question is rather rhetorical, because it has a lot of conventions and solutions. Let me start with the fact that floor tiles, as well as parquet boards, come in different thicknesses. Chasing millimeters is an extremely thankless task, and as practice shows, it is a completely unnecessary activity. If you have a spread of within a couple of mm (usually the parquet board is taller), then the easiest way in the area of the junction with the tile in an area of 0.5-1 meter is simply to fold the backing in two. Further. There are special joining profiles for joining tiles and laminate (linoleum, parquet boards, carpet). There are plastic and metal. There are many manufacturers, Yandex can help. For straight sections and for curved sections. If you are categorically opposed to thresholds (which is in vain), then there is an option using a special cork compensator. However, its use involves precise matching of tiles with parquet boards, which is quite difficult. Sometimes special siliconized colored sealants are used at the junction, but this option is the worst option, because the sealant tends to be wiped off, torn, clogged with sand, etc.
My practice shows that the most reliable way is to use thresholds.
Their use solves a lot of problems at once. Are aesthetics compromised? Yes, partly so, but it is the lesser of two evils.
Other questions on this topic
How to prepare a foam concrete floor for renovation? We bought an apartment in a new building, the floor is covered with some kind of screed (neighbors say it’s foam concrete), the material is like cement, but it generates dust all the time... if you sweep it, it seems you can sweep it all into dust... We asked the residents , what they did with the floors, they said... The color of the floor in the interior is Studio 19.70. The side is not sunny.
I want light wallpaper, white gloss ceiling. All the furniture is wenge-bleached oak, the doors are wenge. What color is best to lay linoleum. I really don’t want it dark, hello everyone! Is it worth using gypsum fiber board for floors instead of screed? We bought a new building. There is no screed or plaster.
The question is what to do with the floors? GVL? Screed?
Or something else? Tell me, please! Hello. What kind of floor to make in “Stalinka”: scraping old boards, laminate onto boards, laminate onto screed? The problem is that upon opening one board, a floor slab with stiffening ribs about 10 mm high was discovered, and after completely dismantling the old floor, leveling the screed and laying the laminate will be costly.Which of the 3 above options is optimal...Which coating is best to choose for the floor of a school gym?Renovation is planned in the school gym.
What flooring material is best to choose, given the fact that the room is constantly in use? We want something bright, unusual, functional and not very expensive. Thank you)
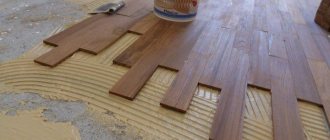
Combinations of seemingly incompatible materials look stylish and unusual if done correctly. What kind of joint can there be between parquet and tiles without a threshold, what are the features of the joint with a threshold, and how to carry out installation correctly in both cases? More on this below.
There are different ways to join parquet floors and tiles
All about the tile-parquet combination
Design ideas have reached such a scale that the combination of materials such as parquet and tiles no longer seems out of the ordinary. In interior decoration, combinations are used in two versions: contrasting and plain. The first will be appreciated by fans of bright, exclusive designs, the second will appeal to adherents of conservatism.
Correctly built-in lighting into the parquet or parquet board, a successful combination of patterns and thoughtful zoning will allow you to add additional novelty to the composition.
Option for zoning a room using a combination of different coatings
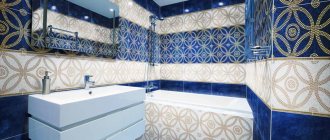
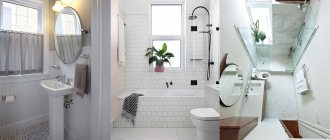
The combination of materials allows for functional zoning in a room for any purpose. So, for example, in an apartment or house with an emphasis on natural finishing materials and, in particular, parquet flooring, tiles will become an indispensable element of the interior in the hallway area, where it is not so easy to maintain perfect cleanliness.
In the same way, tiles and parquet or parquet boards are combined in the kitchen and dining room, highlighting work areas and areas for relaxation and eating. Despite the naturalness of both types of materials, tiles are more resistant to moisture and mechanical damage, so they will be an ideal solution in a work area or in an area with increased load.
How to join tiles and laminate flooring without a seam
This method of joining is possible only if the two sections are perfectly aligned. Most often, this can only be done at the stage of housing construction, when workers are laying the screed. It is necessary to calculate in advance the height of the tile and the glue on which it will be attached. Then add the width of the parquet sheet, the backing underneath and the glue underneath. The resulting difference is equal to the difference between the screed levels. In addition, it is important to cut materials with pinpoint precision. It is very difficult to do this on your own.
Joint - what is it and why is it necessary?
When combining materials, you need to think about how to make sure that the junction of tiles and parquet does not violate the integrity and harmony of the composition.
Ignoring the rules and recommendations regarding the design of the joint will lead to loss of integrity of the flooring, regardless of the class and cost of the materials used.
A good joint in a room does not spoil its appearance and does not leave areas for possible damage at the edges of the covering.
Joints are decorated in several ways:
- molding; threshold; sealant; cork compensator.
It is the threshold that catches the eye more than others. It is advisable to use it when it is necessary to draw attention to the division of the floor into separate zones. If the main goal is to decorate the joint in such a way that the canvas appears as one whole, it is better to use a sealant or cork expansion joint.
Pros and cons of materials for decorating joints
The most popular options for decorating joints have their advantages and disadvantages. For example, sealant is one of the most affordable means for masking a connecting seam.
It is convenient and simple to work with, and the color scheme does not limit the choice. The disadvantages include impracticality. The material loses its presentability after just a year of operation with medium-intensity loads and even earlier if active loads are expected.
Cork placed between the parquet and the tiles allows you to effectively disguise the joint. The advantage of the material is its simple installation and impeccable service as a damper.
The gap does not open even with possible changes in the parameters of the parquet board under the influence of temperature and humidity fluctuations, and this is important. Cork expands and contracts along with the parquet. If the goal is to create a joint without hills, ideally even and smooth, then the material is suitable in all respects.
Option for a wavy joint in the room
As an option, you can use liquid cork as a material for joining decoration. We are talking about a special adhesive composition with a filler based on cork chips. This version of the material has a lot of advantages and is primarily relevant when planning to install a strong, elastic and durable base without a threshold.
The profile is a complex and durable option for a joint.
Typically this is a plastic or metal threshold that connects two coating options. The disadvantage of the design is the elevation formed as a result of fastening. At the same time, it is the threshold that allows you to mask flaws in the process of trimming materials and effectively design joints in the doorway.
The standard length of the profile imposes restrictions on its use, so most often the thresholds are used exclusively for the design of interior joints.
Cold welding of linoleum
This method involves treating the joint between two cuts with a special glue for linoleum.
The composition, acting on the material, is able to dissolve it, penetrating deeply into the structure of the linoleum, and when it hardens, it reliably connects two separate sheets. The glue is quite toxic and you need to work with it carefully, observing safety precautions and ventilating the room. Otherwise, you can easily be poisoned by the vapors of substances contained in the glue. Type A adhesive for cold welding
Type A adhesive for cold welding
The method is simple to perform at home and easily glues both household and commercial linoleum. But it is only suitable if the gap between the pieces of material is small. Also, the technique does not require the purchase of any special equipment. And the seams between the two cuts will be completely invisible to the naked eye.
It is important to remember that this type of welding is not used for material that has an insulating felt layer on the reverse side. It is also not used for thick multi-layer types of linoleum. Cold welding for linoleum
Cold welding for linoleum
Adhesive for linoleum joints
There are three types of adhesives classified as cold welding. Each of them is suitable for processing a certain category of seams.
Cold welding, type C
Table. Types of adhesives for joining linoleum.
| Name | Characteristic |
| Type A | Glue is used to join sheets of new material just brought from the store. Suitable for gluing both household and commercial linoleum. The glue is very liquid, so it is recommended to treat only small gaps with it and, preferably, to work only with dense material. To work with glue, you need to purchase masking tape and use gloves. The drying time for the adhesive composition is about 30-40 minutes, after which you can walk on the floor without fear. |
| Type C | The adhesive composition is suitable for processing material up to 4 mm thick. Most often used for joining or repairing used linoleum. Allows you to join fabrics lying with large gaps. This glue is quite thick and does not require the use of masking tape when working with it. |
| Type T | This glue is used to join PVC linoleum, which has a polyester base. Suitable for joining both new and used material. It is often used for gluing linoleum to a subfloor, but is quite expensive and is usually purchased for gluing fabric used for commercial purposes. |
cold welding for linoleum
Cold welding with application needle
Cold welding of linoleum
Step 1. Two linoleum sheets are overlapped by about 5-6 cm. This is necessary to create a high-quality cut and good joining.
The overlap between the canvases should be approximately 5-6 cm
Step 2. The cut of two linoleum sheets is made in the middle of the overlap. To do this, markings are applied using a ruler and a straight line is drawn.
Marking
Step 3. It is most convenient to make the cut using a metal ruler. It presses well against the material along the previously applied markings. Next, a cut is made with a sharp knife. Both layers of material are cut at once.
Linoleum is being cut
Step 4. The linoleum trimmings resulting from the previous procedure are removed. The result was a neat joint, which even now is invisible to the eye.
The result is a neat joint
Step 5. The linoleum joint is glued with regular masking tape.
The joint is taped with masking tape
Step 6. At the junction of the canvases, cut the masking tape, also using a knife.
Masking tape being cut
Step 7. A special cap equipped with a needle is screwed onto the tube of cold-welding glue.
A cap with a needle is screwed onto the tube
Step 8. Next, the needle is inserted into the gap between the canvases and the glue is carefully squeezed out to its intended place. The tube moves along the applied masking tape.
The needle is inserted into the gap between the sheets
Filling the gap with glue
Step 9. After applying the glue, wait about 15 minutes for the glue to set.
The glue will dry in about 15 minutes
Step 10. The masking tape is carefully removed. It takes about 40 minutes for the glue to dry completely, after which you can move on the floor.
Masking tape is removed
How to seal seams with sealant: instructions
If the goal is a joint between tiles and parquet boards without a threshold using the most affordable finishing material - sealant, then it is worth preparing the following set of tools and materials:
- sealant; vegetable oil; spatula; gloves.
Another option for joining surfaces
The process begins by preparing the working surface - cleaning the seam from dust and dirt, lubricating it with oil (you can use masking tape) in case the sealant gets on the surface.
The sealant is applied into the seam groove using a syringe gun, removing excess mass with a spatula. It is necessary to ensure that the layer of the mixture is uniform and not too thick.
No need to dock
In most cases, the kitchen is tiled for the work area, and the main part of the kitchen is covered with “warm” flooring (laminate, parquet, vinyl). In modern designer interiors, you will notice that a single floor covering is already offered for kitchens and living rooms. That is, without a strip of tiles on the floor in front of the kitchen unit.
Photo: sdelaydom-sam.ru
And in fact, why split up a single space if there are materials that can serve in wet areas without problems? This includes parquet boards, cork, various liquid mixtures, and even porcelain tiles with an imitation of a wooden surface.
If a “cold material” such as natural stone, porcelain stoneware or tiles is chosen for the entire space, it is reasonable to supplement it with a warm floor. Or simply lay carpets in fragments.
How to properly decorate joints with cork: recommendations
To make the joining of tiles and parquet look as harmonious as possible, as noted above, it is better to use cork for decoration. Strips made of this material are elastic and easy to use. In the process you will need:
- scissors; stationery knife; ruler; strips of cork material (2-3 mm wider than the seam and length equal to the butt).
The prepared cork strips are glued to the joint with polyurethane glue.
Decorating with liquid cork is more similar in technology to finishing with sealant.
They also start by treating the edges of the joint with oil, after which they fill it with the prepared composition. Excess cork material is cut off after drying. Sanding work can be carried out a day after the seam has dried.
Option for neatly decorating the joint with cork
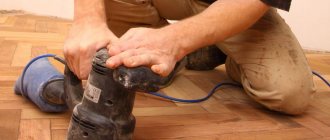
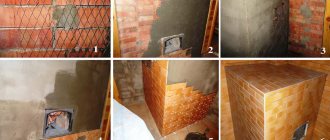
Preliminary work
For similar quality shown in the photo, pre-treatment of the cavity of the connecting seam will be required. In our case, cutting and sanding the ends at the joint line was carried out after gluing the parquet board to the plywood backing. The ends should ultimately be very smooth, without chips, with a barely noticeable outer chamfer. With tiles it’s different - first cutting and grinding with a thorough check by laying it dry, and only then laying it with tile adhesive. The correct gap for the connecting seam should be about 3-4 mm, no more. A similar approach is used when working with parquet.
Threshold technology in joint design
Thresholds mean plates made of plastic or metal with a width of 20 to 100 mm and a length of 2700 mm. They are suitable exclusively for decorating joints with a length not exceeding the length of the profile.
Using a threshold to decorate surfaces made of two different materials in the interior space is justified in all respects. To construct the structure you will need:
- drill; drill suitable for the surface of the subfloor (if it is concrete, then with pobedit coating, wood - special for wood); fasteners; hacksaw for metal; screwdriver; ruler and pencil.
They start with measurements. Measure the required length of the profile by cutting off the required part. In some cases, to form a complete composition, the edges of the threshold are cut at an angle, repeating the shape of the door frame.
An example of a threshold when designing a joint indoors
Fasteners are inserted into the holes on the profile and screwed to the joint, taking into account the characteristics of the rough surface.
Depending on the design features of the canvas and the room, straight, flexible or angular plates are used.
ARCANSAS Some types of thresholds are installed simultaneously with the laying of floor coverings, others - after the flooring. Some “masters” involved in floor installation ignore such “little things”. Therefore, it is important not only to choose the design of the threshold, but also to know when and how to install it ASPROPROFILPAS Aluminum, brass and steel profiles for curved joints of coatings are bent manually or using a special mechanism. The cork expansion joint looks like a decorative border
DUURISequence of installing the threshold with the mounting rail:
a- the lower part of the structure is attached near the edge of one covering; b- the second covering is laid; c- the face strip is inserted into the nylon rail; d- pressed with a hammer and a wooden block; d- the result is a beautiful joint
PROFILPASA profile on a zigzag leg decorates the connection of coverings of the same level(s) or with a slight difference in height. It is “set” on a special glue (b) and after laying the materials (c) the top bar is lowered to the desired level (d) Photo by A. Elistratov DUURI Decorative profiles add completeness to the edges of podiums and stairs (a), smooth out the transitions between coverings (b) ARCANSAS Aluminum profile with a rubber insert are used to compensate for loads in moving joints of ceramic tile floors. Elastic material will prevent the tiles from being torn off from the base and the destruction of joint joints. Photo by A. Elistratov DUURISITY FOREST In any home there are many places that need to be protected, emphasized or hidden with the help of thresholds
At first glance, the main purpose of decorative thresholds is to design the junction of different floor coverings. However, when used correctly, this small interior accessory also solves important technological problems.
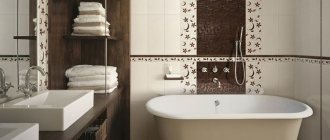
Each apartment can have several floor coverings. If ceramic tiles reign almost unconditionally in the bathroom and toilet, then the floors of other rooms are decorated with other materials.
Stylish living rooms and offices are often decorated with natural parquet, parquet or solid boards, and sometimes natural stone. In areas with the greatest load on the floor - hallways and kitchens - preference is given to porcelain stoneware, ceramic tiles and linoleum. Soft, foot-muffling carpets are usually laid in bedrooms and children's rooms.
This means that you cannot do without decorative thresholds (profiles), with the help of which you can beautifully and technologically correctly design the connection of different materials. These useful elements will mask seams and gaps, hide minor finishing errors or, conversely, become a bright visual accent in the functional zoning of the room. And even in the case when the entire apartment is covered with the same floor covering (for example, linoleum or carpet), thresholds cover the joints of its individual pieces.
The most fashionable way
However, some designers believe that both the cork compensator and the aluminum threshold are all yesterday. They recommend a thin brass metal profile.
This is suitable not only for decorating the junction of different materials or creating a technological seam, but also as decoration. Brass profiles come in different thicknesses (from 2.5 mm) and heights - that is, you can choose an option for the junction of any materials. Metal profiles come in different colors and are made not only from brass, but also from aluminum, zinc, chrome and even gold. They come in different shapes: L-shaped, T-shaped, U-shaped. These profiles can be bent and molded to create any decorative designs.
Life on the move
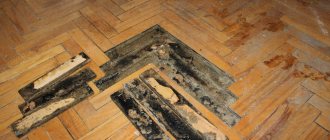
Photo by A. Elistratov Particular care should be taken when selecting and installing thresholds on natural wood flooring (parquet, parquet and solid boards). The fact is that wood, unlike many other materials, reacts to changes in the environment even after it has been cut down, dried and turned into an element of interior design.
In winter, during the heating season, the humidity in the apartment decreases noticeably, and the wooden floor planks gradually dry out and decrease in size. With the arrival of spring, summer and autumn, they respectively gain moisture and increase somewhat. Thus, throughout its life, a wooden floor never stops moving.
When laying natural wood flooring near walls, in transition areas from room to room, as well as in areas adjacent to columns, pipes or other floor coverings, qualified specialists must leave so-called compensation gaps.
Without them, wooden planks, the size of which, albeit slightly, increase, simply have nowhere to go. The coating begins to put pressure on the obstacle with enormous force. According to experts, in places where parquet tightly adjoins ceramic tiles, it often chips off its edge! Another scenario is also possible: poorly secured planks sometimes come off the base.
Everything we said about the properties of wooden floors also applies to laminate flooring. Although the basis of its slats is not wood, but fibreboard, when the humidity in the room increases, it also swells a little.
There is one more nuance: floors laid in a “floating” way, that is, not attached to the base (parquet boards, laminate), move much more than parquet that is rigidly glued to the base. Therefore, the sufficient size of the compensation gap for piece parquet is 10-15mm, and for “floating” floors - 15-20mm.
Compensation gaps near walls are traditionally covered with skirting boards. When moving from room to room or at the junction of different floor coverings, thresholds are used, which are considered an integral element of a well-made floor. The main task of the master is to remember to take into account the size of the fastening when determining the width of the expansion joint.
Laying schemes
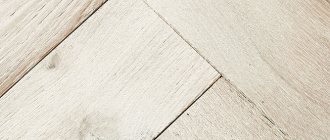
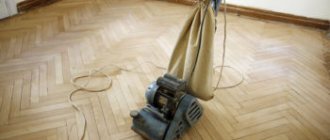
Laying patterns for “panel” ceramic parquet do not differ from standard tiles - all seams in both directions do not “break” and are a grid with square cells. In the same way, a large format with fragments of parquet flooring is laid, but here it is necessary to ensure that the patterns of adjacent elements match so that they form a single whole. There are only two schemes for laying large tiles “under parquet”: basic and diagonal.
Not everything is clear with piece ceramic parquet. Manufacturers and sellers include a very large range of rectangular wood-look tiles in this category.
If you look at the “old” GOST for wooden parquet, then the length of the strip should be in the range of 15-50 cm (in increments of 5 cm), and the width - 3-9 cm (in increments of 0.5 cm). Anything larger refers to solid or parquet boards. And their laying schemes are different. The board can be laid in only two ways: the “deck” is straight and diagonal. And for parquet, according to experts, there are about 300 installation schemes.
The dimensions of ceramic parquet do not, by definition, fall into the GOST 862.1-85 standard. In addition, it does not cover the products of foreign manufacturers of parquet and parquet boards. And in relation to ceramic parquet, it can be considered as “reference”. But it gives an idea of the format, aspect ratio and possible installation patterns.
The width of rectangular floor tiles starts from 10 cm. Tiles that are smaller in width belong to borders and are considered a decorative element. Therefore, when choosing a laying scheme, consider the ratio of the sizes of the two sides and the length of the ceramic plate. If they lie within the range of 1:3-1:6, and the side length is no more than 60 cm, then this is a “small” format, the installation of which can be carried out according to wooden parquet patterns.
Rectangular tiles longer than 60 cm are laid like parquet or solid boards.
Laying methods
Of the variety of installation methods, here are a few of the most popular:
- The “deck” is single with regular displacement of elements by a fixed size - from ½ to 1/6 of the length of the tile. The “banding” step of ½ tile is also called “brickwork” and, like 1/3, is used for small formats. For long ceramic parquet, a smaller “spread” of adjacent elements is practiced. There are two options for laying relative to the location of the walls of the room - straight and diagonal.
- The “deck” is double. The same installation principle as for single, but with double elements. As a rule, the scheme is used for small tiles. It can also be straight and diagonal.
- The “deck” is single, chaotic. A universal laying scheme in which the displacement of adjacent elements does not have a clearly defined step.
- Herringbone. Can be single or double from small sized tiles. Unlike wooden parquet, ceramics use exclusively “English” herringbone, when the piece element has a rectangular shape. The “French” herringbone of elements in the form of an “oblique” parallelogram is found only as a design on large format tiles.
- Square. The scheme is used for small tiles, provided that the length is a multiple of the width - for example, 10x60 or 15x60 cm. Each square has a perpendicular layout of elements in relation to all its “neighbors”.
More complex installation methods (for example, braids, squares with accents or frames, “versailles”) are possible if you use two formats of ceramic parquet that are different in length, but the same in width and thickness.
Using cut ceramic parquet tiles is possible only around the perimeter, when the cut edge is hidden by the baseboard. And for “accents” of squares and braids, you need to use a factory format without “cut” edges.
And such schemes stand out separately when they lay out panels of several types of ceramic parquet on the floor. Each scheme has its own individual drawing, which is developed for the specific dimensions of each element. This is an artistic or palace parquet made of tiles.
Leveling up!
In stores and markets you can most often find three types of decorative thresholds: straight, leveling and finishing.
Straight joints (overlapping joints) are intended for decorating straight joint joints of various floor coverings located on the same level.
Leveling (multi-level) help to connect sections of the floor that have different heights. Easily smooth out differences of 3-18mm.
The final ones are used to decorate the edge of the covering on all kinds of podiums, as well as when approaching the steps of stairs, a balcony or the threshold of a hallway.
Beautiful design of joints, transitions and corners is the main indicator of the quality of finishing work. thresholds must be durable, easy to install and fireproof. A variety of thresholds help connect materials that differ in color and texture, and in addition, extend the life of floor coverings and greatly facilitate the cleaning process.
ARCANSAS Straight profile Leveling profile Finishing profile
Each of these thresholds forms a certain protrusion on the floor surface.
However, in the last few years, there has been a clear desire of most people to have a perfectly flat floor, without any protruding elements. What to do if you need to design the transition from a parquet floor to a tile area by the fireplace or visually separate the living room and kitchen areas? How to compensate for the notorious floor movement?
Photo by R. Shelomentsev The problem is solved using a cork compensator.
It is either simply a separate strip of cork (cork tree bark), or the same strip glued between two panels of wood of the same species as the floor. After all, a 10mm wide cork strip easily shrinks to 5mm, and then returns to its original size without loss. That is, the material easily compensates for floor movement, and there is no need for special gaps and thresholds.
In rooms where frequent changes in humidity and temperature are possible (next to saunas, swimming pools, winter gardens), as well as when Photo by Z. Razutdinov To create a deformation gap between ceramic tiles and parquet, you can use a single cork expansion joint - a strip of cork in natural wood linings ), as well as a metal profile attached to the base of the floor with self-tapping screws (b). The profile protrudes slightly above the floor surface, in contrast to the compensator located with it at the same level of a fairly large floor area or the use of coatings consisting of planks of impressive size (solid board), it is better to use two or three strips of cork, alternating with wooden inserts. Of course, such a design cannot be called a threshold, but it solves the same set of problems.
In addition, cork expansion joints can also play a decorative role. For example, a light strip of cork looks beautiful when framed by dark wood. Compensators, the width of which coincides with the width of the parquet planks, look like a decorative border.
Cork expansion joints are offered by many companies involved in parquet work.
The PARKETHALL company (Russia) has established its own production of these non-standard products, of any profile according to the template provided by the customer. Compensators can be used for a wide variety of curved joints in floor coverings. If there is no need for compensation gaps, smooth curved joints are decorated with thresholds made of PVC and a curved metal profile.
PVC thresholds are first immersed in a container of hot water, and then, when the plastic softens and becomes elastic, they are installed along a given contour.
It is difficult to prepare metal thresholds with a certain bending radius for all possible cases, so their use is limited. But the thin metal profile, running in a narrow strip along the border of the coatings, looks quite elegant. The required curvature is given to it manually or using a special machine, which can be purchased or rented from companies that sell thresholds and profiles.
Varieties
There are several types of profiles used when connecting dissimilar materials. The metal joining material, most often aluminum, can have a width of 10 mm, 16 mm, 25 mm. It is not subject to corrosion, is lightweight, and has a long service life. Where metal profiles are not used, plastic options are used - based on PVC and other polymers with sufficient strength and elasticity. All existing types of floor joining strips are worth considering in more detail.
Liquid
A popular solution designed for connecting linoleum sheets, as well as tiles and laminates together. The structure of liquid profiles is an adhesive base mixed with small particles of balsa wood. Such mixtures are used after laying coatings, filling the gaps formed between different types of surfaces. After hardening, excess glue remaining on the surface is simply cut off with a sharp knife blade.
Such joint sealants are supplied in 0.5 liter packages. The hardening process of the mixture lasts from 6 to 12 hours. It is applied into the cracks using a glue gun.
Flexible
Profiles of this type made on the basis of PVC or rubber are used when connecting coatings with uneven boundaries. This is the best option for curved joining of laminate and tile coverings. The profile is not afraid of operation in conditions of high humidity and easily takes the desired bending angle. The standard dimensions of such elements are 36 mm wide and 4 mm high, the surface has a semicircular shape.
Installation of flexible profiles is carried out during the laying of coatings. It is mounted in a special striker, ensuring tight fixation without displacement. This solution is well suited for coatings that are sensitive to scratches.
Materials and sizes
Since we are talking about threshold materials, it is worth noting that the market offers wooden, metal, laminated and plastic products, the variety of which will undoubtedly allow you to achieve an ideal combination with the chosen floor covering.
“PARQUET HALL” On a floor made of natural wood, thresholds and baseboards made of solid wood look most natural. They can be matched to the coating material and form a single whole with it. The width of the thresholds, regardless of the material from which they are made, is most often 20-60mm. The length, according to manufacturers, starts with the standard width of a doorway with one leaf.
Market research has shown that the size range of lengths of floor accessories from Polish manufacturers starts from 0.8 m, from German manufacturers - from 0.9 m. Everywhere you can find thresholds with a length of 0.93; 1; 1.35; 1.8; 2; 2.1; 2.4; 2.7m. Plastic products reach 3 and even 6 m.
Wooden thresholds look very beautiful and harmonize well with furniture and natural wood floors. But these products are among the most expensive and require the same care as a wood floor.
They are periodically treated with special polishes that mask abrasions, micro-scratches and protect the surface. Heavily worn thresholds are sanded and re-coated with varnish or oil. On the domestic market you can find products made from solid wood of different types of wood from the Swedish companies KHRS (price - $35-45, sizes - 24005820mm) and TARKETT (price - $28-40, sizes - 20004310 and 24005820mm), as well as the German manufacturer NOLTE, priced from $22, 5 (10005017mm, beech) up to $212 (21005717mm, wenge) for 1 piece.
DUURIMetal thresholds (sometimes called moldings) are structurally stronger and more durable than wooden ones, and also have more affordable prices.
Stainless steel, aluminum, and brass are used as starting materials. Aluminum products are anodized for decoration and protection against corrosion, covered with an oxide film to look like gold, silver, bronze. Its thickness varies. On stair steps it is better to use thresholds made of aluminum, brass and stainless steel.
They are easy to cut with a hacksaw. In case of fastening with glue, there is no need to drill holes at the edge of the coating, manufacturers make 25-50 microns. In the latter case, the threshold is guaranteed to withstand ten years of use without changing its appearance.
Some manufacturers apply either a polymer coating that imitates wood or a film with a decorative pattern to a metal structure, or they offer a variety of adhesive-based films so that the buyer can independently choose the design that suits the floor covering. Metal thresholds are supplied to the Russian market by the companies BONA, KBERIT (Germany), DUURI (Finland), PROFILPAS (Italy), NOVOSEL, RUSSKIY PROFIL, TSM (Russia). Price - $2-20 for 1 piece.
Laminated thresholds are made from compressed wood fiber, wrapped in a film with a typographic pattern, which, as a rule, repeats the pattern of the laminate strips. This ensures a perfect combination between the threshold and the floor.
The quality of these products depends on strict adherence to production technology, the strength of the film and the properties of the glue that holds it. Experts from the company “MIR PROFILYA” (Russia) believe that, despite the successes of Russian manufacturers, in this area their products are still inferior in quality to Austrian (NEUHOFER HOLZ), Polish (DAREK, POLMAR) and Swedish (PERGO). The price of laminated thresholds is $6-30 per piece.
Plastic thresholds are the most economical option for designing joints. They are usually used on laminate and linoleum floors, as well as when finishing complex (curvilinear) joint profiles of various floor coverings. The advantage of such thresholds is the variety of colors.
But the service life does not withstand competition with products made from other materials. Domestic manufacturers offer their products for $0.7-1.75 per piece, products from ASPRO (Poland) can be purchased for $2.5-8. The price of a plastic profile from NEUHOFER HOLZ with a length of 3 m is $30, 6 m - $60.
For each type of floor covering, an appropriate threshold is selected: a - aluminum profile for joining carpets; b - elastic PVC profile for finishing curved joints (heating with a hair dryer is recommended); c - PVC profile with hidden fastening for laminated flooring (installed simultaneously with laying the floor)
ASPROPOLMARPOLMAR