How to seal or close a joint
Regardless of what type of ceiling is installed in the apartment - suspended, plasterboard, covered with tiles or wallpaper, or simply painted, to make it look complete, it is necessary to complete the final touch - to decorate the joint.
The gap where the ceiling meets the wall looks untidy, and the structure itself looks unfinished. Therefore, it is necessary to choose a way to decorate this area so that it does not stand out from the overall composition.
Preliminary stages
When choosing the appropriate method, you should determine the thickness of the tile, and also calculate what the thickness of the adhesive layer underneath will be. If the walls were not previously leveled to zero, and the tiles on the kitchen apron were laid on a pre-applied layer of glue, you should allow time for it to dry completely. This should be done because during drying, the thickness of the adhesive mixture decreases.
At the next stage, grouting of the tile joints is carried out. After the specified drying time for the adhesion agent has passed, the tile should be wiped with a damp sponge, removing excess grout, as well as traces of the mixture, which usually stains the surface of the tile. The resulting dust must be brushed off the top row (end) of the tile. Then the end part is primed and time is given for the mixture to dry.
Joints between materials - features
The junction of the laminate and tiles can have different lengths. When zoning a room, you often end up with a large gap, and sometimes a complex shape. When arranging a problem area, you need to take into account the following factors:
- Surface level. It is easiest to work with joints located in the same plane. In other cases, you will have to attach a special step threshold.
- Properties of materials. All floor coverings differ in strength, service life, moisture resistance and other indicators. To prevent deformation of materials, there should always be a small gap between them.
- Tightness. Any joint must be as strong and airtight as possible. This is due to the poor moisture resistance of the laminate, which begins to swell from moisture. Additionally, it is worth using special sealants.
Multi-level threshold for laminate flooring
Figure 3 shows a monolithic joint of single-layer wall panels
with looped outlets of fittings connected by round steel brackets with a diameter of 12 mm.
Figure 12 - Monolithic vertical joint
a – vertical joint; b – vertical joint with insulation package;
1 – external single-layer panel made of expanded clay concrete; 2 – internal
load-bearing panel (reinforced concrete); 3 – concrete grade 200; 4 – poroizol
tourniquet; 5 – sealant; 6 – gasket; 7 – drainage channel; 8 – anchor
diameter 12 mm. ; 9 – package of mineral wool boards; 10 - loop;
11, 13 – bracket with a diameter of 12 mm
Sealing of the joint is ensured by laying poroizol on Izol mastic and coating the outer seam with sealant. A vertical air cavity is formed between the sealed joint area and the sealing, which serves as a drainage channel that drains down the water that gets inside the seam and releases it outside at the level of the base.
The so-called metal-free dovetail joint, which allows you to completely eliminate steel connections, deserves attention. Thanks to the complex “keyed” shape of the edges of all four sides of the wall panel, the joints are able to withstand significant tensile forces.
How to match wallpaper with tiles on a kitchen apron
During repairs, situations may arise that are difficult for an inexperienced person to cope with without prompting. For example, if you lay tiles on a kitchen backsplash, and you have to glue wallpaper above or on the side, then the places where they join may not have a completely aesthetic appearance if you don’t know the specifics.
In this case, some people tear out the wall to create a uniform plane of tiles with wallpaper pasted. But you can use other methods to hide this unsightly area.
Wallpaper on the kitchen walls
Considering the variety of wallpapers, almost all of them are suitable for use in the kitchen. Moreover, wallpaper looks absolutely appropriate in combination with ceramic tiles. Such an ensemble is also beneficial because, due to the high prices of ceramics, you can save money and get a rather stylish kitchen design. Here are some examples of decorating kitchen walls with different types of coatings. They are shown in the photo.
The kitchen is a room that is subject to all sorts of tests in the form of splashes of grease, drops of water while washing dishes and other important factors. Therefore, liquid wallpaper is not recommended. It is best to use tiles or, in extreme cases, washable wallpaper for problem areas in the kitchen. Such options are shown in the photo.
Fiberglass wallpaper has proven itself at a high level in the decoration of walls in the kitchen. They are good because they have a fairly durable structure and if they become dirty, they can be painted at any time, and more than once.
So, to choose wallpaper material for the kitchen, you need to consider some factors:
- dimensions of the room or areas covered with wallpaper;
- design style;
- kitchen furniture interior;
- expected lighting;
- tastes of the inhabitants.
Choosing a corner design option
To ensure that the decoration of the room is in harmony with its contents, it is important to take into account various factors when choosing a profile. It is important to pay attention:
- On surface materials. If the walls are covered with clapboard, the ends covered with a white plastic profile will look ridiculous.
- For the color of the finish. A red profile will ruin the overall impression if the room is made in pastel colors.
- On the design style. The metal profile is not suitable for interiors in a classic style, but it can emphasize the concept of hi-tech.
- On the function of the room. A plastic profile is ideal for kitchens and baths; for children's rooms it is better to choose silicone corners. Wooden with chamfers will be appropriate for decorating cabinets.
Design options may vary. The easiest way is to match the color of the profile to the color of the walls. He will merge with him and will not attract attention to himself. This decision is justified when the surface often catches the eye, this could be, for example, the corner between the hallway and the room.
The color of the corner profile matches the color of the walls. Source www.grandecor.ru
If the choice falls on wooden corners, designers advise choosing the colors and textures of the doors or floor finishes to match. Then it will look organic. If you want to save money, you can purchase plastic corners that look like wood.
Corner profile made of plastic to look like wood Source imageserver.ibud.ua
When creating laconic interiors with a minimalist style, the choice of metal corners becomes justified. They look good in high-tech, in a loft. The width of the shelf must be chosen so that it completely covers the end of the corner. You need to pay attention to this if the walls are covered with panels, plasterboard, if insulation and sound insulation are additionally performed. Such designs always have uneven edges; the decorative angle covers all defects well.
Metal corner in tile finishing Source krovati-i-divany.ru
Usually the angle between the slope and the wall is more than 90 degrees. In order for the selected profile to fit well on it, it must be slightly bent. This can be done with both a metal and plastic corner. To do this, experts advise placing the product on a flat surface with one edge, and then lightly pressing on top with your hands and using a brush to push along the entire length of the corner. In the cold season, this procedure should be done after the product has been in the room for a day and has reached room temperature.
Gluing
Having secured the baseboard under the ceiling, you can begin gluing wallpaper. Gluing is carried out starting from the top of the wall, from the baguette.
The part that will be adjacent to the tile is turned onto its end. The excess fabric is carefully trimmed with a stationery or special knife with a retractable, replaceable blade. The cut is made at the fold. With a small layer of glue, the cut can be made directly along the tile line.
Sealing a joint without a threshold
If there is no possibility or desire to use the threshold, you can use other available methods.
Inter-joint grout
The use of grout is well suited for situations where the installation of the floor covering is completely completed. It will not be possible to apply grout where there is a height difference between the materials. In this case, it will not hide all the defects and will quickly crumble.
The gap between the laminate and the tiles is sealed with high-quality cement or epoxy grout. The order of work will be as follows:
- mark the line of the future seam on the floor;
- without going beyond the line, lay the tiles;
- install the laminate, having previously treated its edge with silicone sealant;
- allow the coating to dry;
- cover the seam with grout;
- Level the grout and, after drying, coat it with varnish.
Cork compensator
An expansion joint is a thin strip of cork that is inserted into the gap between floor materials. Suitable for joints of any shape and size, but the height of the coatings must be the same. If the part is not long enough, several compensators are used. They are also covered with transparent varnish or painted on top, decorated with veneer.
Cork sill compensator
Cork sealant
This composition contains fine cork chips. Once applied, it creates a joint that looks like natural wood. Working with cork sealant is very simple. It must be squeezed out of the tube, carefully fill the joint, and smooth it out with a narrow spatula. Excess sealant from the edges must be removed immediately. There is no need to treat the edge of the laminate before sealing - the cork composition will cope with this task.
Decorative cord
This is an original option for hiding a technological gap. The decorative edging is made of thick textile and has large rope knitting in various design solutions. The color palette of cords is very wide, from monochromatic to weaving several threads of different shades. All this allows you to give the room a more expensive and sophisticated look. But such finishing will not be appropriate in every interior.
Advantages of decorative edging:
It is also important to understand that the cord does not fit every type of design. It looks much more advantageous in a classic interior than in a loft or modern style. But if you choose a discreet white or black edging, then it can be used in almost any room.
The cost of decorative braid starts from 80-100 rubles. per meter and reaches 200-250 rubles, which is twice as much as the previous options.
If you choose the right thickness, the edging can be installed without glue, simply inserting it into the gap. This is a simple job that can be easily done on your own.
The role of wallpaper tiles in surface decoration
In appearance, imitation tiles are not inferior to wallpaper. Tile manufacturers annually offer collections that contain several stylistic solutions in the form of tiles to match the wallpaper. It can be anything:
- One or more colors;
- With or without a pattern, ornament;
- With or without a picture;
- Large, medium or small;
- Glossy, matte, polished, etc.
Tiles that imitate wallpaper retain their appearance throughout the entire period of operation. The design and color do not fade or fade - all the same rich and bright shades. Tiles with a matte surface prevent glare, although the glossy version looks no less luxurious.
Masking tape
As a rule, the joint between a stretch ceiling and a wall is covered with masking tape, since this is the most universal and fastest way to seal the technological gap. Manufacturers do not use a single name for this product; it is called differently: decorative plug, ceiling insert, edging tape, wall corner, elastic for stretch ceiling, etc. In all cases, we are talking about the same thing - a long product made of PVC for masking cracks in the area where the wall adjoins the tension fabric.
The tape is made of plastic of varying degrees of hardness and elasticity, and is also available in a wide color palette. The most popular are standard white inserts, since they are the cheapest and most versatile, but bright multi-colored plugs with a matte or glossy surface are also sold. Additionally, you can make custom tape and paint it in any color. Thanks to this, it is easy to choose the edging to match the stretch ceiling, even if it is of an unusual shade.
Tapes vary in shape and purpose. Some are used to disguise the connection between the ceiling and the wall, others are used when joining materials. For example, for sealing the transition between levels in two-tier structures or when combining textures using a dividing baguette.
According to their shape, camouflage tapes are divided into several types: T-shaped, L (corner), F, SL, R. Each has its own characteristics and is better suited for a specific situation. For example, if the surface is curved, it is worth choosing a wide SL plug to hide uneven walls, since the T-shaped insert is narrower and gaps may remain. Depending on the shape, the appearance of the tape on the ceiling also differs.
Advantages of this type of disguise:
The disadvantages include:
The average cost of 1 meter of white tape is 10-30 rubles. If you use color, it will be more expensive - about 20-50 rubles. (the price still depends quite a lot on the manufacturer). If made to order, it will cost about 130-150 rubles.
Installation is very simple. Installation does not require glue or special tools; the tape is inserted into the gap, pressed with your fingers and fixed in it due to the design of the baguette. In the corners, the plug is cut with a knife and joined at 90 degrees.
Note! Sometimes craftsmen use a spatula to speed up the process, but if there is no experience, you should not use any tools during work so as not to damage the ceiling and the plug itself.
Laying tiles
It all depends on the design you have in mind and the size of the tile. However, there are several styling methods that have proven themselves over time.
- The traditional method is when the tiles are laid in even rows, forming a single grid, regardless of size.
- With offset. The tiles are laid diagonally, moving sideways with each new piece.
- Diagonally. This means that the construction of the pieces comes from the corner. Square tiles are best suited for this method.
Comparison and conclusions
For convenience, we have prepared a comparison table from which you can quickly compare the main characteristics of methods for masking a ceiling joint.
| Characteristic | Masking tape | Ceiling plinth | Decorative cord |
| Price | From 10 to 130 rubles | From 50 to 120-150 rubles | From 100 to 250 rubles |
| Versatility | Suitable for most interiors | Better suited for tall rooms | Doesn't fit well with modern design |
| Appearance | Not too original, just a variety of colors | Large selection of models, materials and shapes | Noble and expensive look, wide range of colors and weaves |
| Backlight installation | Impossible | Available on some models | Impossible |
| Care | Virtually not required | Complex only for illuminated curtain rods | Requires regular dust cleaning |
| Difficulty of installation | Very easy | Quite labor intensive, requires experience and tools | Can be installed by hand |
| Reuse | Maybe | Impossible | Depends on installation method |
Summarize. Masking tape and decorative cord are more suitable for smooth walls with slight curvature. Due to their flexibility, these materials are more convenient for finishing rooms of non-standard configuration (with bay windows, columns, etc.). And if access to the ceiling space is periodically required, then only a tape and cord will allow for repeated dismantling and reinstallation.
Ceiling plinth provides more space for implementing design ideas, but such decor is much more difficult to install, especially when it comes to non-standard layouts. If there are communications located behind the tension fabric that may require access, then it is better to abandon the fillets.
Source
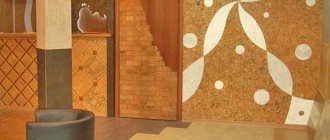
Do-it-yourself finishing materials for simulating a brick wall
To create an imitation brick wall with your own hands, use the following materials:
- wallpaper;
- tile;
- plaster;
- fake diamond;
- brick panels;
- plasterboard panels.
A few words about each of the options.
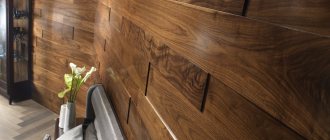
Imitation brick wallpaper
This is the simplest way to depict imitation brick with wallpaper. The textured surface allows you to get the appearance and tactile structure closest to the original.
Wallpaper in the hallway
This method does not replace brickwork, but it has its own advantages:
- budget;
- speed of registration;
- ease of care (dust can be removed by washing if non-woven wallpaper is used).
Pay attention to the special wallpaper made from foamed polymers. Thanks to them you will create the most realistic texture.
Brick wallpaper in the kitchen
From plaster
To make an imitation of a brick wall with your own hands using plaster, first plaster the wall. Smooth the applied solution with your hands. As soon as the plaster hardens, the contours of the brick appear on it. When drawing, you can use a ruler, but the bricks look more realistic if you draw them by hand.
How to make imitation brickwork using plaster
The plaster is removed along the drawn lines, and the contours of the bricks are formed. The grooves are covered with a brush. This way, unnecessary plaster crumbs and other debris are removed from them.
Decorative rock
Artificial stone is distinguished by high levels of stability. Eco-friendly, there are product quality certificates at points of sale. The price depends on the quality. It is widely used due to its availability, large number of textures and aesthetic appeal.
Brick panels
Advantages of brick panels:
- Affordable price;
- Light weight;
- Possibility to install yourself;
- Huge selection of colors;
- Easy to care for;.
- Ideal combination with any materials.
Imitation brick with PVC panels Imitation brickwork from panels is attached with your own hands to plaster, concrete and old brickwork. The reason for this “flexibility” lies in the production secret - UV stabilizers, which give the raw materials strength and protect them from damage and scratches.
The panels are distinguished by a wide range of colors and textures . They tolerate high humidity and the influence of cleaning agents, which makes it possible to use brick-like panels for interior decoration of toilets, kitchens and corridors.
Fixation to the wall is carried out with glue or on the lathing.
Tile
An easy option, based on clinker or ceramic tiles. It is glued to the prepared wall surface, and the gaps between the parts of the tile are covered with plaster or a special mixture.
Made from materials:
- clinker brick;
- tree;
- gypsum;
- Styrofoam.
Such tiles are made of polystyrene foam, gypsum and wood.
| Photo | Name | Description |
| Clinker | Clinker tiles are made from ceramics. It is made from special types of clay into which coloring substances are mixed. In order to imitate brick with tiles in the required shape, the pressing method is used. | |
| Ceramic | Ceramic tiles differ in manufacturing methods: cutting, pressing, extruding. A large assortment of textures and colors allows us to reach consensus in the design of the room. |
From plasterboard
For production, the required number of tiles are laid on a cement adhesive mixture. Wooden slats are used to form the seams. Long planks are placed in horizontal openings, and tiles are placed on the narrow side in vertical openings so that their lengths and the dimensions of the seams match.
From plasterboard
After laying the row, the slats need to be removed, and the seams are filled with a special compound or a special mixture for filling the gaps between the tiles. The wall is painted by hand and varnished if desired.
Painting
From foam plastic
An unusual but interesting solution is foam bricks. The material is lightweight, with low thermal conductivity and high sound insulation. Cut the foam into bricks of any size and texture of your choice. The resulting tiles are primed and painted.
Imitation foam
Polystyrene foam is fragile, so you shouldn’t expect a long-lasting effect from such decoration. Repairing the “masonry” is simple: foam chips are mixed with glue, after which the damaged area is filled with a spatula. If the area is large, cut it out from the wall and glue in a new one.
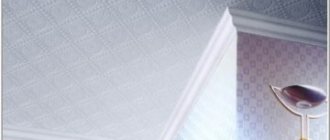
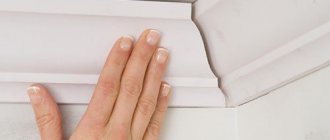
Ceiling plinth
This is also a fairly common method for closing the gap between a suspended ceiling and a wall. Ceiling plinth also has several names: fillet, border, decorative baguette, molding, frieze, interior cornice, etc. Compared to the previous version, it is characterized by a longer, although not very complicated installation, as well as the use of glue and tools for installation .
Most often, fillets are made of polystyrene foam and polyurethane; you can also find models made of plaster, wood and plastic, but they are rarely used with stretch ceilings. The design is quite varied, decorative borders are available in different sizes with all kinds of designs and patterns that imitate stucco. There are not many color options; mostly white skirting boards are sold, but you can paint them yourself in any color.
There are special models of curtain rods on the market, equipped with a recess for the LED strip and a reflective layer that creates beautiful diffused light. The eaves lighting can be of any color, thanks to which it is possible to obtain an original effect and achieve good compatibility with the shade of the ceiling.
Advantages of ceiling skirting boards:
The disadvantages include:
The most inconvenient thing about using ceiling fillets is that they cannot be easily removed and installed several times. If it is necessary to temporarily remove the suspended ceiling, for example, to access communications behind the canvas, then you will also have to dismantle the baseboard.
On average, the price for one strip of a product (usually 2 m) is 50-60 rubles. When purchasing, you need to consider the height of the room. If the ceiling is higher than 3 m, then it is advisable to purchase a border with a width of 10 cm; for a room less than 2.5 m, the baseboard should be about 3-5 cm. For a ceiling height of 2.5 to 3 m, fillets from 5 to 10 cm are chosen.