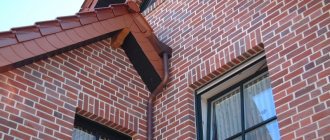
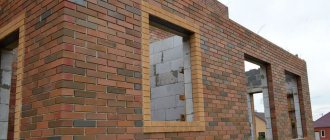
Options for laying bricks around windows The best way to visually highlight openings on the facade of a house is to frame the windows with bricks. If desired, this can be done even if the walls of the house are built from concrete blocks, and even if they are brick, then, as they say: “God himself ordered it.” In addition, lining window openings with brick can be not only decorative, but also structural, since along with metal and concrete, brick is used to construct lintels over openings.
For an ignorant person, to do all this with your own hands, frankly speaking, is not easy. But for those who want to learn this, nothing is impossible. Get acquainted with the information presented below, watch the video in this article - and everything will work out for you.
The process of working with facing bricks: do-it-yourself masonry
Compared to other technologies for finishing the exterior of buildings, facing brick is the most labor-intensive material to work with.
However, its durability, expressiveness and reliability pay for these expenses. Laying face brick yourself is not easy. Cladding requires greater precision than conventional brick construction. Neatness, cleanliness and precision are extremely important in this work, because the task of the facing material is not only to create a surface, but also to decorate it. It’s good if you have a partner who can do the stitching, control the cleanliness of the luggage and supply the necessary materials to the stacker.
Video - the process of laying facing bricks
The first step is to horizontally level the base using a level. Then they plan the amount of material and interchanges. All rows of bricks are first laid out dry in order to exclude non-standard, chipped, defective bricks, and to see how the stones will fit in the places of door and window openings, in the corners. At this stage, dressings are also planned.
Cut the material using a grinder (using a stone disc). You cannot use a circle on metal or chop off excess parts of brick with a hammer or ax. A cement mixture is well suited for binding bricks: water + sand + cement, and the sand fraction must be fine, or it must be sifted. To tint the cement to match the color of the cladding, dyes are poured into it or tinted. You cannot dilute a lot of cement at once, since the mixture dries out quickly, losing its properties. It is better to do several batches one at a time.
The mortar is applied to the façade cladding using a special template so as not to stain the decorated edges of the tiles; the template allows you to avoid bringing the mortar to a centimeter to one and a half centimeters to the edge. It is better to take less mortar to create a narrow fastening layer, this will help avoid dirt during work
It is important to dilute the mixture so that it seems harsh, then the brick or tile will not “float” when laid. The solution is made in a ratio of 1 to 4: fine clay sand is mixed with cement and liquid using a concrete mixer
Apart from the very first line of bricks on the base, the remaining rows are laid out only after the corners have been laid. That is, the beginning of the masonry is the corner joints (the initial height is 5-6 rows). A thread is then stretched between the corners over each row to bring the bricks level.
If the outer part of the wall is dirty, it is worth wiping/washing it immediately, since it will be much more difficult to do this after drying. Are there several rows laid out? Now is the time to wipe the front side with a wet cloth.
The finished masonry is embroidered by rubbing the seams and using a special tool. Excess solution is removed. If the seam is ready, it should protrude beyond the surface by a maximum of a couple of millimeters. The width of vertical seams should be no more than 10mm, and their thickness should not be more than 12mm. There is a rule that will help create proper surface ventilation: every fourth vertical seam in the bottom
the row is left empty. The surface must be embroidered directly during the main work, since otherwise the scaffolding will have to be re-built.
The durability and reliability of the structure is ensured by brick dressings: chain and single-row dressings are the simplest. The masonry mesh is selected depending on how much space is left for the cladding. Usually, during work on the facade carried out after the main construction, the base must extend beyond the wall by at least 12 cm. Otherwise, it will not be possible to provide high-quality support for the facade brick. If there is no stop, the base also needs improvement.
Window slopes and door openings are laid with a poke, laying the column in 1 brick. Sometimes stones of other shades are used to highlight doors and windows.
Window decor made of facing bricks
Construction tools required for laying facing bricks:
- concrete mixer (concrete mixer);
- trowel (trowels);
- buckets;
- forests;
- plumb line, threads;
- hammer;
- seam cutting tool.
Construction of strip foundations on the ground
First, wooden pegs are installed around the perimeter of the construction and the length of the fence is measured to the nearest centimeter. After this, they begin to calculate the number of pillars, taking into account the size of the gates and gates. Depending on the filling of the fence body, the distance between the posts may vary. It ranges from 2.5 to 3 meters. If the soil allows you to avoid installing formwork, concrete is poured directly into the ground.
This is possible for clayey, rocky soils that may not crumble for several days in good weather without rain. If the ground is sandy, it is necessary to install formwork to the entire height of the base. For formwork, boards, plywood, and flat slate are used. If the house is located on a slope, then the fence foundation will have to be stepped.
Photo: foundation with pillars installed on a slope
Benefits of using buta
Foundations for a fence made of rubble stone with brick pillars are in no way inferior to concrete ones in terms of load-bearing capacity. To fill the trench, use any stone materials of suitable size. Large stones are split with a chisel or an old axe. To do this, they are placed on the ground and, with strong blows, first cut a long furrow in them, and then split them. The stones are tied together with a solution of at least M200 grade.
There should be no gaps or cavities between the elements that are not filled with cement mortar. If water gets into the cavity in winter and freezes, there is a risk that the foundation will rupture and the fence may tilt. If the bottom of the foundation tilts a few centimeters, the top of the fence will move 5-10 cm to the side and everything will have to be redone.
Photo: rubble laying
Foundation with glasses and reinforced concrete beam
This is the most cost-effective option for constructing foundations for brick fences. After laying out the plan, holes are dug under the fence and concrete cups are poured into the formwork. At the top of the glass a recess is left equal to the thickness of the beam. Reinforced concrete beams, which act as a plinth, can be cast in one place, and after hardening, transported to the fence and installed. An expansion joint should be provided between the beams and the glasses.
Foundation on screw piles
Steel screw pile supports can be used to construct foundations in soils with low bearing capacity. They have steel caps on which a concrete grillage is formed under the load-bearing beams
It should be taken into account that screw pile supports for houses have a closed contour and are a rectangle or square in plan
Fences can be longer, and in order to reduce the influence of positive or negative temperatures, expansion joints will have to be made at certain intervals. The advantage of screw steel supports is that there is no need to use earth-moving equipment during their construction. In fact, the body of the foundation is above the ground.
Adviсe:
- Choose welded piles for low-density soils or cast ones for heavier ones. However, keep in mind: cast piles are much more expensive, although more durable.
- The internal cavities of the piles are filled with concrete of a grade not lower than M200.
- For fences with a large windage, filled with corrugated sheets, you will have to make calculations for wind load.
Construction of strip-column foundations
This type of base is used for brick fences with continuous brick filling between the posts on unstable soils in climatic zones with a freezing depth of more than 1 meter or in areas with permafrost. A very expensive method of constructing such foundations. This requires the use of special machines and mechanisms: excavators, drilling rigs.
The pillars are concreted in special metal formwork and, after hardening, treated with bituminous compounds for waterproofing. Waterproofing serves as a lubricant for heaving soils when temperatures drop to -30° C and below. The entire body of the foundation with pillars is reinforced with steel reinforcement.
Expansion of the opening
So, removing 6 cm of the wall - namely, the size of a quarter of a brick - does not imply any measures to provide support for the lintel. It’s a completely different matter if you need to radically expand an existing window, combine two openings into one - or even cut an opening in the masonry where there was not one originally.
- Cladding a window opening with brick is not always done in a house under construction. Sometimes a building is simply rebuilt, overhauled, and the expansion of openings becomes an integral part of the work. Therefore, this chapter will provide short instructions on this topic.
- With a significant expansion of the opening, not only the window block is dismantled. To make a new, longer jumper, the old jumper most often has to be removed. The number one task that needs to be solved is to provide reliable supports for the new lintel.
Reinforcing an opening cut into brickwork with a steel lintel
After the surface of the heels has hardened, a beam is installed in the grooves, wedged and supports are arranged. Next, the same thing is done from the side of the room, after which the wall is dismantled; the supporting posts are removed; the nests formed in the wall are sealed; and install the new window frame. Of course, it is impossible to make beautiful brick lintels in such a situation - this is done during the process of building a house. When expanding openings, either reinforced concrete products or rolled steel are used
In private construction, the second option is most often used, which is why we focus on it.
Brickwork of a window opening
- After the metal beam is installed, it and the brickwork above the window opening are jammed, and only then the dismantling of the old slopes begins. The lintel for a new large opening, combining two small old windows, is mounted in the same way. Only here, in addition to the side slopes, you also need to support the central partition.
- After the grooves for the new lintel are cut out and the heels are cemented, the wall between the two openings is trimmed. It is completely disassembled, removing racks and supports along the way, after the lintel beams have been installed. If the wall is thick, then the lintel should consist of three beams: two along the outer contours, and one central, which is inserted from the side of the opening, from below.
Then all this is pulled together with crossbars and the window opening is lined with bricks
Please note that new slopes are laid out using M50 mortar, tying them to the existing wall by all available means
In this case, one of the most popular options for framing the opening today is most often used, which is called a “quarter”. In any case, this is the simplest option.
Layout of decorative elements
The design of quarter-brick openings can be done both during the construction of a wall and during the process of replacing windows. To make quarters on a rectangular window, the easiest way is to use a steel lintel, and it’s most convenient if it’s a corner measuring 120*120 mm.
The metal, by the way, must be coated with an anti-corrosion compound before installation.
If the window needs to be given a spherical shape, then instead of rolled steel, wooden circular templates are used - it is on them that the brick is laid over the window opening.
Brick window opening
- To make a quarter, the brick is pushed beyond the general plane of the wall, poking forward, by 5-6 cm. This is a quarter of the length of the brick, which gives the name to this architectural element. By the way, with the advent of plastic windows, it began to be performed not just as decoration. The quarter on the opening allows you to cover the joints between the masonry and the window frame, thereby improving the quality of thermal insulation of the opening.
- The presence of quarters on the opening is an excellent option not only from an aesthetic point of view. They allow you to use any seals and heat-insulating materials to seal the gaps between the window frame and the wall. Although, in order to highlight window openings on the facade, there are other, more decorative ways of laying bricks.
Simple framing of openings against the background of decorative wall masonry
When constructing masonry, not only the butt side, but also the spoon side can move forward. In this case, the brick itself may not lie on the edge, but be positioned vertically. The position of the bricks, as well as their color, and even shape, can alternate, creating a pattern similar to battlements or a chessboard.
What can I say: an experienced mason can lay out not only the window areas, but also the entire wall, as it is now fashionable to say: in “3D format”. This is exactly the kind of art, without exaggeration, that we see in the picture above.
Method of laying a brick wall
Let's look at how to lay a window opening with facing bricks.
When designing a house and determining the location of windows, the specialist calculates their placement, taking into account the size of the brick stone used.
The base for the window opening is prepared after the tenth row of brickwork is laid out, which guarantees the structure's strength and rigidity. After this, a kind of sole is arranged, laying out the brick stone perpendicular to the center line of the wall and pushing it outward.
The side sections are laid out along the entire perimeter with a whole stone. A quarter is placed inside the opening area. It is made with a corner of a brick for cladding, extended to a quarter of its own size. The window frame will receive a kind of stop and a full guarantee that it will not fall. A thermal insulation layer is immediately formed, closing any possible gaps between the walls and window frames. According to building codes, such a protrusion must be kept to strict dimensions, otherwise difficulties will arise with the design of the side slope areas.
A metal corner ceiling is installed above the window opening, after which brick laying continues again. The outer steel element is slightly recessed into the wall in order to subsequently cover it with a decorative layer.
The corner is installed at a distance corresponding to the parameter of the brick stone; the number of its rows is determined by the type and thickness of the masonry. A concrete pad is placed in the wall along the opening edge under the corner or a solid brick is laid.
Not only a steel corner is used as a ceiling for a window opening installed in brickwork. It is allowed to use I-beam structures, reinforced concrete blocks, and brick lintels. Each option involves laying on a concrete base.
On each side, the entrance section into the wall is equal to half the height of the structure, to which another fifteen or more centimeters are added.
Options and selection of PVC panels
All types of plastic panels are made on the basis of polyvinyl chloride. In this case, the products are divided into 2 types.
The first option is panels that are made entirely of high quality PVC or vinyl. The structure of such elements is homogeneous, which ensures the strength and reliability of the products. Such PVC panels are in demand on the market and are often used for cladding the facades of buildings.
PVC panels can imitate any material for facade finishing
The second type of PVC products is combined and consists of two layers. The outer shell protects the panels from fading and exposure to atmospheric factors, and the inner layer provides rigidity and strength to the elements. Such panels are more expensive and are rarely used for facade finishing.
Panels are elements with holes for fastening
Depending on the appearance, PVC products are divided into the following types according to the type of simulated surface:
- stone; brick; wood, timber; marble.
External differences do not affect the characteristics of products and are taken into account only when developing the facade design
When choosing a material, you should pay attention to its thickness, which can be 15, 17, 18, 21 mm. A specific option is selected depending on the climatic conditions of the region
It is also important to take into account the installation principle by which the elements will be attached. Panels can be mounted horizontally or vertically
In the first case, small panels are chosen, and for vertical installation, products with large parameters are needed, covering the entire height of the wall.
Briefly about the main thing
Many owners of private buildings and commercial buildings are thinking about remodeling the interior space, so punching a new doorway is one of the most popular construction procedures. To work independently, knowledge of the correct technology is required. It is better for beginners in construction not to undertake such experiments, especially since such work requires special permission.
To make an opening in a brick wall, you need to complete all legal documents. The most important thing is to obtain permission from local authorities. If redevelopment work was once prohibited, it is almost impossible to obtain the papers.
When all requirements and standards are met, and the house is not in disrepair, documents are issued fairly quickly. Although you will have to return to the MFC more than once with reports.
Another point is the study of the parameters and properties of the building material. To make the process easier for yourself and speed up the time of constructing a new hole for the door, you need to understand the type of masonry, its density, etc. The choice of tool, as well as methods of work, depend on this. It is also important to study in detail the technology of the work itself.
The process of punching through a doorway itself consists of 4 stages - preparing the wall, drawing the outline and cutting, strengthening the door and external finishing. The penultimate stage is mandatory only for load-bearing and self-supporting walls. If an opening is being cut in a partition, there is no urgent need for the third stage.
Ratings 0
Preparatory stage
If you decide to decorate your home yourself using brickwork, then you should first carry out a series of preparatory work. You should not neglect them if you want to achieve a good and sustainable result. Make sure that the foundation of the house, as well as its overall structure, is designed for the installation of brickwork. The foundation must be constructed in compliance with all building codes. It must withstand significant loads. Cheap and simple bases will not work in this case.
You should also make sure that the foundation of the house is made of raw materials such as monolithic concrete (concrete blocks are also acceptable). The foundation itself must be sufficiently wide
This requirement is especially important because it is on the foundation structure that the facing brick will rest. In some situations, bricks are placed on special steel corners, which are attached to the base using anchor bolts
In addition, it is allowed to organize an additional foundation if the quality of the main one leaves much to be desired. Another foundation must be poured along the perimeter of the building, retreating about 30 cm from the first foundation.
Next you should pay attention to the roof structure
It is very important to take a closer look at the roof. In most cases, in old houses, the cornice part does not protrude beyond the perimeter of the building by more than 25 cm
With such a structure, the bricks will become endlessly wet and may even be subject to destruction. After about 5 years of such use, the brickwork will become unusable. This problem can be solved in one sure way - you will need to coat the walls of your home every year with a special water-repellent compound, but keep in mind that such products are quite expensive
In most cases, in old houses, the cornice part does not protrude beyond the perimeter of the building by more than 25 cm. With such a structure, the bricks will become endlessly wet and may even be subject to destruction. After about 5 years of such use, the brickwork will become unusable. This problem can be solved in one sure way - you will need to coat the walls of your home every year with a special waterproofing compound, but keep in mind that such products are quite expensive.
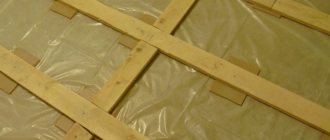
If you plan to cover the main wooden walls with brickwork, then before starting work you will need to coat the wooden bases with antiseptic compounds. If you are decorating external walls, then you need to buy the appropriate product for them. For external work, you should not purchase internal impregnations - they will be of little use. In addition, it will be necessary to attach a vapor barrier material to the wooden walls using a construction stapler. These coverings should be laid with an overlap (minimum - 10 cm).
You will also need:
- carefully inspect the surface of the walls of the house, remove all unnecessary parts, such as lanterns, gutters and other similar objects;
- the previous paint layer, peeling elements, and shedding should be removed;
- all noticed defects must be covered with a layer of putty;
- if the damage to the walls is too serious, you will have to completely plaster them;
- In order to install the insulating layer, you need to put a layer of primer, which will be responsible for better adhesion of the wall and the adhesive.
In addition, it will be necessary to properly prepare the solution. A simple cement mixture is hardly suitable here, because facing bricks are resistant to water absorption. This problem is especially acute when it comes to the installation of clinker bricks, which simply require specialized additives to ensure more effective adhesion.
The correct solution consists of the following ingredients:
- cement grade M500 – 1 part;
- sand – 4 parts;
- water.
Some craftsmen add a little clay to the solution to achieve greater plasticity of the composition. However, here the opinions of different masons differ - some see this as only harmful due to the leaching of the clay component from the composition and a decrease in its strength, while others, on the contrary, believe that clay makes the joints of the brickwork more durable. In this matter, each user relies on his own opinion and experience.
Application of masonry mesh
Fastening facing bricks to a load-bearing wall is often done using a masonry mesh. This is a fairly old but reliable method. The mesh is inexpensive and does not require complicated installation, but it must be laid at the time of construction of the aerated concrete wall; it will not be possible to attach the mesh to the finished structure. The mesh is needed so that when the building shrinks, the load is distributed evenly and cracks do not appear on the facade. You can use a metal product or galvanized mesh.
Attaching the mesh to the foam block
An option for attaching the mesh to the wall using pieces of cut mounting tape and wood screws
Attaching facing bricks to the walls using a mesh should occur every three rows. If a masonry of 2 blocks is used, then you can lay a grid every 4 rows. If not very strong blocks are used, more frequent laying of the mesh is acceptable, but in no case less frequent. It is necessary to reinforce the row from scratch: this will help firmly secure the cladding and avoid damage in the future.
Another option for attaching the construction mesh
This type of fastening for facing bricks can be made from different materials, for example, steel, fiberglass
When choosing a mesh, you need to pay attention to its rigidity; for example, fiberglass is not suitable for areas of the wall that are subject to heavy loads. Metal mesh is considered the most reliable; it can be used for any type of building
Steel springs well, is not afraid of strong physical impacts, is tensile strength, and is lightweight and does not overload the structure. This is one of the simplest and most practical fastenings for facing bricks. The metal mesh is sharp, so there is a high risk of injury. Basalt in this regard is much safer, moreover, it does not rust, and can withstand the same loads.
Fastening a wall made of facing bricks to aerated concrete using a mesh has the following features:
- Withstands loads up to 50 kN/m.
- Has high strength.
- The small mass of the product does not act on the structure as an additional load.
- It can stretch, so it has a certain plasticity.
- If you use a metal mesh, cold bridges may form inside the walls; the basalt option eliminates this problem.
- It is worth noting that the basalt mesh is stronger in tension.
- Not afraid of environmental influences. If the mesh is made of basalt or stainless steel, ordinary steel can oxidize under the influence of moisture and oxygen, which causes rust to appear and the product loses its quality over time.
Conclusion: fastening facing bricks to aerated concrete is possible in a variety of ways, the choice of which depends not only on the cost of the products, but also on the stage of construction.
Video:
Video:
Video:
Decorating a house with panels: pros and cons
The appearance of the facade is an important aspect of the design of a residential building.
For this purpose, there are many types of materials, differing in properties, cost and other features. Plastic facade panels are a popular solution for decorating the facade of a residential building. They have a varied appearance and have high technical characteristics.
Externally, PVC does not differ from other panel options
Plastic products differ from metal and other options at a lower cost. In many cases this factor plays an important role. At the same time, PVC panels have the following advantages:
- the light weight of the material allows you to avoid additional load on the foundation and load-bearing elements of the building; the resistance of PVC to precipitation and temperature changes ensures their durability; a variety of colors makes it easy to find a specific option; simple installation is carried out without a large number of fasteners; to clean the panels, just wipe them with a damp cloth; damaged elements can be easily replaced with new ones without completely dismantling the wall cladding.
PVC panels are available in all hardware stores.
When choosing, it is worth considering the disadvantages of the material.
An important property of plastic is that the panels are not sufficiently resistant to ultraviolet radiation. In order to avoid damage to the skin, you need to choose panels with a good protective layer. And it is also worth considering that low-quality elements are more prone to deformation and cracks than thick and durable panels
Work order
Proper use of masonry mortar.
As a rule, when sealing an unnecessary doorway with brick, a partition thickness of 12 cm (half a brick) is maintained, since this structure does not bear any load; the upper part of the existing wall is held by a lintel. A window in an external fence can also be laid in half a brick, provided that additional insulation is provided.
To ensure that a blocked door can bear the load from hanging cabinets or any household appliances, the usual method of laying stones is used - on spoons. In this case, it is necessary to bandage the seams by half or a third of the length of the brick. Sometimes another method of embedding is used - a one-and-a-half hollow stone 88 mm high is laid with a bandage on the edge. But it should be taken into account that such a partition will not be able to bear additional load.
The work is carried out in the following order:
- Prepare a simple cement-sand mortar of M50 grade, using 1 part M400 cement to 5 parts well-sifted sand. Another option is to purchase ready-made masonry mixture and mix it with water, following the instructions on the bag.
- Moisten the base and sides of the opening with water. Place 1 row of stones near the installation site, cut the last one to the required size.
- Carefully spread the mortar to the length of 2-3 stones and begin laying 1 row. After each laid brick, pull the mortar to its side with a trowel, and then press it with the next stone.
- Apply the mortar to the end of the last brick in advance and put it in place. To maintain the thickness of the seam, the stones must be tapped.
- Fill the entire opening in this way, focusing on the plane of the existing wall. Do not allow the masonry to bulge or cave in; to do this, constantly check the wall, applying an even plank to it. Another option is to pull the mooring line and navigate along it.
In a situation where it is necessary to pass heating pipes made of PPR, metal-plastic or metal through the gap being laid, steel sleeves (cases) are placed in the partition. Their diameter must be greater than the outer size of the pipe. The length of the case is selected so that its ends extend beyond the surface of the masonry by 2-3 cm.
After the mortar has hardened, the structure must be lined so that the door covered with bricks does not differ in appearance from the rest of the walls. Choose the appropriate type of finishing - plaster, drywall or other material.
Advice from professionals
A few tips from experts will help you create a doorway in a brick wall:
- Sometimes when dismantling the masonry, some bricks begin to wobble. They need to be replaced with new elements, secured with mortar (to find out the correct proportions of mortar for laying bricks, read the article here).
- Disassembly should begin from the top in order to begin strengthening the opening earlier.
- It is recommended to choose a place for the future opening in the central part of the wall. This allows you to evenly distribute the load.
- Materials and tools must be prepared before the work process itself.
- Don't forget to leave a gap for the mounting foam. 5 mm will be enough.
- It is important to find out the presence of electrical wiring, fittings, pipes and other communications in the area chosen for the opening.
This video is about cutting out a doorway of non-standard sizes:
Some may think that it is not possible to cut a “passage” in a brick wall on their own. In reality, anyone can handle this kind of work, the main thing is to follow the correct sequence and not forget about observing safety precautions. Saving on materials is contraindicated, especially when it comes to load-bearing structures. Negligence will lead to disastrous consequences.
How to frame an opening
Window edging, like brick laying of any other architectural elements of the facade, can only be done during the construction of the wall, or during renovation, when windows are replaced. Their appearance will largely depend on the design of the lintels in the openings. They can be reinforced concrete, brick (arched or wedge-shaped) or metal (steel angle or profile). So:
Brick cladding of a window opening, which is called a “quarter” in construction, is the most popular type of architectural facade decoration. At the same time, the facing brick is laid with the butt forward, protruding beyond the surface of the masonry by a fourth of the brick body - hence the name.
Window openings when faced with quarter brick
To lay out the quarters, use halves of bricks, which must be cut with a grinder and a diamond wheel before starting work. Based on the standard brick length (25 cm), the size of a half will be 12.5 cm. Accordingly, a quarter is 6.25 cm. When cutting, you can deviate from these dimensions by no more than 7-10 mm. If the protruding part of the window frame is too small, there is no point in it at all. Too large quarters can create a different kind of problem - the window opening will be too wide, and in order to seal the gaps after installing the window, you will have to fill the gaps with foam that are too large
During the construction of walls, window areas must be particularly carefully reinforced. Particular attention should be paid to controlling the verticality of the masonry and the horizontality of the rows. If the master’s level is always at hand, then the window openings will have the correct shape
The window covering must be connected to the wall masonry with a reinforcing wire mesh 3 mm thick (cell 50*50).
Steel corner in the opening
- To lay out the quarter, it is most convenient to block the opening with a steel corner. For this purpose, the size 100*100 or 120*120 is usually used. Before installation, it should be coated with any anti-corrosion compound, or simply painted. The corner is mounted so that it does not protrude inward due to the quarters. A concrete lintel will be installed five centimeters above the corner.
- In order for the row of masonry that will be carried out along the corner to be flush with the general plane of the wall, the bricks will have to be cut in thickness. A window that is not rectangular in shape, but, say, arched, is framed in a similar way, only instead of a corner, the opening is covered with a wooden template, according to which a quarter is drawn.
- After the mortar has hardened in the masonry, the template is removed and the seams are carefully cleaned. To create a double frame, as in the example below, the first row of the quarter is overlapped with the same pattern. Following the facing brick is backfill masonry, which is also covered with a template so that an arch is formed on both sides.
Arched window with brick frame
In general, there are at least a dozen options for laying facing bricks around the perimeter of the window. Moreover, the display can be done not only with a poke forward, but also with a spoon; they can be beautifully combined, creating a beautiful composition above the window. Spoons can be placed either standing or lying down. For example, by alternating three vertical and three horizontal spoons, you can get a pattern that resembles a chessboard. And by alternating spoons and pokes, you get a jagged pattern. A figure can be made above the lintel, resembling a gable roof or a house roof or a dome. So, the design possibilities for window cladding are quite extensive.
Features of the material
Brick is rightfully recognized as the most popular building material, which is found very often. Brick houses and brick-faced buildings can be found on every street. Many consumers choose these products. The distinctive characteristics of modern facing bricks include its attractive appearance coupled with wear resistance.
According to experts and home craftsmen, today's facing bricks may in some ways be inferior to other facing materials in terms of their external characteristics. However, recently this trend has ceased to be relevant. In different retail outlets, people can find different versions of bricks. It can be not only red and smooth elements. It is possible to choose textured options in other colors that look very interesting.
In most situations, in the desire to decorate a house with brickwork, people rely on their “wants”. In this case, quite a lot of important points are missed that have a direct impact on the brick itself and the facade made from it. Experts say that the design material for the facade of the house must be thought out at the design stage. There is no point in leaving this matter “for later”.
If you do not pay attention to this rule, then after making the box a lot of problems may appear. It may turn out that the width of the foundation base is not enough to support the facing brick, because during construction the owner decided to additionally insulate the wall structures
Thus, a facade made of facing bricks has a more significant load-bearing capacity, which can exceed these foundation indicators, which will result in cracking of the masonry. It is quite possible to cladding a house with brickwork with your own hands. Of course, this process cannot be called very simple and easy. In fact, this is labor-intensive work, but it is possible to cope with it. The main thing is to observe all the nuances of the cladding and act step by step, following the technology.
In what cases is it worth sealing a window in a log house?
- an old house was purchased and the new owners decided to carry out a large-scale reconstruction;
- during the first years of operation, it turned out that real heat losses exceeded the calculated ones, and since windows are the main channel of heat loss, the owners decided to reduce the total glazing area (most often, a similar situation arises after the construction of a bathhouse);
- there was a need to change the internal layout of the rooms and, as a result, it was necessary to install one or more old windows;
- During the construction of the house, the requirements for the casing design were ignored, as a result of which the installed PVC double-glazed windows burst, and it was decided to install new windows with a reduction in the glazing area.
Please note that removing a window is a complex and expensive operation, so before deciding to start such work, we recommend weighing the pros and cons several times.
In addition, it should be taken into account that in order to completely hide the location of the sealed window, you will have to significantly modify the interior and exterior of the house.
Window trim
After completing the brickwork, you should leave the bricked window in this condition for some time so that the mortar sets well and dries. It is good if there is sufficient ventilation in the room. This will significantly speed up the drying process. At the next stage of sealing the window opening, finishing work is carried out. They involve cleaning the surface after laying the brick, priming, plastering, as well as putty for wallpaper or paint.
Having cleared the embedded window fragment from traces of cement mortar, you can begin priming and plastering the wall surface. The primer is applied with a special brush with a thick fleecy head. It is recommended to apply several layers of such a protective and strengthening composition, allowing it to dry completely. Then they begin to level the surface of the filled window opening.
For this purpose, ready-made dry mixtures containing lime are usually used. Such material easily turns into a working solution after adding water and thoroughly mixing. The plaster is applied to the surface with a special ladle and then smoothed with a rule, resulting in an even layer. After completing such work, they begin to finish the wall. It involves applying gypsum putty and covering the surface with wallpaper or painting it.
legkoe-delo.ru
Very often, owners of corner apartments, in order to provide comfortable living conditions and keep the room warm, get rid of one of the windows. Most often, brick is used for these purposes.
To brick a window, you need to stock up on some tools. Among them you will need a construction level, a mixer for making the mixture, a trowel, a spatula and a bucket. Such a tool will allow you to complete all the work without much effort. The materials you need to stock up on are bricks, cement with sand and polystyrene foam.
Work should begin by dismantling the window frame. This must be done together with the box. After this, it is necessary to remove all construction dirt and begin laying the material. In some cases, gas silicate blocks can be used instead of bricks.
All work must be carried out in such a way that the thermal insulation of the walls of the house is maintained. To do this, it is necessary to maintain the thickness of the wall covering specified in the design documentation. Therefore, laying bricks is carried out in 2 ways - hollow and solid.
When using the blind laying method, the entire area of the opening is completely sealed. For this, only brick is used. If the hollow laying method is used, then it is necessary to lay one row of bricks on the street side, and the second from the inside of the apartment. The remaining space between them must be filled with foam boards or backfill material. This material will improve the thermal and sound insulation of the new surface.
All installation work must be carried out carefully so that there are no distortions in the installation along horizontal and vertical planes. For these purposes, you need to use a building level, the length of which must be at least 50 cm.
After completing the brick laying work, a layer of plaster is applied. Plaster should be applied both from the outside of the wall and from the inside. For these purposes, it is best to use façade varieties of finishing material. Such facade plaster will not only give a beautiful and aesthetic appearance to the new surface, but will also provide additional protection from various weather conditions.
After completing the finishing work, you need to wait 1-2 weeks and only after that can you actively use the wall surface. During this time, the cement mortar will completely harden.
1pokirpichy.ru
How to do it?
The implementation of window openings in newly constructed buildings is an important component of construction and installation work. Openings are made according to the project and the developed technological map
The owner of the house will need to pay special attention to the situation when the masonry of the window portal is carried out as part of the reconstruction of load-bearing walls. It is allowed to be carried out only after completing a set of preparatory work, the main one of which is obtaining the appropriate permission from city services
In the process of laying
The harmony of the façade of the house is ensured by the symmetrical arrangement of windows. In individual low-rise buildings, such an opening begins to form from the 14th brick row. Regardless of the chosen masonry method, a bonded row is laid under the window sill.
Features of brickwork of a wall opening during the construction of a house:
- Lay out the side walls. A horizontal lintel is placed on the top row of blocks - a purlin so that it not only covers the window portal, but extends onto the side walls by at least 100 mm on both sides. Otherwise, it will not be able to take on the load from the higher rows of bricks and ceiling slabs.
- To install the wedge girder, 40-50 mm wooden formwork is installed above the construction portal. In this run, an odd number of rows are performed, and the central row is installed only vertically.
- A concrete solution of 40 mm is applied to the formwork.
- Then standard or wedge-shaped bricks are placed vertically, with a slight slope, to create a wedge.
- The bricks are laid on edge, with the seams tied between the blocks in one row. The masonry is carried out from 2 sides simultaneously, heading towards the center.
- When everything is done correctly, the last bricks in the middle of the arch will be inserted into the remaining space with great effort.
- After installing the purlin, check the accuracy of the dimensions again, and then proceed to install the next layers of brick. Installation of window blocks, sealing of cracks and finishing are carried out after completion of construction and installation works in the house.
Clamps for brick lintels
Clamps for horizontal masonry
» href=»https://www.bautsystem.com/wp-content/uploads/2017/05/wwwFinal-trapecija.jpg» data-fancybox=»gallery» style=»background-image: url('https:/ /www.bautsystem.com/wp-content/uploads/2017/05/wwwFinal-trapecija.jpg')»>
Clamps brands SK 50-40, SK 50-75 and SK 30-40
Clamps for vertical masonry
» href=»https://www.bautsystem.com/wp-content/uploads/2017/05/trikampis_1200-1024×772-v2.jpg» data-fancybox=»gallery» style=»background-image: url( 'https://www.bautsystem.com/wp-content/uploads/2017/05/trikampis_1200-1024×772-v2.jpg')">
Clamps brands SK 50-170, SK 50-270, SK 50-340 and SK 30-170
Auxiliary clamps
» href=»https://www.bautsystem.com/wp-content/uploads/2017/05/Final-varteliai_1200.jpg» data-fancybox=»gallery» style=»background-image: url('https:/ /www.bautsystem.com/wp-content/uploads/2017/05/Final-varteliai_1200.jpg')»>
Clamps of brands SU 50-45 and SU 30-45 for all types of masonry
Clamps for laying on the edge inside
» href=»https://www.bautsystem.com/wp-content/uploads/2017/05/Final-gulscias_1200.jpg» data-fancybox=»gallery» style=»background-image: url('https:/ /www.bautsystem.com/wp-content/uploads/2017/05/Final-gulscias_1200.jpg')»>
Clamps brands SKK 50-65, SKK 50-170, SKK 50-220, SKK 50-320 and SKK 30-40
Clamps for hanging masonry
» href=»https://www.bautsystem.com/wp-content/uploads/2017/05/final-nauja-jungtis.jpg» data-fancybox=»gallery» style=»background-image: url('https ://www.bautsystem.com/wp-content/uploads/2017/05/final-nauja-jungtis.jpg')»>
Clamps grades S, SX, SXU, SXD and SXK
Set of clamps in blisters
» href=»https://www.bautsystem.com/wp-content/uploads/2017/05/BL-H-mazos_1200-v2.jpg» data-fancybox=»gallery» style=»background-image: url( 'https://www.bautsystem.com/wp-content/uploads/2017/05/BL-H-mazos_1200-v2.jpg')">
A set of clamps for a horizontal brick lintel with an opening of 1.0 and 1.5 m
Set of clamps in blisters
» href=»https://www.bautsystem.com/wp-content/uploads/2017/05/BL-V-aukstos_1200-v2.jpg» data-fancybox=»gallery» style=»background-image: url( 'https://www.bautsystem.com/wp-content/uploads/2017/05/BL-V-aukstos_1200-v2.jpg')">
A set of clamps for a vertical brick lintel with an opening of 1.0 and 1.5 m