Finishing
When installing plastic windows, old wooden window sills are dismantled and replaced with new structures. Standard white surfaces do not suit all users. Recently, cladding with original mosaics and ceramic tiles has become popular.
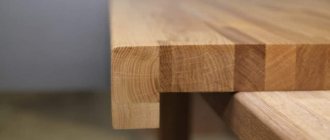
Classic option for finishing a large surface
Features of the material
Due to its performance characteristics, the tile is ideal for decorating a kitchen window sill, because moisture and various contaminants accumulate here. This cladding may even increase its strength.
Compared to a plastic surface, the tiles do not turn yellow and do not lose their aesthetic properties over a long period of use. This material also benefits from an aesthetic point of view. A wide variety of shades and textures allows it to be used with any interior style. The material comes in different sizes, but 10x10 tiles are best for window sills. It is quite large, it looks aesthetically pleasing, and there are few seams between the elements when laying it.
What is necessary
To lay ceramics efficiently, you need to prepare the necessary tools and consumables. The standard list includes:
- Universal primer.
- Adhesive solution.
- Tile.
- Grout for seams.
- Pliers.
- Glass cutter.
- Hacksaw.
- Building level.
- Small rubber mallet.
- Standard spatula.
For the window sill in the kitchen, porcelain stoneware is the best choice. This material has high strength.
Basic set of tools
Porcelain stoneware is durable and high-density. The finished structure perfectly resists the influence of adverse factors. You can place hot dishes and heavy objects on porcelain stoneware.
Scope of application
Most often, a tile window sill is made in houses made of brick, ceramic concrete, foam concrete or cinder blocks. In these houses, the window sill, as a rule, has already been filled or a kind of blank has been made that will serve as its base. It must be thoroughly cleaned of dust and primed to increase the adhesion of the material to the base. If this is not done, the tiles may fly off within a few months.
If there is already a window sill, but you need to make a new cladding, you must first remove the old one. Next, the surface of the window sill is carefully leveled, all dents and chips are filled with putty. In order for the tiles to last for many years, you need to purchase putty, primer and glue from one manufacturer in stores.
Sheathing base made of wood and plastic
The process of finishing window sills from natural materials is no different from finishing concrete surfaces. But in this case, the craftsman will have to cover the entire structure with plasterboard slabs in order to then lay the colored tiles. You can do without cladding gypsum board, but in such a situation you should use an acrylic primer, which is used to cover wooden window sills. For installation you will need epoxy glue and grout.
It is much easier to decorate plastic bases. Instead of an adhesive solution, you can use liquid nails. The reliability of adhesion directly depends on the texture of the plastic. Specialists use special compounds for laying ceramic products on plastic or wooden bases.
Ceramic tile cladding
Ceramics are used in rooms with high humidity: in the kitchen, bathroom, shower. To correctly calculate how much material is needed for covering a window sill, you need to measure its surface, compare it with the dimensions of the tiles and add 20% for possible defects.
You can do it yourself by tiling the window sill, if you follow some nuances. The material must be laid at a slight slope so that the water that falls on the windowsill does not flow into the corner, but goes to the floor.
For window sills protruding beyond the wall, you first need to make a concrete base and reinforce it with steel mesh or rods with a diameter of at least 4 mm. Before laying the tiles, check the tightness of the joint where the window sill meets the window. Existing cracks must be treated with silicone putty intended for wet rooms. Ordinary mastic will not work here, as due to high humidity it will quickly begin to crumble.
For cladding, you can use not only white tiles. It is necessary to take into account the design of the room; in some cases, color will look more advantageous. Some homeowners turn a tile window sill into a real work of art, but it’s difficult to do it yourself; it’s better to turn to professionals. It is worth considering that such work will cost more than standard cladding.
In general, the price of a tile window sill directly depends on the quality of the material, the manufacturer and the cost of repair work.
Traditional installation method
How to make LED curtain lighting with your own hands
Before you begin installing ceramics, you need to prepare high-quality glue. The solution is applied with gentle movements to the back side of the finish and the work surface. You can use a spatula to distribute the composition. During installation, you need to ensure that the elements of the pattern match.
There must be a gap between the dies. To ensure that all the parts lie at the same distance from each other, special plastic crosses are used, which also differ in size.
Experts recommend forming a slight slope of the structure from the window to the outside. Thanks to this, it will be possible to avoid the accumulation of condensation, since all the water will flow from the base of the frame to the very edge. The end parts are mounted only after the laying of the horizontal dies is completed. Once all the tiles have been laid, you can proceed to using putty. It is more practical to use a dark shade. Popular options:
The choice of putty shade depends on the color of the tile. Once the solution has completely hardened, the window sill is thoroughly cleaned. After this, the updated surface is completely ready for use.
Attention! During work, you need to ensure that all vertical and horizontal elements are as consistent as possible with each other at the joints
Decoration with mosaic tiles
Recently, tiling the window sill with mosaic tiles has become popular. The process of laying mosaics is much simpler and does not take much time. This design looks modern and stylish.
The only disadvantage of this cladding is that it has a lot of seams, because the mosaic is much smaller than ordinary ceramic tiles. Moisture can accumulate in the seams and mold can appear, making it difficult to care for the surface. The problem can be avoided if you purchase high-quality grout for joints; you should not skimp on this. When choosing a mosaic for cladding, you need to understand in advance that you need to take more care of such a window sill.
As a decoration, you can purchase a ready-made mosaic in the store or make it yourself from broken tiles. The second option will require certain skills in working with glass. If you do not have such experience, then it is better not to experiment so as not to get injured.
Before laying the mosaic, the surface of the window sill is prepared in the same way as for ceramic tiles. Then special glue is applied to it and mosaic elements are laid. Excess pieces of material are cut off with a glass cutter. Excess grout is removed with a rubber spatula. After the surface is completely dry, clean it with a damp sponge.
Source of the article: https://fb.ru/article/472646/podokonnik-iz-plitki-osobennosti-materiala-i-ukladka-svoimi-rukami
Technology
- Once you have decided on the size of the tiles, you should know exactly how the tiles will be placed on the windowsill. There are two options to choose from: perpendicular or along the window. The choice is made taking into account to minimize the cutting of material as much as possible. To adjust the die to a certain size, use a glass cutter.
- Pre-mark the location of the cut using a marker. The tiles are placed on a flat and stable base, after which trimming is carried out at the designated points. While cutting, press firmly and firmly on the material.
DIY ceiling drawing: decorative element
- Next you will need a rubber hammer. They use it to tap the tile on the back side at the site where it is supposed to be cut off. If the tool is not at hand, you can use the handle of a spatula wrapped in a thick cloth or towel.
- It is necessary to break off with sharp movements, controlling the force. If your skills allow, you can trim the material using a grinder. Using this tool will save a lot of time and effort. Use this technique if you have professional skills.
Do-it-yourself window slopes and window sill
How to make slopes and a window sill from plasterboard with your own hands, photographs of the step-by-step production and finishing of the slopes and window sill with ceramic tiles.
Many homeowners, when replacing a window, come to the idea of how to finish the window slopes, and not everyone is happy with the prospect of installing a white plastic window sill.
An alternative to plastic is a window sill frame made of a metal profile, followed by plasterboard covering of the frame and window slopes, after which ceramic tiles are laid on a plasterboard base.
The strength of such a window sill is not inferior to a plastic one, and the possibility of finishing the slopes and window sill with tiles of any shade and texture will allow you to create a beautiful and unique window in your home.
Someone will say that such slopes are cold, and a slope made from a sandwich panel is much warmer, but this is not so.
Important nuances
The finish will look beautiful if you think it through well in advance. Create the pattern you want to see and decide what size tile will work best for you. Almost always, the best solution is to decorate the window sill with small details or mosaic tiles. They will require minimal styling skills from you and will make the whole process much easier.
Remember that the water resistance of the coating will not be complete if you choose the wrong grout. It must also have the necessary properties. Even in rooms where the humidity is within normal limits. Window openings are more susceptible to moisture, since this is where the border between the cold air from the street and the warm air inside the house is located. Condensation can easily appear. Otherwise, everything will not be so difficult to do. The design of this surface will not differ much from the laying of standard tiles.
DIY repair
You can finish the window sill yourself. Some tips:
- It is necessary to check the integrity of the base: there should be no cracks, large scratches, chips, voids or other defects on the surface.
- The best base for tiles is concrete. This finishing material fits well even on wood and plastic.
- The working surface must be well secured in the opening.
- Finishing should begin after installing the window frame and external sill.
Cutting tiles
Advice from experienced masons
The cladding process will not be difficult if you pay attention to the following factors:
- Surface condition. The base must be complete. If during preparation you find cracks, large scratches, chips, empty spaces, etc., then the problem should be corrected. If you ignore these nuances, the finish will not be of high quality. The tile can simply crack.
- Choosing a base. A concrete base will ensure the durability of the structure and high quality of finishing in general. It will lie on any surface (wooden or plastic) without any problems.
- Surface condition. After checking the area of work, you need to make sure that it is firmly fixed in the opening and will not “ride” during installation.
- Choosing the tile itself. The most important aspect. The type of masonry and the complexity of the work depend on the size of the tile. The diagonal of the tile is selected based on the size of the base. If it is not large, then it is recommended to go with 10x10 or 15x15 tiles. This will eliminate the need for cutting and will give the surface a more attractive appearance. If the dimensions of the base allow you to choose a larger tile, then you can think between 30x30 or 40x20 centimeters. Any store has a wide range of products, so choosing a model is not difficult.
Installation begins only after a new double-glazed window has been installed and the external type of drip has been correctly installed.
Do-it-yourself tiling and tiling of window sills - photo
Photo 1: Correctly placed tiles
- contact layer of glue distributed with a trowel over the base.
- drainage holes should always be located above the window sill.
- window frame.
- external window sill.
- end profile.
- polyurethane foam.
- house wall.
- an aluminum profile with strips of fiberglass reinforcing mesh, embedded in a layer of putty, strengthens the corner under the window sill.
- thermal insulation.
- putty mass on thermal insulation.
- Installation of tiles begins from the middle of the window and moves towards the slopes to maintain symmetry.
- clinker tiles for window sills can be glazed. It looks more beautiful, but this does not affect the choice of glue.
- the outermost tile should be recessed into the wall to protect the area under the window from the formation of drips.
- external plaster.
- The junction of the window sill with the window and with the wall is protected with silicone sealant.
- the distance between the tiles cannot be less than 6 mm; the final width of the seam is selected so that the outer tiles do not have to be cut off.
- a layer of adhesive applied with a notched trowel, made with an appropriate slope, constitutes a direct base for the tile. The grooves created by the passage of the notched trowel serve to increase traction.
Photo 2. Sectional laying of tiles on a window sill
- The tiles must fit under the window frame, otherwise they are easily damaged when pressing on the outer edge.
- the joints are sealed with silicone or a special acrylic sealant intended for external use.
- external window sill.
- The end profile is attached to the wall using anchors, and the space underneath is filled with low expansion polyurethane foam.
- interior plaster.
- house wall.
- thermal insulation.
- external plaster.
- putty with recessed corner profile.
- The bottom surface of the tile is grooved and not covered with glaze, which increases the adhesion of the adhesive solution.
- The drip line prevents water from flowing down the façade under the window sill.
- Before installing the tiles, adhesives are applied, including to its lower surface.
- a layer of glue with a formed slope, laid on a leveled base.
Selecting masonry type
In most cases, the master has to choose from two options:
- Along the area around the window.
- Perpendicular to it.
The dimensions of the base should be taken as the basis for choosing the type. It is necessary to minimize unnecessary trimming of materials. To adjust the die to the dimensions, use a regular type of glass cutter.
After determining the location of the incision, the area is marked with markers. Cladding should only be carried out on a smooth surface that is firmly fixed. Otherwise, you will not be able to trim the marked marks.
You should not be afraid to press hard on the laid material. If you press weakly, then there is a chance that the tile will not press through.
To do the job carefully, a rubber hammer will help, which should be used to slowly tap ceramic products in places where there is a potential cut. As an alternative to a hammer, you can use the handle of a spatula. But you should wrap it in something soft (for example, a towel) in advance, otherwise there is a risk of damaging the product.
The selected part must be broken off with a sharp and forceful movement. If you are not sure that the process will be like this, it is recommended to use an angle grinder. It will save time and physical effort.
Required Tools
A universal list of tools that will be required during the work process:
- Universal type soil mixture.
- Adhesive solution.
- Tile.
- Marker for marking.
- Rubbing material for seams.
- Pliers.
- Glass cutting tool.
- Hacksaw.
- Level.
- Hammer (it is better to choose a rubber one so as not to damage the materials).
- Spatula (regular one is enough).
In order not to waste a lot of time, such materials for work can be found in the same store where you will buy the tiles.
The choice of material for finishing the window sill and window glass
In general, the window opening is designed in the general style of the entire bathroom, consistent with the interior in color and finishing materials. To decorate a window sill, the following are usually used: wood, natural stone, as well as tiles and other moisture-resistant materials.
Most often, frosted or decorative glass with sandblasting is used. If desired, transparent glass can be completely or partially tinted using decorative film. Stained glass decoration looks very stylish and original, as well as installing a mirror instead of window glass.
How to choose and what to combine with
The most direct way is to match the material of the window sill with the frame. The frame will look more complete if the window sill is continued in the slopes. It is harmoniously combined with the color of furniture facades and some of the finishing.
Plastic structures are easy to install and do not require special care. It is advisable that the detergent used does not contain abrasives. PVC products are characterized by the ability to imitate wood or the texture of natural stone; you can choose different thickness, size, matte or shiny surface.
Wooden window sills are close to the classics, cozy, and have good thermal insulation properties. They will last longer if they are protected with a special coating and have less contact with moisture.
The top layer of MDF and chipboard is also laminated and covered with cork or “stone”.
In addition to the fact that a granite window sill will not fit plastic frames at all, it should only be purchased with a certificate; it can accumulate radiation. Marble is highly durable and comes in a wide range of color options.
Subtleties
To ensure that your efforts are not wasted due to poor preparation of the foundation, you first need to do the preparation. It is not too complicated if you follow a few rules:
- There should be no flaws on the surface. Cracks, grooves, bumps - all this needs to be gotten rid of.
- Even in relatively dry rooms like the living room, it doesn’t hurt to treat the surface before finishing with a primer with antibacterial additives - it will save you from unpleasant surprises like the appearance of mold.
- It is necessary to measure everything accurately and draw up a preliminary sketch of the layout of the parts. It is much easier to lay all the components according to the drawing, as well as to adjust individual elements to size if you have a drawing.
- In order not to delay the work directly during finishing, it is better to practice with the cuts in advance, especially if you have no experience in such work.
Replacement or restoration?
Radical actions, namely dismantling the old window sill and installing a new one, are impractical in many situations. Especially if the old one has lost only its external attractiveness, but is still fundamentally strong. This applies, first of all, to stone, wooden, and concrete foundations. Although plastic options are no exception. In these cases, it is enough to update the coating.
Installing overlays on window sills eliminates many problems at once:
- the process does not require much time;
- eliminates the hassle of disposing of waste left after dismantling;
- money is saved.
The construction market offers a repair lining for the window sill that is specially designed for this purpose. Samples of different colors and sizes are available, so choosing a new coating to match the wallpaper or any other will not be difficult.
The main advantages of clinker window sills
High strength is a distinctive feature of clinker. The thing is that this is not ordinary ceramics: the clay mass is sintered at a very high temperature (from 12,000 C and above). The result is a material that can withstand heavy loads, resistant to impacts, scratches, and other mechanical damage.- Excellent aesthetic characteristics. Dozens of color shades, textures and shapes of clinker elements allow you to create a window sill that will organically “fit” into the appearance of the house.
- Resistance to various weather tests. Rain, snowfall, hail the size of an ostrich egg - the clinker window sill itself will remain intact, and will even protect the facade. The material can withstand up to 300 cycles of freezing and thawing - an indispensable quality for our climate, where the thermometer can cross zero up to 10 times a day.
- The color of the window sill remains pristine, even under the burning sun. The secret of such “constancy” is that the clinker is colored “in bulk”, that is, throughout the entire structure during the manufacturing process.
- Eco-friendly material. Each tile is based on natural slate clay, thoroughly cleaned of impurities. Therefore, the finished products are absolutely safe for health and do not cause allergies.
- Record service life. Such ebb tides last for at least half a century (official manufacturer’s warranty). But for clinker, 100 years is not the limit, and over time the coating takes on an even more noble vintage look.
- Easy to clean: just wipe the tides with a damp sponge when they get dirty. You can use chemical cleaning agents - the surface and structure of the clinker will not deteriorate.
Which window sill to choose: main varieties
It would seem that a traditional element is a window sill, what variety there can be. Leading manufacturers of clinker facing elements will object: there are dozens of all kinds of ebb models. Each collection is unique. To decide which window sill to choose, you need to imagine the general style of the house and the size of the window openings.
Classification of clinker window sill elements:
- by color - the most impressive category. There are many shades: from the traditional “brick red” to bright models of indigo, yellow, burgundy, and white.
- by texture: glazed (with a shiny smooth surface) and rough.
- Shape: classic rectangular with rounded edges, drips, borders.
- by size: the usual clinker width is 10.5 cm, length varies from 10.5 cm to 28 cm.
- by brand. The most famous manufacturers of clinker casts represented in Ukraine: King Klinker (Germany) and St. Joris (Netherlands). These are companies with an impeccable reputation, which has been formed over decades and is firmly established for many years.
Judge for yourself how original and stylish the design of a clinker window sill (photo) looks: here are a few ready-made solutions.
Not only window sills: the scope of application of clinker elements
Window openings are a traditional, but far from the only area of application for clinker sills.
What else is decorated using clinker elements:
- balcony sills;
- external and internal thresholds;
- fence parapets;
- homestead architectural objects.
Now you are unlikely to have any doubts about which window sills are better - clinker ones, of course! Decide on the model and brand, and the clinker transformation of your windows will become an exclusive decoration for your home!
Consultants from VipKlinker, a leading supplier of elite decorative building materials from Europe, will help you understand the features of clinker window sills and the main varieties.
Options
The general name “tile” combines very different properties and types of coatings, each of which is interesting in its own way. Some types of such materials are better suited for the task, while others are worse - the complexity of processing the same tile affects it. However, it is worth considering them all:
- Tile. The solution is one of the simplest, most traditional and accessible. The main advantage here will be the choice of possible options - it is huge. The advantages also include high strength and the ability of the coating to withstand the effects of water. However, despite its advantages, tiles have a rather serious drawback - they are difficult to process and not everyone can handle it.
- The same drawback is characteristic of another similar material - porcelain stoneware. In almost every case, you will have to cut the slabs and adjust them to size. Parts made from this material have quite large dimensions and trimming will be necessary in any case. It is best to choose such a coating for wide window openings, where you can get by with a minimum amount of such work.
- Tiles made in the style of bricks look beautiful in most cases, but only when the entire interior implies the presence of similar surfaces. At the same time, there will be a lot of variations in the appearance of parts, as well as the materials from which they are made.
- Mosaic. Very interesting in appearance and the most suitable option in terms of its characteristics. When finishing the window sill with mosaic tiles, you most likely won’t have to think much about fitting - the parts are small and will “fit” perfectly into any dimensions of the surface being designed.
In addition to purchasing a suitable covering option, you will have to think about one more detail - the base on which the tiles will be laid. Most often, the base is an old window sill, which is prepared for finishing and decorated. However, you should not lay such coatings on plastic surfaces. It is better to replace them with window sills made of concrete or, as a last resort, wooden ones.
DIY window sill and slopes
When making a wide window sill, you must not forget about the access of warm air from the heating radiator to the glass; for this, you can provide special technological holes in the window sill for the passage of air. The air holes can be covered with a decorative grille.
When ordering a window, you need to take into account the gaps along the frame, since gypsum board is placed behind the frame. An old concrete window sill will serve as a good foundation in this case.
Window sill installation
The distance from the old window sill to the window frame should allow the installation of a metal profile. The foam that emerged during installation of the window unit is removed.
A metal profile is mounted under the window frame with a preliminary gap for drywall, in place for the plastic window sill, using self-tapping screws.
On the old window sill, small pieces of the profile are mounted every 20 -25 cm; they will hold the upper part of the window sill.
Having inserted it into the horizontal profile, the upper profile is fastened with self-tapping screws, it is made with a protrusion beyond the old window sill, the main thing is not to forget to check the level, all the guides must be in the same plane.
A horizontal guide is placed on short profiles; control is carried out using a level.
To give the window sill additional rigidity and give it a non-standard look, it extends onto the wall, where a piece of the profile is attached.
To strengthen the structure and add volume to the window sill, another profile is screwed to the lower end part of the window sill using self-tapping screws.
The gloss also fades
In addition to its direct purpose, the window sill is used by households for many other purposes:
- as a desk or kitchen table;
- bench;
- additional shelf;
- greenhouse.
The white decorative surface attracts children as an object for creativity.
There are often cases of a window sill being close to a central heating radiator, as a result of which the plastic can become deformed or even catch fire. It does not tolerate too aggressive household chemicals and turns yellow if the window faces the sunny side. All this turns a beautiful piece of furniture into something that causes pity and irritation.
There are two ways to solve the problem: complete replacement and update.