How to transform your bathroom interior: tiling
Page navigation
If you have been thinking about changing the appearance of your bathroom for a long time, now is the time to act. In this article you will learn how to do this yourself.
For a long time, tiling with ceramic tiles was considered a traditional solution for finishing wet rooms. This is explained by its consumer properties that other materials do not have.
Love works wonders. Dogs that have found a new home
In the age of high technology, when social networks have replaced face-to-face communication, and online shopping gives you the right not to leave your home at all, people’s values have changed a lot. But one thing, perhaps, has remained the same - the love of animals and the desire to have a furry friend.
In this same age, you can, without looking up from your personal gadget, order a pet food - this is not new, we have long been accustomed to this. The only difference is the price and assortment.
But sites for delivering the animal itself directly to your doorstep are still wild for me.
So why is it still advised to adopt an animal from a shelter at a time like this? This is worth looking into.
Laying methods
There are several finishing options:
- seam to seam (the seams of adjacent rows coincide);
- diagonal (cladding at an angle of 45 degrees);
- staggered (displacement of the seam by half).
The method of laying tiles usually depends on personal preference or design decisions of the project. The classic option is considered to be a seam into a seam.
Recommended Posts
Recently viewed by 0 users
No registered user is viewing this page.
Kitchen design in Provence style: 50 cozy photos that you will love
12 kitchen design projects for every taste
Mediterranean style kitchen
The best articles on the IVD website
Are you a professional architect or designer?
Are you a professional architect or designer?
The IVD.ru website is a leading Internet project dedicated to the issues of reconstruction and interior design of residential premises. The main content of the site is the archive of the magazine “Ideas for Your Home” - exclusive author’s articles, high-quality illustrations, practical tips and lessons. A team of professionals is working on the project in close collaboration with famous designers, architects and leading publishing experts.
On our website you can choose comprehensive design solutions; view detailed reviews of the market for construction and finishing materials, furniture, machinery and equipment; compare your own ideas with design projects of leading architects; communicate directly with other readers and editors on the forum.
Are you a professional architect or designer?
Source of the article: https://forum.ivd.ru/topic/5910-%D0%B2%D1%8B%D1%81%D0%BE%D1%82%D0%B0-%D0%B1%D0%BE %D1%80%D0%B4%D1%8E%D1%80%D0%B0-%D0%BF%D0%BB%D0%B8%D1%82%D0%BA%D0%B8-%D0%B5 %D1%81%D1%82%D1%8C-%D0%BB%D0%B8-%D1%81%D1%82%D0%B0%D0%BD%D0%B4%D0%B0%D1%80 %D1%82%D1%8B-%D0%B8%D0%BB%D0%B8-%D0%BA%D1%82%D0%BE-%D0%BA%D0%B0%D0%BA-%D1 %85%D0%BE%D1%87%D0%B5%D1%82/
How to lay tiles in the bathroom with your own hands
To decorate bathrooms, two types of tiles are used: wall and floor. To make the cladding yourself, you need to familiarize yourself with the characteristics of one and the other, taking into account the recommendations for use. After this they begin to work.
The finishing surface is marked before it is leveled in order to eliminate bottlenecks and the need for additional purchase of tiles.
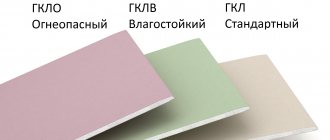
Features of wall material
Although the types of tiles are externally similar, their characteristics differ significantly. Wall can be glossy or matte. It has greater porosity (10-16%) and less weight, but loses in bending strength.
Features of the floor material
In most cases, the tiles are square in shape. It is subjected to more intense stress, therefore it is harder and denser. As a consequence of this, it has a porosity of only 3-5% and low water absorption. The color options are less varied than for the wall. The top layer is matte with a rough finish to prevent slipping. One type of floor tile is porcelain stoneware. The material is particularly hard and wear-resistant. It can withstand sub-zero temperatures and has more industrial applications.
What thickness should the tiles be
Wall tiles are lighter than floor tiles due to their smaller thickness (4-8 mm). Therefore, when laying it does not slide off the surface. The purpose of using floor tiles is to obtain a solid base that is resistant to abrasion. This is achieved due to the peculiarities of manufacturing technology and thickness of 8-16 mm.
How to determine material consumption per square meter
To ensure that there is enough material to complete the work, a preliminary calculation is made. Then they draw a laying diagram with the detailed location of each element. This allows you to present the overall picture of the cladding. For classic installation methods (seam to seam and staggered), buy tiles with a margin of 10%, and for diagonal - 15-20%. In the latter case, the consumption increases due to the fact that the final rows of all sides are cut.
“Final chords” of repair
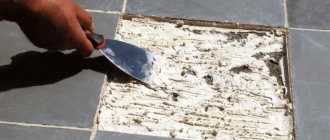
A few days after finishing laying the floor (at least a day), you can start grouting the joints. You must first clean them of any remaining adhesive solution and dust.
The mixture is rubbed into the seams using a rubber spatula. To form neat “grooves,” you can use a special stick with a groove. Excess grout is removed from the surfaces with a soft sponge immediately after finishing work - without waiting for it to dry.
As for the color of the grout, it is not at all necessary that it matches the color of the tile. Playing in contrast in most cases looks incredibly stylish.
At least a week should pass between the completion of all finishing manipulations and the installation of plumbing fixtures. During this time, completely dry seams must be treated twice with a mold and mildew remover. This will prevent the appearance of blackness in them in the future.
By installing the tiles according to all the rules, you can enjoy the impeccable appearance of your bathroom for many years!
How to treat walls before laying tiles
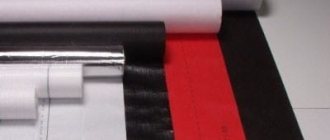
Before cladding, the base must be coated with primers. First, a special antifungal composition is applied, taking into account the constant humidity of the walls in the bathrooms. After drying, the wall is treated with an adhesive primer. It forms a thin film on the surface and prevents moisture from the adhesive mixture from being absorbed into the base.
Before finishing, the floor and 20-30 cm of walls above it are covered with waterproofing mastic in two layers. This will protect the base from moisture.
Procedure for applying waterproofing
- Using a suitable primer, the surface of the walls is primed.
- Waterproofing is installed according to the manufacturer’s recommendations - by spraying, gluing or coating.
- The protective layer dries completely.
- The floor screed is being installed - tiling is done after it has completely hardened.
You can level the surfaces in the bathroom with plasterboard, but only moisture-resistant green material is suitable. Moisture protection must be applied on top - liquid or coating compounds.
You can proceed to the next stage only after the laid mixture has completely dried.
Before cladding, the surface must be dust-free and coated with a primer.
Covering a room with ceramic tiles: design options
In order to decorate the bathroom tastefully, take into account the following features of the room:
- dimensions;
- shape;
- arrangement of interior elements.
These details guide design decisions.
For a small room
If the bathroom is small, use small tiles for finishing. Then every element is visible, and the cladding gives the impression of completeness. Preference is given to light tones of tiles (beige, peach, olive). They make the room brighter, and therefore visually wider. The decor should be calm and not stand out from the general background.
For a spacious room
To make the interior look original in a large bathroom, the combination of all elements is taken into account. In this case, tiles with a composite pattern are used for the floor. The lower part of the wall is decorated with dark tiles, and the upper part is light, separating them with a frieze row. To dilute the uniform color field, several decorated elements are inserted. Unusual solutions also look good, for example, niches in the wall for placing bathroom accessories.
How to lay tiles to the middle in combination with other materials
If finances do not allow for continuous cladding of the bathroom walls, it can be combined. The lower part is covered with tiles, and the upper part is covered with moisture-resistant wallpaper. It is possible to paint with special acrylic compounds followed by applying a wax coating.
Finding the shape and size of the material
“Classic” rectangular wall tiles are an excellent helper in solving many “visual problems”. When laid horizontally, it optically makes the room appear lower and more spacious - this solution is ideal for narrow, small rooms with high ceilings.
By laying the same tile vertically, you can illusorily raise the ceiling.
In a large bathroom, the harmonious combination of floor and wall tiles immediately catches the eye. A winning option for a spacious room is large-format wall tiles matched to the same floor tiles.
To create a “self-sufficient” bathroom interior, it is recommended to use square tiles of the following sizes: 10×10 cm, 13×13 cm, 20×20 cm. If the walls of the room should become a simple, laconic background, it is better to give preference to large-format tiles or a uniform mosaic of light shades .
Tiles of different shapes and textures can be quite harmoniously combined in a bathroom, so don’t be afraid to experiment and introduce cutting-edge design ideas into your interior.
Where to start laying tiles on the wall with your own hands
The initial stage of work involves careful preparation of the surface. To get a neat finish, mark the base in advance. Laying begins from the corner of the room in both directions at the same time. To ensure that there are no narrow pieces left, the number of whole tiles in the row is first calculated and, if necessary, the two outermost elements are cut to maintain symmetry. The cladding is done in such a way that when entering the room the joint in the corner between the tiles is not visible.
How to lay the first row
First, a line is drawn along the perimeter of the room using a laser level.
Its height from the screed depends on the thickness of the future floor, taking into account trimming the bottom row of tiles. According to the marks made on all walls, a wooden beam or galvanized profile is fastened with self-tapping screws. This is the basis to get started. Laying is done in a circle, raising a maximum of 2-3 rows to prevent them from diverging in height. To obtain the same size of the seam between the tiles, auxiliary elements made of plastic (crosses and wedges) are used.
How to lay tiles halfway
If the bathroom is large, solid wall cladding will look like a “hospital” option. In such a situation, an interesting solution is to lay tiles up to half the height and finish the space above it. The cutting of the top line of the last row is done as before. After this, the surface is primed in accordance with the materials used.
Do I need to lay the corners right away?
In order to ideally perform the cladding in a vertical plane, two tiles are leveled at the junction of adjacent walls. In this case, corners are immediately formed that ensure the correct geometry of the room.
How to glue baguettes to the ceiling and baseboards to the floor
The boundary between the walls and the ceiling is emphasized with a decorative element made of polyurethane foam (baguette). It is installed using “liquid nails” assembly adhesive. Thanks to him, the interior takes on a finished look. A plinth is used to bring the planes of the walls and floor together. Typically, it looks like a narrow ceramic strip that is fixed using tile adhesive. If the baseboard material is PVC plastic, the use of “liquid nails” is acceptable.
Which color should I choose?
It is advisable to choose energetic and invigorating warm colors (yellow, red, orange) only in cases where family members are used to taking a quick shower and running errands. “Aggressive finishing” tires very quickly, so it is definitely not suitable for those who like to soak in the bath.
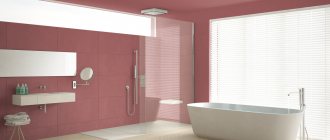
For a bathroom that promotes complete relaxation, you should choose cool colors - all shades of green and blue, gray and even black are also suitable.
A white bathroom always looks luxurious and calming.
Laying black and white hexagonal tiles in the bathroom will add a unique “timeless combination” of contrasting colors
How to lay ceramics on the end of a bathroom
To ensure that the bathroom fits harmoniously into the interior of the room, its side surface is covered with a panel. One of the design options is a frame made of brickwork, lined with the same tiles as the walls. Surface preparation for installation is standard. To simplify the work, a frame is made from a galvanized profile, sheathed with plasterboard and finished. This design is lightweight but not durable.
For a simplified frame design, moisture-resistant plasterboard is used and it must be primed on both sides.
Depending on the opinion of the masters
If conditions allow you to choose any of the options, you can trust the craftsmen doing the repairs. Specialists with extensive experience will determine the optimal sequence themselves and tell you about all the possible pros and cons.
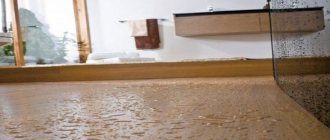
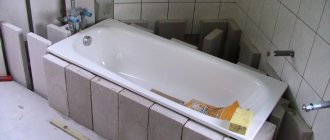
1. If a whole tile comes from the side of the bathtub, rather than a short cut, the picture turns out to be more attractive. When planning to bring a bathtub into a tiled bathroom, it is advisable to approximately determine at what height the side will be before laying the tiles.
2. Before sealing the “seam” between the wall and the bathtub with silicone sealant, it is recommended to fill the bowl with water until it drains. You can drain the water only after the sealant has dried. It is claimed that if you “seal” an empty bathtub, then after filling it can come off the wall. To protect the bathtub and walls from traces of sealant, before work you need to stick mounting tape on them.
3. If you want to “drown” the bathtub into the tiles that were laid long ago, you can make a shallow groove in the tiles. The width of the groove is the size of the side of the bathtub. The bathtub is pushed into the groove, the joint is treated with sealant and/or moisture-resistant grout.
What to remember
When facing, it is important to follow a few simple rules:
- the quality of the work performed directly depends on the correct preparation of the material;
- the base for finishing must be dry and primed;
- The glue is applied both to the surface of the cladding and to the back of the tile with structural elements.
To this day, ceramic tiles are considered the No. 1 material for finishing bathrooms and bathrooms. It is distinguished by a variety of colors and shapes, allowing you to implement the most daring design solutions. Such cladding will delight the owners for a long time.
An important nuance is the selection of the inspection hatch
When planning the layout of the tiles, be sure to take into account the location and size of the inspection opening for access to the plumbing niche. In order not to spoil the bathroom interior and make access to communications invisible, choose special hatches for tiles.
It is better to start facing from the hatch, so that there is a solid tile on it without trimming - this way the inspection opening will be as hidden as possible.
It is important that the inspection hatch is covered with a solid tile without trimming, so that after cladding the opening is completely hidden!
The size of the hatch for the tiles is selected according to the size of the solid tiles that fill the opening you have chosen:
- The width of the hatch is the number of tiles horizontally multiplied by the width of the tile.
- The hatch height is the number of vertical tiles multiplied by the tile height.
Important: the maximum protrusion of the tile from the hinge side is 5 cm. On the other sides - no more than a third of the width and height of the tile.