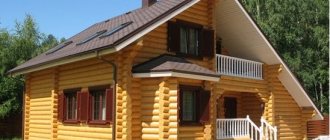
The construction of residential buildings using frame technology does not require significant time and financial costs. Therefore, projects of such housing today are very popular not only abroad, but also in Russia. Floor installation in a frame house, incl. The construction of walls and installation of the roof is carried out immediately after the construction of the foundation.
General terms
In principle, there are two types of wooden subfloor on the first floor of a frame house:
- load-bearing ventilated structure on a strip or pile (screw) foundation;
- lattice structure on a slab or concrete screed.
In the first case, the horizontal level must already be maintained at the level of the base, grillage or trim, in the second - when pouring the base.
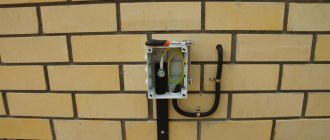
If there is a subfloor in a shallow strip foundation, vents for ventilation must be installed in the load-bearing walls of the base along the perimeter and inside it.
Note : Vents should also be left when arranging the base of the pile foundation.
To protect the wood from rotting when in contact with a concrete or metal surface, the places where the load-bearing floor beams rest on the foundation are isolated using rolled bitumen waterproofing.
A wooden beam must be isolated from contact with concrete Source metasold.com
All wooden elements must be treated with antiseptics, the metal fasteners used and fastening points must have an anti-corrosion coating.
Sex bases by joists
As a rule, the basement floor is located quite close to the soil, there is a danger of moisture penetration, the formation of cold bridges and other negative aspects. In such situations, the wooden structure of the floor base requires additional protection: hydro- and thermal insulation. This will extend the service life of not only the floor itself, but also the frame building as a whole.
You can waterproof the base yourself using roofing felt. It is carried out primarily and is intended not only to protect the wooden elements of the floor structure, but also the thermal insulation material.
Subfloor structure
The structure of the floor in a frame house is no different from the walls.
There are also power elements responsible for the reliability and strength of the structure - joists and lintels. They are also attached to a load-bearing base - the foundation. And in cross-section, this is the same sandwich - a thin-layer sheathing of the frame, inside of which there is insulation. And so that the insulation and wood do not get wet from condensation and atmospheric moisture, they are protected with special films and membranes.
The subfloor in a frame house is installed in two stages.
Features of the subfloor of the first floor. First stage
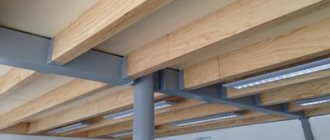
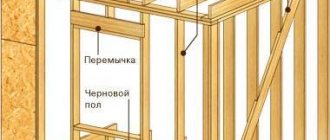
At the first stage, immediately after the construction of the foundation is completed, the load-bearing structure of the floor - joists and cross members - is installed.
This is what a simple “skeleton” of the first floor floor looks like Source sk-rusdom.ru
And here there are different options for mounting them:
- The logs are attached to the top of the frame beam of a pile foundation or the beam of a strip foundation with nails. First, along two opposite walls, a façade (banding) board for joists is attached to a beam or beam. And then the logs themselves are installed between them. If necessary, they are built up with an overlap, which should rest on one of the internal load-bearing walls of the strip foundation or the internal beam of the grillage (purlin).
Scheme with fastening the logs to the facade board Source ms.decoratex.biz
See also: Catalog of house projects using frame technology presented at the “Low-Rise Country” exhibition.
Basic data for calculation
Logs are wooden or other material rectangular beams that are laid on the floor of the room in order to level it and create reliable support for the finishing flooring.
Basic information on joists and floor construction is presented in the article “Wooden floor on joists: do-it-yourself installation.” The following points are most important for the calculation.
Dimensions of the room and the planned mode of its operation . The dimensions and purpose of the room are important for determining the length of the span (the required length of joists, solid or composite), their position and the choice of wood. For walk-through rooms or corridors, it is customary to place the frame across the direction of movement. Accordingly, short lags can be used. In rooms with natural light, it is important to consider the direction of the light rays and their intensity. If the illumination is sufficient according to SNiP standards 05/23/2010, it is important to place the logs across the direction of the light flux. In this case, they will heat up (and become deformed and age under the influence of heat) evenly. The choice of wood is influenced by the humidity in the room. For dry spaces, common coniferous trees are used (spruce, pine, fir, smereka), for wet spaces - larch. In especially critical cases, we use oak.
The type of support for beams is on a solid base (screed, reinforced concrete slab or masonry), on adjustable or non-adjustable supports, around the perimeter of the room on protrusions of the foundation or grillage. The support of the joists is directly related to their location. When installing a floor on top of a floor made of wooden or metal beams, the joists are attached directly to the beams. If the distance between the floor joists does not correspond to that required for the flooring (based on strength conditions), then a second layer is placed on top of the first layer of beams, with the necessary spacing. In this case, level alignment is performed for the first layer. On solid foundations or soil, logs are placed according to strength standards.
The location of the bars is only in one direction or along and across the room. The frame is arranged in the form of a lattice if increased strength of the flooring is required or if it is planned to create a “floating floor”. In both cases, the connection of longitudinal and transverse beams increases not only the strength, but also the rigidity of the structure and its resistance to deformation.
Lag section. Selected depending on the thickness of the deck board and span. The greater the load and the longer the span, the larger the cross-section of the beam. The thicker the floorboard, the more you can increase the span and reduce the cross-section of the beams.
Video description
The rigidity of the structure is ensured by additional spacers, the length of which must correspond to the pitch of the joists (minus their thickness). How Larry Hong does this can be seen in the video below:
Racks and joists in one fastening unit Source stroiremdoma.ru
- The logs are attached to the strapping beam, for which special slots are made.
- The logs are attached to the frame beam on the inside using special brackets.
There is no clear opinion regarding the lag layout step.
A more “economical” option is 600 mm. And if we talk about the axial distance, then taking into account the thickness of the lag - 625 mm. But some experts recommend a pitch of 400 mm. And although the mats will have to be cut when insulating with mineral wool, the structure of the subfloor will be much stronger.
Important! In places where heavy equipment is installed (stove, fireplace, floor-standing boiler with boiler), the layout (step) of the log is further reduced.
Tips and tricks
The supports are made of wood, and the base for them is a concrete base, which is provided for each pillar. Insulation is performed with roofing felt in 2 layers. The surface of the logs is leveled for laying a clean floor; to do this, a layer of wood is cut down to 20 mm to maintain the level. They use a chainsaw and an axe.
The installation area of the logs is equalized by lining the plates until a positive test result is achieved with a building level on a long rail.
When laying boards, the tongue and groove tongue fits tightly into the groove. The board elements are fastened to the joists with screws or self-tapping screws at intervals of 2 cm from the edge. Hardware is placed at an angle to the middle of the board. The caps are sunk into the body of the board, and the hole is puttied or sealed with a piece of suitable wood.
Video description
The principle of reducing the layout of logs in places where heavy objects are installed is used not only in frame houses.
For example, the same advice can be heard in the following video, although it talks about the construction of the subfloor of a timber house. As you can see, in practice there are no fundamental differences - this is the same wooden floor of the first floor: See also: Catalog of companies that specialize in the design and construction of turnkey country houses.
Installation of subfloor. Second phase
The second stage of arranging the subfloor begins after the walls are in place and the roof is installed. Although frame houses are prefabricated, precipitation can “happen” at any time, and mineral wool must be laid provided that it does not get wet from rain.
There are three ways to make a floor in a frame house (more precisely, its lower part):
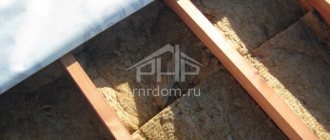
- The base is hemmed underneath the lag . It is made from boards, moisture-resistant plywood or OSB. Since decorative qualities are not needed for this, you can take an unedged board, but be sure to remove the wane (bark) and treat it with an antiseptic. The entire load that will fall on this base is the weight of the mineral wool. Therefore, it is enough if the board is 20 mm thick, and plywood or OSB - 10-15 mm. The disadvantage of this method is that the base is fastened from the side of the subfloor, and this is only possible with sufficient clearance to the ground.
This is what the floor plan looks like with a bottom lining Source chrome-effect.ru
- The base is hemmed along the “cranial” block . This is the name given to a small block of cross-section (usually 50x50 mm), which is attached to the joists on both sides at the very bottom. Base boards or cut plywood sheets (OSB boards) are laid on these bars. Moreover, their attachment to the cranial block is carried out purely “symbolically”. The advantage of this method is that installation is carried out “from above”, so there is no limitation on the clearance between the ceiling and the ground. Disadvantage - the logs must be at least 200 mm high (even better - 250 mm) to compensate for the loss of useful space for floor insulation. You can also note the additional purchase of the bar as a disadvantage.
Scheme of a subfloor with a cranial block Source smesystroy.ru
- The subfloor of a frame house is mounted on top of the joist . This method is used if the base is low and there is virtually no underground floor. In fact, it is necessary to lay additional logs perpendicular to the joists of the main subfloor. In this case, the base of the subfloor is attached to the main joists, and additional joists are mounted on it - they serve to attach the finishing floor covering.
After the base is installed, a waterproofing membrane and insulation are laid between the logs (main or additional for the third method).
DIY installation features
To prevent the wooden frame from rotting, vents are installed to ventilate the floor.
Before installing the frame floor, impregnations are purchased to extend the life of the load-bearing elements. Use heated drying oil or waste oil from engines. When installing a frame floor, exits for sewer and water pipes are provided, space is left for them, or they are installed immediately.
Assembly steps:
- production of vents in the foundation or plinth;
- preparation for laying heated floors, installation of the system;
- laying beds, supports and floor purlins;
- installation of strapping and logs;
- insulation, insulation;
- clean flooring.
The supporting base is mounted on the ground, often a reinforced concrete monolithic slab. The preparatory floor is made of unedged material. The supporting frame is made of wooden purlins, logs are placed on them, beams are load-bearing elements. The supports are wooden posts for purlins that protect the beams from contact with the mortar. The lathing is made with a wooden lath with a cross-section of 50 x 50 mm, which is mounted on a beam system.
Second floor subfloor
The construction of a subfloor in a frame house on the second or attic floor differs from the basement floor.
Here the vapor barrier is located differently and additionally there must be elastic gaskets to compensate for impact and structural noise. In addition, only mineral wool is used as an insulating layer. Moreover, this is explained not only by its non-flammability, but also by its ability to absorb airborne noise, which foam plastic does not have. That is, it acts not as thermal insulation, but as sound insulation. Therefore, its thickness will be less (although for this case it is better to choose mats of special acoustic wool).
Sound insulation is important for the ceilings and floors of the second floor of a frame house Source rubankom.com
Note : Airborne noise includes any waves in the acoustic range - speech, music, a working TV or stereo system. Impact noises include walking on the top floor, sounds from objects falling on the floor or furniture being moved. Structural noise propagates through structural elements from operating equipment (ventilation, air conditioners, water supply and heating system pumps).
From the point of view of sound insulation, the recommended sequence of arrangement of the floor layers of the second floor (from top to bottom):
- finishing coating (for laminate – with a backing made of foamed polyethylene);
- plywood or OSB board;
- rubber or cork backing glued on top of a chipboard (or plywood);
- rubber or cork gaskets on floor beams ;
- mineral wool between beams;
- vapor barrier;
- sheathing;
- ceiling cladding (plasterboard, lining or panels);
Mistakes made when calculating logs for plywood and their consequences
Typical mistakes that are made when calculating lags for plywood include too wide a pitch, insufficient number of lags, and incorrect section dimensions.
The negative consequences of such errors include:
- the appearance of cracks in plywood;
- deflection of plywood;
- damage to the decorative coating;
- unevenness on the surface of the finishing coating;
- destruction of supporting elements.
PHOTO: e-stroy.pro If there are errors during operation, problems will arise
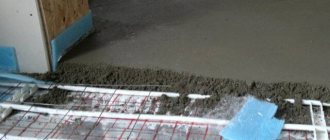
How to organize the screed itself?
Screed for heated floors involves the use of a concrete mixer. It produces medium-thick concrete. It is poured over the surface of the pillow, arranged on top of the logs and insulation. It is important to ensure the surface is level. The heated floors themselves are laid under a finishing screed.
Additionally, you can reinforce the foundation with joists. This will give it strength and resistance to damage. However, in most cases, the foundation on logs already has high characteristics and there is no need for additional work. Next, waterproofing, insulation, vapor barrier, finishing screed, heated floor and decorative layer are laid.
Reinforced screed
With such a floor, a wooden frame house will be suitable for both seasonal and permanent residence. It does not matter whether it is based on logs or concrete slabs. Almost any option is suitable for a heated floor as a floor covering. Insulation materials also harmonize with all materials, allowing you to create an aesthetic design.
can a cat give birth at half a year?
Source
Foundation requirements
The foundation surface must be checked for evenness. The height difference should not exceed 1 cm per 1 linear meter. Otherwise, it is necessary to additionally use a cement-sand screed.
During the process of pouring concrete for the foundation, when it has not yet hardened, anchor fastenings for the beams must be installed in increments of up to 2 m.
Before continuing construction work, care should also be taken to properly waterproof the foundation. This will ensure its durability, protect it from gradual destruction, and protect the first floor and basements (if any) from fungus, dampness and insect breeding.
You can waterproof the foundation using a variety of options for rolled, coating, sheet and sprayed materials. You can also use concrete with special hydrophobic additives that increase the degree of water repellency.
Concrete gains full strength by 28 days of hardening under normal conditions. However, laying the floor can begin about a week after pouring, when the foundation already has about 60-70% of its final strength.
If laying the floor is carried out before installing the walls and erecting the ceiling of the next floor, then the work must be carried out in dry weather, and also making sure that the foundation is dry from precipitation.