According to scientists involved in studying the ecological state of the Earth, pollution of the soil and atmosphere today, alas, has already become something of a norm. It is difficult to find a territory on the planet where everything would be fine. Even if they are far from industrial centers, pollution is transferred over vast distances, and you can’t vouch for anything.
DIY water filter
Various chemicals spread with wind, precipitation and, of course, end up in water bodies and groundwater. In this regard, purification, if water is planned to be used for food purposes, is an extremely important issue. To do this, it is recommended to use high-quality filter units, preferably permanently located. But sometimes circumstances develop in such a way that cleaning is required in conditions where an industrial filter is not available for one reason or another. What should I do? It turns out that you can sometimes make a water filter with your own hands at home or even on a camping trip, without incurring any special costs.
How to make a water filter
The easiest way to purify water is to pass it through a layer of charcoal.
Most of the impurities remain in the filter, and the water is safe to drink. Many jug filters operate on the principle of carbon purification. However, coal cannot rid water of chemical elements. Another inconvenience is the need to regularly change the layer of coal through which the water passes. Changing the filter is necessary every three days, just enough to solve the problem of water filtration in the house.
How to make a carbon filter?
- It is necessary to burn a sufficient amount of birch firewood in a metal container, such as a tank.
- The coals formed after combustion, after they have cooled, are placed in a funnel.
- The funnel is placed in a container to collect filtered water, and water is poured into the funnel itself from above.
Remember that such a filter cannot be used on an ongoing basis; the carbon layer quickly becomes clogged and requires replacement.
You can improve the carbon filter and make it more efficient by making a multilayer filter. In this case, a layer of sand is added to the coal layer. You will also need a piece of gauze or loose fabric.
- You need to make coal, as in the first case.
- Several layers of fabric or gauze are placed in the neck of the funnel.
- A sufficient layer of charcoal is poured onto the fabric, and a layer of river sand is poured onto the charcoal.
- It is better to pour a layer of gravel onto the sand, which, in turn, is covered with a layer of gauze.
The further operation of the filter is the same as in the first case. True, here the cleansing will be much more effective. The only negative is the length of time it takes to manufacture such a filter. The filter agents themselves also need to be changed frequently.
The third version of the carbon filter was most common among Soviet tourists and even soldiers during the war. Today, an activated carbon tablet is included in any kit for a foot soldier; it allows you to purify water for drinking in field conditions.
As you may have guessed, you can make such a filter from activated carbon. So, let's make a water filter with our own hands.
- A layer of gauze or cloth is placed in a funnel or an inverted plastic bottle without a bottom and with a hole in the lid.
- Activated carbon tablets are poured onto it.
- Water is poured onto the coal, which, passing through a layer of agents, is purified.
One standard tablet of activated carbon can purify a liter of water, take this into account when calculating. In any case, there should be several tablets in the filter for the cleaning to be most effective.
Overview of filtration materials
Water purification is carried out through porous layers of materials that can be replaced as needed or in connection with the assigned tasks. To determine the quality level of filtration, water must be sent for laboratory analysis. Sometimes it is enough to visually feel the difference between the original and purified water in terms of taste characteristics.
The main list of filtration materials is traditional: cotton wool, gauze, cotton fabrics, pebbles, coal. But sometimes the question arises, what to prefer and why?
River or quartz sand
For the purpose of mechanical purification of water from impurities and contaminants, sand is used. Quartz is considered the most suitable due to the suitable shape of its grains and mineral purity. The angularity of the particles resists sticking, a property important for filtration. Quartz sand is finely dispersed, which enhances the quality of water purification.
Charcoal or coconut shell
The use of coal is associated with the removal of pesticides, traces of chlorine, ozone, and organic matter through the adsorption process. Efficiency is achieved provided the structure is porous.
If the charcoal was produced in a factory method, then technology ensures that the charcoal has pores. Making coal yourself does not lead to the desired stage, although there will still be some porosity.
The best cleansing structure of charcoal is achieved by charring coconut shells or pits of plums, apricots or peaches.
Lutrasil
An additional filter component that has recently appeared on the modern market. The presence of special polypropylene fibers in it ensures high-quality cleaning from impurities and substances harmful to humans.
The main condition for high-quality cleaning is filter media
The working container is selected so that all the necessary filling fits into it. A variety of components are used for absorption: artificial and natural. The latter have higher filtration capabilities. These include:
- sand from a river or quarry;
- gravel;
- zeolite;
- Activated carbon.
For initial rough cleaning, cotton fabric materials or even paper are usually used. According to hygienic requirements, they are very impractical: they are constantly in a humid environment, subject to rotting, and an unpleasant odor appears. The very structure of such filters contributes to almost instant contamination, which requires frequent replacement.
The best material for filtration is activated carbon
Artificial materials have the best performance in this regard. One of the most preferred is lutrasil. It is not afraid of moisture, dirt accumulates to a lesser extent than on cotton. Of the other fabric filters, the synthetic one used in coffee machines is the cheapest.
Zeolite is also a mineral, but has a disproportionately greater filtration effect. It cuts off metal and salt impurities - everything that comes into the water from the agricultural industry: pesticides, herbicides, mineral fertilizers.
Zeolite used in homemade structures
Activated carbon has found the most widespread use in homemade devices. It retains mineral formations and toxic substances with equal quality. Another advantage is that water after passing through it becomes transparent, unpleasant odors and microorganisms are eliminated.
Cooking charcoal yourself is not particularly difficult. Wood of any species is used, except coniferous. Birch has the best qualities. Firewood is loaded into a metal container, which is placed on the fire, ideally in a stove. When they are red hot, stop heating and allow to cool. If you overdo it, valuable filtration properties are lost.
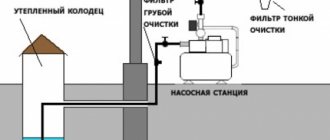
How to make a filter for a well with your own hands
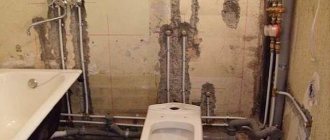
Well filters are installed on the bottom pipe and lowered into the source along with the casing; making them yourself is pointless if you are not involved in downhole drilling. The problem is relevant for drilling organizations and individual drillers who want to make an inexpensive, high-quality filter with high characteristics and parameters that are most suitable for a specific well (depth, soil composition).
Gravel
To install a gravel filter with your own hands, proceed as follows:
- First, the size of the gravel backfill is selected taking into account the granulometric composition of the aquifer sand. To do this, contaminated water is removed to the surface, and after it is filtered, the size of the sand particles is determined.
- The gravel fill should have a granule size approximately 8 times the minimum diameter of the sand particles or 5 times their maximum diameter. For example, if the dimensional parameters of aquifer sand are 0.5 - 1 mm, the backfill should have dimensions of 4 - 5 mm, with sand grains 0.25 - 0.5 mm. gravel sizes are 2 - 2.5 mm.
- The gravel fraction selected by size is immersed in the well bottom using the free-fall method in a water flow; its minimum thickness is 50 mm.
- Multi-layer backfilling is allowed, starting with larger fractions and moving on to small particles.
Rice. 11 Sprinkling the casing
Hole filter for perforated well
You can make a perforated filter yourself without much effort if you have a simple tool (a drill with a suitable drill bit). When installing a perforated filter from 125 HDPE casing pipe, proceed as follows:
- Markings are made, noting the distance from the bottom plug to the end of the sump about 50 cm, the length of the filter part with perforation is 110 cm.
- Draw 4 equally spaced lines along the pipe, drill 4 rows of holes with a diameter of 20 - 22 mm. feather drill for wood - they need to be done in a checkerboard pattern. The distance between them should be about 10 cm.
- The burrs formed during the drilling process are cleaned with sandpaper, or they can be scorched with a gas torch.
If the depth of the source is small, the number of holes can be increased to 8 rows, and also holes can be made for almost the entire length of a 3-meter pipe, their number will be about 20 - 25 pieces in a row.
Rice. 12 DIY holey filter
Slotted
The manufacture of a slot filter is rarely carried out independently - the process is labor-intensive and time-consuming. When installing it, proceed as follows:
- Make markings along the pipe surface, dividing it into 8 equal-sized sectors, drawing 8 lines and retreating 50 cm from the ends.
- To cut slots, take a grinder with a disc for metal or concrete, but it should be taken into account that the slots from the disc for metal will have a smaller width.
- Cutting is done in increments of 10 mm. by the width of the sector between two lines, alternating free longitudinal sections with cut ones. In this case, stiffening ribs 20 mm wide are left between the slots. through 10 – 20 lines.
- After cutting out 4 longitudinal segments with slotted areas, their surface is cleaned of burrs with sandpaper.
Rice. 13 Plastic pipe with slots
Wire mesh filter systems
Making a wire filter at home is not possible - to ensure a gap between the turns of the V-shaped wire is about 0.5 mm. it requires welding to a rigid frame from the inside at thousands of points.
At home, mesh filters are most often made by proceeding as follows:
- They take as a basis a casing pipe with round holes made using the technology described above. A nylon cord or stainless steel wire with a circumference of about 2–5 mm is wound onto its surface. with a distance between turns of 50 - 100 mm. The ends of the winding are secured with brackets, screws or screwed with adhesive tape.
- A metal or synthetic mesh is placed over the winding; to fix it, a second outer winding of wire or synthetic cord is used.
Rice. 14 Making a strainer
Design features of industrial and home-made installations
Purified from harmful chemical and bacteriological impurities, life-giving moisture is considered accessible to people only after filtration. In cities, due to the wear and tear of communications, it reaches consumers with rust, lime deposits and other additives. In such conditions, even an aquarium needs to purify the water, otherwise the fish will not survive.
If the house is connected to water supply, the owners use washing machines and dishwashers, which react even more sensitively to water quality. Manufacturers equip their products with mesh filters, which provide rough cleaning, but allow small particles up to 5 microns to pass through. This is harmful for many household devices; they require additional fine filtration.
Simple household filters for the home
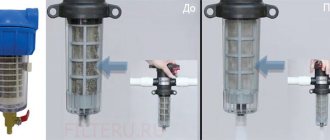
Industrial units are produced separately for cold and hot water; it is unacceptable to use them for purposes other than their intended purpose. In addition, a pressure regulator is required if pressure drops are observed in the pipes. All such installations have one or more cartridges plus a settling tank in the form of a flask or glass. The quality of water depends on the material used and the cell sizes of the working elements.
All of them require periodic replacement, because harmful impurities accumulate.
The cost, depending on the design, is sometimes very impressive. A DIY water filter allows you to get rid of unnecessary financial expenses, and the quality of cleaning can exceed some industrial designs.
A simple homemade device
Advantages and disadvantages
Cleaning structures made independently from improvised means and materials are quite inexpensive, convenient and accessible.
This is their great advantage over purchased filters and installations that do not take root at all in country houses and dachas due to cost and unacceptable conditions for use. Any average person can make a simple and at the same time effective filter using household tools and devices: a knife, a plastic bottle, a bucket, fabric and other materials.
The disadvantages of homemade designs for traditional filtration are:
- high level contaminants The pores of the filters can only partially resist harmful substances.
- A typical problem with the purifier is the internal accumulation of polluting microorganisms , the concentration of which increases as the filtration materials are used. The lack of self-cleaning affects the operation of the entire system as a whole. But a solution to this problem has not yet been found.
- Microelements needed by humans in particles commensurate with the size of contaminants are also retained by filters and demineralize the water.
Materials for filtration equipment
The efficiency of cleaning depends on the quality of the filtration material; a limited number of them are used in wells, the main ones being:
Stainless steel. In addition to strength, the material has flexibility and excellent corrosion resistance; the durability of stainless steel is tens of years. It is used to make strong meshes and wires that are mounted on top of the pipes. The disadvantages include the high cost of stainless steel products.
Plastic. Plastic is another common material for the manufacture of filters in water sources; meshes and cords are made from it, which are cheaper than stainless steel. Plastic is corrosion-resistant and inert to most chemicals, easy to install and has a long service life. The disadvantages of plastics include low physical strength, which does not allow them to withstand heavy loads at significant depths.
Non-ferrous metals. Copper, brass, and bronze can be used in the manufacture of water filters without any restrictions; they have high corrosion resistance and a long service life. Soft alloys with a high copper content are recommended for use at shallow depths to avoid deformation from strong water pressure. In the manufacture of filter elements, brass mesh and thick wire made of brass or copper are used.
Rice. 4 Filter for casing pipe - installation in the well
Steel. Steel filters are susceptible to corrosion and can be used as a budget option in water intake sources intended for technical needs. Increased content of iron oxide in water as a result of iron corrosion of more than 0.3 mg. per liter leaves a yellow residue on water main equipment and plumbing fixtures. Galvanized steel also rusts over time to form zinc oxides, which are harmful to human health - this material is not recommended for use in water filter elements.
Stationary Geyser filters: general rule for installing cartridges
For water with a moderate amount of impurities - soft and hard with a content of magnesium and calcium salts up to 5 mEq/l - the following rule is observed:
- 1st stage: mechanical cleaning cartridge,
- Stage 2: ion exchange purification cartridge,
- Stage 3: sorption purification cartridge.
For more “saturated” water—super-hard and ferrous—the rule works in the second and third stages; there are deviations for the first. Let's summarize the arrangement of cartridges in stages in stationary Geyser filters for all types of water.
| Water type | Cleaning stage | ||
| 1 | 2 | 3 | |
| Soft | Mechanical | Ion exchange** | Sorption |
| Hard (2–5 mEq/L) | Mechanical | Ion exchange | Sorption |
| Super hard (more than 5 mEq/l) | Ion exchange | Ion exchange | Sorption |
| Glandular | Oxidation | Ion exchange | Sorption |
Note to the table * - Some models have a multifunctional BAF cartridge with a mixture of sorbents and ion exchange resins. In all modifications of the Geyser Classic filter it is on the third stage, in the Geyser Standard filter for soft water - on the second. ** - The only exception is the Geyser 3 VK Lux model for soft water, where ion exchange is replaced by less expensive sorption. This budget option for a three-stage cleaning filter is in demand among buyers.
Pool water purification
Do-it-yourself sand filters allow you to filter a fairly large tank. They are easy to set up, and their cost is half that of store-bought ones. The structure consists of the following parts:
- container with a wide neck;
- pipes for water supply and intake;
- quartz or glass sand as a filter.
It requires a plastic reservoir, usually a barrel, at the bottom of which there is a fine mesh with cells smaller than sand. Its fraction is from 0.4 to 0.8 mm.
The first one changes after 2 or 3 years. The second one will last 5 years, but its cost is higher. Multilayer media is also used when the filter elements alternate from larger to smaller sizes or gravel is included.
Dirty water is supplied into a sealed container from above, suspended mineral and organic particles remain in the filter, and clean water flows into the pool from below. To operate the device, a pump with a power of 150–300 W is required, which is usually installed in front of the tank. Then he pushes the liquid out. If you place a pump after a container, a vacuum is created in it and water is sucked in. There is no fundamental difference in the two schemes; the procedure is ensured in any case.
For the first option, you need a container with reliable tightness that will withstand the pressure created in it. An expansion tank with a membrane is often used. This is removed and the inside of the body is painted to protect the iron from rust.
Using a plastic barrel with a volume of at least 60 liters for such purposes is also possible. But not every container of this type can withstand pressure: the lid often breaks off or the sides split apart at the joints. In this case, it is advisable to use a pump connection diagram after the filter. The lid is additionally sealed to prevent the slightest air leakage. The master class will show you the details in more detail.
To allow water to flow in and out, fittings are cut into the housing and the connection points are carefully sealed. A coarse filter is installed at the feed: an inexpensive cartridge or bottle neck with a mesh. A plastic pipe with holes is mounted on the back side of the filter tank, covered with non-woven material, through which even fine sand does not penetrate, and clean water flows into the pool.
If a pressure circuit is implemented, be sure to install a pressure gauge on the fitting in the tank lid or between the pump and the filter. It is more reliable to use a manifold that has a pressure sensor, air vent and safety valves. If the suction principle is used, a tap is cut into the lid. When the system becomes airy, just open it and bleed the air.
A filter with top water intake is placed below the level of the pool mirror. Taps are installed on both pipes to regulate the operation. The discharge and collection sites are located as far away as possible. Before turning on the pump, the tank is filled with liquid manually.
Type
Why do you need a well filter?
The need for filtration inside the well is caused by the following circumstances:
- Purified well water, in contrast to contaminated water, increases the service life of submersible and surface well pumps - impellers, membranes and other moving parts wear out less.
- Filtered water, when further passing through the pipeline, pollutes less filters in water purification systems located in the water supply system - this allows you to save money on the purchase of new cartridges and increases their durability.
- Filtration increases the service life of automatic control systems for pumping equipment - pressure and idle speed switches, hydraulic accumulator.
- Purified water contributes to better permeability of the water main and increases the service life of plumbing units (check valves, ball valves, mixers).
- Additional well treatment contributes to better quality of drinking water used in households.
Rice. 3 Filter element design
Simple hiking water filter
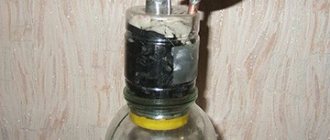
In order to design a water filter with your own hands, we will need:
- two identical plastic bottles with caps;
- plastic tube with a diameter of the neck of a bottle;
- glue gun;
- a drill with a feather drill, or a strong, sharp knife.
Now let’s find out how to make a water filter:
- Unscrew both caps from the bottles and glue them together along the front side using hot glue from a gun.
- Screw a pen drill with a diameter of 20 mm into the drill, and drill a through hole in the glued covers. In extreme conditions, you can cut through it with a camp knife, but you will have to tinker a little longer and be precise.
- Insert a plastic tube into the resulting hole. Its length should be slightly shorter than the height of the plastic bottle.
- Take your bottles and screw them into the caps on both sides. One of the bottles will then be placed on a plastic tube.
Your DIY water filter is ready! But how to purify water with it? Let's check:
- Unscrew the empty bottle from this device and fill it with water that needs to be purified. Take any cloudy water with mud to better notice the difference.
- Place the bottle on the table and screw the second part of the structure into it through the cap.
- Leave the bottle somewhere in the sun or, if possible, cover it with a black cloth to enhance heat absorption. Or you can immediately use a black plastic bottle.
- After a few hours, check how our filter is doing. You will find that the liquid evaporates from the first container and passes through the tube into the drainage container, settling on its walls and flowing down. And the condensed water looks absolutely pure, just like bottled water from the store!
- When a sufficient amount of water has collected, unscrew the water collection bottle, turn it over and unscrew the cap with the tube - that’s it, you can enjoy clean water! It’s true that it’s better to boil it before using it if you have heat-resistant dishes and the ability to make a fire.
If you try to make this filter yourself at home, then no problems should arise. In extreme conditions, you will, of course, have to use a knife instead of a drill, and think about where to get a plastic tube, or what can replace it. But water bottles and superglue are usually carried by any travelers.
Why do you need to purify water?
Water from open sources is characterized by the following physical and chemical indicators:
- Taste – sour, salty, sweet, bitter. It comes from dissolved impurities and gases.
- Smell – hydrogen sulfide, swampy, putrid, fishy, muddy, etc. Its source is substances found in wastewater or that enter the liquid naturally.
- Turbidity and color come from organic components, particles of clay and silt, and microorganisms.
To make a simple homemade filter, you can use an Aquaphor cartridge. The price of such a filter is about 400 rubles, for this price you can filter about 200 liters of water.
In addition, water that has not passed through at least a simple water filter contains industrial and domestic wastewater, combustion products of various types of fuel, harmful chemical elements, particles of dolomite, lime, gypsum, and sand.
The Aquaphor filter is great for hiking and traveling. With this filter you can filter river or rain water. To be safe, boil the water before use.
All this can cause:
- gastrointestinal diseases;
- intoxication of the body;
- the accumulation of salts in it, which lead to diseases of the joints, bladder, the formation of gall and kidney stones, allergic reactions, and the development of iron bacteria.
In these cases, water purification, even with homemade filters, sharply reduces the likelihood of negative consequences for humans.
We make a water filter with our own hands to purify well and borehole water
The problem of drinking water purification is becoming relevant not only for city residents, but also for residents of rural areas. To make water from a well or borehole suitable for drinking, you can make a water filter with your own hands.
Why filter well water?
It would seem that what could be purer than well water, sung in ancient Russian epics? Alas, modern reality is not at all like a fairy tale. Water in private wells can be contaminated with a variety of substances, such as:
- nitrates;
- bacteria and pathogens;
- impurities that impair the taste and quality of drinking water.
For the excess of nitrates, i.e. salts of nitric acid, in drinking water, we should “thank” farmers who widely use fertilizers and pesticides when growing agricultural products. Some of these substances inevitably seep into the aquifer.
The simplest filter can be made from a plastic bottle with filler
Poor quality and damage to equipment lead to the fact that the water contains an admixture of rust, sand, etc. Drinking such water is simply unpleasant. Therefore, it is recommended to buy or make at least a simple water filter for your dacha.
Review of filtration materials
The principle of operation of the filter is simple and well known to everyone. It is necessary to pass water through a layer of filtration material. The filler can be different:
- textile;
- cotton wool;
- paper napkins;
- gauze;
- sand;
- grass;
- coal;
- Lutraxil.
You can buy charcoal in a store or make it yourself
For regular use, other materials are used, mainly charcoal. It is laid in layers, alternating with sand, gravel, grass, etc. Lutraxil is a synthetic material made from polypropylene fibers.
The simplest filter from a plastic bottle
The use of ordinary household filters for a small garden is rarely convenient. Such devices require the supply of water from a water supply system under a certain pressure, and not every dacha has a water supply system with suitable characteristics. Pitcher filters purify water too slowly.
In addition, you will have to constantly change cartridges. Therefore, a homemade water filter made from a plastic bottle and a bucket with a plastic lid may be the most acceptable option.
A homemade water filter can be made from a regular plastic bottle.
This filter uses carbon and ordinary fabric napkins as a filler.
The simplest filter for a summer house is made as follows:
1. The bottom of a plastic bottle needs to be cut off.
2. Cut a suitable hole in the plastic lid of the bucket.
3. Insert the bottle into the hole with the neck down.
4. Fill the filter with filler.
On top of the receiving container you need to place a 10-liter plastic bottle with a filler hole in the bottom. To make a filter, you can use a 40 mm piece of polypropylene pipe. The top and bottom of the pipe are covered with pieces of perforated plastic, which is recommended to be fixed with hot glue. The pipe is filled with charcoal.
Such a homemade filter should fit tightly into the neck of a standard ten-liter bottle. All that remains is to connect the receiving tank with the filter and the bottle. You can immediately fill the installation with a full bucket of well water, which will be filtered after a few hours. This way there will always be a supply of clean drinking water in the house.
Three-flask design for full-fledged water supply
Happy owners of a full-fledged water supply in a private house can make a three-flask homemade filter for water purification. To do this you need:
- Buy three identical flasks.
- Connect the flasks in series with two quarter-inch nipple adapters. In this case, it is necessary to strictly adhere to the in/out designations in order to maintain the direction of water movement. Nipple threads should be sealed with FUM tape.
- The outermost holes of the flasks are connected to the quarter-inch tube using straight adapters.
- Connect the filtration system to the water supply with a tee, which is cut into the water supply using a 1/2” connector.
- At the outlet, a standard drinking water tap is connected to the filter system.
- Fill the flasks with filter material. You can use a polypropylene cartridge, carbon filter and anti-scale filler.
This is interesting: Walls in the corridor - finishing options
Filter for a summer cottage or a hike
Before you start assembling your homemade product, you need to be aware that such simple filters only carry out selective water purification. One way or another, worm eggs, viruses and bacteria may remain in it, and the content of hardness salts and iron may be exceeded. This water must be additionally boiled, and as disinfectants you can use iodine solution (add 5 drops of a 5% alcohol solution to 1 liter of water), potassium permanganate (tinting the water to a barely pink color), hydroperite (0.5 tablets per 1 liter of water) .
One of the homemade devices for primary water purification can be made literally from scrap materials. It is often used on a hike to remove mechanical impurities and toxins. After the filter, the liquid must be boiled. The instructions for making a filter for a summer house or some extreme conditions look something like this:
- take a large plastic bottle, cut off the bottom;
- using the bottle as a funnel, place it in another container, for example, a glass jar or a piece of another bottle (in the shape of a glass);
- line the first filter layer with a clean cloth, gauze, cotton wool or other available material. This layer will be responsible for fine purification of water from mechanical impurities. If conditions permit, boil the fabric before laying;
- Fill the bottle with charcoal to about a third of its volume. It is better to use activated charcoal, but if it is not available, charcoal from a fire pit is quite suitable. But you cannot use coniferous species. The larger the coal layer, the better, because... it is responsible not only for mechanical cleaning, but also for the adsorption of organic substances, which include components that cause the unpleasant taste and odor of water. In addition, coal absorbs toxic impurities;
- the top layer of the improvised filter will be represented by river sand. Rinse it first and then heat it over a fire. Sand is responsible for removing large mechanical impurities from water. To prevent it from mixing with coal, an intermediate bridge made of a thin layer of fabric can be laid between them
That's it, our simplest treatment plant is ready! It is better not to use the first portions of water, because... First, coal dust and ash will be released from the coal.
One of the simplest options involves making some kind of filter jug. But for this you will need to purchase a cartridge; you will only need to make a suitable container for the water filter yourself. In our case, a plastic bottle is used for these purposes.
Remove the cartridge from the packaging and clean the plastic bottle from dirt if possible. Prepare a sharp knife or scissors for the job.
Cut the bottle at its widest point, where the cone ends. The operation must be carried out so that the resulting funnel, when placed in the second part of the bottle, does not fall into it.
Place the cartridge in the funnel and use a marker to mark a line defining its lower part. Next, you need to cut off the neck and insert the cartridge into the resulting hole so that it fits snugly into the funnel. This is a very important stage, because otherwise, some of the water will end up in the collection tank in an unpurified form.
Place the funnel with the cartridge in the remaining part of the bottle - congratulations, you have made a filter for your summer house with your own hands! The main advantage of this design is its simplicity and compactness. In fact, to manufacture it, you only need a factory cartridge, because Finding a plastic bottle is not a problem.
A good flow system can be assembled from syringes, various parts of plastic bottles, and medical tubing made of PVC or silicone rubber. Cotton wool and crushed activated carbon can be used as filter layers. The set of tools and materials for its manufacture is as follows:
- 3 syringes. Choose the largest volume, such that the diameter of the syringe is equal to the diameter of the hole in the whole bottle;
- 5 plastic bottles. Only for two is the volume important (preferably 1.5 or 2 liters), the rest are needed as sources of spare parts (caps and necks);
- a small piece of hose with a diameter matching the diameter of the bottle cap;
- two plastic tubes. Through them, water will be supplied to and removed from the filter;
- a dozen tablets of activated carbon. From it we will make a filter layer with our own hands, responsible for removing organic matter;
- cotton wool Will be used for cleaning from mechanical impurities;
- beeswax, sugar or plaster of Paris with egg white. Serves as an adhesive that can be used when working with food utensils;
- sandpaper;
- sharp knife or scissors
We will use two identical syringes as the body. To begin, remove the piston and use a knife to remove the stops protruding from the body. To ensure the parts stick well, sand the area as shown in the picture above. So, you have two halves of the filter housing - how do you connect them?
For fastening we will use a bottle threaded connection. Cut off the neck of the bottle at the point where the container begins to expand. Unscrew the cap, but do not throw it away - we will need it later. Such operations must be carried out with two bottles. As a result, we will end up with a pair of plugs and necks. Everything else can be thrown away. Products for fastening to a part from a syringe must be sanded from the inside. Why, it will become clear later.
Our next task is gluing the parts of the filter housing. There is one nuance here: you cannot use moment, super glue or other compounds for this. After all, our filter will come into contact with water for food purposes. Therefore, we will use caramelized sugar solution as glue. To prepare it, take a couple of tablespoons of sugar and heat them slowly over low heat. Apply the resulting glue in a thin layer to the sanded surfaces and immediately connect them. You can also experiment with a solution of gypsum and egg white (add liquid egg white to pure gypsum powder in a ratio of 3 to 1), natural beeswax, natural pine tree resin and other substances that do not pose a health threat if they get into the water ( For the sake of brevity, we will further call this glue food grade). As a result of these actions, you will get two identical parts. Now let's figure out how to connect them.
To connect the two parts of the water filter housing, you need to make a so-called connector. Its components are two plugs (the same ones that remained at the previous stages of work), a piece of hose with a diameter equal to the diameter of the plugs and a width equal to twice the width of the plug. Sequence of work:
- Using a knife, cut small holes in two corks (with a diameter equal to 2/3 of the diameter of the cork);
- using sandpaper, sand the outer parts of the plugs, as well as the inside of a piece of hose;
- Apply pre-prepared food glue to the sanded surfaces and assemble the connector. You can use it as soon as the adhesive joints dry
So, we already have almost everything we need to make a water filter with our own hands. It remains to deal with two containers: the first will be responsible for supplying dirty water, the second – for receiving purified water. If any clean vessel can act as a receiving container and everything seems to be clear here, then there are a couple of tricks with the first container.
How to make the first container:
- take three plastic bottles and a syringe;
- cut off the bottom of bottle 1 and unscrew the cap;
- cut off the flared tip of the syringe, make a hole in the plug and insert the element cut from the syringe into it from the inside. It should fit tightly into the hole, and the connection will be airtight. But to be extra sure, you can additionally use some edible glue. The result of our work will be a plug with a pipe;
- take bottle 2, we only need the cork from it. Use a sharp knife to cut holes in the threaded area of the plug. Now it can be placed in bottle 1, where it will serve as a filter for rough water purification (from sand, etc.);
- take bottle 3 and place it in what is left of bottle 1. As a result of these actions, the screwed cap on bottle 3 should touch our coarse filter (see point 4). Cut the bottom of bottle 3 so that you get a funnel, make slits in it;
- assemble all the parts together as shown in the picture above
Place a small piece of cotton wool in one part of the filter housing, then add pre-crushed activated carbon, fill the rest of both housings with cotton wool. It needs to be compacted, but not too much, because... this affects the filtration rate. Use a connector to connect the two parts. All that remains is to connect the housing using plastic tubes to the supply and receiving containers - you have managed to make a filter for water purification with your own hands. However, there are several nuances in using such a device:
- the performance of the system is determined by the difference in level between the point of water supply and the point of its discharge;
- at the first stage it is necessary to initiate the flow of water, creating traction, similar to draining fuel from a car tank
Well filter
To avoid silting of the well casing, as well as to reduce the load on the main treatment devices, a mechanical cleaning filter is provided at the water intake site. Below we will talk about the two most simple and effective designs of filters for wells made of plastic or steel pipes. It’s easier and cheaper to make them yourself than to buy ready-made products.
Briefly about what they are. This is a plastic or steel pipe 3 m long, divided into three zones from bottom to top: settling (about 0.5 m), filtering (2 m), installation (0.5 m). Through the filter zone, the water enters the settling tank, where it is preliminarily purified from random impurities under the influence of gravity, and the mounting part is used for fastening to the casing pipe or fixing the cable when it is lowered into a pipe of larger diameter.
Two situations are possible:
- in an active well. After washing it, it became necessary to install an additional barrier for mechanical contaminants (sand and small stones). In this case, a finished filter of smaller diameter is placed in the casing;
- when constructing a well. In this case, the well filter is the first section of the casing pipe
Be that as it may, the technology for its manufacture is the same in all cases. Let's look at the simplest version of a plastic filter for a well. By analogy, you can make the same structure from steel.
We will need:
- pipe 3 m long;
- pipe cover or piece of plastic;
- polyamide cord with a thickness of 3 mm;
- P64 polyamide mesh for filtration;
- hacksaw for metal;
- screwdriver and 10 mm drill;
- self-tapping screws; roulette;
- construction stapler
First, let's mark out the functional zones of our pipe as shown in the figure below.
It makes sense to immediately mount the bottom of the device. For these purposes, cut out a round plastic element and drill three 10 mm holes in it (for water). Secure the bottom with self-tapping screws. Further, the approach to work depends on how water will enter the casing: through holes or through cracks.
Drill holes with a diameter of 10 mm in a staggered pattern. Take the distance between holes located in the same line equal to 100 mm. Maintain the same distance between the longitudinal rows located with an offset of 50 mm - hence the checkerboard order. Drill a couple of additional holes on both edges of the filtration zone, which will be required to secure the cord. It should be understood that the role of these holes is solely to ensure the efficient use of well flow, i.e. so that water in the required volume enters the casing pipe.
Attach a cord to one of the edges and make a dozen tight turns around the pipe. Next, wrap it with a spiral in increments of about 150-250 mm. Closer to the opposite part of the filter pad, again wind about ten tight turns and secure the cord with a pair of holes. So that trying to make a filter for a well with your own hands does not involve mechanical work according to instructions, we will explain why this cord is included in the design. It is necessary in order to create a small space between the mesh (more about it below) and the holes in the pipe. In this case, the entire grid area is used. But if it just fit tightly to the pipe, only the part that is located at the holes would work.
All that remains is to wrap the pipe with a special P64 synthetic mesh, which will serve as a filter layer, and secure it with a construction stapler.
Instead of holes, you can make slits in the filter pipe. This will significantly increase the area through which water will enter the casing, as well as reduce the size of particles that can get there, bypassing the mesh barrier. To do this, use a sharp knife or hacksaw to make 100 mm long slots on both sides of the pipe in 20 mm increments. At the same time, after every 10-15 slot holes, leave an untouched gap of 50-100 mm in length. All other operations are similar to those described above for a perforated well filter.
Well filter
To purify water in a well, a simple and effective solution is still used, which is called a bottom filter. Naturally, you can do it yourself. There are two approaches here:
- direct filter. The choice in its favor is made on the condition that the bottom of the well is constantly being eroded and this is the cause of muddy water. For example, in the case of a clay bottom. The idea is to reinforce the bottom with large stones, gradually reducing the fraction of subsequent layers. Those. the first layer is stones cleared of algae, thoroughly washed, which are best collected on the river bank. Next we lay the large pebbles and finally the smallest ones. The thickness of the layers is within 20 cm, hence the total thickness of the entire filter will be approximately 50-60 cm. Of course, the thicker the layer, the higher the quality of the resulting water. But at the same time, the capacity of the well decreases and the load on the bottom increases;
- return filter. If the situation is the opposite, and the turbidity of the water is due to the sandy bottom of the well, then backfilling is carried out in the reverse order. However, coarse quartz sand can be used as the first layer (then there will be 4 layers: sand, small and large pebbles, large stones)
Pool filter
The large volume of water and the abundance of sources of pollution require periodic cleaning of pools. This task is best accomplished with a flow-type cleaning device through which liquid will be pumped. When people talk about a homemade pool filter, they most often mean a simple sand (or sand) filter. A diagram of a simple but fairly reliable installation is shown in the figure below.
To make a pool filter with your own hands, you will need the following set of tools and materials:
- capacity from 50 l.;
- PVC sewer pipe with a diameter of 110 mm;
- tee 110x110x45 mm;
- pipes with a diameter of 45 mm;
- polyamide mesh;
- 3-4 corners and screws for fastening them;
- plastic sheet for partition;
- screwdriver and 10 mm drill;
- centrifugal pump and hose with a diameter of 45 mm
The idea is as follows: water will be pumped into the upper part of the container and onto the perforated partition. With its help, uniform distribution of liquid over the entire surface area of the sand load will be ensured; Large debris will linger here. Next, the liquid will pass through a layer of sand and be cleared of smaller mechanical impurities, gradually filling the central pipe. The water outlet is located at a level below the inlet, which, based on the principle of communicating vessels, facilitates its exit from the container by gravity through the pipe.
If desired, instead of sand or together with it, you can use any other suitable material: foam rubber, crushed stone, coal, etc. It all depends on what contaminants you want to remove from the water in the pool and what labor costs you are willing to spend - a sand filter is simpler and cheaper to maintain than its analogues.
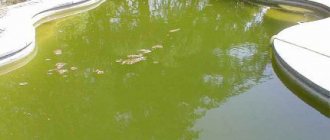
Pond filter
Today it is fashionable to have a small, but private pond at your summer cottage. Not everyone is lucky with the location of their dacha, so they have to solve the problem by installing an artificial reservoir. But if in natural conditions ponds are a self-regulating environment, then the development of man-made objects depends entirely on the measures taken by their owner. To keep the water clean, installing a filter is considered as one of the measures. You can buy a finished product, but it is quite possible to make a filter for a pond with your own hands - in order to save money and understand the processes occurring in it.
You can consider two simple design options:
- external filter, as in the example described for the pool (see above);
- submersible filter, the design of which we will discuss in more detail
To make the case, we need a container with a volume of 20 to 40 liters. The larger it is, the less often the filter will have to be serviced, but the more difficult it will be to disguise it in a small pond. Make holes in the bottom 1/3 of the container with a diameter of about 5 mm. Place several layers of foam or other waterproof filter material into the container. This must be done in such a way that the foam covers the holes made in the body. To prevent the container from floating or moving along the bottom of the reservoir, place several heavy stones inside. Now the most difficult thing is to solve the issue with the lid.
It is necessary to make a hole in the lid for a submersible pump, the operation of which will ensure the flow of water through the filter media. The hole is carefully sealed, as is the fastening of the lid to the body. All that remains is to choose a suitable place and flood the water purification device there. Once a week or two you will have to remove the device from the water and wash the foam.
Home water filter
The most basic household water filter, which you can make from scrap materials at home, is a filter made from cotton wool and paper napkins.
Please note that such filtration can only free water from dirt and debris, but not from chemical impurities, which, in some cases, can be hazardous to health.
- You need to prepare a bottle or funnel, as we did in previous cases.
- The bottle is filled with several layers of cotton wool and paper napkins in random order.
- The dirtier the water, the more filter material you need to put in the funnel.
- The filter is ready, all you have to do is pour water on top and place a container under the funnel to collect clean water.
These methods of making a household water filter are taught in school. If you know how to purify drinking water, you can put your knowledge into practice in difficult situations. In any case, this is only a temporary filter replacement; it will be difficult to use such a filter on a permanent basis.
Anastasia Sergeeva
What is a well filter and its structure
Water purification from a well occurs in two stages - with a well filter and surface filtration systems built into the water main. In this case, the well filter has a structure consisting of three main elements:
- Above-filter area. The part that plays the role of fittings when mounted on a column.
- Filter elements. Includes the holes in the pipe of the correct size and the external materials that are attached to it.
- Sump. The space for placing soil particles that have fallen inside the source or are screened out by filter elements is the lower part of the filter without perforation. The sump for water from the well is about 0.5 m long.
Rice. 2 Filter design
Stationary filter device consisting of three flasks
Now let's figure out how to make an effective filter yourself to connect it directly to the system. For these purposes, we will need three flasks with the same geometric parameters into which we need to place the filler.
From containers prepared in this way, we will make a productive stationary filter for purifying tap water, guided by the following diagram:
- Take two 1/4 inch adapter nipples. Use them to connect all three flasks into one structure.
- Seal the joints of the nipples (their threads) with fluoroplastic sealing tape (the so-called FUM material).
- Using straight adapters, connect the 1/4-inch holes of the two outer flasks to the tube.
- Cut the prepared filter into the pipeline (you will need a half-inch connector and a tee).
- Connect a regular water tap to the filter outlet tube.
High-quality water in modern conditions, especially drinking water, is a very rare occurrence. If several decades ago there were still clean springs and wells, now they are very rare even in rural areas. Agricultural companies pollute the soil no less than industry and herbicides. Mineral fertilizers inevitably penetrate into the sources. Water filtration has become a necessity.
Jug-type installations have become frequent guests in kitchens in the city and in the country. They are effective for small volumes of liquid. But if you need to clean tens or hundreds of liters, such devices are unsuitable. When there is a well, borehole, or swimming pool on the property, water filters are necessary. You can buy ones designed for these purposes, but those made by yourself are always cheaper.
Sand option for the pool
Before you make a water filter with your own hands, you need to decide on the volume of liquid that needs to be cleaned. If the displacement is small, then home-made devices with sand filling are suitable.
Any container of suitable size can perform the functions of a cartridge. Liquid supply and outlet pipes are inserted into it and sand or other filler is placed. A PVC corner is useful for turning the pipe.
For efficient cleaning, several containers can be connected together using an M10 threaded sleeve. A compressor is connected to the system, the power of which is calculated depending on the volume of the pool.
Water preparation devices for food
You can clean dirty liquid at home with homemade filters. The resulting product does not always satisfy all requirements. Only the use of high-quality elements allows you to achieve the expected results. They retain mechanical, chemical and bacteriological impurities.
At the dacha they use several types of homemade filters:
- flow-through coal;
- submersible for technical water in an aquarium, swimming pool;
- external, allowing you to get rid of mechanical contamination.
A homemade system is used when it is necessary to coarsely filter water from a well, well, or rainwater. Fine cleaning is used to eliminate odors caused by the presence of bacteria.
Simple filters for home made from plastic containers
There is no better absorbent for a homemade device than activated carbon. It does not allow mechanical impurities to pass through, as well as many toxins and bacteriological harmful substances. For production, dishes with a sealed lid and plastic pipes are used. For a small aquarium, disposable syringes are suitable.
The main thing is that the volume allows you to accommodate the required amount of filter material in several layers. The manufacturing process of the simplest device occurs in the following sequence:
- 1. Take a plastic bottle or other similar container, in which the bottom is cut off. Below, at a distance of about 2 cm, 2 holes are made with an awl.
- 2. One 10mm hole is also drilled into the lid. Alternatively, many small ones are pierced.
- 3. Screw onto the bottle and begin laying the cleaning material. Natural fabric or ready-made filters, lutrasil, are used on the bottom and walls.
- 4. Next comes activated carbon. On top there is clean sand, then gravel, which alternate in several layers. The total volume should not exceed 2/3 of the container's capacity.
- 5. Cover everything with a cloth that will not allow large particles to pass through. They hang it up and fill it with water, wait for it to be cleaned and poured into a clean container.
The system has a disadvantage: filtering takes a long time.
It is more convenient to use 2 pieces of pipe, one of which is 4 times longer than the other. The short one is used for rough cleaning. Place the lid tightly on the plastic container in which the hole is made. A mesh is placed on it and the space is filled with pharmaceutical cotton wool or padding polyester. On the other side, the pipe is also covered with a lid and mesh.
One end of the long piece, which serves as a fine filter, is prepared in the same way: a tight lid with a mesh. On the other side is the neck of a plastic container. The filter material is filled in, each layer in turn. Both parts of the structure are connected.
It’s also easy to do water purification for your home aquarium yourself. Requires 2 disposable 10 ml syringes with cut off tips. They are connected to each other, holes are made along the entire length. A tube with a spray at the end is placed inside, and if you add zeolite, the quality of the water will increase - nitrites will be removed. The outside of the device is wrapped with a sponge.
Principle of operation
Operating principle of a reverse osmosis system
Water passes through several layers of filter and is successively freed from various contaminants. The more levels, the higher the degree of purification. Fillers can be different, each with its own filtration features and capabilities.
The first stage of purification is the mechanical screening through porous materials of particles of rust, sand, clay, and any debris that may be contained in the water. In this way, transparency is achieved, giving the appearance of cleanliness.
Subsequent filters can change the color, taste, smell of water, and change its chemical composition.
The following are used as cleaning layers:
- tissue or gauze;
- cotton wool;
- paper napkins;
- quartz sand;
- charcoal;
- Lutraxil;
To effectively filter water, you need to know its features and composition. This information helps in selecting filters. For example, when receiving water from an artesian well, a lot of iron and hardness salts enter during the drilling process. Accordingly, cleaning should be aimed at removing iron content with a selected reagent.