The direct purpose of the plinth is to protect the structure from precipitation, soil moisture and sudden changes in temperature. That is why the base is built from materials that are resistant to any negative phenomena. Modern builders use different materials, but brick is the most popular. Basically, clinker, ceramic, acid-resistant and silicate bricks are used for the plinth.
DIY fencing installation
Required tools:
- cord;
- roulette;
- chalk;
- pegs;
- sledgehammer, hammer, crowbar;
- shovel;
- welding machine;
- grinder with cutting disc for concrete;
- trowel;
- concrete mixer;
- level;
- brush.
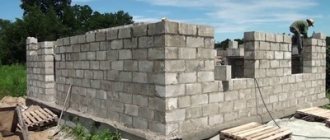
A fence made of concrete blocks is similar to brickwork, only the blocks have larger overall dimensions.
Hollow blocks are often chosen for fencing construction, as they are lighter and cheaper than solid ones, and at the same time just as strong. In addition, masonry can be easily reinforced through voids.
Preparatory work
Using pegs and a cord, the territory is marked. Pegs are driven in and a cord is pulled between them to mark the axis of the fence. The boundaries of the trench for the strip foundation are marked with chalk.
The trench is dug using a shovel. The width of the trench is twice the width of the block fencing masonry plus 0.4 meters. Depth, if the soil is not heaving - 0.7 meters. If the soils are wet, then the foundation is buried 0.2 meters deeper than the soil freezing mark. Data about the level of soil freezing in a particular region is found in building codes and regulations.
Strip foundation device
The durability of the structure depends on the careful manufacturing of the foundation and the quality of its components. So, you need to do the following:
- The bottom of the trench is compacted, then drainage layers of sand and crushed stone (0.1 meters each) are made, each layer is successively watered and compacted. The walls and bottom of the trench are covered with roofing felt to provide waterproofing and prevent soil from spilling onto the foundation.
- Concrete solution is being prepared. Components: cement M200, crushed stone, sand in a ratio of 1-5-3 and water. It is convenient to make the concrete mixture using a concrete mixer.
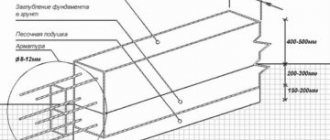
- 0.1 meter of concrete mortar is poured onto the drainage with waterproofing, and after it hardens, formwork from boards is installed. The formwork is provided with spacers so that under the pressure of concrete (or earth on the other side) it retains the required shape.
- To ensure the strength of the structure, a frame made of reinforcement is placed in the formwork, fastened with knitting wire or welding. The frame is made of reinforcement with a diameter of 12 mm or more. Four longitudinal rods are connected by vertical and transverse rods in increments of 10 to 20 cm. The frame should be made smaller in size than the formwork by 2-5 cm on each side.
- Vertical outlets from reinforcement are attached to the frame with the expectation that they will enter the masonry of blocks through the voids in them for a better connection between the foundation and the fence. The height of the outlets above the foundation is 15 cm. Pipe racks for future pillars are also attached to the frames, strictly vertical in level at the marking points.
- We install the first rack at the beginning of the frame. The location of the second rack is determined experimentally. Next to the trench, parallel to it, blocks are laid out, first for the post, then for the fence, taking into account the mortar joints, about 3-4 meters in total. The middle of the next pillar block will show the axis of the second pillar. This is necessary so that a whole number of blocks fit in the span. Having studied the markings, you can then perform it using a tape measure.
- Pour the concrete solution into the formwork. The mixture is compacted well using a crowbar so that there are no sinuses. The formwork is removed after a week, when the concrete gains strength.
- The vertical surfaces of the foundation are coated with bitumen mastic and the previously laid roofing material is glued to it. The free space between the foundation and the trench is covered with earth and compacted.
Laying a fence made of concrete blocks
The construction of the fence begins with the construction of pillars from special concrete blocks in places where pipes or reinforcement have already been removed from the foundation to the height of the pillar. If the blocks are without grooves, then after 3-4 rows between them horizontal reinforcing masonry meshes are placed, releasing them from the pillars (so that these meshes will later fit into the masonry of the fence).
Cement mortar for masonry is made from cement and sand in a ratio of 1-4 with the addition of water.
Wall concrete blocks are laid on the foundation in rows, observing the bandaging of the seams, as in brickwork. The distance between two vertical joints of adjacent rows must be at least one third of the length of the block.
The verticality and horizontality of each laid block is checked with a building level. Blocks of one row are placed along the construction thread.
The blocks are laid with rustic jointing. It is recommended to make the thickness of the mortar joint 1-1.5 cm. To fasten the fence to the foundation, the voids of the first row of masonry blocks are filled with concrete mortar. When the fence laying is completed, the post is covered with a special post cover, and the fence canvas is covered with a gable cover.
Arrangement of the basement
When arranging the basement, it is very important to choose high-quality material, this reduces the risk of shortening the life of the building. If the physical properties and technical characteristics of the brick are appropriate, more than one generation will live in the built house.
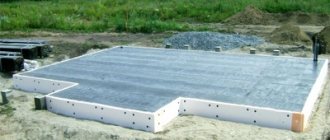
The layout of the plinth is shown in the following figure:
Classic base on a strip foundationSource rekvartira.ru
For its reliable subsequent operation, the following recommendations must be observed during installation:
- The thickness of the plinth is determined based on the wall materials. For brickwork, you need a base with a base of at least 51 cm. If the walls of the house are made of timber, then a width of 25 cm is quite sufficient.
- When laying a brick plinth, properly selected cement mortar is very important. A mixture with the following composition optimally meets all requirements: cement M200, sand and lime. The proportions should be 1:6.7:6.7. The mixture is brought to a dough-like consistency.
- The existing system for calculating materials allows you to prepare the required quantity for arranging a brick plinth. For 1 m? the ground floor needs 400 bricks (size 250? 120? 65 mm) and 30 cm? cement-sand mixture
Useful tips
If you decide to build a house from cinder blocks, then you first need to build the strongest and highest possible foundation. Experts recommend turning to tape options.
We must not forget that cinder block walls are very dense. Because of this, many craftsmen are faced with the problem of laying pipes and electrical wiring. As a rule, specialists in such cases turn to special equipment. That is why it is advisable to think about carrying out this work in advance if you are going to do it yourself.
When choosing this building material, always pay special attention to its filler. The best options are those with shell rock, expanded clay, sawdust and crushed stone.
They are safe and environmentally friendly.
Be sure to ensure the integrity of the cinder blocks when selecting them.
In addition, you should pay attention to the identity of the geometry of several elements located in different pallets
When it comes to transporting cinder blocks, pallets are most often used here. However, you can also resort to simple storage. Blocks can only be stored on pallets. They should be located under a canopy to protect them from the harmful effects of various atmospheric precipitations. Hollow elements should be placed with the voids facing down.
Experts say that it is quite possible to check the quality of a cinder block using an ordinary 15 mm nail - try sticking it into the material below with your own hands. If a nail goes into it, this will indicate that the quality of the blocks is not the highest.
Please note that cinder blocks that were produced without the use of a special vibrating machine are much inferior in strength characteristics to elements that were produced using a similar technique. They can only be used in the construction of simple non-residential premises.
Cinder blocks cannot boast of high thermal insulation characteristics, such as, for example, foam blocks
Therefore, if you are building a residential building from these materials yourself, then you will have to pay special attention to the thickness of the seams. If they turn out to be too thick, the building will turn out cold - heat will simply escape through the seams to the outside
An excessively thick layer of mortar (more than 1.5 cm) will negatively affect the thermal insulation qualities of the walls.
If you decide to finish cinder blocks with a plaster mixture, then first you need to prepare them for this work. Otherwise, the plaster simply will not stick to the blocks.
Before proceeding with the construction of this or that building from cinder blocks, you need to correctly calculate their required quantity. To do this, you need to calculate how many parts there will be in 1 m3. For example, a material with parameters 390x190x188 mm can be calculated in this way: 39x19x18.8 = 13930; 1000000 (cube volume): 13930=71. There will be 71 blocks in 1 m3.
Don't skimp on purchasing cinder blocks. Too cheap materials may turn out to be of low quality or even dangerous from an environmental point of view.
The pros and cons of cinder blocks are discussed in the following video.
Laying methods
Laying walls made of cinder block material is possible in several ways.
1) In two stone blocks.
2) One and a half blocks.
3) In one cinder block.
4) Half a stone.
The solution must be laid no more than one and a half centimeters thick. If the layer is thicker, the thermal insulation properties of the finished structure may decrease. To increase these properties, it is better to leave the voids inside the blocks unfilled. The solution is placed only at the joints of the blocks and where it is needed. When the wall is ready, the voids in it are filled with very fine slag, which is then carefully compacted.
In any case, the construction process is much faster than if you used ordinary bricks. This is due to the size of the material and the ease of its use. So, the brick is smaller in size, so you will need twice as much of it. Consequently, more movements will have to be performed. And a lot of cement will also be used. This means that cinder block saves money. When the process of constructing the walls is completed, you need to begin their hydro- and thermal insulation. This is necessary to prevent moisture from reaching the surface of the material.
This is especially important to do before you install the roof.
Once the walls are completely weatherproofed, the roof frame is installed. It is constructed after all work related to the building frame is completed. To prevent condensation from forming between the ceiling and the roof of the house and moisture from collecting, vapor and waterproofing materials should be laid between them. When the roof installation is completely completed, it is necessary to perform a vapor barrier on the ceiling. It, like the entire roof, must be insulated inside with basalt or mineral wool.
Masonry technology
After the reinforcement mesh is installed on the foundation of the structure, you need to begin the laying process. You will have to lay out the base frame from the corners. In this case, after the first row is completed, the evenness of the structure is checked using a building level. Brick laying on the foundation is carried out in strictly horizontal rows of one brick or 1.5, less often 2 bricks. Each stage of masonry is covered with mortar, the thickness of which is approximately 2.5 cm. After the brick foundation becomes four rows high, it is recommended to begin the process of building walls. The base surface is finished mainly with decorative stone. It happens that tiles are used as a finishing material for a building.
The base must be placed on waterproofing.
If you plan to build a basement floor on a brick foundation, you should take care of installing a ventilation system. It is better to place ventilation holes at a height of 15 cm from ground level. The size of the window depends on the overall diameter of the vent pipes. The base should not be laid on the ground, using a waterproofing layer in the upper part. Therefore, upon completion of the installation of insulation, layers of roofing material are laid.
If insulation of the structure is planned in the future, the layout is done in one and a half bricks.
Properties that a brick for a plinth should have
Considering all of the above, it is clear that the brick for building a basement must have the following properties:
- increased compressive strength (from 200 MPa);
- standard dimensions - 250x120x65 mm;
- high environmental friendliness;
- moisture resistance;
- relief surface.
The strength of the brick ensures the reliability and durability of the base and the entire structure as a whole. Standard sizes will ensure a smooth and attractive appearance of the base and the entire building in particular.
The beauty of the base speaks of the thoroughness and thoroughness of the work done. Source kirpichmaster.ru
In addition, the construction of the basement will be less labor-intensive. The absence of harmful impurities in the brick will prevent harm to the residents of the house. The embossed surface of the brick adheres remarkably well to the mortar and prevents the formation of cracks and cracks and, accordingly, cold bridges.
Roof of a house made of expanded clay concrete
Your home should be comfortable and cozy, so you should choose your roof wisely. The simplest option is a gable roof made of corrugated board. This material is the most popular because it is inexpensive and durable, does not require continuous formwork, and due to its light weight there is also no need for reinforced rafters.
- A mauerlat is attached to the last row of the wall - a wooden board connecting the rafters and the wall.
The rafter system is assembled on the ground. First, the outer rafter legs are raised and installed, a control thread is stretched between them, along which all other rafters will be aligned.
The waterproofing is spread and fixed with a counter-lattice along the rafters. The sheathing is stuffed and corrugated sheets are laid.
The video shows the process of constructing a roof in a very accessible and clear way:
A house made of expanded clay concrete is an excellent and inexpensive option for those who want to move outside the city, especially if noisy Moscow has already become tiresome!
Start of construction
Before you begin the construction process, you need to decide on the size of your budget. There should be enough money to purchase ready-made material or for components for its subsequent manufacture. In addition, the construction process will also require funds from you, as will the repair process.
So, if you purchase everything you need to build a foundation and build walls on it, but there are not enough funds to continue construction, then all the work will go down the drain. After all, we already wrote earlier that a cinder block absorbs moisture, which means that it will quickly become unusable, and everything will eventually have to be redone. If you cannot make all the calculations yourself, then contact a construction company that specializes in planned developments and calculates the amount of required material with an estimate.
You must also put in order all the documentation proving your right to property and so on.
Preparatory work
Before starting construction of the fence, you should stock up on the necessary materials and tools. We will need the following building materials:
- Cinder block in the right quantity. The most affordable ones are ordinary, gray blocks. Along with them, torn, chipped, and colored cinder blocks are also produced. They have a rough surface that imitates wild natural stone.
- Components for preparing cement mortar and making a cushion: water, sand, crushed stone, cement.
- Rolled waterproofing (bikrost, roofing felt, stekloizol).
- Gravel, rubble stones, broken bricks, rebar. This is necessary for pouring the foundation.
From the tool you should prepare:
- Shovel.
- Trowel for laying mortar.
- Construction level, plumb.
- Roulette.
- Pegs and rope for marking.
When a cinder block fence is being erected, the entire construction can be represented in the form of several successive stages.
Subtleties of choosing blocks for a fence
A fence is the main attribute of any summer cottage. One of the main requirements for this design is strength and originality. Such parameters are typical for fence blocks. They are obtained from various solid materials with unique technical characteristics. Therefore, before purchasing this product, you should consider some of the subtleties of choosing blocks for the fence.
Peculiarities
Fence blocks are cubic artificial materials. They are made from various solutions, which, after hardening, form a strong and solid structure.
Outwardly, they resemble bricks and are large in size. Most fence blocks are hollow. This structure allows you to obtain an optimal ratio of strength and light weight. There are also solid products that consist of solid concrete or other mortar.
Blocks are a universal building material used to construct not only fences, but also small posts or fences. Some manufacturers produce them in the form of prefabricated elements, which, when joined, form a brick with empty space inside. These products make it easy to hide metal fence posts while creating a consistent post and fence style.
Advantages and disadvantages
Fence blocks are used everywhere in construction, as they have several advantages:
- The construction of fences is speeding up several times. This is achieved not only due to its larger size, but also to its correct geometric shape. Laying a rectangle does not take much time, since it is easy to level it in all planes.
- Low price. The blocks are made artificially, which reduces the cost of production compared to natural stone. This is also influenced by the large volume of the element, which can replace several bricks at once.
- Strength. This indicator may vary depending on the structure of the product. Some blocks tolerate frost well, do not absorb moisture, and can also withstand significant loads.
- Minimal care. Fences made from these products can be used for a long time without restoration. At the same time, the top layer practically does not lose its original characteristics.
- Variety of designs. Many manufacturers supplement the top layer with various decorative effects. This allows them to be used when creating original landscape solutions. The blocks combine perfectly with metal, wood and other building materials.
- The blocks do not burn and do not support combustion. This makes them safe for use in factories and other specific places.
- Durability. Some types of blocks can last up to 100 years, which is not always possible with brick or wood.
What are they for?
Over the hundreds of years of civilization, humanity has come up with many ways to organize cordons of personal territory, but until today nothing better than stone blocks for a fence has been invented. Another thing is that today it is often not natural stone that is used, but its somewhat cheaper versions, which involve the use of one or another filler, but in general this does not affect the strength.
Stone blocks, even of artificial origin, are powerful and reliable. The presence of any filler does not greatly affect the strength of the constructed wall and the owners can be sure that intruders will definitely not break such a fence. In order to destroy such an obstacle, you need special equipment, and robbers of any level are unlikely to decide on such a risky undertaking.
If previously only the most powerful of this world could afford such a luxury, today any person who has his own personal plot is able to give his family a feeling of complete security thanks to the construction of such an engineering miracle. Such opportunities have arisen thanks to rapid progress. For example, previously stone blocks had to be searched for in the surrounding nature and then delivered from the nearest deposit to the customer’s location.
Nowadays, industrial enterprises press any available filler with the addition of cement to a state where the final result is in no way inferior in reliability to natural stone. Moreover, the owner can even install the fence with his own hands, which will significantly save the cost of its construction. At the same time, the procedure is not so complex and lengthy that it requires relying on called specialists, which further reduces the cost of the project.
Step-by-step DIY installation instructions
Before installing blocks for fence posts, mandatory measures are taken to prepare the area and concrete supports for a massive structure. They include excavation, concreting and provision of drying conditions.
Base structure
If a massive fence is planned along the entire perimeter, then a strip foundation is poured; in other cases, it is enough to form reliable foundations for each pillar separately.
Ready-made fence posts
The work is carried out in the following order:
- After determining the required distance between the pillars and marking their position along the perimeter, they begin to dig holes. The depth should be slightly greater than the freezing level of the soil in the region where installation is taking place. The dimensions are 15 cm larger than the base of the elements in each direction.
- The bottom is covered with a ten-centimeter layer of gravel.
- Then a central metal pole is installed in the middle of the pit. It must be in a strictly vertical position.
- The pit is framed with reliable formwork, either factory-made or made independently from boards of the required width, taking into account the above-ground part of 10–15 cm.
- To strengthen the support, internal reinforcement is carried out.
- A concrete mixture of cement, sand and crushed stone is poured in a ratio of 1:2:3.
During the pouring period, the remaining air should be eliminated and the composition should be compacted with a crowbar or a piece of pipe by stirring the concrete, and the assembly of the main structure should be carried out only after the base has completely dried.
Options for columns made from type-setting blocks
Installation of blocks
The concrete pillar is assembled in stages in the following sequence:
- with a one-piece design of the elements, one block at a time is strung onto the central metal post, but with a locking system, the assembly is carried out at the place where the fence is installed;
- connect the rows using a concrete mixture (sand and cement (3/1) with the addition of a plasticizer);
- if it is necessary to trace elements of electrical wiring or communications, a box made of thick plastic or metal is installed inside the pole;
- to give maximum strength to the structure, additional reinforcement is carried out before filling the internal cavity with concrete;
- the internal space is filled in stages, through the installation of three or four blocks;
- They finish the work by attaching the top cap, which prevents precipitation from entering the interior, since they contribute to the accelerated destruction of concrete in the “hot-freeze” temperature regime.
Scheme for installing typesetting blocks with your own hands
Work on concreting the base and assembling pillars should be carried out at an ambient temperature threshold of at least four degrees Celsius, otherwise the concrete will not be able to gain the required strength and will weaken the structure. If such an unforeseen situation occurs, you should use a special additive or use folk remedies.
One of the options for self-assembly of type-setting pillars is presented below in the video.
Types of typesetting blocks and their characteristics
The average weight of one block is from 10 to 25 kg. Length 30–50 cm, width 15–25 cm, height 14–25 mm.
Based on their composition and technical characteristics, they are divided into several types. Let's look at each of them in more detail.
Expanded clay concrete
Expanded clay is called clay that is fired at high temperatures. Thanks to the addition of expanded clay, the weight of the concrete block is reduced.
The choice of colors and textures is small. The surface is often rough. The shape is rectangular.
Decorative
Raw materials - clay, artificial stone, concrete and various fillers.
According to the design features there are:
They also produce decorative slabs for fencing, which allows you to quickly assemble modular structures that do not require finishing.
The surface of such blocks can imitate:
They are similar in structure and size to gas blocks and foam blocks. The price is affordable. Wide choice of colors.
Thanks to their original appearance and light weight, they have gained popularity not only in the assembly of fences, but also in the construction of houses and gazebos.
Construction
The raw material is pure concrete. They have impressive weight. There are cavities inside. The surface is smooth on top. Color – grey. Due to their unattractive appearance, they are rarely used when constructing fences in the private sector, more often as post material, or for fences at industrial sites.
They are light in weight. Frost-resistant. There are cavities inside.
Concrete
Another name is besser. Depending on the manufacturer, crushed stone, gravel, and screenings are added to the composition. These components strengthen the structure of the blocks, increase strength, and resistance to mechanical damage. Color – gray with shades. They are inexpensive.
Foam blocks
The composition may be different for each manufacturer.
Popular types are gas silicate and aerated concrete.
The structure can be solid or hollow.
When constructing fence posts, foam blocks are often used. This is due to its low weight and convenient size.
Dimensions of the standard block – 20*20*40 cm.
Often they take material whose surface imitates torn stone.
Finished sections and pillars made from blocks can be painted. You can learn more about the procedure and application nuances here: “Painting a concrete fence.”
Which brick should not be used for the plinth?
Due to its high hygroscopicity, sand-lime brick is absolutely not suitable for arranging a basement. The base built from it will gradually collapse, since silicate perfectly absorbs moisture from the soil and is destroyed by temperature changes.
In just a couple of years, the basement will need a major overhaul. A collapsing base will, in turn, lead to the destruction of the foundation and, accordingly, the building as a whole.
Sand-lime brick: beautiful, but not suitable for a base Source bricknews.ru
Decorative design
Today, many manufacturers are trying to diversify the style of blocks to give them an attractive look. This expands the scope of their application and makes similar building materials more popular.
Fence blocks can imitate several types of substances:
- Brick.
- Slate.
- A natural stone.
- Tile.
To add naturalness, the blocks are painted in different colors. Colored structures can be painted directly on site after installation. This approach is often used by designers to create unique structures and styles.
Particular attention is paid to shades that are present in nature
“Stone” products are suitable for almost any structure, as they can withstand high loads and are compatible with various construction approaches. If you use smooth blocks, then they can be decorated with additional finishing. It is easy to glue ceramic tiles, natural stone or apply decorative plaster to a concrete surface.
Monolithic pillars
Making monolithic concrete supports is a simple process. This is an opportunity to create a high-quality base for a fence yourself at minimal cost. The great advantage of a monolithic pillar is the ability to decorate it at your own discretion. The supports can be made of any shape - round, rectangular or square, the main thing is to assemble the appropriate formwork. To create the correct shapes, boards or plywood are suitable; for round supports, a plastic pipe sawn in half.
Installation of a monolithic concrete pillar
- A hole is dug and crushed stone is poured onto the bottom.
- A reinforcement frame welded from longitudinal and transverse rods is installed in the hole. The verticality of the frame is checked by the building level.
- Concrete is poured into the hole and compacted.
The hole is left to harden. Reinforcement of a hole for pouring concrete into a pillar - The formwork is being installed. The reinforcement cage should not come into contact with the formwork, but should be located exactly in the middle.
- The formwork is filled in layers with a cement composition, each layer is bayoneted so that there are no air cavities left. After 3 days, the formwork is removed.
The resulting nondescript concrete pillar will be given a decorative touch by textured plaster, artificial stone or decorative brick.
Decorative stone for fence posts
Artificial stone is widely used for both interior and exterior decoration of buildings, foundations, finishing and cladding of fences and pillars. It is a composition of cement, sand and various additives and coloring pigments. Decorative stone perfectly conveys the texture and beauty of natural minerals and at the same time has a number of additional advantages that distinguish it from natural materials:
Fence trimmed with decorative stone- Price. Natural stone has a high cost compared to artificial material cast from concrete.
- Ease. Decorative stone has less weight, it is easier to lay it on regular tile adhesive or cement without additional fastening. In addition, the lightweight material does not overload the supports.
- Correct form. Thanks to its straight lines and geometry, artificial stone does not require complex fitting and selection of elements.
- Resistance to negative natural factors. The facing stone is suitable for external work; it is not afraid of moisture, critical temperatures and exposure to ultraviolet radiation.
- Variety of choice. The shape, color and texture of the artificial material can be any.
Decorating and painting
The facade of the fence made of gray cinder blocks needs plastering and painting. To do this, you can use ready-made (industrial) dry plaster mixtures prepared in accordance with the instructions:
- Mineral;
- Silicate;
- Silicone;
- Acrylic.
You can prepare the plaster yourself. The principle of preparing plaster is the same as when preparing masonry mortar. Only the proportion changes. They take less cement, more sand, and fluff lime is added as a filler.
A layer of plaster is applied 8–10 mm thick.
For painting, water-based paints are used (acrylic, silicate, latex, silicone, etc.). Their selection is wide, and prices vary.
Painting red
Painting yellow
The paint is applied with a paint roller in 1–2 layers, depending on the base and absorption into the plaster base.
Manufacturers
Many large enterprises, as well as private companies, produce sand concrete blocks on the Russian market. In the Moscow region you can purchase products that produce hollow and solid products. Partition and foundation modules of this type can be found at. You can also find the product you need at, “Pushchinsky Plant”.
In the regions, everything is also in order with the production of sand concrete blocks. One of the major suppliers is Ecostroy LLC from Kineshma in the Ivanovo region. Trust-Snab has its factories in Moscow and Kaluga. The Tula Concrete Concrete Plant, which produces blocks of various types, is no less famous among builders.
Types of blocks and their advantages
Finishing a concrete fence with plaster
The fence made from the blocks in question is easy to install. You don’t have to turn to professionals for help and do all the work yourself.
The advantages of such decorative products include the ability not only to create a solid fence, and thereby completely protect yourself from the prying glances of passers-by, but also to do without finishing it. In addition, such blocks resist open fire well, which means they are fireproof.
Solid block fencing
This material is not afraid of either low temperatures or high humidity. The dimensions of the products allow the installation of both a completely concrete fence and a fence consisting of different materials. For example, you can combine the material with wood, corrugated sheets, plastic and other materials.
The positive qualities of fencing made of such material include the following:
- This is a reliable capital structure;
- The decorative nature of the material used allows you to create a wide variety of types of fencing;
- A fence made from expanded clay blocks is strong and durable;
- It is not difficult to build such a fence yourself. It is enough to follow the sequence of work performed;
- Concrete is not afraid of moisture, so it is not susceptible to rotting and mold;
- Fencing made from such blocks can withstand wind loads and other aggressive environmental influences;
- Concrete fencing is fireproof.
Upon completion of the construction of the fence, its surface can be painted in any color.
Hollow decorative block
It is important that this paint is resistant to environmental influences and is intended for painting concrete surfaces. On the modern building materials market there are many different types of material with a decorative surface
Concrete fence blocks
Thanks to this, you can implement any design ideas.
Decorative items
The disadvantages of this building material include its heavy weight. One element has a mass of at least 30 kg, and there are also more massive products.
The structure turns out to be very heavy and therefore requires the creation of a solid foundation. Therefore, it is impossible to do without additional financial costs. But still, such a material has much more positive properties than negative ones.
Blocks for concrete fences
Main characteristics
Fence elements. A standard decorative product has dimensions of 480x320x150. Its surface can be simple, looking at which you can immediately understand that it is concrete.
Some sizes of decorative items
But there is also a material with a surface that imitates crushed stone. This material goes well with spans made of wood, metal, plastic, and PVC.
Product range
Fencing made from decorative blocks fits perfectly into any design. The product is the main element in the design of the support column. In shape it is a rectangular parallelepiped.
Decorative blocks are produced by vibration pressing. Cement acts as the main binder. Often additional components are added to the concrete mixture: crushed stone, gravel, brick.
Some decorative material options
Types of decorative blocks
There are several options for decorative products:
| The hollow block is lightweight. Allows for hidden communications - electrical, alarm, gate automation control. Subject to reinforcement to enhance strength. Their price is lower compared to full-bodied ones. | Solid blocks made of cellular concrete are light in weight and do not exert a serious load on the base. |
|
|
| With one decorative side | With two decorative sides |
|
|
| Insulated multilayer expanded clay concrete blocks | |
| |
| There are products with grooves designed for better connection with each other. | Stacked hollow block for forming a column with reinforcement inside. |
|
|
What you need to know about this material
Today, the requirements for any building materials are incredibly high and foam blocks are no exception. The material should not be subject to any destructive processes, including rotting. It must also have excellent soundproofing and thermal insulation qualities. There is no need to talk about safety and durability, since these parameters are considered key. Even in construction, many people prefer to use foam blocks rather than build brick walls.
A material such as foam block has begun to enjoy well-deserved popularity in recent years. It allows you to build not only various fences, but also full-fledged residential buildings. However, not all material can be called high quality.
After all, such economical production often pushes people to try to save even more. Only high-quality products are stored on special pallets, covered with a protective layer of polyethylene and neatly stacked. This is the only way to avoid damage to the material due to its incredible fragility.
An example of how foam blocks should not be stored
The fragility index plays an important role. If you try to crumble it only with your fingers, then with a high quality indicator of the product it will not crumble. If the material begins to crumble, then its quality leaves much to be desired, because the manufacturer has decided to save on cement.
Even the slightest crack will not speak in favor of the manufacturer, as this indicates violations of the drying technology. Internal tension will be created, which will lead to the complete destruction of the foam blocks.
A comparison with a gas block can be seen in the video below.
The bubbles should be small and there should be a lot of them. The oval shape indicates the low strength of the fence material. The dimensions of the foam blocks should also not differ.
Form
Today, all types of fence blocks are rectangular in shape. But they can only differ in the structure of the top decorative layer. The simplest products are made with a smooth surface. The advantage of such options is their high-quality joining during installation.
Externally, they do not carry any decorative load and are used only as a building material in places where decoration is not so important
Particular attention should be paid to the decorative block, which has a torn surface. On the surface of these products, a rough structure is formed piece by piece, which resembles crushed stone (the second name of these products)
With the help of such products it is easy to imitate almost any texture of natural materials. But the cost of such a block is much lower than natural products.
Construction site waterproofing
- preventing the aggressive influence of the environment on the base structure;
- ensuring moisture permeability;
- increasing the service life of the basement structure;
- protection against cracks and other types of deformation.
The main task of the waterproofing coating is to remove cavities in the base. The passage of water and moisture in the presence of through cracks is prevented. If there is a hole in the base cavity and water gets into it, it will destroy the structure when it freezes.
High-quality waterproofing of the foundation involves laying the material in horizontal and vertical directions.
Popular building materials for waterproofing purposes:
- liquid rubber;
- roofing felt The sheets are stacked in two balls. Connected together with bitumen mastic;
- glass insulation
To protect the structure from rain, an overhang is installed. The low tide gives the structure a protruding appearance. Its size is 70 mm.
Advantages of a cinder block fence
Fences are built from cinder block relatively rarely, considering them too labor-intensive. However, such structures are built to last for decades, unlike other materials. We list the main advantages of such construction:
- Extraordinary durability of blocks, amounting to more than 50 years. If the outside material is additionally lined, the building will last much longer.
- A cinder block is one and a half times lighter than a brick, so the load on the foundation is reduced.
- Relatively low cost compared to other solid materials. The cost of construction is further reduced if the blocks are made by hand.
- The fence can be given a decorative look by facing it with ceramic tiles, which fit perfectly on this material.
- Environmentally friendly building material that does not harm people and nature.
- Construction can be done with your own hands, without the involvement of craftsmen.
Construction Features
The technology for constructing buildings from cinder block material is practically no different from building, for example, from brick. In the same way, the foundation is made, the walls are erected, the roof is installed and communications are laid. Differences are only noticeable at certain stages.
- Protecting the foundation from water. Due to the fact that this type of building material is hygroscopic, it simply needs to be protected from moisture, which will come from everywhere, including the foundation. Therefore, foundation waterproofing work must be carried out with special care.
- Masonry. A cinder block is laid in almost the same way as a brick. The method of ligating the blocks is the same and has not changed for many years. The difference lies in the fact that the cinder block has voids. They are used depending on what purpose is being pursued. If the house is low, then the voids are simply filled with cement. This allows for additional strengthening of the structure. If the building has several floors, then a frame made of reinforcement is inserted into the cavity. This allows the material to withstand the load coming from the upper floors.
- A cinder block house cannot do without an armored belt. Of course, I use it in the construction of all buildings made of blocks. It is designed to distribute the load that comes from the floor slabs onto all walls. If the house is being built from cinder block, then the armored belt is especially important. They even make it a little larger than usual.