The screed for a warm water floor is a simple cement pour. It is called roughing and is done to level the surface, prevent heat loss, and pipe deflections. In addition, it affects the durability of the finishing layer, which is poured on top of the heating system. It can be laid in three ways. Let's talk about them first.
Why do you need a screed for underfloor heating?
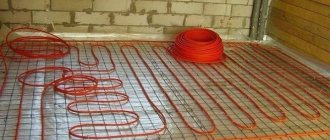
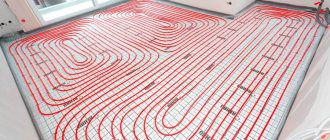
Heated floor screed is used during the installation of a heating system to level the surface. A layer of concrete covers the pipes and fills all the areas between the turns. Thus, the entire system is located inside the concrete screed. As already mentioned, it reliably protects it and reduces heat loss during operation.
When a special plasticizer is added to the mixture, air bubbles will be removed from the concrete, resulting in a very dense screed. The outer layer of the screed is the base for the decorative floor covering.
A screed under a warm water floor not only protects the pipeline well from all kinds of damage, but also promotes uniform distribution of heat over the floor surface. It also supports thermal and sound insulation of the lower floors.
How to fill a heated floor
How to properly fill a water-heated floor - there are three methods that can be used. All of them are simple in technology, their process is similar, although each method has its own characteristics.
| Floor filling method | Description | pros | Minuses |
| Concrete | A common option is a cement-sand composition. To give greater strength to the floor structure, sand is replaced with filler. It prevents the base from crumbling when heated. In addition, when using filler, the thickness of the mortar layer decreases from 50 to 30 mm. | Strength, durability and uniform heating of the floor surface. | Significant floor weight and long curing period. |
| Semi-dry composition | The main difference is that it contains less water than in the first composition. Mandatory presence of polymer additives and fiber fibers. | Increased strength of the floor, dries much faster, has less shrinkage and the resulting surface from this composition is practically not subject to cracking. | Less plastic, this may cause voids. After drying, the resulting base should be protected from water. |
| Self-leveling mixtures | The composition resembles a cement-sand mixture. It can be used to make both a rough base for the floor and a finishing coating. But for screeding a warm water floor, only a coarse leveler is suitable. It comes with different bases: gypsum and cement. Both types can be used to fill heated floors. | It has the greatest plasticity, hardens quickly, and does not require careful leveling, as it spreads under its own weight. | High price. |
Advantages and disadvantages of dry screed for warm water floors
Before choosing a dry screed for a heated floor, you should understand its pros and cons:
- First of all, it is worth noting the fact that the technology of dry screed is not complicated; it can be performed by a person without special training, which cannot be said about concrete;
- secondly, it can be done in several stages, gradually and slowly. You won’t have a lot of time to do cement work; here you need to process a large surface in a short time, because... the solution quickly thickens and becomes unusable;
- After completing the sand-cement screed, you will have to wait about four weeks until it dries completely. There are no such difficulties with dry; it dries very quickly;
- In addition to the heated floor system, communications and electrical wiring can also be placed in the loose layer;
- if the water circuit is damaged and you need to repair it, access to it will be unhindered;
- the structure weighs little, so you can carry out installation work on any floor;
- You can use any base (concrete and wooden floors.
Flaws:
- dry screed is a favorable breeding ground for insects and rodents;
- in case of a leak, moisture accumulates inside the floor, which may result in an unpleasant mold smell, and then you will need to completely redo the floor;
- a screed using gypsum plasterboard is not able to withstand auxiliary partitions in a room made of blocks or bricks, because it will simply push through, which will cause the floor to become wavy.
You can use our warm water floor calculator.
How to properly lay a “semi-dry” concrete screed
In order for the concrete layer to be perfectly smooth, you need to position the beacons correctly. The distance between the beacons is left such that the one and a half meter rule can be used. That is, a distance of no more than 140 cm should be maintained between the beacons.
Types of beacons:
- Mortar beacons made of narrow ridges of cement-sand mortar (gypsum cannot be used). Not the most effective method, since the ridges must dry out, and this takes time. In addition, a rule can accidentally “knock down” such pointers.
- Lighthouses made of metal pipes. Pipes or other rigid profiles are strengthened at the required height. A day after laying the concrete, they are removed and the recesses are filled with mortar. Pipes are used several times for this purpose. The only condition is that they must be perfectly even. Both round and rectangular profiles are used.
Galvanized guides for plaster. The stronger the beacons, the better. The optimal size is 1-1.4 cm. After they have performed their function, they can be left in place or removed after the solution has set. Such beacons are disposable. If you have the skills, you can set them as evenly as possible. Strengthen with mortar, adjusting it to the level using a piece of tile or a brick fragment. The distance between the beacons is 40-50 cm. Sometimes they are installed on special supports that can be adjusted.
The essence of dry screed technology for heated floors
As the name implies, “dry” means a light system, without the addition of water and plasticizer. A heated water floor is a fairly massive structure, and if you use a wet screed, the level of the floor itself increases.
Using a wet screed, the ideal thickness of the cake is approximately 50-70 mm. However, as practice shows, very often the thickness of the cake reaches 100 mm or more.
It is worth saying that not every room has the required ceiling height to compensate for the lost centimeters. In addition, a wet screed increases the load on the floors of the building. The weight of 1 m² of a heated floor with a concrete screed is 200-300 kg. It is clear that the weight of the structure in a room of 15-17 m² will be serious and not the weight of the house, much less apartments, are designed for such a load. Therefore, many users prefer dry screed.
Dry screed for heated floors can be made in two variations:
- wooden;
- polystyrene.
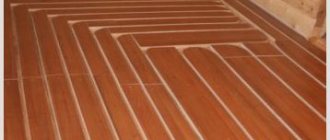
Based on what materials are used, the name and installation method are determined. In this case, strips and boards made of OSB, gypsum fiber board and chipboard act as the main support. But you can use any other tiled material. For a polystyrene system, the support layer is made of polystyrene boards. Insulating layers are laid directly on this base, in which there are grooves for installing water circuit pipes. The final coating here will be not a monolithic concrete slab, but a stacked structure made from gypsum fiber board sheets.
Methods for laying finishing screed
There are two general rules for all material laying options. Before pouring or backfilling the top layer, builders recommend sketching the location of all elements of the system, as well as checking its performance. You can test it in two ways.
Testing of heated floor elements
- With operating temperature. Start bringing the system to operating temperature at 20°C. Raise to 5°C after three to four hours. Drain the coolant if leaks appear and repair them. Then start again. Leave for 2-3 days. If all is well, you can do the finishing touches by first cooling the system.
- With high blood pressure. Run the coolant into the system and create a pressure 2-3 times higher than the working one. Leave it for a day. If the pressure drop is no more than 1.5 Bar, proceed to filling.
When pouring the screed, the pipes must contain coolant heated to 25°C.
During pressure testing, it is recommended to additionally secure the pipes. After a successful trial run, you can proceed further. We will give step-by-step instructions for each installation method.
How to fill a wet screed
Filling in one room should be done in one day, and interruptions in work should be minimal. The exception is a surface divided by a damper tape. In this case, areas can be filled intermittently.
- Attach damper tape around the perimeter of the room. It is needed so that the frozen floor does not crack due to temperature changes.
- In a large room, fix it every 20 m2, between adjacent contours. The pipe passes through it and is enclosed in a corrugation at the passage point. You can use T-shaped strips instead of tape.
- Protect the installed hinges of the water floor from mechanical damage with boards.
- Insulate the pipes supplying water to the collector. If they are plastic, hide them in the grooves made in the floor insulation.
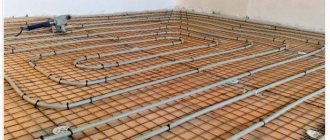
- Place a metal mesh with 10x10 cm cells on the heating system.
- Using a level, install metal beacons with a height equal to the thickness of the layer. Fix the first one at a distance of 20-30 cm from the wall. The next ones are in increments less than the length of the rule by 20 cm.
- Secure them with alabaster and wait until it sets.
- Prepare a sand-cement mortar in a 3:1 ratio or dilute the finished composition with water.
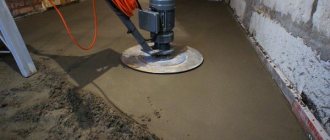
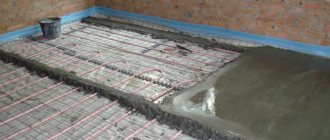
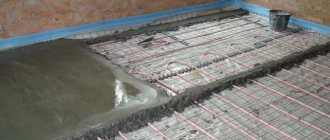
- Spread the material over the surface while tamping it down to remove air bubbles.
- Smooth out the mixture using the rule.
- Cover it with film the next day.
Instagram @_alexey_denisov
Instagram @styazhka_pola__
Instagram @rusteplopol1
Instagram @rusteplopol1
Drying usually takes 20-28 days. During this period, no other finish can be laid on top.
The damper tape should not cross the thermal contours themselves. She is always located between them.
How to install a dry screed
All components of the composition and the surface on which they will be poured must be perfectly dry.
- Fix a damper tape around the perimeter of the room and between the heating circuits to compensate for the expansion of the material.
- Using a level, install the beacons. They should be equal to the thickness of the mixture.
- Lay two guide rails parallel to each other on top. The outermost one is at a distance of 25 cm from the walls. The gap between the slats should be less than the length of the rule.
- Place the rule on the guides and start aligning from the far wall towards the exit.
- The slats can be left or removed. In the second case, the furrows from them are leveled with a wide spatula.
- In the area where the work was completed, secure the first sheet of drywall or chipboard. The recommended gap between it and the wall is 10-15 mm.
- Apply glue to the edges of the sheet and carefully lay the next sheet.
- Fasten them with self-tapping screws. Sew the entire floor in this manner.
- Fill the gaps near the wall with foam.
The final finish can be installed the next day, when the glue has dried.
Instagram @gkpartiya
Instagram @stroypolrf
Instagram @sk_tehnologiya
Instagram @slavianskiiterem
How to lay a semi-dry screed
- Install damper tape around the perimeter of the room and between the thermal circuits.
- Lay a reinforcing mesh with 10x10cm cells on top of the thermal system.
- Mix cement and sand with a shovel in a ratio of 1:3. You can add fiberglass, plasticizer or PVA glue.
- Set some of the mixture aside and pour some water on it.
- Repeat this with the entire slide, leave it for half an hour.
- Then mix the material two or three times with a shovel.
- Check its readiness. The finished material easily sticks together into a lump, remains moist, but water does not flow out of it.
- Place the beacons and add the mixture in small parts.
- Lift the mesh so that the composition is evenly distributed inside the thermal contours.
- Compact the material and level the floor surface using the rule.
- Seal the furrows from the lighthouse the next day in the same way, but add a little more water.
- If you do not have time to fill the entire room in one day, cut the edge at a right angle.
- Cover the floor with film for two weeks to prevent water from evaporating. Air should not get under the film.
Watch the video for a visual presentation of these instructions.
Wooden floor heating system
This method is used most often. The thickness of the materials used for the support layer should be slightly higher than the diameter of the water circuit pipe. In this case, you can use plywood, gypsum fiber board, fiberboard, MDF or chipboard. When laying the strips, you need to determine the width in accordance with the pitch of the heating pipe. They need to be fixed using damper tape.
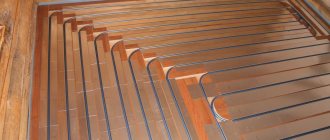
The support layer is placed across the supporting structures (joists). The route of the future water circuit should be schematically marked on it. Each of the pipes must be lined with support strips, taking into account a distance that is slightly greater than the diameter of the pipeline. In the area where the water pipe bends to turn, the support strips are rounded.
In the middle of the support rails there are special plates that distribute thermal energy. The design of these plates includes a special groove into which the water circuit pipe fits precisely. Ultimately, the pipe will fit as tightly as possible to the plate. The heat transfer effect is increased.
The plate covers at least 80% of the floor area. The pipeline, which is placed in the described plates, does not need to be additionally fixed to the supporting base.
The next stage is the covering itself. To do this, you need to use gypsum fiber sheets or other materials that are suitable for this technology. The process of installing sheets is carried out using special self-tapping screws. As a result, you will have a structural base, a load-bearing and heat-distributing layer on which the floor covering is laid.
For finishing you can choose different materials, but you should take into account a number of nuances:
- wood (parquet, laminate, regular boards) must be certified to work with heated floors;
- if you want to lay ceramic tiles, then you need to take care of an additional layer of gypsum fiber board, which is attached to the bottom layer of the structure.
If we compare the wooden system with the polystyrene one, the first option has a number of advantages.
Requirements for finishing the floor
The effect of a warm floor is best felt with floor coverings made of materials with a high thermal conductivity coefficient (ceramic tiles, concrete, self-leveling floors, baseless linoleum, laminate, etc.). If carpet is used, it must have a sign of suitability for use on a warm base ( Fig. 20
).
Rice. 20. Carpet suitability mark
Other synthetic coatings (linoleum, relin, laminated boards, plastic compound, PVC tiles, etc.) must have signs indicating the absence of toxic emissions at elevated base temperatures ( Fig. 21
).
Rice. 21. Floor covering suitability signs
Parquet, parquet boards and boards can also be used as a covering for heated floors, but the temperature on the floor surface should not exceed 26 ° C and the mixing unit must include a safety thermostat. It should also be taken into account that the moisture content of natural wood flooring materials should not exceed 9%. Work on laying parquet or plank flooring is permitted only when the room temperature is not lower than 18 ° C and the humidity is not more than 40%.
Polystyrene underfloor heating system
The use of synthetic materials as key design elements makes it possible to work with any type of residential building in which a warm water floor is installed. The polystyrene system is suitable for both concrete floors and wooden structures. The key feature of the technology is the ability to lay stacked structures directly on old coatings.
The main requirement for polystyrene systems is that the base surface must be well prepared, cleaned and leveled.
Dry backfill Knauf for floors
The sequence of installation actions in this case is as follows:
- On a clean and leveled surface, it is necessary to lay a polyethylene film, the thickness of which is 150-200 microns. At the joints the film is laid with an overlap (10 cm). The joints must be sealed with mounting tape;
- A damper tape is laid along the perimeter of the heated room on the load-bearing walls;
- profile polystyrene foam can be laid on top of the polyethylene film;
- The water circuit pipe and heat distribution plates are installed on top;
- in the areas of pipe bends where the plate ends, linings are made of polyethylene film under the pipes;
- after the heating pipe is laid, the entire structure must be covered again with plastic film, the thickness of which is 100-200 microns;
- then GVL sheets are placed on the structure in two layers. The total thickness of this coating must be at least 20 mm.
After all the above manipulations have been completed, you need to decide on the finishing coat.
Ceramic tiles cannot be laid on a polystyrene system without a rigid frame. Due to the excessive rigidity of the tiles, the flooring will crack too quickly (due to insufficient rigidity of the base).
You can replace profiled polystyrene with regular polystyrene foam sheets. To do this, you must perform all the actions prescribed by the basic technology. An advantage of this method is the increased rigidity and strength of the dry screed.
Polystyrene systems cannot be used for heated floors that are connected to a centralized heating system. Too high a temperature regime for heating the coolant can damage polystyrene foam.
Preparatory work
Before pouring the screed onto a warm water floor, some preparatory work is required:
- level and clean the base;
- install a heating system.
When installing a heated floor, you need to fill it after installing the entire “pie”; it is important to lay all its layers correctly.
The sequence of laying layers in the “pie” of a warm water floor is as follows:
- Rough screed - it is cleaned and leveled.
- Waterproofing - a polyethylene film with a thickness of 200 - 250 microns is placed.
- Thermal insulation - foamed polyethylene with foil coating is installed.
- Reinforcing mesh - it is necessary to give strength to the structure. In addition, pipes can be attached to it if the polystyrene foam base with bosses does not fit.
- Heating circuit (metal-plastic or polypropylene pipes with a cross-section of 20 mm) - it is fixed either to the mesh with special fasteners, or is laid on polystyrene plates between the bosses.
- Reinforcing mesh - it can be laid on top of the heating system, if desired, to give greater strength to the structure.
Before filling, it is necessary to connect the system to the collector, check it for leaks and how it heats . After which, a beacon is installed, which helps to obtain a level base from the concrete composition.
Installation of warm dry floor
In order for the heated floor screed to be performed at a high level and of good quality, it is necessary to comply with a number of requirements and installation rules:
- When installing a heating system, before pouring the solution, it is necessary to thoroughly clean the surface of construction debris, dust and dirt. If this requirement is neglected, then during hardening the solution may completely peel off from the base.
- You need to start laying the screed from the walls opposite to the entrance. It is necessary to make small holes in the screed, 4-5 cm thick. This will ensure strong adhesion of the new screed to the lower base. The surface will dry evenly and quickly.
- The most acceptable thickness of a concrete screed is considered to be 3-5 cm.
If you make the screed thicker than 5 cm, then the floor will take a long time to heat up, but if it is thinner than 3 cm, then, on the contrary, the coating may overheat and the floor will crack. If it is necessary to make a thinner screed (for example, 2 cm), a plasticizer should be added to the solution or self-leveling mixtures should be used.
- To ensure that the floor covering does not undergo deformation and that cracks do not appear on it due to the effects of high temperature expansion, expansion joints must be used along the walls and near the doors and an expansion strip of polyurethane foam must be laid.
- When performing a dry screed, it is important that the backfill is completely dry. In order for the consistency of the screed to be as dense as possible, the particle size should not exceed 5 mm. Under no circumstances should gaps or crevices be left between the gypsum board sheets and the backfill. To prevent the composition from drying out too quickly, after the pouring process is completed, the screed must be covered with plastic wrap or the surface can be sprayed with water from a spray bottle. At room temperature, you need to wait 30 days until the screed dries completely.
- The initial start-up of the heating system (a month after pouring the screed) is carried out in two stages: first, the temperature in the system gradually increases from the minimum value to the maximum (this is done during the first seven days).
- Then the temperature gradually decreases from maximum to minimum (this is carried out over the next seven days).
If you follow all the above requirements and recommendations for laying screed, you will be satisfied with high-quality warm floor covering for many years.
To summarize the above, it is worth noting that a heated floor under a dry screed is a good alternative to a concrete coating. Their efficiency is no worse, but the heat transfer is slightly lower. But wooden and polystyrene structures are more durable and reliable.
Temperature gaps
The main reason why cracks appear on a concrete screed is the incorrect location of expansion gaps.
According to the instructions, when installing a screed heated floor in rooms with a complex layout or having a large area, it is correct to divide the room into zones before pouring the concrete. The demarcation needs to be done with a damper tape, 5-10 cm thick, and the entire area along the walls is laid with it.
The damper tape helps protect the heating system from damage, because during the heating process the structural elements expand. If you do not install the damper tape, the concrete floor screed will quickly crack.
There are several points by observing which you can correctly arrange expansion joints:
- Each zone that is fenced with tape should be no more than 30 m2, and the sides should be no more than 8 meters long.
- If the room has a complex layout, it is divided into square or rectangular zones.
- In some conditions, it is possible to make divisions at 1/3 of the depth of the solution.
- After the floor screed has hardened, the seams are sealed.
How to fill with a “wet” screed
If a lot of water is added to the solution, you get a “wet” screed. The solution will be plastic.
The component ratios are as follows:
- When laying heated floors in a dry living space, an M200 solution using M500 cement is suitable. You will need 1 part cement, 3 parts sand and 1-1.4 parts water.
- When laying heated floors in a damp room (in a bathroom), you need an M200 solution based on M400 cement. Take 1 part cement, 2.5 parts sand and 1-1.4 parts water.
- In reality, the volume of liquid depends on the moisture level of the sand and the amount of dust in it. In this regard, water is added gradually, mixed and plasticity is controlled. The result should be a mixture similar to thick sour cream.
- The solution is leveled between the pipes and compacted, removing air bubbles.
The process of leveling the mixture is facilitated by a long rule and pre-placed beacons. The recesses are filled with the mixture and leveled again.
The screed is made from the screenings in the same way. But everything is done more carefully, more labor will be required. The advantage of the “wet” method is the plasticity of the solution, which is easy to level with a rule.
Screed composition
Screed for heated floors can have a different composition; usually a mixture of sand and cement is used. Often crushed stone or expanded clay is added to the solution to save cement, as well as a plasticizer to improve properties. In this case, a concrete screed is obtained. The cement content in the mixture may vary, depending on the chosen floor covering.
If laminate, parquet, tiles or other heavy materials will be laid on the screed, then take 5 parts sand and 0.7 parts water to 1 part cement. When planning to lay light flooring, for example, linoleum, carpet, the ratio of cement, sand and water will be 1:4:0.7. When adding crushed stone to the mixture, adhere to the following proportion: 1 part cement, 3 parts sand and 5 parts crushed stone. The amount of water can reach half the mass of cement. Regardless of the composition of the mixture, it is recommended to add a plasticizer to the heated floor screed. It can be PVA glue. For 1 bag of cement you will need 1 kilogram of glue.
Screeding can be done easier and faster by using ready-made mixtures. How to use them is indicated in the instructions supplied with them.
pros
If you install a heated floor on a dry screed, you may encounter a sufficient number of its positive qualities. The most common among them are:
- The design is very light when almost no load is created on the floor. Subsequently, any type of flooring can be installed.
- The ceiling can be not only concrete, but also wooden. That is, there are no restrictions here.
- Once the installation of the water floor system has been completed, you can begin laying the selected flooring option. This significantly reduces the time frame for carrying out work, which is especially important when it is necessary to quickly move into a residential premises.
- The screed is of insignificant thickness, which has virtually no effect on the height from floor to ceiling in the room.
The most important thing in this situation is to carry out all the work efficiently in order to obtain a truly effective design for heating the room from the base of the floor.
Floor covering
When a heated floor under a dry screed should be covered with a floor covering, then its version should be designed specifically for a heated water floor system. For this purpose, it has special markings indicating this. But each individual case has its own characteristics.
So, for example, for tiles you will have to additionally create a layer of gypsum fiber boards, which are fastened together in a checkerboard pattern using glue.