The Dachny Expert portal expresses gratitude for the expert assistance in preparing this material.
Spets.Krovlya LLC is a reliable contractor for roofing work on pitched roofs of any complexity. Guaranteed quality, clear deadlines and a fixed price, which is immediately specified in the contract and will not change!
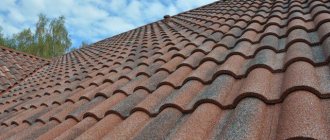
Metal tiles are roofing materials in the form of profiled steel sheets coated with a polymer coating. It is used to cover roofs with an angle greater than 14 degrees.
Outwardly, it is similar to classic ceramic tiles, but surpasses it in reliability and ease of installation. In this article we looked at what is better, soft roofing or metal tiles?
The material is resistant to temperature changes and other negative climatic influences. Its main disadvantage is low sound insulation characteristics , but this can be eliminated if the work is carried out correctly.
In this article you will learn how to make a roof from metal tiles with your own hands, step by step from A to Z. If you do not know how to choose metal tiles, then read this article.
Installation of sheathing
This stage of work should be given special attention, since it is on the sheathing that the tiles will be attached. This design also provides natural ventilation of the internal roof space.
- Metal tile sheathing is made from wooden beams . The relative arrangement of the boards can be continuous or thinned out.
- Most often sparse structures , and the distance between the boards (sheathing pitch) is strictly tied to the distance between the lower depressions of the tile waves, since in these places the material has the greatest strength.
- The distance between the first two bars on the side of the slope should be approximately 70 centimeters less than the established pitch.
- The minimum thickness and width of the board for sheathing are 25 and 100 mm , respectively.
- The width of the board for the counter-lattice can be half as large. The first board from the edge of the roof should be 15-20 mm thicker than all the others.
NOTE!
The boards are pre -calibrated to one size to avoid future distortions and unevenness in the arrangement of the tiles.
Lathing step
Installation of the structure is carried out after completion of the installation of the waterproofing layer. The main lathing is attached to the counter lath, which is connected to the rafter frame with self-tapping screws. At the ridge of the roof, additional support boards are laid under the metal tiles.
Stage 3. Foundation
Lathing for metal tiles
As noted earlier, metal tiles weigh little, so they do not need a reinforced base - you will need a regular lathing made of wooden slats. The pitch of the sheathing should be calculated according to the dimensions of the tiles, so as not to drive the screws into the void during installation.
Counter-lattice
Counter-lattice
Important! When calculating the pitch, the location of the windows is also taken into account - it is not advisable to place rafters above them.
Calculation of metal tiles
calculated as follows (or use an online calculator):
- The area is calculated .
- The effective size of the tile sheet is calculated; for this, the area used in the overlap is subtracted from its total area.
- The number of rows of tiles on the slope is calculated. To do this, the working length of the slope must be divided by the width of the sheet.
- The number of sheets in a row is counted.
- The numbers of rows and sheets in a row are multiplied.
When calculating the number of sheets in a row, you need to keep in mind the amount of overlap , which can reach 15-20 centimeters.
To ensure that there is no shortage of material, it is better to round all values up.
Roof calculation
Overhang dimensions
The size of the eaves overhangs can vary in width from 0.6 to 1.5 meters. In order to determine exactly how long the roof overhang should be extended, you should familiarize yourself with the technical standards SNiP II.II-26-76 with the recommended sizes of eaves overhangs depending on the technical characteristics of the roof structure. In addition, building codes regulate the type of overhang structure depending on their purpose and type.
Overhang sizes are selected depending on the shape of the roof and weather load
But if you look at it, building codes do not provide for strict regulation of the projection of the roof overhang onto a horizontal surface. There are general recommendations for installing the minimum dimensions of overhangs depending on the roofing material:
Slate
(asbestos-cement corrugated sheets) – the minimum overhang size is not less than 50 mm.
Ceramic tiles
– the minimum overhang must be at least 70 mm.
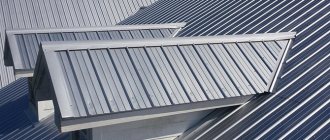
Steel roofs, corrugated sheets
– not less than 100 mm.
For private houses, a cornice is selected that combines architectural expressiveness, aesthetic beauty and protective functional features. Although the installation of such a cornice overhang is financially expensive and technically more complex, many owners deliberately agree to increase the cost of construction, since such a cornice overhang will fully justify itself during operation.
Metal roofing: waterproofing and vapor barrier
Before you begin installing metal tiles with your own hands, you should take care of insulating the roofing pie. Protection of internal spaces from liquid is provided by layers of vapor barrier and waterproofing.
The waterproofing is located between the rafters and the counter-lattice and prevents moisture from the environment from entering the interior of the roofing pie. The most common moisture-proof materials are polyethylene and reinforced films. They are stretched over the entire area of the slope with slight sagging. It is important to ensure that the waterproofing does not overlap with the thermal insulation.
Roofing pie
Vapor barrier is a protective layer that generated in the premises to pass into the interior of the roof This is the lowest layer of the roofing pie; it is located under the rafters (to which it is attached) and thermal insulation, thereby ensuring its protection from condensation.
An attic roof made of metal tiles must have a high-quality vapor barrier; in cold roofs without insulation, installing a vapor barrier is not necessary.
Stage 4. Thermal insulation
Roofing pie
Thermal insulation is necessary not only to prevent heat loss, but also to protect against the noise of rain. First, the rafters are covered with a vapor barrier material (for example, Izospan or Yutafol). Next, an insulating layer (no more than 25 cm thick) is laid, covered with an antioxidant film and attached to the rafters with wooden blocks.
Important! The material between the bars should sag slightly (about 2 cm) so that the condensate flows only into the drain.
Required tools and equipment
Covering a roof with metal tiles begins with preparing the necessary tools . To install a metal tile roof you will need:
- Screwdriver.
- Rail.
- Tin snips or other metal cutting devices such as nibblers, circular saw, etc.
- Construction stapler.
- Tape measure and marker.
- Components of the roof and roofing pie: tile sheets, self-tapping screws, hydro-, steam- and heat-insulating materials, timber for sheathing and rafters.
NOTE!
When working with tiles, you should not use a grinder or other abrasive cutting tools, as this disrupts the structure of the sheet.
Types of eaves overhangs
The final design of the overhangs depends only on the wishes of the developer. It does not have any effect on functionality, but only if all recommendations of building codes and regulations are strictly followed.
Table. Types of eaves structures
Before making a final choice, you should consult with professionals, taking into account the appearance and the need to ensure the recommended operating conditions of the roof.
Installation of metal tiles - step-by-step instructions
How to properly cover a roof with metal tiles with your own hands? The first step is to arrange the rafter system.
It is on it that all other roofing elements will be fixed. The system is constructed from wooden beams, and their size exceeds the dimensions of the sheathing bars .
The most important elements of the rafters are:
- Mauerlat . This is the fulcrum of the structure.
- Rafter legs . They hold the sheathing on themselves and rest on the mauerlat.
- Racks . Strengthen the support of the rafter legs.
The rafters are fastened to the wall using so-called shanks . These are strips of metal that connect two structures with nails or screws.
Next, the main insulating layers : insulation, vapor and waterproofing. A waterproofing film or membrane is applied to the rafter system and fastened to it with a stapler. Thermal insulation is placed in cells formed by the intersections of the rafter beams, and is fixed using cords drawn crosswise in the lower plane of the rafters.
Installation of rafters
After completing the installation of protective structures, you can begin installing the sheathing, on which we will subsequently lay the roofing. It is applied over the rafters and waterproofing layer and attached to these structures with self-tapping screws.
NOTE!
Before installing the sheathing, you need to coat all wooden roofing materials with antiseptic preparations and allow them to dry. Don't forget to choose the angle of the roof.
Installing metal tiles with your own hands:
- A cornice strip is attached to the frontal board, providing protection for the roof from the effects of wind.
- When performing work, the need to ensure good natural ventilation of the space is always taken into account. To do this, you need to leave gaps between all layers of the roofing cake. The basis of natural ventilation is the possibility of free air circulation under the roof ridge.
- The last step is the installation of metal tiles . It must be taken into account that the sheets must protrude 5 centimeters beyond the edges of the sheathing and be aligned horizontally along the eaves line.
- The ridge strip is attached to two additional boards , which are installed at the joints of two slopes when installing the sheathing. Such measures are necessary to ensure additional resistance of an important structural element to negative influences.
metal tile laying diagram
Laying metal tiles around a chimney requires extra care. Firstly, it must first be plastered . Secondly, you need to install boards around it that are attached to the sheathing. Thirdly, the tiles are cut to 15 centimeters on all sides facing the chimney.
Chimney bypass
Basic options for overhang installation
Visually, the protrusion of the roof above the walls increases the area of the house and visually reduces the height of the building or house. There are several main options for the design of this roofing element:
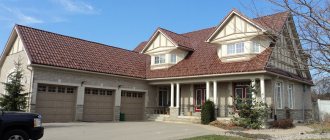
Houses with an attic
. Roof structures with an attic provide for the maximum width of eaves overhangs. This is connected not only to create aesthetic design proportions, but also to organize the protection of the vertical surfaces of the facades under the protruding slopes of the attic.
Houses located in a calm climate zone
. If the building is located in areas with low wind load, then in such cases the flow of rain by the wind will not be “blown” onto the outer walls of the facade. Therefore, in such places there are often buildings without eaves overhangs. An example is an architectural classic - an English-style mansion with stone walls and a tiled roof with a tiny narrow cornice. This minimalist solution for the cornice is completely justified: stone walls and narrow window openings do not need special protection from bad weather conditions.
If the house is located in a “quiet” area, it does not need large overhangs
Narrow overhangs
. A house equipped with narrow overhangs visually looks compact due to the fact that the narrow eaves overhang rests on the projection of the wall. It turns out that the overhang is located on the eaves of the building, and the structure of the eaves itself is, as it were, “wrapped” into the pediment of the building. Due to this, the external appearance of the building acquires elegance and airiness of structural lines and proportions tending upward. Narrow roof overhangs are excellent for buildings located within the city with dense buildings, in the presence of a small plot of land or in the absence of it. In such cases, houses with minimally sized eaves, due to their practicality, fit perfectly into the surrounding buildings.
Wide cornices
. Large roof overhangs create a comfortable and protected space underneath. Under the outer walls of the house, equipped with wide eaves, a cozy place is created, in which you just want to put benches and a rocking chair, decorate with flowerpots and hanging pots with beautiful flowering plants. In a country house, under a wide canopy you can place garden tools, a summer storage room, and a place for storing firewood. The house, equipped with wide eaves, surrounded by flowers, green lawns, attracts attention with its unique style and aesthetic design.
On our website you can find contacts of construction companies that offer construction services in installments and work with maternity capital. You can communicate directly with representatives by visiting the “Low-Rise Country” exhibition of houses.
The choice of eaves overhang design affects the energy efficiency of the building. To reduce overheating of the house and create comfortable living conditions during the hot summer season in buildings with a southern and south-eastern orientation, windows on the ground floor are often equipped with protective awnings or roller shutters with shading canopies. In this way, it is possible to reduce the costs of cooling indoor spaces associated with excessive summer heating from the hot sun
A canopy over the windows will protect from excess sun in summer
Additional elements
In addition to the above eaves and ridge strips, when installing a metal roof, you may need the following products (full list here):
- Snow guards. They loosen the snow masses falling from the roof, making their fall relatively safe for building structures and for humans.
- Junction strips . These products frame the joints between tiles and all important structures, such as chimneys and ventilation pipes.
- Corners and valleys . They protect all corner roof structures.
- Low tides . Used to redirect flows of rain and melt water.
- Horse.
Additional elements
Organization of ventilation
If the roof overhang is completely closed, it is important to consider its ventilation. If gable eaves do not require the installation of additional holes for ventilation and are hemmed “solid”, then hemmed eaves overhangs should provide for the natural organization of ventilation of unused attic and under-roof spaces. The incoming air flows move from bottom to top, and so that warm air leaves and does not settle as condensation on the structures of the rafter system, special small holes are made in the upper part of the roof - vents, and for influx, supply air holes are made in the eaves overhangs.
Ventilation is not the last element when organizing a roof
To calculate the number of supply ventilation openings, technical recommendations are used: the size of the openings depends on the overall projection of the roof area and is taken equal to 1/500 of the entire area. The size of the supply vents, naturally, should be equal to the number of vents in the upper part of the roof. To prevent small birds and various insects from flying under the eaves of the roof, the ventilation openings are covered with protective nets.
Advice from the experts
- The distance between the beams of the rafter frame should be no more than 60-90 centimeters , otherwise the roof structure may sag.
- When performing work, you need to wear soft-soled and walk on the tiles, stepping into their lower deflections. This will prevent the material from being pressed through.
- The absence of contact between the protective layers is important not only to ensure ventilation, but to prevent their mechanical damage due to friction.
- To provide additional ventilation, you can install dormer windows in the attic.
- To install all elongated additional elements evenly, you need to stretch the thread and secure it between two already installed structures.
This is what the technology for laying metal tiles on a roof looks like. This material has an approximate service life of about 50 years , but without the need for repair work, operation will only take place if the installation is carried out correctly.
It is important to correctly calculate the material consumption; for this you need to know the dimensions of the coating, as well as all dimensions and proportions. Even minor deviations from the required indicators can lead to a reduction in operational life by an order of magnitude.
Features of material care
As already mentioned, metal tiles are covered with a polymer layer that protects against corrosion. But constant exposure to ultraviolet radiation, precipitation and dust sooner or later causes the destruction of the protective layer. This is why metal roofing should be cleaned regularly.
Find out detailed information from calculations to installation, how to install snow guards on a metal roof, from our new article.
- Dirt and dry leaves are washed off with a damp fluffy brush.
- To remove more complex stains, you can use special cleaning products for polymer surfaces.
- Do not use aggressive chemicals - they can destroy the protective layer.
- Gutters are cleaned with a stream of water under pressure. The jet must be directed from the ridge to the eaves.
- To clear the roof of snow, you can use only those tools that, in principle, are unable to damage the coating.
If all these rules are followed, metal tiles will last about 50 years.
How to lay metal tiles on a roof with a triangular or trapezoidal slope
If there is a need to cover a triangular or trapezoidal roof with metal tiles, then the installation of two additional bars will be required. They are installed along the fold line of the roof on both sides of the “ridge”. After this, the cornice board is mounted and the assembly of the sheathing begins. The sheathing pitch for metal tiles in this case is calculated in the same way as with the standard scheme. Then the cornice system is installed. They begin to lay the metal tiles only after all these procedures have been carried out, orienting and aligning the first sheet along the eaves strip.
Important! The distance between the corner sheets that were trimmed and installed near the “ridge” should not exceed 10 cm.
In order to install the ridge assemblies, you need to align the ridge strips relative to the angle of the “ridge”. If you use a straight ridge, it must be cut according to the existing corners, and for a semicircular ridge special plugs are provided. Moreover, it is best to use plastic models.
Ridge installation diagram for roofs with a triangular or trapezoidal slope
The ridge strip must be located strictly along the axis of the “ridge”. This is not too difficult a task if the slope angles are the same. If they have different sizes, then the task becomes significantly more complicated. Bright polyurethane foam is used as an auxiliary material, which allows you to determine the quality of the connection to the slopes.
Video description
The following video will allow you to better understand how to cover a roof with metal tiles.
The assembly process includes several stages:
- is attached to the edge of the cornice , which is 15 cm thicker than all the others. The next one is installed 50 mm closer than all subsequent ones.
- Bars with a cross section of 50 mm are placed on the rafter legs , which will be used as an internal counter-lattice. This add-on is necessary to form a ventilation vent.
- Waterproofing is installed on the internal counter-lattice , fixation is carried out using a stapler. The film is not stretched tightly; a certain amount of slack should be left. The individual panels are overlapped with an overlap of 15 cm.
- Boards are placed on top of the waterproofing , which make up the external counter-lattice.
- After the reinforced elements are installed on all the cornices, the remaining boards are attached .
- The end strip is attached to the height of the tile wave so that it rises above the general level of the sheathing.
The sheathing can be regular or solid. The first option is suitable in most cases, while a complete covering of boards with a gap of 15 mm is used with heavy sheathing of high thickness.
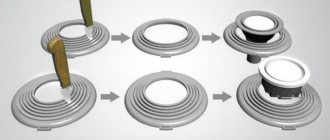
What is the difference between a cornice strip and a drip edge?
The additional elements are similar, but they can be distinguished.
Drip design
Standard dimensions: length – 200 cm, width 100 mm, height 60 mm, bend width – 10 mm.
Principle of operation:
- Water penetrates the drip line along the roof surface.
- It flows down it, moving into the gutter of the drainage system. Precipitation is removed from the roof.
Cornice strip design
The installation of the eaves strip is carried out on top of the sheathing; the element is installed so that it protects the roof surface from sedimentary water. The plank changes the direction of sedimentary water falling on the cornice, transferring it into the drainage system. Additional functions:
- Does not allow heating of the roofing material.
- Organizes natural ventilation.
- It is distinguished from drip edge in that it is a visually noticeable element, therefore it can be used to decorate the roof.
The differences between the elements are presented in the table
| Parameter | Kapelnik | Plank |
| The main task | Removing condensation from the waterproofing layer. | Removal of sedimentary water from outside the roof. |
| Installation features | Attached under a layer of waterproofing. | Mounted under the roof. |
| What protects | Building's facade | Roofing |
How to calculate
Such work is carried out with clear planning of the process, so first of all a roof project is developed. To do this, accurately measure the roof slopes, count the number and length of valleys, ridges and other components. The plan includes a drainage scheme.
Roofing diagram with metal tiles Source srbu.ru
Based on the collected data and the features of the chosen installation technology, it is possible to find out how many building materials will be required for the work. The home owner can perform the calculations himself, or, after collecting the data, contact a company specialized in the sale of roofing materials. Its staff will guide them through special programs and determine the costs involved.
Before laying metal tiles, you need to purchase and deliver a sufficient amount of building materials in advance. If there is a shortage of them, construction may be stopped, and the unfinished roof will be vulnerable to the influence of precipitation.
See also: Catalog of projects of two-story houses with a garage and a gable roof
Common mistakes
If the work is performed by a group of people who have no real experience and have only theoretical knowledge, minor or serious violations of the technology are possible. As a result, the strength and durability of the roof is significantly reduced.
What does an error in laying metal tiles lead to? Source roof-tops.ru
Working with self-tapping screws
Most often, inexperienced craftsmen make the mistake of screwing in self-tapping screws. If the fastener is fixed too close to the edge of the sheathing board, the wood may peel off. As a result, the fixation will be unreliable - the screw will hang in the air, and the base will lose strength.
You cannot screw in the screws too far from the wave, otherwise the head when clamped will lead to serious deformation of the roof. At best, this will lead to a loss of visual appeal; at worst, the metal will tear and water will leak inside. During installation, you should make sure that the self-tapping screw is screwed evenly - this is the only way to ensure the tightest possible fit of the head and maximum protection from the environment.
Inexperienced craftsmen often under-press or over-press the hardware. In the first case, water will slowly penetrate into the roof through the remaining gap. In the second, deformation will occur, reducing the service life of the roofing. Ideally, there should be no gap between the rubber gasket and the tiles.
Low quality boards should not be used Source krovlya-kryshi.com
Errors when laying sheathing
When laying each base strip under metal tiles, you need to monitor their location. All boards are laid strictly parallel; when nailing them, you need to make sure that they are all located on the same level. For this purpose, a rule with a special indicator is used.
The spacing of the sheathing must not be violated, otherwise it will be impossible to secure the roof elements. Take the time to use measuring instruments when fixing each board and beam - this will ensure maximum accuracy.
Video description
The following video shows how to join sheets of metal tiles:
Fixing is done using self-tapping screws designed for working with metal tiles. They are made of galvanized steel, and are complemented by an outer coating and a wide cap. This design provides reliable protection against corrosion, both for the fastening element itself and for the roof.
At the bottom, self-tapping screws are installed at each wave deflection, which guarantees reliable fixation. Above it is enough to fasten through one wave. Install the screws so that they are located exactly in the middle of the beam or board.
Process Features
Since additional load is expected on the valleys, in this place the sheets are attached on each wave to a continuous sheathing. Since several sheets will be joined at this point, they need to be fastened so that they form an even angle.
A properly equipped chimney Source orchardo.ru
A separate methodology is provided for chimney equipment:
- this functional element is complemented by a continuous sheathing attached directly to the brickwork;
- a pre-cut sheet of tile is fixed to the sheathing, adjacent ones are laid so that an even angle is formed;
- the joint is hidden by decorative elements attached with screws;
- For maximum tightness, steel sheets are fastened so that the top strip is tightly adjacent to the surface of the chimney, and the joint itself is covered with sealant.
If everything is done correctly, a gap is formed at the junction of the top sheets into which a seal can be installed.