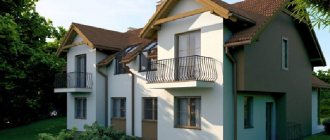
A change house is a temporary space where you can store tools and equipment, as well as have lunch or relax after work. Since building a house is a slow process, it makes sense to build a change house with your own hands. This will allow you to save some money on the purchase of a finished structure, and subsequently use it for your own needs, for example, a guest house, bathhouse or barn.
Technology and materials
The change house is a fairly simple design. As a rule, this is a frame made of timber or profile metal, covered with boards, moisture-resistant plywood, OSB boards, corrugated sheets, etc.
For internal cladding, MDF, fiberboard or plywood with a thickness of 6 mm or more is used. For insulation, polystyrene foam, polystyrene foam, and mineral wool are used. Thermal insulation not only keeps the room warm in winter, but also prevents severe overheating in summer.
In wooden buildings, it is preferable to use mineral wool, the properties of which, in particular vapor permeability, are in many ways similar to wood. This allows the materials to evaporate moisture equally without creating areas of rotting.
Polymer thermal insulation has almost zero vapor permeability, so moisture accumulates in the wood and causes its premature destruction.
Panel change house
The foundation for a change house is most often not permanent - horizontally placed blocks, reinforced concrete or wooden beams, logs or other supports.
In addition to doors, the cabin is provided with windows as a source of daylight. There may be no utilities at all, but as a rule, electricity is provided so that tools and equipment can be plugged into a fixed outlet.
Floors can be either rough without insulation (if the change house is for storage) or insulated. Thermal insulation is laid between the joists, and the cracks are carefully sealed. Top covering material - board, plywood, OSB.
The roof is made in the form of a rafter system or a continuous panel along the floor beams, followed by the installation of roofing material - corrugated sheets, metal tiles, etc.
Sequence of installation of the cabin:
- Foundation device.
- Frame assembly.
- Laying roofing materials.
- Installation of windows and doors.
- Insulation and sheathing.
- Laying communications.
- Finishing.
As a decorative finish, you can immediately use paintwork, moisture-resistant wallpaper, or linoleum for the final floor covering.
Disadvantages and possible problems
Nowadays, wheel chassis parts for non-self-propelled vehicles are made from high-quality steel. However, even in this case, problems may arise with the design. For example: corrosion of steel parts operating in aggressive environments, intense wear of friction pairs and spring plates, mechanical damage to suspension elements, brake and trailer systems.
To solve these problems, manufacturers use rubber boots, bumpers made of polymer material, special coatings and alloys.
Layout and drawings
Standard sizes of cabins and openings:
- length - 6-9 m;
- width - 2.5 m;
- height - 2.5 m;
- doors - 0.9x2.1 m;
- windows - 0.9x0.9 m.
Since you are building a shed to suit your needs, you can move away from standard solutions and make it larger or smaller.
The area of the cabin depends on the purpose:
- to change clothes and store equipment, 8-10 m² is enough;
- if you plan to relax or live there temporarily, it is better to make the room more spacious - up to 25-30 m².
Planning is decided according to the same principle:
- for a warehouse - a room without partitions;
- for temporary accommodation - a vestibule and a room.
The doorway can be located at the end or in the middle of the cabin. In both cases, the room is conveniently divided into several parts that can be used for different needs. In the walk-through vestibule, equipment is stored or a locker room is organized; other rooms are equipped with a kitchen, storage room, and rest area.
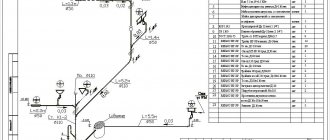
Here are some options for drawings with different locations of internal partitions and communication designations:
Change house with two separate rooms and a vestibule
Two separate rooms with vestibule, bathroom or storage room
Smaller vestibule, but larger rooms
Change house with shower and toilet
To heat water, an electric boiler or instantaneous water heater is used, but provided that the cabin has running water. For the summer period, you can install a storage tank on the roof of the cabin. On hot sunny days, warm water will be enough to freshen up after work.
With separate entrance to shower and toilet
For the toilet, you can make a separate cesspool, dig a plastic septic tank, or install a dry closet with peat or liquid filler. The latter option is convenient because it does not require sewerage or plumbing, and there are no odors or other unpleasant phenomena associated with a cesspool.
Arrangement of a change house
The outer walls of the cabin trailer are sheathed with clapboard or OSB boards if finishing is planned for painting. In this case, the overhangs along the perimeter of the roof are not large enough, or the building itself is located in an open area, it is best to cover the outer walls with profiled roofing sheets. Ventilation windows are cut out along the upper and lower edges of the sheet, or it is better to build independent vents for water vapor.
Interior decoration of the cabin
If the building is planned to be built with subsequent repurposing as a bathhouse or guest house, then the best finishing option is considered to be cladding the walls and ceiling with ordinary clapboard.
After two or three years of operation of the cabin, the material darkens, a dark coating of dampness and even mold may appear along the lower edge, so anything else is rarely used for the walls.
The exception is the bathroom and shower block of the change house. In this case, it is best to make the walls and ceiling based on plastic panels.
Lighting in the cabin
According to fire safety rules, the exit from the room and the installation location of the heating device, stove, air heater must be illuminated. The rest of the room is equipped with lighting at your own discretion. Typically, a change house is divided into two parts in which ceiling lamps need to be made - a bathroom and a recreation area.
All electrical wiring of the cabin is mounted in metal corrugations. All lines must be located on top of the wall cladding. The place for the box with the circuit breaker and the bags is chosen so that the working panel is illuminated by a ceiling lamp.
Water supply and sewerage in the cabin
The supply of water and drainage communications into the premises is carried out through the subfloor of the trailer. To prevent the pipes from freezing in the winter, a caisson or collector is built in the ground under the sewer and water supply system, insulated with polystyrene foam and covered with a plastic box.
For mobile and summer versions of the trailer, you can build a connection to water and drainage using flexible and corrugated pipes.
Requirements for cabins
At large facilities under construction, temporary premises are organized in accordance with GOST 22853-86, GOST 23274-84, GOST 23345-84 and others. There are no such strict requirements for building your own home, but you still need to follow some general rules, as well as safety precautions:
- Choose a place for a change house on a small hill or flat area, but not in a lowland or on a slope. In case of heavy rains or melting snow, flooding is possible, and the washed-out foundation will fail or slide down.
- Take into account the layout of the site, the location of central communications, and the ability to connect to them.
- The change house should not be located close to a warehouse of flammable or explosive materials; the fire gap is at least 15 m.
- Electrical wiring is laid only in corrugated cable ducts.
- It is advisable to have a carbon dioxide or powder fire extinguisher in the cabin. The first is safer for others, since high pressure is not created, the second is effective for extinguishing deep fires. But it can only be used from a safe area in the absence of people.
- If polystyrene foam (foam plastic) is used as insulation, a fire-resistant seal made of basalt wool must be laid around window and door openings.
Compliance with these measures will help you use the cabin for a long time and safely.
Actual sizes of cabins
In addition to the practice of standard cargo transportation in the Russian Federation, there is transportation of oversized cargo, the features of which are:
- taking into account the size of the vehicle with cargo on the platform, trawl or trailer, a route is laid out;
- a permit is issued at the State Traffic Safety Inspectorate, escort vehicles are allocated;
- traffic is partially or completely blocked on sections of the route;
- the cost of the service is significantly higher than delivery of standard cargo to the recipient.
It is very expensive to constantly transport large, non-dismountable change houses using this method. Therefore, such projects are developed and implemented for inventory container buildings, the operation of which is planned in one place.
With the length of the product, everything is somewhat simpler:
- manufacturers try to stick to sizes of 3 m, 6 m, 9 m and 12 m;
- however, for specific layouts and placement of equipment inside the inventory building, arbitrary dimensions can be used.
An example is an 8x3 change house with two adjacent rooms or a 4x7 m Luxury garden building with a terrace.
Foundation for a change house
The foundation is necessary to establish the structure on a stable basis, to protect the lower part from precipitation and high humidity. The foundation is first prepared - leveled, sprinkled with crushed stone or sand, and compacted. If the soil is loose, better preparation is needed. The top layer under each support must be removed to a depth of 30 cm, and then a layer of crushed stone, gravel or sand 15-20 cm thick must be poured and compacted well.
The most common material is heavy concrete blocks. It is not recommended to use cellular concrete due to its low strength and high water absorption. The blocks are laid in 1 or several rows in the corners of the cabin, every 1.5-2 m around the perimeter and in places where internal partitions support.
Do-it-yourself mobile shed with a pitched roof
If it is not possible to pour a concrete foundation slab, you can build a frame shed using a different technology - but in this case you will need several concrete blocks, preferably foundation ones. At the same time, to simplify the design of the entire cabin as a whole, the roof can be made pitched (“flat”). Let's figure out how to make a mobile shed with your own hands using step-by-step instructions.
Site and foundation preparation
The site is prepared in the same way as in the first case - cleared and leveled. But there is no longer any need to cut off the soil, since the house will be mounted on a strip foundation made of blocks. But it is necessary to fill up the layers of sand and crushed stone - they will, at a minimum, serve as a kind of drainage for the underground space. Outside, around the block foundation, it is necessary to make a small blind area - to do this, it is enough to give the soil adjacent to the outside of the block a slight slope.
Strip foundation laid out from blocks for a change house
Frame assembly
Several layers of roofing material are laid on the upper surface of the laid blocks, which plays the role of waterproofing, and a wooden beam is applied around the perimeter. For a structure of this type, the thickness of the beam should not be less than 100 mm - a smaller cross-section simply will not provide the required guarantees of reliability.
Ruberoid plays the role of waterproofing
This method of installing a cabin with your own hands has its advantages compared to the first method, in which the lower starting bars are rigidly tied to the concrete base. The main advantage is that the design is mobile; it is quite easy to move it from one place to another. In addition, the presence of an underground space guarantees a dry floor. With additional treatment of wood with an antiseptic, this design will serve properly for a very long time.
Walls
Do-it-yourself installation of walls in a shed with a pitched roof, as in the previous case, begins with attaching corner vertical posts to the base. Then the installed bars are connected in the same way along the perimeter with horizontally located wooden jumpers. The finished frame is sheathed with the selected material.
Attaching to the base of the corner vertical posts
One point should be taken into account - since the roof will be pitched, one of the walls must be made slightly (usually about 0.5 m) higher than the opposing one. The difference in these heights will determine the angle of inclination of the slope, and the magnitude of this angle depends on local climatic conditions: during heavy snowfalls, the slope should ensure free descent of snow from the roof; in warm southern regions, the slope can be symbolic, sufficient for rainwater to roll off.
Installation of a pitched roof
The frame of a pitched roof is one of the simplest building structures. The two outer rafters are installed, then a construction cord is stretched between them. Along this cord, intermediate rafters are evenly installed in increments of approximately 0.6 m. For fastening, it is recommended to use special professional fasteners - plates, angles, brackets. Any roofing material can be used, usually slate or corrugated sheet.
When calculating the length and installation of rafter beams, one should not forget about the need to install small (20-30 cm) overhangs on the raised and lowered sides of the cabin. You can additionally make a small canopy over the front door.
Installation of rafter beams
The floor in the change house is made with your own hands in two layers - rough and finishing. If the room is small, foundation bars are used as supports for the subfloor; if the area is large, it makes sense to add several intermediate joists. Small cross-section bars are attached to the subfloor - logs for the finished floor. The space between them is sewn up with windproof (vapor barrier) material and filled with any available insulation. Lastly, the flooring is laid - usually OSB sheets, plywood or planed boards.
The floor is filled with insulation
Do-it-yourself country house: 2 options
The basis of the change house is a power frame made of strapping, racks and lintels. Sheet materials provide additional rigidity. If boards, siding, etc. are used as cladding, the frame must be reinforced with jibs - boards secured at an angle.
The second option is to assemble a cabin from SIP panels. These are multilayer slabs with insulation glued inside - polystyrene foam or polyurethane foam.
Installation of a traditional frame building differs from SIP panel construction:
- in the first case, the frame is first built, then the insulation is laid and the sheathing is fastened;
- in the second, the assembly is carried out element by element, that is, each panel is first attached to a ready-made rack, and then the next support is installed in the groove.
The most affordable option, which can be implemented even alone or with an assistant, is a frame using conventional technology. It can also be improved - first assemble the sections in a horizontal position, then install them vertically.
How to make a metal shed with your own hands
Making a metal shed yourself is a fairly simple matter, but at the same time it needs to be taken with due seriousness.
Layout of a homemade metal shed
To do this, you should adhere to the basic rules when constructing such premises and use the material and tools that are listed below.
If you comply with all the conditions, you can be sure that the building constructed from metal blocks will serve you for many decades. And its high functionality and usefulness will pay for all costs in a matter of months of operation. In order to make a high-quality change house from containers and blocks with your own hands, you will need the following tools:
- A regular hammer with a strong handle;
- Apparatus for welding work;
Assembling a frame for a change house made of metal - Electric grinder with discs of different diameters;
- A powerful drill that will allow you to use a roofing attachment and large drills;
- Screwdrivers of various sizes and types;
- For painting - special brushes;
- Mask to protect eyes from welding arc;
- Joiner's corners of different sizes;
- Saw for wooden material;
- Stapler.
Before starting work, make sure that you have all the necessary materials, as this will significantly speed up the manufacturing and assembly process, and will also help to avoid unexpected difficulties during construction.
How to build a change house: step-by-step instructions for assembling a frame
For construction you will need:
- timber 100x150 mm for strapping;
- board 50x100 mm for racks;
- foundation blocks;
- floor board 40 mm thick;
- inch board for sheathing;
- OSB or lining for cladding;
- waterproofing;
- insulation;
- window and door blocks;
- impregnation for wood;
- fastener
For finishing you will need paint and varnish materials, linoleum, as well as window and door fittings. Optionally - drainage system, porch, canopy. All lumber is pre-impregnated with antiseptics and fire retardants.
Bottom harness
Lay the lower frame beam with a minimum cross-section of 150x100 mm horizontally on the foundation supports. In the corners it can be connected using the “half-tree” method, end-to-end or “with a root tenon”. If it is necessary to join lumber along the length, the ends are trimmed to form a lock, and the connection is reinforced with metal plates.
Floors
The second stage is the installation of joists and subfloors. The logs are attached to the bottom frame using corners. The laying step is 50-60 cm according to the size of the insulation. A board is temporarily placed on top for walking during installation. In the future, it will be dismantled, and insulation will be placed in the floors.
The floor system must be rigid. If the span is more than 2.5 m, it is recommended to secure spacers between the joists.
Installation of racks and top trim
The next step is installing the racks. They use boards 50x100-50x150 mm, which are mounted in a row one by one with a pitch of 60-100 cm, in the corners - 2 or 3 pieces, depending on the design solution of the unit.
This method of arranging elements eliminates freezing and blowing of the corner, and also ensures rigidity.
The installation of the jib is not carried out when the cladding is made of sheet materials. In other cases, corner and intermediate posts are secured with inclined boards, which need not just be nailed to the frame, but a notch must be used. Such a joint will not become loose due to fluctuations in humidity and will remain stable for a long time.
At the top, the racks are connected by an upper frame - a 50x150 mm board laid flat, or a 100x150 mm beam. It is attached to the racks using galvanized corners or a strapping connection. For this method, you need to cut grooves, join the elements and fix the assembly with nails at least 150 mm long.
Step-by-step instructions: photo reports with explanations
It is difficult to understand some things from the description. No matter how much you read, you won’t understand until you do it, or at least watch how others do it. This is why photos of the construction of cabins are useful: you can look at how the units were made and find a solution for yourself. This is a kind of manual for those who decide to build on their own.
Construction of a wooden cabin
A cabin was built from wood at the dacha. Dimensions 3*6 m, insulated - for temporary residence during the construction of the house. The following materials were used:
- board 50*100 mm - 28 pcs;
- timber 100*150 mm - 5 pcs and 50*50 mm - 24 pcs;
- blocks 20*40*20 mm - 20 pcs;
- roof boards 25*150 mm - 10 pieces;
- tongue and groove floor board 30 mm thick - 21 pcs;
- lining class A 5 packs of 6 meters and 6 packs of 3 meters;
- roofing felt 4 rolls;
- polystyrene foam - 4 cubes;
- windows 90*90 cm - 2 pcs;
- doors;
- Senezh Ultra - 10 l;
- corners and plates to strengthen strapping connections;
- fasteners (nails, screws, finishing nails), polyurethane foam. This is what the materials on the site look like
Since prices for materials greatly depend on the region, there is no point in talking about the cost of construction. But from this list, you yourself can determine with fairly high accuracy how much a self-built shed will cost.
Please note that this list does not include roofing material (ondulin was planned) and there is no glass. Also, lining for interior decoration has not been purchased.
Before construction began, all wood, with the exception of the lining, was treated with Senezh Ultra antibacterial impregnation. Covered in two layers. So the quality of processing should be normal.
Wood processing
They marked out the area for the building. We decided to place the blocks on a sand bed. They dug holes 25-30 centimeters deep, poured sand, and compacted it. Blocks were placed. First we set up the two outermost ones, put a flat board on them, and a level on it. This is how the outer blocks were set up. Then the intermediate ones were adjusted to the height of the boards. So on all sides.
Setting up blocks
Next, the harness was laid. Beam 100*150, cut into half a tree. They folded it and secured it with pins for security.
This is how they cut into half a tree
And this is how to lay a medium beam. After checking the corners and diagonals, we knocked them down with studs.
The next step was to lay the floor joists. They were placed every 50 cm, and we will also install the racks every other one. They were made from a 50*100 mm board placed on a narrow part.
Floor joists installed
We decided to immediately assemble the racks with rafters on the ground, strengthen the connections with corners, and then install them ready-made. They were assembled from the same 50*100 mm board.
We knocked down the front pillar - it was longer, the rear and rafters were nailed, and the plates were screwed on with self-tapping screws
The racks were secured with temporary jibs
The posts were nailed down with long nails. Then, for reliability, all attachment points were reinforced with corners and plates. They were already mounted on self-tapping screws.
50*50 mm bars were nailed to the sides of the joists. The result was “nests” for laying polystyrene foam. It was placed on polyurethane foam: both hermetically and reliably. A floor board was nailed on top.
They nailed a block on both sides of the joists and laid polystyrene foam.
The floor was laid on top
Next, the sheathing stage began. First, we installed additional racks on the sides and reinforced them with jibs.
Additional racks and jibs give greater rigidity to the building
Now comes the actual plating. On the short side there was a lining made of packs of 3 meters, on the long side they nailed six-meter ones.
Beginning of plating
Having completed the sheathing halfway, we laid the sheathing under the roofing. A 25*150 mm board was nailed in increments of 30 cm, with increments of 20 cm at the edges (so that the overhang could withstand). Then we continued with the paneling.
In the places where the windows will be located, they installed mortgages - a board that lies across the counter. The window frame will rest on it. They were fastened with nails all the way through, but the joints were additionally reinforced with corners.
Installed mortgages in places where windows are supposed to be fastened
When the back and blank side walls were sewn up almost to the top, roofing felt was rolled out onto the roof. He will lie there until we buy ondulin.
Sheathing continues
The outer skin is almost ready. The doors were bought without finishing - only the frame covered with fiberboard
Start of door trim
While we were finishing nailing the clapboard on the outside, work was also in full swing inside - they were installing foam plastic. The width of the sheet is 100 cm, the distance between the posts is 95 cm. We have to cut thin strips.
We put foam between the posts
To prevent it from “falling”, we grab it on top with thin corners, which we attach, of course, only to the beam of the rack.
This is what a foam-lined room looks like from the inside
The corners at the top that hold the foam are visible
We started lining the inside, but the lining ran out. For now we have switched to painting the outside. It turned out well, it seems.
This is what a painted cabin looks like from the outside
We had to buy additional lining and finish the interior finishing.
The inside was also lined with clapboard
We started making the partition. It was assembled from the same boards - 50*150 mm. The joints are traditionally reinforced with corners. They covered it with clapboard.
Drains under the partition
Lined on one side with clapboard
We started insulating the roof. They used the same foam and the same technology - they propped it up with corners.
Insulating the ceiling of a cabin
The joints with wall insulation were foamed with polyurethane foam.
The joint with the wall insulation is foamed
Then we started covering it with clapboard.
Beginning of lining the ceiling with clapboard
The ceiling trim is finished
We started laying the roofing. We bought ondulin and laid it with overlap on one wave. They were attached to each wave with special hardware purchased along with ondulin.
Mounting ondulin on the roof of a garden shed
Then we started finishing up the interior. The partition was also insulated with polystyrene foam and lined with clapboard on the other side.
Almost sewn up partition
Finishing the piece above the doorway
This is how the wall looks in the final version
The inside of the lining is coated with water-based varnish. It only gives a slight tint to a slightly darker color. There seems to be no film on the wood. If you look directly, it generally seems that the tree is not covered with anything. Only when viewed from the side at a certain angle is the shine visible.
This is after painting
On the floor, the varnish is already with a film: so that the wood does not wear out. Covered in two layers.
Then we started finishing the overhangs. They were sewn up with the same clapboard. In general, working with the clapboard took the most time.
We are sealing the roof overhangs. The front is almost finished.
Side view
Metal frame for a change house
Metal was chosen as the basis as it is more reliable and durable. The thought that the change house might have to be moved also played a role. If the frame is made of metal, she will not be in any danger.
We are going to build something like this type of cabin
The dimensions were determined based on the length of the angle rods: 11.7 m. The following dimensions emerged: 2.8 * 5.8 m, height - 2.5 m. The frame was welded from an angle with a shelf 75 mm, thickness 6 mm.
The foundation is made on pillars cast independently: construction began in the fall, and there’s still nothing more to be done. So it was decided to fill in reinforced columns: six pieces. First, the area was marked, after which the locations for the foundation columns were determined.
Marking the area and the base for the posts
Holes were dug 50*50 cm, total depth about 30 cm. Crushed stone was poured onto the bottom in a layer of about 10-15 cm and compacted tightly. There is the same amount of sand on top, also with a tamper. As a result, the bedding came to the same level as the ground.
Roofing material is laid at the bottom so that moisture does not escape from the concrete, and it “ripes” normally and does not dry out. Next, the formwork was assembled and the reinforcement was laid in it.
This is what the formwork for the post and reinforcement looks like
The area is dry, the water drains normally, so there should be no problems. I just mastered welding, so it’s not clear whether the reinforcement is welded or twisted.
Before pouring concrete
Everything is filled with concrete, covered with film: the end of October, and in order for the concrete to be of normal strength, it needs to be wrapped.
The columns are wrapped up
The frame frame took a long time to cook - all winter: frosts, workload, did not allow us to operate with the required frequency. The base was made from a 75 mm corner, 6 mm thick, and 40*2 mm was used for reinforcement.
The beginning of the cabin frame from a metal corner - the bottom frame
The side parts were cooked entirely, then with the help of 4 people they were placed in a vertical position and fixed in this way. Profiled pipes 40*40*2 mm were used on the racks to which the window and door frames would be attached.
Frames are assembled lying down
The most inconvenient moment is measuring diagonals alone. You have to constantly monitor them, but doing it alone is inconvenient. But it is necessary to set everything, otherwise there will be a distortion.
To give greater rigidity, I welded strips of metal in the corners. I got them by loosening the corner (40 mm). It was possible to buy an additional strip, but I used cuttings of a corner.
Strips for rigidity in the corners of the frame
View from inside the corner
It was difficult when we were installing the frames: in the cold we only wore thick gloves, and it was difficult to hold them firmly. That’s why they propped it up with boards and whatever they could. But the angle was strictly maintained.
The first circuit is exposed
To ensure a rigid attachment to the frame, metal plates are welded at an angle.
Having exposed the sides of the frame, they were rigidly connected using a metal angle
The entire frame was gradually assembled.
Sidewalls are raised and welded
We finish cooking the plates in the corners: top and bottom
We weld several beams at the top. Now the frame for the change house is “iron”
The frame from the metal corner for the change house is ready
Now all that remains is the casing. It can be anything: even the same lining, block house, or an economical option - plywood and OSB. To attach the bleach to the corner, it is more convenient to screw the beam, and then attach the sheathing and everything else to it. The same situation applies to the rafter system: a block is screwed around the perimeter with self-tapping screws and pre-aligned, and the rafters are attached to it.
Ceiling and roof
A change house is a small structure that can be rationally covered with a pitched roof. It is easy to manufacture and economical in terms of material consumption.
To create a slope, one of the long walls needs to be made higher to provide a slope for water drainage. This is usually the front façade. To create the required drop, you can immediately make the front pillars longer when installing the frame, or attach a wooden panel of the required height to a ready-made box.
The elevation angle is determined by the type of roofing material and must be no less than:
- 3-5° - for rolled roofing, folded metal sheets;
- 7° - fiber-cement sheets, corrugated sheets;
- 12° - metal, ceramic or bitumen tiles.
The footpiles are laid on the mauerlat - the supporting beam of the strapping, secured with corners, overlays, and staples.
A sheathing of 25 mm thick boards is mounted on top of the rafters or a continuous flooring of OSB boards is laid on which a soft roof can be laid.
Briefly about the main thing
A change house in a dacha often becomes the first home in which you will have to spend the night for several years before the construction of a real house. You can build it yourself in 1-2 days and save money. It is enough to make a simple foundation, weld or knock together a frame, install walls, floor and roof.
Companies offer ready-made houses of various sizes in the form of ready-made parts. It is enough to assemble the “constructor” in the right place. This is a good option for those for whom a standard house is enough, and who do not want to make calculations and purchase materials.
Question
Write in the comments what you think - is it worth making a metal frame in the change house or will a regular wooden frame suffice? Is there a change house at your dacha?
Sheathing and insulation of cabin walls
If polystyrene foam is used as insulation, no additional waterproofing is required. The material is not afraid of moisture and is practically waterproof. Mineral wool is more capricious because it has greater water absorption. In heated rooms, it must be protected from steam humidification using a vapor barrier, and waterproofing must be installed on the outside.
The thickness of polystyrene foam for winter use of the room must be at least 100 mm. To avoid the appearance of cold bridges and local freezing, it is recommended to lay 2 layers of insulation of 50 mm each with joints spaced apart.
Before covering and insulating, you need to install window and door frames, and additionally strengthen the openings with another row of boards.
To lay insulation, one of the skins - external or internal - must already be ready. The heat insulator is inserted into the grooves between the racks, the cracks are foamed, and covered with the top skin.
Materials required for the manufacture of metal cabins
- The main material for the frame is a profile pipe with dimensions of 40 by 60 mm, 40 by 40, 40 by 20;
- If you need to install additional insulation in your building, it is best to use material specialized for this purpose;
- Material for protection against the negative effects of steam;
- Moisture barrier;
- Metal sheet that has been pre-galvanized;
- Mounting rail;
- Fastening elements such as screws for metal and wood;
- A primer mixture that is suitable for use on metal surfaces;
- Flexible elements made of metal and used as corrugated sheeting;
- Electrical devices, wires, sockets, insulation. This will be necessary for the electrification of the cabins. Particular attention should be paid to insulation and grounding, since the change house is made entirely of a conductor of electricity - metal;
Design and layout of a metal shed for self-assembly - Structural elements such as windows and doors.
Insulation of floor and roof
Nail cranial bars with a cross section of 50x50 mm along the bottom of the log. Lay boards or OSB on them and secure them.
In the resulting “nests” install polystyrene foam with a thickness of at least 50 mm, and for winter use 100 mm, fill the cracks with foam. If mineral wool is used, the floor pie looks like this (starting from the bottom):
- external cladding board;
- waterproofing;
- insulation;
- vapor barrier;
- air gap of at least 30 mm;
- finished floor board.
The gap provides ventilation and prevents moistening of the basalt wool, reducing its thermal insulation quality. Roof insulation with polystyrene foam is carried out in a similar way. The slabs are fixed between the rafters, and the ceiling is covered with boards or OSB from below.
Do-it-yourself 3 by 3 change house: estimate
There is often a situation when a change house is built with the prospect of using it as a summer kitchen, a guest house, or even just a barn - in general, the construction on the farm is necessary and even necessary. However, taking on the construction of a 3 by 3 shed with your own hands, without presenting at least an approximate estimate of upcoming expenses, is at least reckless!
What determines the price
The cost of the upcoming work and the cost of materials depends on a large number of factors, the main of which are the following:
- type and dimensions of the foundation;
- the dimensions of the cabin itself;
- material of the walls of the structure;
- availability and quality of interior decoration;
- floor and roof construction;
- number, sizes and design of windows and doors;
- the presence and scale of utilities in the cabin - electrical wiring, water supply, sewerage.
Project of a change house with an area of 3x3 m
To make it easier to take into account all these points, it is necessary to draw up a project, deciding on the dimensions of the future room; and the dimensions are dictated by the planned functional “responsibilities” of the change house. A change house with an area of 3x3 m is quite enough for use as a tool storage, a summer kitchen and a mini-bedroom with a single bed.
Unnoticed expenses
The optimal material for construction is wood; This is explained by its low cost and reusability. Metal is significantly more expensive and during construction requires certain professional skills - but if they are available, construction takes much less time.
The presence of windows, even the smallest ones, is mandatory in a cabin - even if they do not play their direct role, they will certainly be useful for providing air ventilation. It is highly desirable to have working electrical wiring in the cabin - at least one socket and artificial lighting will not be superfluous.
Wood is the optimal material for construction
If you want to entrust rather dirty construction work to professionals from construction companies, it is a good idea to first familiarize yourself with the cost of their services - sometimes it can be quite unexpected. But in any case, the final amount in the estimate for building a 3 by 3 cabin with your own hands will always be less.
A little about the choice of materials
Wooden structures do not require special professional skills from the performer, but this material needs high-quality antiseptic treatment - otherwise it will only last for a few seasons. And such processing is quite expensive. If it is necessary to carry out finishing work and the building has a vestibule, the cost of materials can be safely multiplied by one and a half, or better yet, by two.
Wood needs high-quality antiseptic treatment
Metal structures are much more durable than wooden buildings, but also more expensive. But their main drawback is that they are relatively difficult to make collapsible and mobile. All other things being equal - the same finishing, communications, space - metal structures cost about one and a half times more than wooden ones.
Unexpected expenses
Another often forgotten, but quite serious and in many cases almost unpredictable item in the estimate of a 3 by 3 change house with your own hands is “consumables”. These include staples for staplers, tape, nails and screws, electrodes, wind and vapor barrier film, and insulation.
You can reduce costs somewhat if you hire professional builders, but purchase the material yourself. However, in this case, you need to have a good understanding of the characteristics of modern building materials, otherwise the savings may turn out to be very ephemeral.
Change house on a metal frame
Steel is not subject to rotting, but is susceptible to moisture, so all parts must be treated with anti-corrosion agents before or after installation. The first option is preferable, since it is very difficult to get into small gaps in an already assembled frame.
The construction of a foundation for a cabin on a metal frame is no different from a wooden one. The site needs to be leveled and concrete blocks installed. You can mount monolithic columnar supports with embedded parts, to which the frame will subsequently be welded.
You will need:
- corner No. 70-80 for the lower and upper trim, corner posts;
- profile pipes of square or rectangular cross-section for intermediate racks;
- corner reinforcement plates.
It is advisable to weld the frame on a bench, but at home this is usually not possible. Therefore, all elements are installed on a flat, solid base, first temporarily fastened with an intermittent seam, and after checking the correctness of the geometry, the entire frame is scalded.
Experienced welders advise first welding parts on opposite sides of the frame to avoid misalignment as a result of temperature deformations in the metal. After assembly, areas with damaged coating should be re-treated with an anti-corrosion agent.
For the outer cladding of a cabin on a metal frame, corrugated sheeting is usually used. It is recommended to use wood or wood materials inside, and polystyrene foam as insulation. In combination with metal, it perfectly performs its task without causing any side effects.
The advantages of a change house on a metal frame are higher fire safety, strength and durability. If desired, it can be moved to another place in assembled form, even without dismantling the casing.
Types of cabins
Conventionally, cabins can be classified according to several criteria:
- scope and purpose;
- device;
- design;
- materials.
Scope and purpose
Companies engaged in the manufacture of cabins according to standard projects (and to order) distinguish two large classes in the product catalog:
- construction trailers;
- country cabins. Country house "Eco-House"
In turn, construction cabins have the following purposes:
- for human habitation, including for changing clothes, resting and eating;
- administrative (management, accounting and monitoring the progress of work);
- sanitary and hygienic boxes (toilet, washbasin, shower);
- storage of inventory, tools and materials;
- security and checkpoints.
Country cabins are of the universal type. They are usually divided into several zones with different purposes. And the choice of a specific device depends on further plans for use - a change house is not a house, and it is quite easy to convert and improve it.
Device
Based on the internal structure (layout), several of the most common projects can be identified:
- One room. A change house without partitions, which is why it is often called a “dummy”.
- With vestibule. It differs from the previous version by the presence of an internal vestibule, usually located at the end. The entrance door can be installed either on a short external wall or on a long one.
- From two adjacent rooms with an interior door in the partition.
- From two isolated rooms with separate entrances.
- Of two rooms separated by a vestibule and partitions with interior doors. Sometimes such a project is called a “vest”.
Design
There are three main types of cabin construction:
- panel;
- frame;
- container or block containers.
To be precise, block containers are panel or frame structures that are assembled from sandwich panels. The difference from the first two options is that manufacturing companies sell block containers either completely ready for installation or disassembled. In the latter case, the change house is assembled on site in accordance with the technical documentation: diagrams, drawings and instructions that are included in the delivery set. This category also includes transport containers that are converted into cabins.
If we analyze the proposals of manufacturers, then frame structures . They are stronger and more reliable, easier to transport when assembled, and construction trailers have their own chassis and can be transported to another site as a trailer.
Independent developers also prefer to build frame cabins - they are easier to make with your own hands, and the choice of materials, especially for cladding, is limited only by the construction budget.
Materials
The materials for the frame are:
- wooden beam and block;
- metal channels and corners.
Boards can be used as additional stiffeners for a wooden frame, or a strip for a metal frame.
For external and internal cladding (rough and finishing), the choice of materials is much wider. It can be:
- all kinds of boards: OSB, DSP, chipboard, gypsum plasterboard, gypsum board, plywood, aqua panels;
- wooden lining;
- block house;
- imitation timber;
- sheet metal;
- profiled sheet;
- siding (metal, PVC, cement);
- PVC panels (PVC lining);
- wooden sandwich panels;
- metal sandwich panels.
Note. Materials indicated do not include roofing.
Country cabins are also built using timber. But in essence, these are small wooden houses that differ from “normal” ones only in size and smaller cross-section of timber - 100x100 or 100x150 mm. And of course, the cabins have a “lighter” foundation.
Types of sandwich panels
For the construction of household temporary or permanent structures, wall sandwich slabs are used for walls and roofing slabs for the design of the roof of the cabin. Wall slabs can have a smooth or corrugated external design; roof slabs are most often smooth.
Standard sizes of multilayer slabs for wall construction:
- 300x115x3.2 cm;
- 300x115x2.4 cm;
- 300x115x1 cm.
For the construction of cabins, sandwich panels with a metal coating are used. Depending on the need for insulation, you can use panels with insulation made of polyurethane foam, mineral wool or polystyrene foam of various thicknesses.
CAREFULLY!
The thicker the insulation in a multilayer panel, the higher its thermal insulation characteristics and, accordingly, the greater its weight.
The locking connections that are used to fasten the panels to each other can be with closed or open fastening options . A hidden lock is the most effective: it is closed by the protruding part of the slab and is not exposed to wind and moisture, the joint of the panels is reliably protected from the cold.