A person who dares to make furniture on his own will receive a high-quality and exclusive item made to suit individual tastes and needs.
Not all designers or factories are ready to provide what you need.
Preparation
Plywood is a versatile wood material. Before the advent of plastics, plywood was used to make everything from airplane wings to children's toys.
Advantages of plywood:
- resistance to warping;
- low fracturing;
- Smooth surface;
- environmental friendliness;
- durability;
- ease of processing.
The first thing you need to determine when designing is what the cabinet will be made from.
Advice . It's worth going shopping and seeing if they have what we need in stock.
Kinds
Different tasks require different thicknesses. The weight of the finished product depends on it
- thin _
Consists of 3 - 7 layers of veneer, with a total thickness of 3 - 8 mm. This type of plywood is lightweight and is good for making panels for frame construction of furniture or for facades. It is convenient to use such plywood as the back wall of a cabinet. - average thickness - 10 - 16 mm. The most popular type, combining load-bearing strength and the ability to withstand end fasteners.
- thick - over 18 mm. It is used for load-bearing critical structures, floors, and weight distribution. From it you can cut out support bars and openwork strong structures for walls.
Types of wood
Plywood consists of veneer sheets glued together. The wood used is spruce, pine, oak, but the most popular is birch. It peels perfectly and has an excellent appearance.
The strength of the wood and its appearance depend on the type of wood used.
There are 5 grades based on the quality of wood used. The first one is the “cleanest”, without knots or visible defects. Fifth - allows for veneer shortages, unevenness, and fallen knots. For a cabinet that will be painted with opaque paints, you can use grade 2-3 ; if you want to preserve the appearance of the wood, you should use grade 1-2.
Advice . Most often, combined plywood is found - outer sheets are made of birch, and inner sheets are made of alder or pine. This will not affect the quality of the furniture, and such material costs much less than high-quality varieties.
Moisture resistance
It depends on the glue used and manufacturing technology.
- FC . Has average moisture resistance. It can delaminate if exposed to water, so it is better not to use it for bathroom furniture.
- FSF . It has excellent properties and can be used in any furniture. When purchasing, you should pay attention to the formaldehyde emission class. It should not be lower than E1; this is an acceptable parameter for use inside buildings.
- FOF . Rarely used for furniture, as it is impregnated with phenol-formaldehyde resins and has a high level of formaldehyde emissions. It has excellent weather resistance - it is not afraid of moisture and cold, so it is mainly used outdoors. There are practically no alternatives for outdoor furniture; fortunately, there is no need to worry about formaldehyde concentrations in the fresh air.
Materials and tools
A well-equipped workshop provides the opportunity to realize any ideas.
Of course, you can use inexpensive hand tools, but in this case the quality will be lower and the labor intensity will significantly increase.
To assemble the cabinet we will need:
- drill _ The end joints of plywood should not be loaded with spacers - it may delaminate. To tighten screws or drive nails, you will have to drill filler holes. You can purchase a frame or a template for your drill yourself - all holes must be perpendicular. A cordless screwdriver of sufficient power can act as a drill;
- sawing tools - machine, jigsaw, circular saw. It is better to cut thick sheets when purchasing - many stores provide sawing services on format-cutting machines. A jigsaw produces a crooked cut; if you have to make a cabinet for a workshop, it will do. For more precise cuts, you will need a circular saw with a guide bar. It makes it possible to cut sheets with an accuracy of tenths of a millimeter;
- measuring and auxiliary tool. Parts of high-quality furniture must be precisely sawn. To measure and mark the sheet, you will need a tape measure, a 50 cm long metal ruler, and a small and large square. Angle clamps and clamping clamps will help hold the parts during drilling and assembly. It is better to have several of them - they will be useful for further work;
- if the work is carried out in a residential area, it will be useful to purchase a construction vacuum cleaner - it connects to a power tool and makes the work cleaner. With the help of a simple homemade cyclone, you can use a household vacuum cleaner in this role;
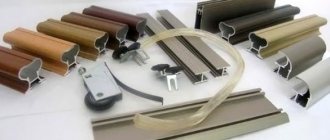
- fasteners _ The peculiarity of plywood is that not every fastener can be used. When expanding, there is a high risk of splitting, so it is worth using adhesive and corner fasteners as much as possible;
- glue - any carpenter's glue. The most convenient are polyurethane compounds;
- corners - galvanized furniture;
- for hidden fasteners with thick plywood, you can use tightening screws ;
- for unloaded areas, you can use self-tapping screws, confirmats or nails . For such spacer fasteners, you need to drill a guide hole with a diameter of 1 mm less. This will not reduce the strength of the product, but will avoid internal stresses.
To fasten the fronts and drawers, you will need hinges and other fittings. It can be purchased online or at your local specialty store.
Scheme and drawing
Cabinet drawing
Before purchasing materials, you should carefully draw the future product and calculate the dimensions. This can be done either manually or on a computer - graphic editors Sketcsh Up or 3Dmax will make the task easier. The contoured large parts are designed first, which are “clogged” with small partitions and compartments.
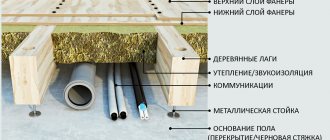
There are two main technologies for plywood cabinets:
- With a load-bearing wooden frame . The cabinet is a structure made of planed wooden blocks, and the walls are made of plywood or veneer. The design is lightweight and durable.
- With plywood frame . The use of thick plywood will completely replace a wooden frame; the design technologies are the same as in the popular chipboard.
Advice . Before designing, it’s worth browsing through furniture makers’ forums - standard designs are posted there for free access, which you can customize to your liking.
When drawing, do not forget about the thickness of the materials, the location of the fittings, and the location. Opening doors should not interfere with passage; access to all compartments should be easy.
In general, a cabinet is a box with two supporting side walls, a lid, a bottom, “stuffing” of shelves and drawers. A flat lightweight sheet is attached to the back side, giving shear strength, and doors are attached to the front side if desired.
The result of this stage will be the following materials: a general drawing of the cabinet, an assembly drawing with dimensions and notes on fasteners, a list of parts indicating thickness, dimensions, and method of fastening.
Some useful tips
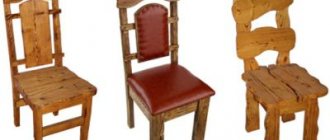
Before making a chair from plywood, a novice home craftsman should read the opinions of experienced carpenters and listen to the advice of experienced craftsmen. Such information can be extremely useful and useful in future work.
An important point is the correct choice of material for the future product. The best option would be to purchase birch plywood. Its characteristics compare favorably with analogues due to its greater strength and ease of operation. Painting and processing such plywood is not at all difficult due to the characteristics of the wood.
It is not recommended to skimp on sheet thickness. A person falling from a broken chair can cause serious injury.
The seat can be formed using foam rubber and covered with any durable fabric. If the product will be used in utility rooms (workshop, garage or storage room), you can get by with a hard seat option. This will save materials and make the piece of furniture more practical.
At home, an assembly jig - a professional tool used by experienced craftsmen - will help you make a good chair without flaws. It is not necessary to buy a unit for one-time work. You can try to find a specialist with such a device and persuade him to borrow it. The result is worth the effort.
How to do it?
Material cutting
The main advantage of this material is its easy workability. Smooth sheets are easy to saw, sand, and join. There are a number of recommendations that will allow you to get a much better result:
- Before cutting with household saws, you can stick thick masking tape or screw thin plywood onto the cutting line. The saw teeth are capable of chipping wood fibers, and the cut will be “ragged.” If the fibers are pressed, the cut will be clear, the fibers will not chip;
- Marking lines should be as thin as possible. You can use a marking cord or a finely sharpened pencil. The cut is made so that the line remains visible from the side of the finished part;
- If you have a ready-made project, it is better to cut the plywood on a sawing machine in a specialized company. When designing, you can think about how the parts will be cut out - this will save the usable area of the sheets, and will also allow you to avoid troubles when purchasing, when you have to buy a whole sheet for the sake of a small shelf;
- Tenon or miter joints can be sawed either manually or using CNC machines. Inquire about the presence of enterprises with such equipment; cutting on such a machine will improve the accuracy of the part and make any curved cuts;
- the ends after cutting can be sanded, rounding the edges, or processed with a manual milling machine if desired;
- in places of future fasteners on thick parts, you can make “plugs” from wood or anchor compounds. A place in the end is drilled out, a soft dowel lubricated with glue is hammered in, or liquid polyurethane anchor compound is poured. The hole should not exceed 1/3 of the thickness of the plywood. This technique will increase the strength of the perpendicular joint; it will be possible to put a larger load on the shelf.
Assembly
Having a detailed drawing will make this stage much easier - you can only keep simple dimensions and parameters in your head .
Before assembly, you should lay out the parts on the floor and sign them with self-adhesive paper and a felt-tip pen.
As a rule, assembly begins from the main perimeter - load-bearing walls, ceiling and bottom. If there are several walls, be sure to assemble them at once. The help of a partner, clamps, and a jig for adding holes will help make assembly easier.
After assembling the perimeter, be sure to check the perpendicularity of the surfaces; if it is rectangular, you can check the diagonals. We secure it with temporary bevels on the back side.
We “clog” the structure with shelves and nests for cupboards. After this, we attach the back wall - it will give shear rigidity.
We put the cabinet in place, assemble the cabinets, shelves, hang the fronts and other planned fittings - mirrors, hooks, handles, legs, plugs.
Important . The cabinet should stand level, not swing on its legs, and the doors should open and close easily.
Finishing
To finish the cabinet, you will have to disassemble it again - remove drawers, fronts, hooks, mirrors and shelves.
Surfaces are sanded manually with sandpaper or sanding machines. It is better to do this in several stages, reducing the abrasive grain by 50%: No. 180 - No. 240 - No. 320. The movements of the sandpaper when sanding by hand should follow the grain of the wood - this way, scratches from accidentally trapped grains of sand and coarse abrasive are less noticeable.
Plywood with thick face veneer can be fired or wire brushed. This will add a vintage feel, making the coating “older” and more prominent. This treatment is suitable for finishing hardwood veneer - oak, ash, hornbeam, birch.
The smooth surface of plywood can be coated with various coloring compounds:
- oil-wax .
Gives a natural look and withstands tinting. Not suitable for saturated colors, used in designs that preserve the appearance of wood. The oil impregnates the top layer of wood, protects it from moisture, but the wood itself will absorb mechanical loads (scratches, abrasions). It is practically odorless and can be used when working “on the balcony” or in an apartment. Easy to apply and rub in with a rag. It is important to know that it is better to burn rags after oil, otherwise they can spontaneously ignite at any moment; - tinting + varnish . Suitable for “glazing” wood while maintaining its natural appearance. It is better to use tinting based on solvents with a high dry residue - nitrobes. They give a uniform, rich color, do not raise the pile, and are easy to apply. Minus - pungent odor during application, if there is no workshop;
- opaque enamels for wood .
They create a protective film that completely covers the grain of the wood. There are different types of materials that differ in properties and application technology. Oil-based pentaphthalic paints are popular, but they are short-lived. For furniture, it is better to use nitro enamels or acrylic varnishes - they are absorbed into the upper layers of wood and do not “snap off” over time. Impregnation will help reduce paint consumption - impregnation of plywood with inexpensive compatible bases (primer, drying oil, oily solvents); - combined options . Using masking tape, you can finish unpresentable ends with opaque paint, and treat beautiful veneer surfaces, for example, with oil or clear varnish. The “game” of imagination when using different colors adds uniqueness to the product.
General information
Making plywood furniture is not as difficult as many might think. Of course, certain skills in working with tools are needed, but they can be acquired in the process of making wooden furniture with your own hands. The only thing is to start with simple designs, so the chair is an excellent option for a beginner.
It must be said that a beautiful plywood chair, made independently, will perform not only a practical function, but also a decorative one. And if you also make a table in the same style, you will get a set of furniture that can decorate the interior of a country house or even an apartment.
Another argument in favor of making plywood furniture yourself is that this work does not require a workshop with a large number of woodworking machines. You can get by with household tools such as a jigsaw and an electric drill. In addition, it is advisable to have a router and a grinder.
Even if you have to buy these tools, they will quickly pay for themselves, since the price of good furniture is very high these days.
Advice! To give plywood products a more attractive look, they can be decorated with saw-cut carvings made with a hand jigsaw.
Children's plywood high chair project
Decoration
After painting, the furniture is assembled and installed in place. The use of decors - patina, overlay elements, panels, metal corners - will help to give a complete appearance.
Most often, the appearance is spoiled by multilayer ends ; they can be sealed using U-shaped profiles made of plastic or aluminum, self-adhesive melamine tape with a wood pattern, or paint.
If you are considering making cabinets from other materials, we recommend considering furniture board, chipboard, plasterboard and cardboard.
Types of features of plywood chairs
Folding chairs are made from plywood of various types and designs. The easiest option to start with is a plywood stool. The transforming chair is more complex structurally. You can’t do this without pre-prepared drawings and carpentry skills.
Experienced craftsmen bring unusual ideas to life, producing unique products. It’s nice to make almost designer chairs with your own hands, simultaneously acting as a developer, manufacturer, and decorator.
There are no analogues of the product either in a furniture store or in relatives’ homes. An important point is the significant savings in the family budget. Homemade stools cost much less than factory-made options. Almost every owner has the tools necessary for production at home. The main thing is desire and patience.
Photo
Perhaps the following photos will give you a couple more ideas for designing the final result
What to consider when choosing a design
A stool is a versatile piece of furniture that can be hidden in a closet or garage if desired. But in order for the finished product to be truly functional, the choice of design must be approached competently . Factors such as the shape and size of the stool, as well as the type of upholstery, must be taken into account.
Stools with different upholstery
Form
When choosing a stool design, you need to pay attention to the shape of the finished product - it should match the shape of the table. For example, if the table is rectangular, then round stools will not go well with it. Furniture items should complement each other.
Homemade folding stools
Upholstery type
Due to the fact that the plywood stool will be used intensively, it is advisable to select types of materials for upholstery that do not require special care. Such materials include eco-leather, flock and other washable options. Of course, the color of the upholstery should be combined with the interior of the room.
The upholstery should be durable and low maintenance
Chair dimensions
Another important criterion that you need to pay attention to when choosing a stool design. To make the products convenient to store and use, their height and width should allow stools to be placed under the table. This rule does not apply to bar stools, because they should initially be high.
DIY stool ladder
Decorative legs
It is more convenient to buy ready-made legs than to cut them yourself. Moreover, in modern stores there are many different models. Therefore, you can choose the element that you like and will match the design of the cabinet. For the model described, decorative legs made of wood were chosen. The legs will be attached to the product using wooden blocks.
- Lay the cabinet blank on its side or on the back wall. The main thing is that there is easy access to its lower part.
- Prepare the legs for fastening: attach a 5x15 cm block to each of them, using glue and 2 screws for each.
First we attach a block to the top of the leg - Securely fix the resulting bars to the bottom using construction glue and screws.
We attach the leg to the bottom of the wardrobe
Make sure the cabinet is level on the surface. It should not wobble or fall to one side. An unstable position is dangerous: it can cause the product to fall, which could result in injury to family members.
Now the wardrobe stands on its own two feet
High chair
A children's high chair is a much more complex product. To connect parts together, it is better to use confirmats instead of conventional self-tapping screws, which will provide additional reliability. Cut out the necessary parts from plywood and drill holes for fasteners, accurately observing the dimensions. Sand the edges and surfaces of the parts themselves. Assemble the product.
Particular attention must be paid to sanding the edge parts remaining from the jigsaw.
Important! When tightening the confirmations, do not tighten them too much.
Paint is rarely used, mainly for children's furniture. Products for adults are coated with wear-resistant varnish as standard.
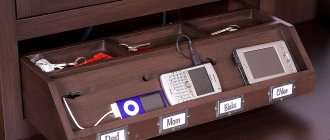
Shelves and partitions
Since the closet is quite wide, make sure the shelves can support a decent amount of weight. It is important that the middle does not sag. Therefore, for the interior of the cabinet, a stationary shelf in the middle of the structure was chosen with a divider for additional support underneath. Adjustable shelves will be in the upper half of the wardrobe.
- For a stationary shelf you will need a thick plywood board 51 cm wide and 91.5 cm long.
- Count 68.5 cm from the bottom, make a mark at this level (on both side walls).
- Make guide holes for mounting at the marked distance.
- Connect the shelf to the walls using appropriate fasteners.
Attaching a stationary shelf to the walls - For the divider you will need a board 50.5 cm wide and 68.5 cm long.
- Make a mark at the level of the middle of the attached shelf.
- Attach the divider vertically between the bottom and the shelf that was already installed earlier. Use screws or self-tapping screws. Fastening is carried out from above and below.
- Make markings and drill holes for mounting adjustable shelves. They should be located along the side walls of the cabinet and on both sides of the divider.
Holes for mounting removable shelves - Attach the corners and hang shelves on them.
The holes for fastening the shelves should be located symmetrically to each other. To achieve greater accuracy, use special measuring tools. Not all holes need to be used at the same time. You can change the number of shelves.
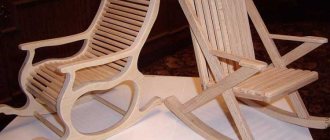
Small fishing chair
A chair for fishing or for picnics is the simplest product with which it is recommended for a person without experience to start making homemade furniture. It is necessary to cut two supports in accordance with the diagram. Connect them together using the existing grooves. Attach strong fabric to the top edges of the supports.
The chair is ready, and due to the special shape of the grooves it will fold, so when delivered to the river bank it will not take up much space.
Back wall
Take a sheet of thin plywood (12 mm), cut it to fit the back of your workpiece. Attach it to the frame.
Fastening the back wall with a stapler
Check the perpendicularity of the surfaces - the frame should be rectangular, without bevels or shifts. It is better to do this during installation, measuring the diagonals: they should be equal.
Improving the closet
To make a plywood cabinet even more convenient and functional, you can add sliding doors on casters and wheeled legs.
The doors will be convenient if the closet is in the living room, on public display, but there are clothes or other things that you would not want to put on display. The essence of sliding doors is simple: a metal profile is attached to the bottom and top, along which rollers run. It will be most convenient to make two doors, which can be made from the same plywood. However, it should be noted that sliding doors are convenient only in wide cabinets, plus when preparing shelves, it is necessary to include doors in their depth.
Wheels on metal brackets make it easy to move the cabinet while cleaning. It is not difficult to secure such legs.
Return to content
Decorative finishing
- Take the smooth profile molding and cut it into 10 pieces so that each piece fits the sides of the cabinet. That is, you should get 4 planks 152 cm long, and 6 planks 48 cm long.
- Attach the molding to the cabinet along the perimeter of the sides using glue or liquid nails.
Decorative moldings on the side - Use the same method to attach the molding to the top and bottom of the face.
- To securely fix the parts, use clamps.
- Strengthen the grip with screws.
- Take decorative molding, cut it to size, and attach it to the outside around the perimeter of the cabinet lid using glue and screws.
- If desired, you can also decorate the bottom of the cabinet.
Bottom design is not necessary
Decorative molding is an optional element that you can do without or choose a different design.