18932 0 0
Andrey August 2, 2016Specialization: facade finishing, interior finishing, construction of dachas, garages. Experience of an amateur gardener and gardener. We also have experience in repairing cars and motorcycles. Hobbies: playing the guitar and many other things that I don’t have time for :)
When setting up a summer cottage, summer residents usually have the issue of storing equipment, since it is extremely inconvenient to carry it with them. This problem can be solved by building a utility block. Building this structure is easier than it seems at first glance, and you can see this from this article, in which I will tell you how to build a utility block with a toilet and a firewood shed.
Utility block with shower and toilet
What is a utility block with toilet and shower?
The name of the utility block with toilet and shower speaks for itself; it is a combined structure that allows you to combine several rooms for various purposes. Such premises can be not only a toilet and shower, but also a storage room, garage, shed or a place for a recreation area.
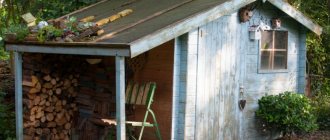
Large utility room with toilet and shower
Such buildings were previously used to store various things and garden tools. But, subsequently, they were assigned a different role. They began to be used more purposefully, equipping a kitchen, shower or veranda inside.
The size of a utility block with a bathroom and shower may vary, depending on what goal a person pursues when erecting such a structure for his dacha.
The advantage of such premises is that several sections of a certain value can be placed under one roof.
Household plan
In one utility unit you can place:
- Storeroom, garage, shed, toilet, shower, veranda.
- Toilet, shower, terrace, veranda.
- Shower, toilet, bathhouse, garage and storage room.
Types of buildings
A summer kitchen is a closed or semi-open space designed for cooking. A summer kitchen is very often erected even before the construction of the main house as a change house, adding other rooms to it, for example,
- rest room;
- utility block;
- bathroom;
- bath;
- garage.
The role of the change house during construction is irreplaceable; it will depend on the attached room and its functional purpose. Very often such temporary shelters are needed for the accommodation of a construction team. After the construction of the house, the cabins with a summer kitchen will be converted into a kitchen with a utility room and a terrace for relaxing in the fresh air.
In addition, change houses with a kitchen are necessary in the countryside, since they can replace the construction of a full-fledged house. Dacha cabins have no more than one or two rooms, a kitchen, a bathroom and a utility room - this is all the essentials to be able to spend the night at the dacha in the summer.
When a summer kitchen is built after the house has been built, much more attention is paid to its design. They immediately try to attach a garage and a bathhouse to it, and only then change houses and other utility rooms. Therefore, projects for summer kitchens with a utility room can be divided into simple and complex, which will be discussed further.
Selecting a project
The choice of a summer kitchen project combined with a utility room should not be spontaneous, as you need to take into account a lot of nuances:
- The overall size of the building and its location on the site.
- Budget for construction.
- Functional purpose.
- What extensions need to be made, a garage, a bathhouse or change houses.
- What style will the summer kitchen be in, and will it fit into the design of the site as a whole?
Important! The choice of building material will largely depend on the style of construction. After all, a kitchen made of timber will clearly not harmonize with brick buildings.
- When drawing up and choosing a particular summer kitchen project, you need to take into account all the standards of construction, fire safety and sanitation. This will make it easier for you to register the site and save you from legal disputes.
What can the construction be made from?
Household units for a dacha can be of two types:
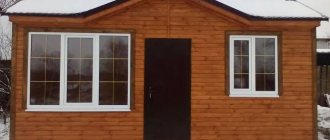
Wooden utility block with toilet and shower
- Capital.
- Temporary.
Temporary outbuildings are needed for a certain period of time while construction is underway or other work is underway. Upon completion of construction, they are demolished as unnecessary. Therefore, for construction you can use any available material:
- board,
- slate,
- Ondulin, not even new.
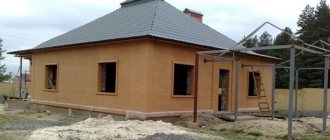
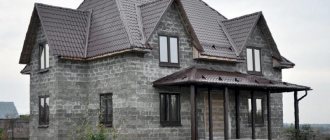
Capital buildings with a bathroom and shower require more attention. Typically, a utility block for a dacha consists of a foundation, walls, roof and doors. When building such buildings with your own hands, it is recommended to use:
- tree,
- brick,
- gas blocks,
- foam blocks.
In order to determine the amount of material, you need to draw up a drawing or project.
Erection of the building frame
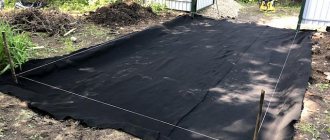
Any foundation should be thoroughly waterproofed. For this, roofing felt, roofing felt, and bitumen mastic are used. They are laid on top of the supports so that the wooden structural elements do not have direct contact with them.
Now the bottom trim is made - a square of timber, with a cross-section of 15x15 centimeters. Wooden beams are laid on supports and secured with anchor bolts. Logs are laid on them - transverse beams to support the floor. For them, a beam measuring 10x10 cm is sufficient.
It is important to remember that all wooden elements must be thoroughly treated with antiseptic solutions and special impregnation against insects and mold. After all, the future gazebo with a utility block, built with your own hands, will be located in the open air and will feel the influence of weather conditions. The treatment should be done at the preparatory stage, before actual construction.
Thematic material:
- Bathhouse with a gazebo under one roof
- Gazebo with rest room
After installing the logs, the frame beams are fixed strictly vertically. They should be located in the corners of the structure and in places where the project involves openings for doors and windows. For beams, you need 2.5-3 meter pieces of timber with a cross section of 10x10 cm. Here it is better to use wooden bevels for greater rigidity of the entire structure. They are placed diagonally between the vertical posts.
The frame is completed with a top frame made of a 10×5 or 15×5 cm board. It is needed to stiffen the frame and to connect it to the roof. The rafters will rest on these boards.
Installation of a timber frame
Household projects
This stage of construction involves not only choosing the location of the utility block, but also drawing up its design. On paper you need to indicate all the dimensions of the structure and internal partitions. This will allow you to fairly accurately determine the amount of materials.
Variant of the utility block project
The utility block for a summer residence can be made in several versions.
For example, you can take the following projects as a basis:
Project 1
Utility block with toilet and shower (Project No. 1)
This building has a rectangular shape, 4 meters long and 2 meters wide. In such a room you can place a toilet, shower and shed. Each room has its own door, and the middle room also contains a window. You can calculate the dimensions of each room yourself, based on your capabilities, or use the data provided. Sometimes you want to watch some homemade porn, made with love. But sometimes there are difficulties with choosing a genre to watch. Eat. for example, such a genre as homemade FFM porn video, where two girls try to give maximum pleasure to a guy, bringing him simply to the cosmic magnitude of orgasm. that reaches right up to the Earth’s orbit, which can be observed from the link,
Project 2
Utility block with toilet and shower (Project No. 2)
This project also has a rectangular shape and three rooms, where it is also planned to place a shower, a toilet and a shed. But there are slight differences between the first option and the second; the rooms have an internal connection. The room contains one door and two windows.
Project 3
Utility block with toilet and shower (Project No. 3)
The third project has a slightly different arrangement of rooms. Two narrow rooms are designed for shower and toilet, and one large one is reserved for a barn. Each room has its own door.
Project 4
Utility block with toilet and shower (Project No. 4)
The fourth project offers another option for placing rooms. Where the doors of the rooms are located on two opposite sides of the building. Small rooms are reserved for toilets and showers, and a large room is reserved for household needs or a shed.
What to build a utility block from
You can build a utility block for a dacha with a shower and toilet, as well as other additional functions, from a variety of materials:
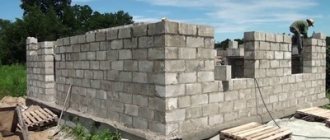
- wood (this includes timber, boards, lining, etc.);
- blocks (cinder blocks, foam blocks, etc.)
- metal profile;
- bricks, etc.
If you are new to construction, I recommend using wood for these purposes for the following reasons:
- ease of installation;
- no sophisticated equipment required. Our ancestors coped with this task generally with the help of one ax;
- no large financial costs are required.
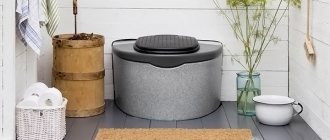
Household unit from block containers
If you don’t want to do construction, you can purchase a ready-made utility block 3 in 1 shower toilet and shed made from modular containers. Their cost starts from 10,000-15,000 rubles.
Therefore, next, as an example, we will consider the construction of a frame building. It should be noted that if construction technology is followed and proper care is taken, such a building can last for a very long time.
An example of a frame utility block project
Preparatory activities
Before you start planning the outbuilding itself with a toilet and shower for your dacha, you need to choose a suitable location on your dacha plot. The building must fit harmoniously into the landscape of the site along with other buildings.
Recommended distance between buildings in the country
In addition, there are a number of other points to consider:
- Since the utility block will be equipped with a bathroom with a shower, it will also have a drainage hole that needs to be cleaned periodically. Therefore, such a structure must be placed near the fence.
- The drainage pit should be located at a distance of 15 meters from residential buildings.
- Large trees should not grow nearby, and there should be no underground communications.
- In addition, it is necessary to provide underground tanks into which sewage will be collected.
How to build a utility block?
The modern market can offer a wide range of projects for outbuildings for a summer residence. If you have a little knowledge in the construction business, then you can easily make a utility block with your own hands, guided by the plan outlined below.
The sample will be a rectangular utility block with a bathroom and shower for a summer house with dimensions of 6m x 3m x 3m.
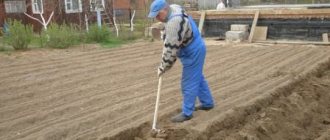
First stage
Marking the perimeter for the foundation. The pillars will be located at the corners of the building and in the center of the six-meter walls. The first thing to do is to remove part of the soil 20 cm deep, and in its place pour a ten centimeter layer of sand. The sand cushion should be compacted well.
Foundation diagram for a utility block
Now you can start preparing the holes for the pillars. The depth of one hole should be 1 m 20 cm. Before lowering the post there, a layer of fine gravel or sand should be poured onto the bottom and compacted well. After this, the pillars are lowered into the prepared holes, and, after checking them for verticality, they are carefully covered with sand.
If metal pipes are used instead of wooden poles, then their inside must be filled with concrete mortar by 1/3 and raised slightly so that the mortar forms a stable and durable base.
Second phase
Laying the foundation and installing the base of the utility block
While the foundation dries, you can start building the base of the frame. For these purposes, you need to take a wooden beam (15 cm x 15 cm) and make the base of a rectangular frame from it. The corner parts are fixed “half-wood”; self-tapping screws are used for the grooves. Between the foundation and the frame you need to lay a roofing felt layer, the edges of which need to be bent down. For greater strength, the frame can be reinforced with three transverse joists. For them, a 10cm x 10cm beam is used.
Third stage
Once the base is ready, you can begin making the frame yourself. A beam with a smaller diameter is used for it. The frame begins to be assembled from the end parts, taking into account that windows can be made on these sides.
Construction of the frame of the utility block
Vertical posts must be secured with steel angles and self-tapping screws. To secure the post to the foundation reinforcement, a hole with a diameter of 1 cm is drilled in its base. Having thus installed all four corner posts, they need to be strengthened with additional elements and struts.
The front part of the facade is mounted in this way: the middle pillars must be fixed in increments of 1 m 80 cm. To prevent them from moving during installation, they are temporarily connected with a board.
The selected project has two compartments, so you will need to design 2 door openings and one partition. The size of the doorways is 2 meters high and 85 cm wide.
The rear facade is assembled in the same way, only the work is simplified by the fact that there are no doors or windows.
The final touch is the upper junction at a height of 2 m. A beam with dimensions of 5 cm x 10 cm is used for it. It is formed from individual elements that are butted together using galvanized corners.
Fourth stage
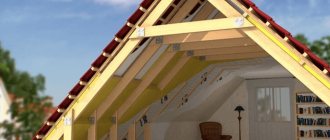
DIY gable roof
This stage involves the construction of rafters and roofing. It is recommended to assemble the rafters on the ground, and when they are assembled, they are installed on the frame. The tilt angle should be about 10 degrees. The rafters must be secured using self-tapping screws, and the overhangs and cornices must be sheathed with edged boards.
Fifth stage
The fifth stage includes interior and exterior finishing. Roofing material, slate, tiles or sheet iron must be laid on the roof. Hang doors and install windows.
Foundation for a gazebo-shed made of wood
If the location of the dacha is an area with sandy soil and low groundwater flow, supports in the form of piles or pillars are sufficient for the base of the cabin. They are placed in the corners of the future structure.
For a pile foundation, you can use an asbestos-cement pipe with a diameter of 15 cm. A sand cushion is poured into the prepared holes in the ground and compacted. Then a piece of pipe of the required size is inserted and reinforced with metal pins. Fill the support 1/3 of the length with concrete and lift it slightly so that the solution gets under the base of the pipe, then it will stand firmly.
Technology for installing piles under the foundation
You can insert metal reinforcement or anchor bolts inside to connect to the beam if the project involves a heavier structure. Or make columnar brick columns at the corners of the building. For a dacha with heaving wet soil, you need a strip foundation; it is more reliable.
The easiest way is to install sand concrete blocks as a base. To do this, remove the turf to a depth of about 30 cm and fill it with 15 cm of sand and compact it. Place blocks on top in several rows on top of each other. This method is suitable only for good soils, without excess moisture, and for buildings on a hill. Then they will fully support the weight of a summer house made of timber.
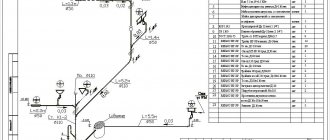
Installation of piping on a columnar foundation