If you do not need to restrict access to the premises, and you do not want to disrupt the ventilation of the rooms, then you can install an interior portal between them with your own hands, which will not lose out to doors in terms of interior design and will require little expense. As a rule, a portal between rooms is installed in a living room or other common room, and below we offer brief instructions for its installation.
Types of portals
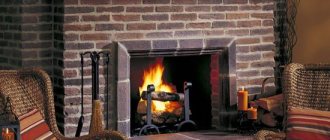
It is believed that arches and portals are used only to frame the entrance to a house or an interior passage. However, you can often find an unusual use of such a design in the interior, for example, as a decoration for a fireplace.
Today, portals are classified according to their installation location:
- design for a doorway;
- frame for a window opening;
- product in the opening under the outer door;
- decorations for a fireplace or hearth (example in the photo).
To make such arches, the entire range of existing materials is used: from polymers to natural stone. The most popular portals are made of wood and plastic; recently, structures made of wood-based materials are often found. Among wooden arches, products made from pine and other conifers are more common: they are resistant to moisture and are cheaper than other materials.
Rectangular interior arches
Today, every second apartment is decorated with an arch, or even more than one. More and more people are trying to move away from interior doors in favor of open space. There is a tendency to move from complex arches to more primitive forms. The shape of the arched vault determines its name. The rectangular interior arch is one of the most popular.
Selecting a portal form
The most popular shape for a portal is a rectangle. To decorate such a design, you can use decorative elements. In modern interiors, the shape of the opening can be almost any. Adherents of the traditional style will like the classic arch.
It visually makes the room taller. If you don’t know which portal will be appropriate in your apartment or house, use the following tips:
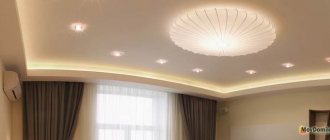
- For rooms with low ceilings, it is recommended to use rounded arches with a corner radius half the width of the opening. This value makes the arch bend gentle. This form does not rest against the ceiling, but visually lifts it.
- In rooms with high ceilings, a classically shaped arch with a radius equal to half the width of the opening is used.
- In addition to the arch, there are non-traditional door portals in the shape of an ellipse, irregular polygons and others. Their design assumes a slope in one direction.
The easiest way to get an arched opening is to purchase a ready-made set of racks and panels.
Advice! If you do not want to weigh down the walls of the room, pay attention to plasterboard portals. They are indistinguishable from stone products, but at the same time they are very light in weight.
Interior door arches: types and materials. Recommendations for choosing an interior arch
If you can’t find the most suitable interior door? Perhaps you should leave this and abandon them altogether, besides, there is an excellent alternative option, namely, interior arches, which have many advantages, among which are the following:
- Thanks to the use of interior arches, you can visually make the room wider;
- Interior arches will add style and elegance to any interior;
- Such an arch can become a real decoration of the apartment, and the room will look much more luxurious;
- Thanks to the use of arched vaults, you can get rid of many standard solutions that are usually used in the construction process.
Features of assembly and installation
If constructed correctly, the portal design can visually expand or narrow the room in height and width. In addition, arches visually make rooms feel freer due to the absence of unnecessary interior structures.
The functionality of the portal is determined by the materials from which the product will be assembled. You need to be able not only to select raw materials, but also to prepare them.
Note! To ensure that the installation of the portal does not cause unnecessary difficulties, choose high-quality and dry wood. Otherwise, the portal may crack or deform from moisture and stress.
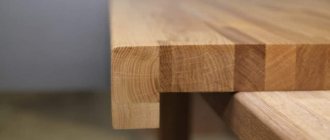
When choosing wood for a portal, use the following tips:
- Structures made of hornbeam, mahogany and oak look very advantageous in the interior. The wood of these species has very noble shades and texture. But the cost of such materials is extremely high.
- The cheapest option for interior arches is pine. Wood is durable and easy to process, which cannot be said about the materials described above.
- The most affordable option in terms of cost is construction made from particle board materials. Portal elements can be covered with a special film imitation wood or painted with any paint.
- Another inexpensive design option is an opening made of chipboard with a laminated coating. It does not require finishing.
Advice! When assembling the portal with your own hands, make sure that the raw materials are dried. Humidity no higher than 15 percent is considered acceptable.
Materials for the production of arches
Once you have decided on the shape of the interior arch, you need to choose the material for its production. This is very important, since there is such a thing as the incompatibility of walls and different types of arches. To prevent the entire structure from suddenly collapsing one day, which is far from perfect, you need to look into this issue in more detail:
- Brick arches are the most difficult to produce, since first the arch needs to be laid out with bricks, plastered, covered with plaster and painted. The main disadvantage is that it will not be possible to give it an artistic form.
- Wooden arches that are very durable. Their disadvantages include the fact that they are heavy, so they are definitely not suitable for loose walls. In addition, they have a high price. A wooden arch requires constant care, since the wood can dry out and crack, various insects can live there, and it smolders even after being treated.
- Arches made of plasterboard. Due to the high plasticity of this material, a wide variety of shapes can be cut from it. This arch can be decorated with spotlights, shelves or curves. In addition, they are very low in cost;
- Arches made of MDF, which look simpler than other types of arches.
Preparatory stage
Before installing the arch, it is necessary to prepare the walls in the openings. The optimal material for cosmetic finishing is gypsum plaster. For novice builders, it is recommended to install perforated corners. They will make it easier to level the opening.
During preparation, special attention is paid to installing the first corner. It must be perfectly aligned on all axes. Otherwise, the entire portal will be skewed after installation.
The distance between the corners is filled with special compounds. For such work, some builders use putty followed by painting. However, if you plan to install a portal in this place, then it is better to use special compounds.
Arch color selection
The color of the arches should completely match the shade of the doors, since they have similar functions. If the openings are decorated in a single color palette, this can significantly streamline and even harmonize the entire interior. Sometimes arches are matched to match the floors or furniture.
If the arch is made of solid wood, then its color may vary, since wood is very diverse in structure. By using special varnishes, the natural shades of wood can be preserved, but the color may change depending on the lighting. MDF arches have a constant, even color.
After determining the color, shape and quality of the arch, it will not be difficult to purchase the most suitable option. You just need to place an order in our store, and soon you will be able to fully enjoy this beautiful and very useful purchase.
Advantages of open openings
Of course, you can’t leave a bathroom or toilet without a door. All other rooms can do without them under certain circumstances. And this is not only a lack of space in the apartment, the reasons can be completely different, and not always forced.
Passages closed by doors are often rejected, citing the following arguments:
- By visually dividing rooms into zones for different purposes, the feeling of large space is maintained.
Passage from the hall to the living room
- Open passages do not allow air to stagnate in the rooms; it circulates freely between windows and exhaust ducts, maintaining a favorable microclimate throughout the house.
An additional advantage of this solution is free air exchange.
- An opening without a door allows you to design it in a non-standard way, using through shelving and niches, stained glass inserts or a bar counter.
Stained glass decoration
- The absence of a door gives scope for choosing the shape of the opening, which can be given any height and configuration, including asymmetrical.
Unusually shaped opening
- Designing a portal will cost less than installing a door frame with a leaf and finishing slopes.
Of course, free passage is not always justified or appropriate. In addition to such intimate areas as the toilet and bath, utility rooms such as pantries, the kitchen, if it is equipped with a gas stove or heating boiler, and the bedroom should be closed. But in the latter case, exceptions are possible.
For example, if the bedroom is combined with an insulated loggia, where an office, winter garden or sports corner is equipped, the opening between them does not need to be closed. However, as in the case of combining the loggia with other rooms. Also, a free passage can be left between the dining room and living room, dining room and kitchen, living room and hall.
Note. The opposite situations are also possible, when one large room is divided by a stationary partition, highlighting functional areas, but the opening is left without a door.
As is the case with doors, which must be in the same style in order to emphasize the integrity of the design of the apartment, open portals must also form a single ensemble. In this case, it is advisable to choose not only the same materials for finishing, but also adhere to the same shape.
The arched opening in this photo stands out from the general concept
It's time to talk about this in more detail.
Preparing the opening
The side edges of the interior opening must be leveled in advance using gypsum plaster and perforated corners. The corners are optional, but with them it is easier to align the edges of the opening and you won’t have to cut the trim. It is important to install the first corner perfectly accurately along all planes, because in the opening the slightest distortion will be noticeable, and even more so if there is furniture nearby. Remember that the width of the trim is 100 mm, so try to adjust the distance between the corners to this size.
We fill the space between the two corners with the solution and wait for the composition to completely set. Some limit themselves to puttying and painting the sides of the opening, but we are making a portal, so we only puttyed and painted the top edge.
The standard width of the extension is 10 cm - this is just right for an interior partition and most often trimming is not needed, but if the wall thickness is less, then the extension element will have to be cut and then one of the sides of the opening will be covered with a platband.
Extras
On the front side of the doorway, the portal elements are attached directly to the door frame, and in deep openings, to attach the portal, it is necessary to install frame extensions into the opening.
Door extensions are decorative panels that are used to extend the frame and cover the side surface of the opening. Installing a decorative portal on the front door is carried out in the same way as attaching a regular platband, and the main difficulties arise when installing a portal with an extension.
Installing a portal with access
As a rule, wood has special grooves for attaching additional strips. Manufacturers produce MDF panels, the thickness of which is standard. For self-installation, the most convenient are telescopic extensions, which provide a movable connection between the extension strip and the frame stand and the casing with the extension strip. Finishing the inner surface of the opening using this design is done quickly and efficiently.
Installation of a telescopic structure
Additional panels are installed in the following sequence:
- Using a tape measure, measure the distance from the edge of the opening to the quarter for the addition in the box. This distance may be different on both sides, so sometimes you have to prepare the side panels of different widths and cut the top with a cone.
- Measure the height of the sides of the opening along the scuttle posts. To cut the planks to length, measure the distance from the floor to the horizontal quarter in the lintel of the box.
- Using these dimensions, long strips are marked with a square and cut to the required length.
- The length of the crossbar is measured along the width of the opening. It can be wider than the box and will lie on the vertical panels of the extension.
- After this, assembly begins. Install the vertical panels, then the top lintel.
- After the panels are inserted into the grooves of the tray, they are pressed to the desired depth, guided by the opening.
- Safety struts are installed between the side planks to prevent inversion after blowing with foam.
- Polyurethane foam with a low expansion coefficient is blown into the gap between the wall and the slats.
Important
! In telescopic structures, you can use standard side trims to decorate an opening in the form of a portal, and instead of the top one, you can buy and install a monolithic cornice with capitals.
If there is no special groove
If there is no special groove in the box, then one must be made. Moreover, it is not necessary to mill the back side of the box. It is enough to fill the end of the loot stand with a regular rail, which will serve as a stop for the extension panel.
If the extension is not wide, then it can be attached to the box stand using long self-tapping screws. To do this, you will have to drill through holes through the entire bar at the end, through which it will be attracted with self-tapping screws to the box.
Important
! When installing extensions on an overlay with stuffing of the thrust strip, craftsmen advise cutting not the side strips to size, but the top one. So, by installing long extensions and resting them on a nailed rail, when inserting a lintel, they will be additionally fixed.
Installing portal elements
Finishing with a portal is even simpler than installing a platband, since all elements are installed end-to-end, without the need for cutting at 45 degrees. The platband is attached to grooves, nails or glue. The cornice and capitals are attached using liquid nails.
Installation video:
Installing the portal itself will not present any difficulties. To make the opening neat, the main thing is to correctly install the extensions and finish the inner surface of the opening.
A door portal is a design that will allow you to create an ideal indoor microclimate without limiting space. Such openings are no worse than traditional doorways, and they also add a special charm to the interior. The unusual appearance of the portals can favorably emphasize the style of the room. In addition, such a design can be made independently.
Arch in the interior: what is good?
What arc can be called successful?
1. One that successfully solves any of the problems listed above.
2. Echoing something (for example, the shape of windows, furniture, decor, other openings).
3. Proportional to the size of the room.
4. Does not obstruct the flow of light.
A tall and wide arch located exactly in the middle of the wall looks most advantageous.
Narrow arches look good if there are several of them. They can be located on one wall or along the corridor.
What is an arch?
An arch is a traditional architectural element that is a curved covering of an opening in a wall. Man borrowed the arch from nature. The arched shape is absolutely natural - it is found everywhere. This is, for example, a tunnel made of trees growing along the road or the entrance to a cave.
The classic arch is usually symmetrical about the vertical axis. However, the shapes of the arches are very diverse.
The most common is the regular semicircular shape .
Arches with corners are also popular - they are called segmental . They describe a segment of a circle (or ellipse) with a central angle of less than 180 degrees. It is believed that such an arched opening is the most suitable solution for interiors that are far from classic.
For wide openings, an elliptical or three-center arch shape is often chosen.
Lancet (Gothic) openings are quite rare, as are horseshoe-shaped or three-lobed ones . Usually they are built in order to add zest to the interior or emphasize its special style.
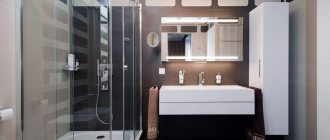
How to seal a metal sheet?
To finish the slopes of a metal entrance door, the frame method is most often used. To create the base, you must use metal profiles. Finishing with wooden blocks is also acceptable.
It is important that the canvas fits tightly to the surface
To strengthen the metal door frame, you need to install lintels on the supporting part of the structure. Their installation at the corners of the structure is especially important. At this stage, you can lay cables and other wires. After this, it is necessary to secure the selected fabric with self-tapping screws or nails.
It is also very popular to seal the slopes of metal doors with a cement-sand slope. But for this it is necessary to level all the slopes with a primer and make a stop for the subsequent installation of finishing materials
For a metal structure, it is important to take into account the thickness of the mortar layer and the thickness of the finishing material so that such finishing is not too massive and does not disturb the overall picture of the door structure
Drywall is perfect for sealing slopes near a metal door. This is due to its small thickness and versatility. But this material requires additional insulation.