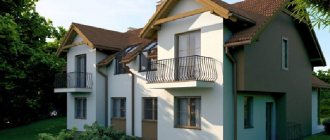
Various materials can be used to build a garage. One of the most popular among them is timber. A garage made of timber has a number of advantages: vapor permeability, low cost, environmental friendliness, etc. In addition, a wooden garage made of timber will look much more attractive than a brick or concrete one.
Selection of construction technology
From logs
The main thing is to select the optimal construction technology and complete all stages in strict accordance with the chosen type of construction.
The most common two technologies for constructing garages made of wood: using frame technology and using rounded logs.
It is necessary to give preference to the construction of a box for a car using log technology if the main building, house or cottage, is built from similar material. A frame structure will cost less, it is easier to select materials for it, and the construction time will be significantly reduced. In addition, the exterior of a wooden frame garage can be finished with any facade materials suitable for the style of a country house immediately after the construction of the building or after some period of time.
Gates
Swinging garage doors can be made on the basis of a wooden frame, covering it with boards, clapboard or profiled steel sheets.
If more reliable protection is required, then you need to buy and install steel roller blinds or automatic sectional doors in the opening. Their color can be precisely matched to the color of the timber walls, achieving visual harmony.
Do-it-yourself shed: step-by-step instructions
The very first stage of building a barn is preparing the site. For this:
- the soil is thoroughly cleaned of debris;
- vegetation is removed;
- the surface is leveled.
All building materials that may be damaged by moisture are placed under a canopy. If this is not possible, shelter is provided for them. To
Creating a foundation
Light frame structures are installed on a columnar or pile foundation. A block shed will require a more solid foundation. The choice of foundation also depends on the characteristics of the soil.
The use of a columnar foundation is not recommended on heaving soil. During the process of movement, the supports are squeezed out, which leads to misalignment. On soft soils and peat bogs, preference should be given to piles.
Marking
To mark, you will need a cord, tape measure, and stakes. You can quickly make the correct markup using the following methods:
- Using a theodolite - with the help of a cord and stakes, the location of the longest wall of the barn and nearby corners is determined. Using a tape measure or measuring device, mark the location of the remaining corners and tighten the cord.
- Egyptian triangle - mark a point on a stretched cord located 4 meters from the corner. A point is laid perpendicularly at a distance of 3 meters. There should be exactly 5 meters between the ends of the segments (points 2 and 3). Further marking is carried out from the right angle, the correctness of the construction is checked using the Pythagorean theorem.
A cast-off made from posts and cross slats will allow you to more accurately fix the geometry of the barn. The cord is secured to the nails. It can be removed before starting excavation work.
Features of different types of bases
The following types of foundation are used to build a barn:
- Tape - its arrangement will require a trench about 50 cm deep and arrangement of formwork. To ensure the strength of the base, the structure is reinforced with wire or reinforcement. You can continue work a week after pouring the concrete. You can also make a strip foundation from blocks.
- Columnar - represents free-standing supports installed at the corners of the box, along the perimeter, under the partitions. For their installation, holes 40 cm deep are also dug. To prevent the supports from moving during the operation of the building, the bottom of the hole is lined with sand, and the support itself is filled with cement.
- Pile - requires the use of special structures for screwing in supports, excellent for moving soils. After installing the supports, their top is cut off level, and the cavity is filled with cement mortar.
Barn without foundation
A temporary structure can be erected without laying a foundation. If the building area does not exceed 20 square meters and the height is 2.5 meters, it can be installed directly on the ground.
When making such a decision, keep in mind that on clay soil, during snow melting and seasonal rains, a large amount of moisture remains on the soil surface, which will contribute to the destruction of wood. On sandy soil, a shed without a foundation will last for several seasons, since moisture is quickly absorbed by the soil. The construction procedure will be as follows:
- Site preparation, including soil leveling, compaction, and arrangement of a sand and crushed stone bed.
- Deepening the corner posts by 60-70 cm.
- Construction of a frame from 50x100 mm timber.
- Covering with boards or other finishing materials.
It is recommended to use a metal profile sheet for the roof. It looks beautiful, has a low weight, which eliminates the creation of a high load on the walls of the structure or the soil.
This shed is suitable for seasonal use, storing equipment and firewood.
Construction of the frame
The frame consists of racks, upper and lower trim, inclined jibs, and jumpers. To create it, a beam with a cross-section of 100x100 mm or a board measuring 150x150 mm can be used. You can use staples, pads, bolts, nails, and self-tapping screws as fasteners. The work order is as follows:
- The bottom trim beam is laid on a layer of waterproofing and secured with studs, bolts, and anchors.
- Floor joists are installed.
- Racks are installed from the corner and secured at the top using strapping.
- The frame is strengthened with jibs attached to the upper and lower beams, the openings are reinforced with boards.
If OSB, plywood, and jibs are used as finishing, you may not use them.
Roof arrangement
The roof can be single-pitched or gable, its angle of inclination depends on the wind load in the region
During construction, it is important to take into account the pitch recommended by the roofing material manufacturer.
Project preparation
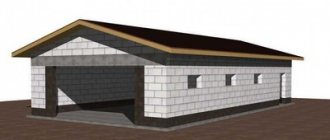
In order to properly build a reliable structure for storing a car, before carrying out construction work you will have to prepare a sketch with a construction project. To do this, draw a design diagram on paper with all the partitions, corners and load-bearing walls. However, before doing this, it is better to determine the size of the room.
Garages with a size of 6 x 4 meters and a height of about two and a half meters are considered optimal. This area is enough to store one passenger car.
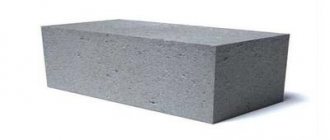
At the project planning stage, it is necessary to decide on the materials that will be used. To connect components, it is better to use steel plates or iron brackets, which can securely secure the logs. The main building material is timber with a cross section of 10 x 10 centimeters.
When making the frame of a building, larch or other types of trees are used that are resistant to humidity and temperature changes.
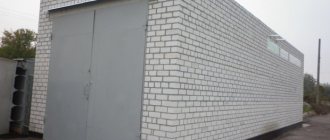
To protect the building from intruders, a gate measuring 2.7 x 2.5 meters is installed. For external finishing of the walls of the room, you can use corrugated sheeting or other similar finishing material.
Video about building wooden sheds
The barn turned out to be beautiful, but not cheap. But it is decent in size, strong and in appearance no different from a house - it fits into the composition. Everything is shown/described in detail, there is one violation: the waterproofing under the metal tiles is laid vertically. Even with good gluing of the strips, sooner or later the water will make a path for itself. Otherwise, everything is correct.
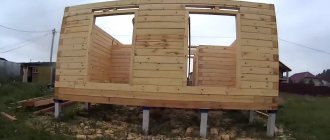
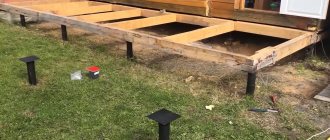
In this case, the barn is built with your own hands on what is probably the cheapest foundation: concrete is poured into old tires. The frame stands on these “pillars”. Naturally, they need to be placed on a flat, reliable surface and they themselves must be at the same level. In terms of strength, the base will not be inferior to the best concrete blocks, and may even surpass them. Tires protruding from under the structure can be closed by making a step and subsequently placing flowers on it or using it for other needs. It will be even more practical.
Another video with a step-by-step illustration of the construction of a frame barn made of timber.
Design selection
Before starting construction, a project should be designed and approved, which will determine the type of foundation, design of walls, roof and floor. Let's take a closer look at these points.
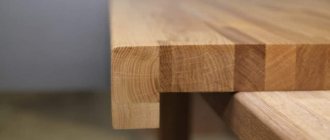
Types of timber assembly.
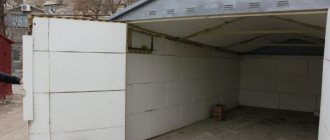
The simplest option for a wooden garage is a foundation made of a monolithic reinforced concrete slab, which will provide excellent support and at the same time serve as a floor. Often boards are laid on the floor and covered with linoleum.
A sand-crushed stone cushion should be poured under the foundation and compacted well, and 2-3 layers of roofing material should be laid on top as waterproofing so that groundwater does not absorb into the concrete.
If you plan to have a heated garage, then it would be a good idea to insulate the floor as well. For this purpose, it is necessary to place extruded foam plastic, supplied in sheets 1-3 cm thick, under the finishing screed.
To avoid wetting the walls with rainwater, it is advisable to choose a foundation thickness such that the floor level is 20-30 cm above the ground level. In order to protect the walls from unnecessary moisture, it is advisable to pour a concrete walkway around the perimeter of the garage, about 70-100 cm wide.
When building a garage from timber, there are even more affordable options, such as strip, column and pile. The tape one does not need to be laid deep, 60-80 cm is enough and it will perform its functions well. Wood is a good material that is not afraid of foundation deformations.
But the piles should be driven below the freezing point so that the frozen soil does not force them out.
Next you need to decide on the walls, ceiling and roof. The frame is constructed from timber or timber. The roof can be covered with any available roofing material; there are no restrictions here. Gates are also often made of wood or metal of various designs.
Approximate costs
To calculate the approximate costs of constructing a box for a car from logs, you need to decide exactly how the construction will take place. If you plan to build the structure yourself, you will be able to save up to 30% of costs on the work. If you leave the matter in the hands of qualified workers, you can get a ready-made garage faster, but more expensive.
It is also worth considering the fact where the site is located. If this is a city, then the cost of transporting the logs will be small; if this is a suburban building, then you will have to spend money on delivery.
You can order the construction of a garage with a ready-made project.
For example, on average, a garage with dimensions of 4x9 meters will cost 450,000 rubles if you order work and materials from a contractor.
In this case, a log with a diameter of 20 cm will be used for construction.
The list of services includes a specialist visiting the site to mark the ground , setting up a trench, formwork, pouring the foundation, building walls and erecting a roof.
At the same time, contractors indicate that there are also free services in such packages. This includes free accommodation for workers in a shed on the site, transportation of materials, unloading them, and garbage collection.
Important ! When working independently, the materials will cost a little more, since the contractor buys them in bulk and the cost for him is lower.
Roof
When the walls are erected, they begin to construct the slabs for the garage roof. First, the ceiling beams are installed. Then a template for the rafters is made.
To do this, a 50 by 100 mm beam is applied to the end of the frame, and the cut lines are marked. You should set aside two centimeters from the point of contact with the edge of the strapping. A horizontal line is drawn that marks the notch.
The rafter legs are cut into the upper crown; a “half-tree” connection is usually used. For reliability, the rafters are secured with corners. Then the board sheathing is installed, its pitch is selected based on the type of roofing.
The waterproofing of the roof will be polyethylene, which is laid on the sheathing and secured with a stapler. If you don’t have enough money for a normal roof, you can use a waterproofing film like Izospan D for some time in the summer, then you don’t have to fix the polyethylene.
The selected coating is applied to the waterproofing layer. For a garage, you can choose inexpensive slate or corrugated sheeting, but a wooden building with a roof made of tiles or ondulin looks more beautiful. The roof is laid as stated in the instructions for the material.
When installing, you should pay attention to the most vulnerable places: the ridge and the connection between the roof and the walls. Here the wood can rot, so it is advisable to go over it with impregnation
Finishing work
After the timber garage frame is built, it needs to be finished. First of all, it is recommended to wait some time for the shrinkage process to complete. However, since laminated veneer lumber was used in the construction, and the technology was strictly followed at each stage of installation, finishing can begin in the very near future.
- If you used timber, then covering the walls will not be too labor-intensive for you, and you can handle it yourself. Internal walls can be finished with clapboard. Metal or plastic siding is suitable for cladding external walls.
- To prevent the joints between the beams from being blown through, it is recommended to place a special membrane under the sheathing to protect the room from the wind.
- Having completed the finishing work, you can begin installing the floor. By the way, in garages you can often find ordinary flooring made of boards.
Fig13. The timber garage is ready, the gates are installed
;Finally, the last work on arranging a garage made of timber is installing gates and glazing. The support beams that were laid during the construction of the box will now help complete this stage efficiently and quickly.
Conclusion
A timber garage has a fairly simple design and can be erected very quickly. If you decide to build a parking space for your car in a short time, the technology described in the article will help you independently complete the task. The video clip posted in the material will allow you to learn a lot of valuable information on this interesting topic.
There are quite a lot of materials and structures for constructing a garage. These include expanded clay concrete, brick, foam and aerated concrete blocks, wood and profiled steel sheets. Garage walls are often built using frame technology - low-cost and high-speed.
However, we will look at the basic principles, projects and technology for constructing a garage made of timber in order to determine the main advantages of such a solution, evaluate the design features and options for performing the work.
The advantages of a wooden garage include:
- environmentally friendly wood, which absorbs the smell of gasoline and exhaust gases;
- sufficient level of energy saving and low cost of building materials;
- simplicity of processing and ease of assembly, allowing construction to be carried out without the use of any specialized tools or installation equipment;
- excellent vapor permeability of timber walls, reducing humidity levels;
- optimal compatibility with the facade of the house and the landscape of the site.
A set of necessary tools
Construction work cannot take place without special tools. Therefore, you need to familiarize yourself with the basic devices that will be needed for construction. These include:
- Pickaxe with shovels. Such tools are used to work with soil in the manufacture of the foundation of a structure.
- Saw. An indispensable device used for sawing wood.
- Chainsaw. It will be needed if large-sized logs are used for the construction of the building, which are difficult to saw with saber or circular saws.
- Stapler. Used for installation of heat-insulating materials on floor coverings.
- Level. This measuring tool will be needed to monitor the evenness of vertical and horizontal surfaces.
- Hand tools. These include a chisel, pliers and hammers.
Sheathing and insulation of a frame garage
The interior cladding of the structure is usually done with clapboard. This material helps create favorable climatic conditions inside the garage. It is suitable for both wall and ceiling cladding. Its advantages also include ease of installation, as well as low cost.
The wooden lining is attached to a metal sheathing. The sheathing should not be fastened to the wall tightly, but so that there is a small gap between it and the wall. This is necessary for ventilation, as well as to reduce the risk of deformation of the lining.
When installing a heat insulator, you need to place it in such a way that there are no gaps left in the frame. If it turns out that it is impossible to install without gaps, then the empty space can be filled with polyurethane foam. After the foam has cooled, you need to remove its excess with a knife.
When insulating floors, many experts recommend using expanded clay. It will not only insulate the floor, but also create excellent sound insulation. In addition, it is quite durable. Therefore, it will not have to be replaced after a few uses (unlike other insulation materials).
Do-it-yourself timber garage
Often, profiled timber is used as a material for making a garage.
The advantages of laminated veneer lumber include:
- There is no risk of temporary deformations; it will always have a smooth surface;
- Glued laminated timber is not subject to shrinkage and shrinkage;
- It has optimal humidity, which eliminates the risk of rotting or fungal formations;
- Great for complex projects;
- Easy to install.
Despite the large number of advantages, laminated veneer lumber has its disadvantages. One of them is the high price. A garage made of laminated veneer lumber will cost approximately 2 times more than the same garage made of profiled timber.
Profiled timber is a timber that has protrusions on one side. These protrusions create additional reliability of the connection. The disadvantages of profiled timber include its poor thermal insulation. In winter, being in a garage made of profiled timber will be quite uncomfortable.
Timber frame
In order to avoid problems during the construction of the frame, you must first make a sketch or plan on a sheet of paper.
On the sketch you need to draw all the contact nodes and additional structures. If the owner does not have enough experience and knowledge to create an accurate sketch, then you can take a ready-made design from the Internet. When planning a garage frame made of timber, the connecting elements also need to be drawn on the sketch. The racks and beams can be connected either with brackets or with metal plates with holes for self-tapping screws.
Also, when making a frame, it is better to avoid various complex connections (for example, notches). It is most convenient to place the beams overlapping or, as builders say, “half a tree.”
The assembly of the frame itself begins with the lower crown. You need to attach the corner posts to it, and the upper crown is already attached to the corner posts. The optimal length of the beams is 3 m. To ensure that the racks do not change their position after installation, temporary fixation can be made using boards.
Advantages and important features of timber
Timber has many advantages that set it apart from other building materials. The main advantages of wood include the following:
- Environmental friendliness. Glued laminated timber is called an environmentally friendly material that does not emit any chemical fumes into the air and does not harm human health.
- Small price. The building material has an affordable price and therefore can be used to save money when building a garage.
- Good energy saving. All garages that are made of timber retain heat inside and do not require additional insulation of the walls and ceiling.
- Protection from moisture. Wood has good waterproofing properties, thanks to which the humidity in the room does not exceed average levels.
- Easy to use. All builders who have used wooden beams claim that it is very easy to use. To build a small garage you will not need any special machinery or equipment.
- Appearance. A wooden structure will fit into any site design.
Also, the advantages of the building material include its high degree of construction readiness, since many companies, before selling, check with buyers about the dimensions of the garage and cut the blanks themselves.
Garage exterior cladding
Cutting in frame elements.
Before cladding the walls of the garage structure, you need to organize a sheathing of 30x30 or 40x40 mm beams. Next, the cladding is attached to the sheathing.
External wall cladding is made of different materials:
- Siding: metal, vinyl. Capable of imitating the external aesthetics of other materials, characterized by a wide range of colors and simple installation
- Sheet corrugated sheets. It is not difficult to attach such material to walls, it is affordable and durable;
- Lining. Cheap material that has average performance parameters, but is quite suitable for a motorhome. Installing lining on walls is not difficult.
Step-by-step instructions for building a garage from timber
Foundation preparation
For a garage made of timber, a strip foundation is best suited
Installation of the foundation can be divided into several stages:
- Selecting the type of foundation and its dimensions. For garages, strip foundations are most often used. The average depth for it should be 70-100 cm, and the width - 50 cm. The length and width are calculated based on the size of the future garage.
- After all the measurements and markings, you need to dig trenches for the foundation of a pre-agreed depth. Sand and crushed stone are poured at the bottom of the trench to strengthen the future foundation.
- Next, the formwork is installed. It is preferable to simply buy and install, but you can do it yourself. The formwork must be well secured so that it does not move or become deformed during the pouring process.
- Often they decide to make the foundation reinforced for additional strength. To do this, a metal mesh is inserted into the future foundation, which is fastened with a special wire.
- After reinforcement, you can begin pouring cement. You need to wait about a month until the foundation gains full strength, after which you can move on to the next stage.
Installation of a log house
Methods for connecting timber
At this stage, the crowns of the log house are installed. When assembling a garage from a ready-made factory kit, all the necessary cuttings will already be made.
If you are making a garage from a regular log house, then you need to make the necessary cuttings yourself. It is recommended to stick to the “half-tree” or “paw” type - these are the most proven and reliable types of connection. Having decided on the type, perform a rough assembly of the log house according to the template. Make all the necessary cuts and holes, number the timber for easier assembly after treatment with special means.
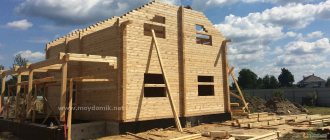
Construction of the garage is in full swing
Wall installation is carried out according to the selected type of project. It is convenient to use profiled timber, as it has special grooves for strong fastening.
Roof installation
Metal tiles are worth choosing as a roofing material if you are not on a very limited budget.
To build a roof, you need to decide on the roofing material. There are several common options from which you will have to choose:
- Ceramic and metal tiles. Very expensive and difficult to install material. It is used for expensive garages and is characterized by high quality.
- Profiled sheeting. Cheap and lightweight material that is easy to install on any roof. But, unfortunately, it is susceptible to corrosion and does not hold heat well.
- Flexible tiles. Sold in rolls and very easily mounted on the roof. The only negative is the short service life.
The construction of the roof begins with the installation of the Mauerlat - this is the most important element of the future ceiling. The Mauerlat is made from timber with a cross section of 150x150 mm. The Mauerlat is attached to the wall using brackets or studs.
Rafters are installed on the Mauerlat - this is the frame and the main part of the pitched roof. For rafters, timber with a cross section of 100 mm is most often used.
The process of installing rafters for a pitched garage roof
Next, the rafters are fastened with lathing.
Do not forget about waterproofing, which must be placed under the roofing material.
After the wooden part of the roof is erected, the roofing material that was originally selected is placed on it.
Calculation
First you need to determine the desired size and shape of the garage. As an example, we will take the most standard and common option - a rectangular garage 7 m long, 4 m wide and 3 m high. In such a garage you can comfortably place any medium-sized sedan.
First we need to find the perimeter of the future garage. This is done according to the formula (A+B)*2.
(4 m + 8 m) x 2 = 24 m. This is the perimeter of the garage walls.
Now you need to find the area of the walls. To do this, use the formula: p*h. That is, the perimeter multiplied by the height: 24 m x 3 m = 72 m2. This is the area of all the walls of the building.
Next, it remains to calculate the volume of the walls, which means the volume of the timber we need. The section we took as an example is 100 mm or 0.1 m.
To find out the volume, you need to multiply the area by the cross-sectional size. In our case it is: 72 m x 0.1 m = 7.2 m3. This is exactly how much material will be needed to build a garage, taken as an example of size.
Do not forget that you need to subtract the size of the gates and windows from this size, but it is individual for each case. For example, there may be no windows at all, and the size of the gate may vary greatly. You can play it safe and not deduct the size of the gate, and the remaining timber will be a reserve for various unforeseen expenses or damage to the timber.
If you don’t want to spend extra money, then it’s enough to subtract the volume of timber needed for the gate from the original size. For example, the width of the gate is 2.5 m and the height is 2 m. Then we find the area: 2.5 m x 2 m = 5 m2. Next, we multiply the area by the cross-section and get 0.5 m3, which we need to subtract from the total volume of the required timber.