You don't have to be a romantic to appreciate the practicality of hut houses, so popular in the Soviet Union. So far, this retro style of architectural buildings is more often used in projects of country houses, but there are prerequisites for the construction of A-shaped houses for permanent residence.
The idea of triangular buildings with a roof reaching to the ground came from Scandinavia and America back in the 70s of the last century and was forever registered in our area. To get comfortable housing, when drawing up a project, the climatic features and principles of house building in the region are taken into account.
Let's find out how a triangular house is structured, what its positive and negative qualities are, and how to avoid gross mistakes when designing.
Facade
We didn’t think at all what the facade would be like, but we knew right away.
First of all, not siding, only wood. Secondly, the color blue. Thirdly, it is advisable to highlight the texture of the wood. Because of the builders who don’t know how to count angles, our façade area has increased. It would seem like three degrees, but the height is a meter. The builders also told us that we should be grateful, because this is an increase in area. Uh... your train is moving too fast, I don’t understand what you’re talking about! Apparently, they meant that the amount for the facade will not increase by a multiple of construction cretinism.
First, we thought about a façade made of larch and brushed plank. With painting it cost us $14 per “square.” But there was almost no money left, so we decided to consider an edged board. We arrived at the sawmill, and there was brushed larch. My heart started pounding, but then I thought: your blue paint is actually thick, are you serious?
In general, we moved away from the corner with larch, were a little sad and took false pine beams of the second category.
There were two installation methods, we chose the first one, herringbone - it’s more economical and the joints are not visible, which is cool. The uncool thing is that the craftsmen who made the façade have disappeared. They just did and did and left. Simply, without warning. Just “we’ll be there in three days.” What? Job? Deadlines? No, we haven't heard. It’s as if they work for us for condensed milk. For 65 “squares” of the facade, 2.9 liters of primer and 9 liters of paint (for two layers) were enough. Tecurilla applies perfectly and looks perfect. I painted it myself. We are delighted.
Now we have the box assembled, the windows are in place, the roof is done, the floor is poured, the staircase is made with our own hands and the interior decoration begins.
Interior planning
When planning the interior of a hut house, you should be especially careful. So, if you use classic country furniture, then you risk turning the building into a small closet. The unusual shape of the rooms requires non-standard furniture and original design solutions.
Creative solution for installing windows on top of the roof
However, this form of rooms should not be considered a disadvantage. Such an original layout can be “played up” in an interesting way. Alternatively, you can abandon the standard zoning, which will make the space more spacious. A great idea for a kitchen would be to use an unusually shaped design instead of a standard kitchen unit. For example, the cooking zone can be made in the form of a free-standing ball. In any case, you will most likely have to make custom furniture, since the models available for sale do not take into account the characteristics of your home.
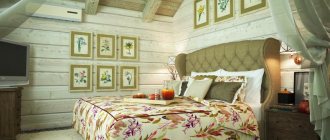
Spacious second floor with both a bedroom and a living room
With such a design in the interior, it is better to abandon unnecessary furniture that will clutter up the space. Decorative elements and other decorations should also be used to a minimum, otherwise they threaten to weigh down an already compact space. Therefore, styles such as minimalism or Scandinavian are most suitable for a hut house.
Interesting design ideas brought to life in the design of the second floor of a hut
In addition, the interior of a country house should not compete with the beauty of the countryside. Therefore, the interior should only organically complement nature.
Competent design of the first level in a spacious triangular house
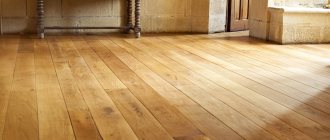
When finishing and decorating the interior, it is better to use natural materials. Natural wood would be especially appropriate.
Interior decoration of a house made from natural materials
Advantages and disadvantages
Buildings of this type are certainly very beautiful. But they also have both positive and negative sides.
Pros.
- The facade, unusual for Russia, looks very stylish. Such a structure will delight your eye and surprise your friends and neighbors.
- The appearance will fit into absolutely any landscape.
- Compact shape does not take up much space. It does not cast a shadow on the adjacent area - it is perfect as a summer house building and will not make it difficult to grow crops.
- The frame design is simple. It’s quite simple and quick to build it yourself, because you don’t have to build walls separately
- All precipitation will simply flow/roll down the roof. You will not bother yourself with removing snow from the roof, and in spring-summer-autumn the rain will not “drum” on it.
Minuses.
Due to the A-shaped tapering walls, the space is “eaten up”. Such a house may be dark if the windows are not designed correctly.
It is important to make panoramic windows that face south, as well as roof windows. If you are building a hut on your own, it will not be easy to correctly think through the internal layout: where is the best place to place the stairs, which side to make the door on, is it worth delimiting the zone on the 1st floor, etc. Difficulty installing a heating system, low frost resistance
Due to the design, the walls a priori cannot be thick.
Heating installation in a country house
Heating may not be needed for a summer cottage, which will only be visited in the summer months. During periods of cold weather, you can get by with an oil radiator or an air heater
If dacha owners plan to live or visit their dacha all year round, it is worth thinking about installing heating. You can buy a potbelly stove, of which there are a huge variety today, and install it in the center of the room. The stove can also be placed against the wall, however, do not forget about the lining made of refractory/clamotte bricks.
In any case, it is necessary to install the potbelly stove on a non-flammable and durable base. The place where the pipe passes through the ceiling is lined with protection consisting of stone wool. Such insulation will protect nearby surfaces from heating up to 1000⁰C, which is an excellent temperature reserve.
Triangle roof
The foundation stood for almost a month, which, in general, is not bad, and then in a couple of weeks the house was put under a roof.
Our love is a roof. At the stage when we thought that the house would fall apart due to the poor quality work of the builders, we looked at the roof and were happy: it was incredibly beautiful and did not look heavy.
I already wrote that we love the color blue, and I really wanted to go blue with the roofing too. But this is somehow difficult, and at some stage I almost agreed to a green beaver tail, but the internal marketer ordered me to look for it as cheaply as possible.
The builders' estimate included shingles at $5.65 per square and carpet at a dollar per square. It’s still a mystery to me what kind of carpet this is, but that’s a thing of the past. Red. Brown. Bolotnaya. These three words sounded like a sentence, I kicked as hard as I could.
At some point we saw the “Glacier” collection from TechnoNIKOL, and my heart melted. But I decided that $8 was too expensive. So I sat down and made a list of companies that had such tiles, and I got a table of 27 contractors. Those that do not deliver were excluded. Then she began sending estimates to all companies, bringing down the price. This is a marketing technique: if you need something cheaper, just say that someone is giving a lower price. This time I threw out the estimates: the roofers didn’t take my word for it.
Drum roll: I have Glacier tiles for $6 square!
From the jambs:
— the holes for the gas pipe were not made in advance.
— we made a hole for ventilation in advance, but mastic flowed from there, now it looks like my tears over a perfect construction site.
PHOTO GALLERY OF READY PROJECTS
4 Total Score
Customer ratings: 4 (5 votes)
Construction stages
Laying the foundation
For this design, you can choose one of three types:
- tape;
- pile;
- pile-tape.
Preference depending on the type of soil and area of construction.
Walling
The main feature of the triangular-shaped structure is the presence of only two walls: the front and the back (rear). Therefore, for the construction of the walls of a country house, it is better to give preference to wood or wood products (glued laminated timber, chipboard, fiberboard).
Although you can also find options for construction from brick or gas blocks.
Window placement
Where would you prefer to live: in a private house or apartment? Definitely an apartment! Comfort, coziness and warmth, surrounded by people and infrastructure 31 (4.22%) Only a private house! There is silence, peace, a lot of space and few people around! 339 (46.19%) Why choose just one? There is an apartment in the city, and a private house outside the city. 342 (46.59%) I am a free Citizen of Planet Earth! I don't need a man-made cell! 22 (3%) Back
Windows in the house are the main source of lighting
Therefore, it is very important to choose the right location from accommodation. Most often they are located on the front wall of the house.
Although you can consider their presence on the roof
In this case, special attention should be paid to the reliable structure of the frame. It must be as strong as possible to withstand the pressure of the roof, and at the same time light so as not to create pressure on the base
Frame formation
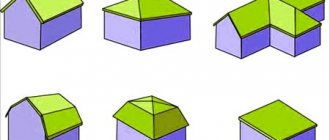
The frame of the hut-shaped structure consists of two isosceles triangles connected to each other. Depending on the roof material, the structure can be made of either wood or metal.
Roof selection
As mentioned above, in order to create less pressure on the base of the house for the roof, it is better to choose lighter materials.
You can opt for metal tiles, ondulin or metal profiles. Although the choice depends entirely on personal preference and budget. The main thing is to take care of high-quality heat and sound insulation.
Suitable for thermal insulation:
- expanded clay;
- glass wool;
- Styrofoam.
If only the roof is insulated, then the material is laid inside the building. But you can also think about a system for insulating the walls of the building. Then it is advisable to place the insulation outside, hiding it under the sheathing.
Sheathing options
For the exterior cladding of a house, siding or metal profiles are most often chosen. They are durable, frost and moisture resistant, resistant to fading and sudden temperature changes. For interior decoration, aesthetic and fungus-resistant materials are most often used: lining, plasterboard, ceramic tiles.
Various types of plaster will look impressive for both external and internal decoration.
Pay attention to heating
Stove heating is being replaced by new modern types:
- gas;
- electrical;
- steam.
By choosing this option, you can be guaranteed to heat all rooms, including the attic or attic area.
As you can see, a triangular-shaped house is a creative and inexpensive solution. The main thing is to choose a suitable project in advance and think through all stages of construction in detail.
Features of the construction of hut houses
Most often, the basis of a triangular house is an insulated wooden frame covered with waterproof and windproof material. Pediments are also made using frame technology. Occasionally in the construction market there are options with end walls made of timber and brick.
Manufacturers of SIP panels offer developers ready-made kits for assembling hut-like buildings for temporary and permanent residence.
The choice of roofing coverings for A-frame houses is quite wide. Here you can use slate (ondulin or asbestos-cement), bitumen and ceramic tiles, and wooden shingles.
Let us note in passing that metal tiles for such a structure are not the best material. The large area of the slopes turns it into a huge “drum”, humming under the blows of the rain. Insulation that acts as sound insulation will not be able to reduce the noise from the steel coating to an acceptable level.
The sheathing of gables and rafters in a frame building is most often made of OSB boards. They increase structural rigidity, speed up and simplify installation.
The roof of huts has two drawbacks: it does not retain heat well in winter and heats up quickly in summer, so in addition to good thermal insulation, you need to take care of ventilation. It is recommended to install both air gaps and ridge ventilation, as well as vertical channels.
Construction of a hut house includes the following stages:
• laying the foundation;
• assembly of wooden frame and internal partitions;
• roofing construction;
• installation of windows and doors, flooring and staircase installation;
• laying insulation and finishing work.
Let us examine in more detail the process of erecting a frame hut on a pile foundation.
For the foundation, 3-meter reinforced concrete drilled or screw piles with an expanded base are used (you can use timber beams). Next, they begin to assemble the A-shaped frame elements, after which the frame itself is assembled.
The assembled frame is sheathed on the outside with wood or OSB-3 panels
At the next stage, exterior and interior finishing is carried out. A competent layout allows you to fit a staircase with a mini-library into the interior.
The ceiling of the second floor does not connect the front parts, but breaks off in the middle, which eliminates the feeling of a pressing ceiling or cramped space.
It is not difficult to make accurate calculations and select the necessary building materials for independent construction if you have the skills and relevant knowledge. Otherwise, it is better to order a turnkey project from professionals. The team assembles a frame hut house in a period of 7 to 14 days. Firms offer standard projects or develop
Advantages and disadvantages
A gable roof, reaching all the way to the foundation or plinth, is the most suitable option for regions with a humid climate.
Hut houses have many advantages, for which they are so popular. Among the advantages of such buildings, it is worth noting their following qualities:
- Easy to install. During the process of building a house, you will not need the help of specialists, because it is quite possible to do all the work yourself.
- Since such a house has no walls, the construction time for the structure is the shortest, because you do not need to carry out masonry work or pour concrete to form the walls.
- A gable roof, reaching all the way to the foundation or plinth, is the most suitable option for regions with a humid climate, prolonged rain or a lot of snow in winter. The thing is that such a roof reliably protects the base and other structures of the house from getting wet in conditions of high humidity and heavy rainfall.
- You just need to look at the photos of such houses to understand how harmoniously they fit into any suburban landscape. Such buildings are appropriate in mountainous areas, among tall pine or deciduous forests, in ordinary rural areas, among country houses or in an open landscape with low-growing plants.
- The price of houses of this type is relatively low, since there are no costs for masonry work or the purchase of mortar, and the foundation for such a light construction can be made lightweight, which will also significantly save money and time.
- The triangular building is the best way to save free space on a small summer cottage. Moreover, this configuration of the structure provides a minimum of shadow, so light-loving plants will feel great on your site.
- If you want to spend a minimum of effort and money on building a country house or a building for year-round living, then a house in the form of a hut is exactly what you need.
In order to place two floors in such a building, you will have to arrange a staircase inside, and this will lead to an even greater reduction in usable area
However, the construction of hut houses also has its disadvantages, which are also worth mentioning so that you can form your own opinion about the need to build such a house. So, among the disadvantages of these houses it is worth listing the following points:
- Since the main enclosing structure is the roof, the structure's protection from the cold is not very high. To make such a house comfortable in winter, the roof must be carefully insulated.
- Due to the fact that the roof slopes form the side walls of the house and taper towards the top, there is a significant loss of usable space inside the house.
- In order to place two floors in such a building, you will have to build a staircase inside, and this will lead to an even greater reduction in usable space.
- A gable roof gets very hot in the summer, because its surface is large. This heat is transferred to the rooms inside the house, so in the heat of such a house it is impossible to do without an air conditioner.
- A roof that is too high and steep makes it very difficult to install roofing material.
- The rafter structure, due to the large sloping roof, requires the use of elongated non-standard rafters. Such products will have to be made to order from high-quality wood.
- The same applies to panoramic glazing (if it is used at the ends of the house). Not only does it need to be ordered, but in addition to this, it is worth using energy-efficient double-glazed windows. It's not cheap.
- When creating the interior of a room, due to the sloping walls, you will have to use non-standard approaches and individual furniture.
- The seemingly cheapness of a house at first glance can result in high costs for the installation of a high-quality, well-insulated roof.
Layout
In most cases, an area of 6x6 m is chosen for a country house. Housing of this size was built in the USSR until the 80s of the last century, as evidenced by reference books on the design and construction of houses of that time (scans of some publications are posted online). Due to the small usable space of the hut house, special attention must be paid to the layout. When designing, the following points are taken into account:
- The layout of the first floor must include a vestibule or a small hallway. The airlock will help protect your home from cold air.
- On the ground floor there is a living room, kitchen and bathroom (due to lack of space it often has to be separated). A popular studio option is when the kitchen and living room make up one space, and also serve as a dining room.
Ground floor studio space Source pinimg.com
- It is extremely important to choose the shape of the staircase correctly and position it with minimal loss of space.
- The second floor is designed for one or two bedrooms. Since sloped walls reduce usable space, it is important to make the most of it. The easiest way to do this is by placing built-in storage areas (cabinets, shelves, closets) along the roof slopes.
- Since the project is being created for a summer cottage, it is complemented by a terrace or porch, spacious and comfortable enough to provide enough space for evening tea parties.
Second floor design Source wowowhome.com
What are the disadvantages associated with the construction of triangle houses?
The function of the main enclosing structures is performed by the roof, which is not capable of providing a high level of protection from the cold. To create comfortable conditions for living in winter, you will have to additionally insulate the building with high-quality thermal insulation materials.
Forming the side walls of the building, the roof slopes gradually narrow upward. Because of this, housing loses a significant part of the internal space that could be used as rooms. If the house project with your own hands involves the construction of two floors, you will have to build a staircase structure inside. It is not only difficult to implement, but also leads to additional loss of usable space.
In summer, a gable roof, due to its considerable size, is subject to strong heating. As a result, heat is transferred to the interior, so installing an air conditioning system will not be superfluous. In addition, steep slopes complicate the process of installing roofing material.
The gable roof of a hut house gets very hot in the summer due to its significant size.
The large slope of the roof imposes other restrictions, so for construction you will have to buy elongated rafters of non-standard size. Such products are made exclusively to order. For this, high-quality wood is used. The same difficulties arise with panoramic glazing. Most often it is used in the end parts of the house, occupying most of the facade. Panoramic windows, like special double-glazed windows, will have to be purchased to order. Moreover, cleaning such large glasses in the future will not be an easy task.
Sloping walls may not appeal to everyone, because arranging furniture in such a room is not an easy task.
Sloping walls require a special approach to the interior. You will have to carefully select pieces of furniture or even make them to order, since standard designs can hide useful centimeters in rooms with an unusual configuration.
Materials
Houses with roofs down to the ground have fairly simple assembly, so site owners can implement a variety of projects without the help of specialists. For construction can be used:
- beam;
- lining;
- wooden shields.
Quite often a dry board is also used. The interior space of a house with a timber roof down to the ground is not so vast. To save usable space, the stove and fireplace chimneys are moved outside the building. But this approach has some disadvantages, because a significant part of the heat will go outside.
Advantages and disadvantages
Hut houses have their advantages over standard buildings, but their owners will still have to face some difficulties.
Advantages
The advantages of hut houses relate to both their appearance and functional features.
- Huts attract with their appearance, architectural design and design, so they are ideal for young families, people with creative thinking, and those who are tired of typical buildings. However, they will also appeal to those who love comfort - such houses have a special atmosphere and contribute to comfortable rest and tranquility
- The universal look fits the house into any landscape - in the forest, in the garden, in the countryside, in the private sector. It will look contrasting to conventional buildings and harmonize with natural elements
- The simple design reduces construction time and saves on materials. If you have the necessary tools, it can be built by hand in a short time. Also, for a small building it is not necessary to make a volumetric foundation - you can get by with a strip foundation located only under the walls
- A gable roof is suitable for regions with high rainfall. It will not accumulate moisture and will protect the soil near the foundation from erosion
- Huts fit well into a small plot of land. They have compact shapes and make it possible to design a beautiful home without taking up a lot of space. Such buildings do not provide much shade, so they do not interfere with plants, and the triangular roof will allow trees to grow
A large number of varieties of designs and interior layouts provide ample space for the implementation of ideas and make it possible to create a house that ideally meets all the needs of its owners.
Disadvantages and possible difficulties
A hut as a country house has a minimum of disadvantages, but if you adapt it to a place of permanent residence, you will have to face difficulties:
- low thermal insulation and frost resistance
- loss of usable area due to narrowing
- the need to buy non-standard materials
- a small number of ready-made planning projects
In general, the disadvantages of a hut house can be compensated for by a high-quality layout.
A hut house is an excellent original solution that will look good in combination with any landscape. It is a quiet corner conducive to peace and relaxation. The simplicity of the design greatly facilitates construction and saves time and materials, and the result is surprising in its appearance and functionality.
Hut House using Frame Technology / A-frame house / Country summer house
Hut house (A-shaped house): projects, dimensions, layout, advantages and disadvantages | (75+ Photos & Videos)+Reviews
How to make a children's house with your own hands: from wood and other materials. Drawings with dimensions | (80 Photo Ideas & Videos)
How to make a hut in the forest with your own hands
First you need to find a suitable place to build a hut. This place should be safe for your life. We do not advise you to build a hut on the banks of a river, in narrow gorges, or at the bottom of a canyon. Because in case of flooding or heavy rain, this place may become unsafe. Also, do not build a hut under sagging rocks or near steep mountains.
You can build a hut without any tools. However, you will need a standard set to work:
The great thing is that you will most likely always have these tools with you. They will significantly reduce the robot’s time, and the process itself will be more enjoyable.
As you can see in the photo, most huts can be built using a simple technique of weaving from branches. In order to make a high-quality roof and walls that will be reliable in all weather conditions, you only need to use those materials that are found in the forest at almost every step, these are branches, bark, moss, leaves, grass. By collecting all these materials you can make a good hut with your own hands.
Huts come in different shapes and sizes, it all depends on how many people it should accommodate, as well as what its purpose is - it will be a shelter from the sun or protection from the cold and wind. But with all this, you need to take into account the type of terrain, weather conditions and time of year.
Making a lean-to hut
A lean-to hut consists of only one wall, made directly by you. This wall should rest on something, it could be a fallen tree or a large stone or two trees growing nearby. You can make this wall or canopy from branches and cover it with leaves. This type of hut will serve as protection for you from light rain, scorching sun or other circumstances. However, you will not be able to completely protect yourself from strong wind, snow or rain. Also, this building is not so practical. Since you can have a good rest in it, however, you will not be able to comfortably spend the night there.
In order to build a building you will need two strong logs with branches at the top, 2–2.5 meters long. Drive these logs into the ground at an angle to the base and secure the crossbar at the top. At a distance of 30 cm, you should place branches (poles) with one end pressed into the ground and the other resting on the crossbar.
Making a gable hut
This type of hut is more convenient and practical. A gable hut is made according to the same principle as a lean-to hut. But the difference is that the poles that are installed from the crossbar to the base of the ground must be installed on both sides. This can be seen in the photo.
One side should be completely covered with small branches or leaves, and the other will be used as an exit. If you have a film or tarpaulin with you, then use it as additional protection from rain and wind.
Once you are done with the exterior work, start with the interior work. What is meant? You need to take care of the floor covering. Especially if you don’t have sleeping bags or other warm clothes with you. If you have to spend the night in cold and wet weather, make sure you don't sleep on the ground. Build something like a stretcher with your own hands and cover it with dry leaves and grass that you can find, or unnecessary things that may be in your backpack.
Remember, if there is a question about preserving your health or even life, you should not look for the most convenient types of materials. Use what you have on hand. The main thing is that the material you choose is dry and reliable. But, probably, few of us may need to build a hut in the forest due to various extreme situations. Therefore, in the next part of this article we will talk about how to help our children build their own hut.
Wigwam hut
We build the frame: draw a circle on a flat surface. Around the circle you need to dig a row of sticks. The upper ends of the sticks must be connected using rope, tape or wire. However, everything must be very reliable so that your children are safe. At this stage, we can say that the frame is ready.
After making the frame, you only need to cover the wigwam with colorful fabric or film, as you see in the photo.
If you have a summer house or your own garden, then do not lose this opportunity to make an original and very beautiful wigwam from sunflowers for children. To do this, you just need to plant a few sunflowers in a circle. And when they grow up, tie them together. You can only imagine how happy your child will be playing in such a hut that you built.
Construction of a triangular house - photo
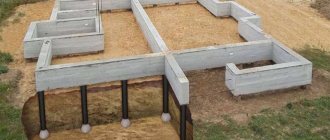
The foundation of the house is a shallow-buried strip foundation. To construct it, trenches with a depth of 300-800 mm were dug (the site has a slope), the bottom of which was compacted with a sand-gravel mixture (layer 200 mm), and then pre-assembled elements of the metal frame were placed in them and formwork was installed. Foundation strips cast from concrete grade MD00 rose above ground level by 600-800 mm. To prevent the evaporation of moisture from the concrete, the freshly cast tapes were covered with plastic film. After 4 days, the concrete gained approximately 25% of its design strength! the plastic film was removed, and then the wooden formwork was dismantled and removed from the trenches
The support for the floor panels are beams with a section of 240 x 140 mm. The beams were placed at such a height that the surface of the floor panels laid on them was flush with the top of the foundation strips
Sections of timber with a cross-section of 120 x 100 cm were attached to the flooring with self-tapping screws, on which the panels of the internal walls will rest. Before installing the panels, two PSUL tapes were glued into the grooves on the strapping bars.
Link on topic: Construction of a passive house from insulated timber (+photo)
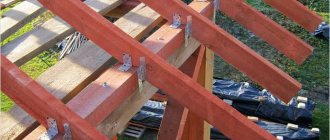
The installation of wall panels began from the corner of the house and immediately joined the internal walls to the external walls. The panels were temporarily attached to the ceiling with slopes, and then tightened with self-tapping screws
At the bottom of the wall panels, the OSB boards are extended beyond the frame by 100 mm - during installation they tightly grip the framing beam. The connection is fixed with self-tapping screws
Glued beams with a cross-section of 320 x 160 mm were installed above the openings of the walls of the first floor, attaching them to the panel frame with self-tapping screws 420 mm long.
In the central part of the house, 200 mm thick floor panels were laid on the assembled walls of the first floor. They were attached to the walls with screws screwed at an angle, the pitch of which was 300 mm.
The second floor wall panels were installed on the assembled interfloor floor, and then the purlin beams were inserted into the grooves made during the manufacture of the wall panels. The cross-section of the beams is 420 x 240 mm, they are made of laminated wood
After completing the installation of the purlins, the builders mounted inclined beams on the side facades of the house, attaching their upper end to the outer purlin and the lower end to the foundation strips.
Roof panels with a thickness of 240 mm began to be laid from the bottom up, from the foundation to the roof. Windproofing was laid on the assembled slope and pressed with counter batten slats.
A flooring made of OSB boards was attached to the counter-lattice slats, and a ventilated gap appeared under it.
The angle of inclination of the roof is only 30° degrees, so the installation of the roofing began with the installation of a continuous waterproofing carpet.
Soft bitumen shingles, the petals of which are shaped like wooden shingles, were glued onto the waterproofing carpet of the roof. In future pergolas located on both sides of the house, larch boards were created
Since the house is located far from gas mains, it was decided to gasify it autonomously. To implement the plan, we purchased and installed a liquefied gas tank with a capacity of 5 m3. It only needs to be filled once during the heating season.
In order not to violate the integrity of the panels, communication and ventilation pipes were laid in special enclosures located in the bathrooms
Electrical cables, on the contrary, were laid inside the panels, placing them in a non-flammable corrugated pipe. All cables converge to one shield
For interior finishing, the panels were lined with sheets of plasterboard, which were puttied and covered with dispersion paint. The wooden elements visible in the interior, as well as energy-saving wooden windows and doors, were painted in a dark tone, contrasting with the color of the walls. The floors are finished with parquet boards.
In the bathrooms of the house, a dry screed was made using special moisture-resistant panels, which are connected using a tongue-and-groove system. The floor surface was treated with a special waterproofing compound and covered with ceramic tiles
In central Russia, such an element as a pergola is still quite rare. Most likely, over time, the owners will plant climbing plants around both pergolas, and then both currently empty “outbuildings” will certainly become a favorite vacation spot for the whole family.
The roof outlets of the building were lined with painted clapboard. Using laminated veneer lumber treated with a protective compound, spacious pergolas were added to the house on both side facades.
The front facade of the house was covered with boards painted in a dark tone and complemented with copper decorative elements. Tempered glass parapet installed on the balcony
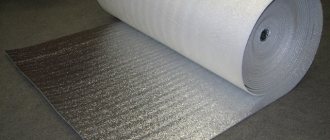
Insulation: how to do it right
This step can be performed in parallel with the sheathing. Since the most common thermal insulation is mineral basalt wool, we will give recommendations for its installation:
- A vapor barrier membrane is installed from inside the room. It protects the insulation from saturation with heated vapors. The insulation is stapled to the frame posts, the joints are carefully taped. The overlap must be at least 100 mm.
Mineral wool slabs are cut according to the pitch between the posts plus 1-2 cm, so that they can be inserted at random.
The insulation is installed in 2 layers with joints spaced apart. This is necessary so that there are no through gaps left. If the cross-sectional height of the racks is not enough, additional sheathing is used, where another row of thermal insulation is laid.
Waterproof and windproof material is fixed on top of the slabs. It allows steam to pass through, which promotes the evaporation of moisture from the mineral wool.
A ventilation gap of at least 40 mm must be left between the insulation and the façade cladding. It is organized using lathing made of bars. A gap is also left in the casing below and above for air circulation.