The final stage of work associated with the construction of the foundation base is the laying of floor slabs on the foundation. Activities are carried out in stages, using special equipment. Correctly performed installation guarantees the strength and reliability of the supporting foundation for the object under construction. In this way, construction work is completed faster than pouring mortar into the formwork.
Construction of reinforced concrete foundation slabs: flat
LOCAL RESOURCE STATEMENT GESN 06-01-001-16
| Name | Unit |
| Construction of reinforced concrete foundation slabs: flat | 100 m3 of concrete, rubble concrete and reinforced concrete in action |
| Scope of work | |
| 01. Cutting and installing boards 02. Installing formwork panels 03. Fastening formwork elements with wire and construction nails 04. Installing reinforcement 05. Laying concrete mixture |
The price does not contain overhead costs and estimated profits; accordingly, the direct costs of work for the period 2000
(prices of the Moscow region), which are calculated based on
2009
. For further calculations, this cost must be multiplied by the conversion index to current prices.
You can go to the pricing page, which is calculated based on the standards of the 2014 edition with additions 1 The basis for using the composition and consumption of materials, machines and labor costs are GESN-2001
| № | Name | Unit Change | Labor costs |
| 1 | Labor costs of construction workers Level 3 | person-hour | 220,66 |
| 2 | Labor costs for drivers (for reference, included in the price of the EV) | person-hour | 27,31 |
| Total labor costs for workers | person-hour | 220,66 | |
| Workers' compensation = 220.66 x 8.53 | Rub. | 1 882,23 | |
| Payroll for drivers = 384.81 (for calculating invoices and profits) | Rub. | 384,81 |
OPERATION OF MACHINES AND MECHANISMS
| № | Cipher | Name | Unit Change | Consumption | Article number Rub. | Total RUB. |
| 1 | 020129 | Tower cranes when working on other types of construction 8 t | mach.-h | 26,06 | 86,4 | 2 251,58 |
| 2 | 021141 | Truck-mounted cranes when working on other types of construction 10 t | mach.-h | 0,98 | 111,99 | 109,75 |
| 3 | 030101 | Forklifts 5 t | mach.-h | 0,27 | 89,99 | 24,30 |
| 4 | 040502 | Installations for manual arc welding (DC) | mach.-h | 4,3 | 8,1 | 34,83 |
| 5 | 111100 | Deep vibrator | mach.-h | 10,71 | 1,9 | 20,35 |
| 6 | 331532 | Electric chain saw | mach.-h | 0,1 | 3,27 | 0,33 |
| 7 | 400001 | Flatbed vehicles, load capacity up to 5 tons | mach.-h | 1,47 | 87,17 | 128,14 |
| Total | Rub. | 2 569,28 |
| № | Cipher | Name | Unit Change | Consumption | Article number Rub. | Total RUB. |
| 1 | 101-0797 | Hot rolled wire in coils, diameter 6.3-6.5 mm | T | 0,0102 | 4455,2 | 45,44 |
| 2 | 101-1513 | Electrodes with a diameter of 4 mm E42 | T | 0,005 | 10315 | 51,58 |
| 3 | 101-1668 | Mat | m2 | 30 | 10,2 | 306,00 |
| 4 | 101-1805 | Construction nails | T | 0,002 | 11978 | 23,96 |
| 5 | 102-0061 | Edged softwood boards 4-6.5 m long, 75-150 mm wide, 44 mm thick or more, grade III | m3 | 0,04 | 1056 | 42,24 |
| 6 | 203-0512 | Boards made of boards 40 mm thick | m2 | 3,6 | 57,63 | 207,47 |
| 7 | 204-9001 | Armature | T | 8,1 | 0,00 | |
| 8 | 401-9021 | Concrete | m3 | 101,5 | 0,00 | |
| 9 | 405-0253 | Construction quicklime lump, grade I | T | 0,01 | 734,5 | 7,35 |
| 10 | 411-0001 | Water | m3 | 0,73 | 2,44 | 1,78 |
| Total | Rub. | 685,81 |
TOTAL BY RESOURCES: 3,255.09 RUB.
TOTAL PRICE: RUB 5,137.32.
Look at the cost of this standard at current prices open page
Compare the price value with the value of FER 06-01-001-16
To draw up an estimate, the price requires indexation of the transition to current prices. The price is based on the GESN-2001 standards, as amended in 2009.
in
2000
.
To determine intermediate and final price values, the DefSmeta
Turnkey construction price
Average market prices for slab reinforced concrete foundations (construction on a turnkey basis) are reflected in the table . The given values are indicative, because the final cost in each specific case must be calculated separately by a specialist.
| Height of the foundation slab, m | Cost of turnkey installation, rub./m3 |
| 0,20 | 4000–4200 |
| 0,25 | 4100–4500 |
| 0,30 | 4400–4800 |
| 0,35 | 4900–5100 |
| 0,40 | 5500–5700 |
Prices for monolithic slabs for foundation construction are presented in the table:
| Plate length, mm | Slab width, mm | Slab height, mm | Slab price, rub. |
| 2010 | 2010 | 200 | 12500 |
| 2010 | 1500 | 200 | 9300 |
| 1500 | 1500 | 200 | 7000 |
| 1900 | 500 | 200 | 2500 |
Features, advantages and disadvantages of a reinforced concrete slab for the foundation
A foundation made of slabs is the most advantageous option when constructing a building. A reinforced concrete slab under the foundation is used for laying in the foundation to a limited extent, as it is characterized by small depth and insufficient load-bearing capabilities. But in certain situations, this method is considered as an optimal design that combines reasonable cost and sufficient reliability. When choosing such a foundation, it is necessary to take into account the actual loads and the quality of the soil composition.
Characteristics of slab foundations
A monolithic reinforced concrete foundation slab has one undeniable advantage over all other structures - it is a large support area, which makes it impossible for the building to tip over. However, when installing on a slope, or when building on wet soils, there is a danger of slipping. In such conditions, the slab is designed with stiffening ribs.
Expert opinion Vitaly Kudryashov builder, aspiring author
Ask a Question
Note: For better stability and load distribution, both options should rely on concrete preparation, although lightweight technologies are also used in low-rise construction. For example, the footing (reinforced concrete slab under the foundation) can be replaced with a profiled membrane.
Membrane instead of concrete
- Thanks to the large support area, the pressure on the ground is minimal: the loads are distributed evenly, which prevents the formation of failures. And all this despite the fact that the slab has the highest load-bearing capacity.
- It is ensured by a monolith that has no joints, as well as precisely calculated reinforcement with a significant margin of safety. These are the very qualities due to which, despite the high cost, it is the slab that is most often designed in low-rise construction.
- The term “floating” is often used in relation to it, and here’s why. The plate is not subject to local bending. During natural movements, it moves along with the soil, because even on heaving soils it is located almost on the surface. Of course, it is possible to bury it, but only if the house has a basement or ground floor.
- The fact that the slab is not buried does not make it any less reliable. To neutralize the forces of heaving, part of the active soil underneath is replaced with sand-crushed stone mixtures that are not subject to heaving.
- The thickness of the bulk layer rarely exceeds 30 cm, so the volume of excavation work during the construction of a monolithic reinforced concrete foundation slab is very modest. Accordingly, the installation of formwork does not require a lot of material, which provides significant savings compared to deep-laying tapes.
- High consumption of concrete mixture and reinforcement, the need to ensure continuous pouring and the use of special equipment entail an increase in the cost of the structure. However, the choice can still be considered justified, if only because in the end we have a reliable subfloor. The concrete floor, which has to be poured over the ground when installing the belt, also requires certain costs, but here such a need disappears altogether.
- The slab can be insulated, and not only with layers of insulation under the sole, but also include an underfloor heating system. In this case, the problem of freezing and thawing of the soil under the house disappears altogether. The Swedes were the first to come up with this technology, so in our country it is known as the Swedish USHP stove.
In all respects, a slab monolith has solid advantages - but provided that it is correctly designed and correctly poured.
Design
What is foundation design? This is the compilation of a model of the influence of bending loads that can cause the building to tilt. Based on these loads, the thickness of the monolith should be calculated and a scheme for its reinforcement – both local and general – drawn up.
- No matter how tempting it may be to draw up a drawing yourself or take someone else’s, already finished project as a basis, we do not recommend doing this. Even with design-free construction, which is quite often practiced in the private sector, the foundation still needs to be developed professionally, based on preliminary research. Only then can you be sure that the base of the house will be both reliable in operation and economical in cost.
- According to the calculation results, the slab can be either 400 mm or 200 mm thick. This depends on the percentage of reinforcement, since different solutions can be implemented on the same object. Only a specialist can manipulate reinforcement correctly, and only he can find the optimal balance between price and strength.
- With a minimum thickness of the slab, special attention is paid to locally loaded areas - those on which columns, walls and their intersections, concrete stairs and brick kilns rest. With an increase in the thickness of the monolith, there may not be local reinforcements, but then the overall frame should be more “hardy”.
- The reinforcement provides the slab with adequate resistance to punching, and in order to be able to reduce its volume, stiffening ribs facing the ground are provided in places subject to increased loads. For deep-set slabs, the stiffening ribs are the basement walls, and they face up rather than down.
Expert opinion Vitaly Kudryashov builder, aspiring author
Ask a Question
Note: In relation to the contour of the house, the foundation slab should be slightly larger. As a rule, these are “steps” of 250 mm from each wall. Protruding elements of the building in the form of a garage extension, veranda or terrace can also be located on the slab. But since these zones carry small loads, to save money they are often designed on cheaper tapes or point supports.
The contour of the foundation (reinforced concrete slab) protrudes slightly beyond the contour of the base
Feasibility of use
It is advisable to install a monolithic foundation made of reinforced concrete slabs in places with constant soil vibrations.
Carrying out a comparative analysis of pile, strip and slab type foundations based on the validity of their use, the option we are considering is more reasonable to use in the following situations:
- if the construction site has difficult soil;
- According to the project, the project under construction does not have basements or high ground floors;
- when the foundation base is also the base for the floor. In this case, it will be necessary to provide hydro- and thermal insulation protection;
- foundations made of reinforced concrete slabs are installed in areas with severe soil freezing.
Formation of a protective cushion
A slab foundation is not mounted directly on compacted soil. The basis is a protective cushion of sand. It is designed to compact the soil. During the work you will need sand mixed with fine crushed stone. Sands of fine or dust fractions are also used. The thickness of the pillow is from 20 to 30 cm. For low-density soils it is from 45 cm. Technology of the pillow device:
- a layer of sand with a maximum thickness of 10 cm is poured and water is poured from a hose. Afterwards it is compacted using a manual tamper;
- crushed stone is poured in and compacted with a compactor.
Each subsequent layer of the pillow is poured in the same way.
Such preparation is necessary for preliminary shrinkage of the soil.
Advantages and disadvantages
First, let's look at the advantages of a foundation made of reinforced concrete slabs. These include:
- the ability to install such foundations on any type of soil. The existing floating platform completely eliminates possible soil movements without damaging the entire structure;
- monolithic slabs make it possible to install a “warm floor” heating system, and this is a direct path to savings in winter;
- foundations made of reinforced concrete slabs are highly resistant to loads and can easily withstand different weights of vehicles;
- structures built on monolithic slabs are not subject to the negative effects of groundwater;
- installing a monolithic foundation does not cause any difficulties, all work is carried out on our own;
- no additional floor installation work is required, you can begin finishing immediately;
- the design has a long operational period and does not require repair work, which allows you to save certain amounts of money;
- there is no need to prepare a deep pit, because the slabs are able to evenly distribute all loads;
- Reinforced concrete slabs are considered a durable and reliable building material and provide excellent protection for premises from the penetration of rodents and insects.
Unfortunately, there are still certain disadvantages:
- foundations made of monolithic reinforced concrete slabs have certain restrictions on their use. When working, you have to focus on the temperature regime, which should not be lower than fifteen degrees. It turns out that in order to achieve good results in terms of strength and durability, the mortar will have to be laid in the warm season;
- Initially, you will have to spend a decent amount on purchasing building materials, but after a certain number of years it will be compensated.
Selection of fittings
When constructing a monolithic foundation, it is very important to reinforce the foundation with high-quality materials. Enormous pressure will be transferred to the reinforcement. The foundation is reinforced in two layers.
The first layer is a mesh with a cell of 20x20 or 25x25 cm. The thickness of the mesh rods is usually 12-14-16 mm. Next, pieces of this mesh are laid 5 cm from the bottom layer (waterproofing or thermal insulation) on horizontal or vertical guides with an overlap. Then they are tied together with wire and tied to vertical guides. Their height depends on the thickness of the slab.
The second layer of reinforcing mesh is laid in the same way. It is attached to vertical guides 3-5 cm below the top edge of the slab with wire, manually or using a special tool.
Thicker reinforcing bars can be used in the corners and ends of the slab.
The laying of communications (water, sewerage, electricity) can be carried out up to this stage. The communication lines are insulated, insulated and routed outside. Next comes the pouring of concrete.
Installation of slabs
Let's consider the algorithm for constructing a foundation made of flat foundation reinforced concrete slabs.
Preparation
Certain preparatory work needs to be done. The slab should be laid evenly, carefully leveling the base and removing vegetation. A foundation pit is prepared for the entire area of the building being constructed, the depth of which reaches fifty centimeters (the cushion and the thickness of the slab are taken into account). Crushed stone and sand are poured onto the bottom in a layer of fifteen to thirty centimeters, taking into account the heaving of the soil. The layers are filled to a height of eight to twelve centimeters, and careful compaction is performed.
Waterproofing and insulation
We lay a layer of waterproofing material on the prepared pillow. Most often, roofing felt is used, from which two or three layers are made, leaving overlapping strips of fifteen to twenty centimeters.
A thermal insulation layer is laid over the rolled material. It is recommended to use foam boards or polypropylene foam as insulation. The main advantage of this material is its excellent thermal insulation properties, increased resistance to the negative effects of moisture and low temperature conditions. It is allowed to make the insulation layer from expanded clay, pouring a ten-centimeter layer.
Installation of slabs
To cover the entire foundation surface, you will need a certain number of ready-made reinforced concrete flat slabs. They are laid using lifting mechanisms as close to each other as possible. Product thickness parameters are determined taking into account the expected load forces created by the future object.
Under light outbuildings, it is enough to lay slabs of standard sizes, the thickness of which varies between twelve and fifteen centimeters. For the heaviest objects, slabs from twenty-five to thirty centimeters thick are used. The steel bars of the laid products are joined to create an overall reinforcing system. The surface of the laid slabs is carefully leveled relative to each element.
Concreting
There are gaps in the joining areas of the laid slabs, which should be sealed with a solution of sand and cement. To prepare the mixture, use cement material grade m 300 and higher and sand, taken in a proportional ratio of “one to three.” As soon as the solution has dried, a leveling screed is placed over the entire foundation surface.
To carry it out, use a similar mortar mixture, pouring a layer from three to five centimeters thick. The main goal is to form a perfectly smooth surface, for which during work you will have to use a building level for control and a rule that needs to be used to level the surface.
The next stage is to properly dry the poured screed, eliminating the appearance of cracks on the surface. To prevent the material from shrinking sharply, the surface layer is periodically moistened for eight to ten days. To retain moisture longer, it is recommended to cover the screed with polyethylene material.
Laying floor slabs on the foundation
One of the stages of building a house is laying floor slabs on the foundation. Most often, work of this kind begins after the concrete that was poured into the base box has completely matured. Floor slabs can simultaneously act as the ceiling of the basement and the floor of the main building. For those who are far from the topic of construction, it may seem that the process is not particularly difficult. However, experienced experts say that each construction process has its own subtleties and nuances that you should know about. This will help you install the slabs correctly and efficiently and avoid basic mistakes that can cause serious problems during the operation of your home.
- Rules for laying floor slabs
- Sequence of installation work
- Tying slabs with reinforcement
- Adjusting the dimensions of the floor slab
- Cross section
- Lengthwise cut
- Methods for covering large openings without slabs
- How to cut a hatch in a reinforced concrete floor
Required Tools
To arrange a slab foundation that meets the requirements of GOST, you will have to rent lifting equipment and prepare the following set of tools:
- for preparatory work - shovels, crowbars, picks, devices for compacting pillows;
- for installation work - a grinder, hammers and sledgehammers, scissors, pliers, a sharp knife;
- At the concreting stage, you will need a trowel and trowel, usually a spatula, a construction mixer, and a grater.
The quality of the work performed is checked by the construction level. In addition, a tape measure and a metal ruler will come in handy.
Laying slabs on the plinth
After preparation, they begin to lay the floor slabs on the foundation. Since the weight of the material is several tons, lifting mechanisms are used. The panels can be laid on cement mortar or on a dry surface. The first method is preferable because the installation will be further strengthened.
Here's how to properly create a slab floor:
- mix a thin solution;
- apply it to the foundation tape with a two-centimeter layer;
- arrange the reinforcement rod (sufficient diameter - 1-1.2 cm);
- then lay the floor slabs on the foundation with the smooth side inward, fitting them tightly using a crowbar.
Installation of the ceiling
It is not necessary to lay reinforcement, but this prevents the mortar from being squeezed out at the seams, and the joints are located at the same level. The overlap should be horizontal as much as possible. Reliability is achieved by fixing the hinges of adjacent reinforcement panels to each other. Each connecting node is connected by welding. The width of the area where the ceiling is supported on the plinth depends on the material from which the latter is built: the “overlap” on the brickwork should be no less than 125 mm, and on a reinforced concrete structure - at least 6 cm. These values are determined by the project.
Floor panels can rest on 2 or 3 sides, or completely along their perimeter.
The outermost and 1st slabs are laid with support on 2 sides. The gap between the 3rd side and the strip foundation can reach 0.25 m. It is sealed in various ways, for example, by constructing a reinforcing belt.
APPLICATION AREA
A standard technological map has been developed for the installation of flat monolithic reinforced concrete foundation slabs in general purpose buildings and structures with slab thicknesses up to 1200 mm.
The parameters of the monolithic reinforced concrete slab of the technological basement were taken on average based on those actually used in the projects of the Promstroyproekt Institute.
Reinforcement of foundation slab structures is assumed to be flat meshes and spatial frames; The joints of the mesh and frame reinforcement are overlapped, without welding, and spaced apart.
Calculation of labor costs, work schedule, need for material and technical resources, technical and economic indicators were carried out for a slab measuring 37.2 ´ 44.35 m (temperature block) with a thickness of 1.2 m (basic version).
This map also allows, using facets, to calculate the above indicators for a slab with a thickness of 0.8 and 0.4 m.
The technological map provides for the construction of a monolithic foundation slab using the unified dismountable formwork “Monolit-77”, enlarged into formwork panels.
Pouring concrete
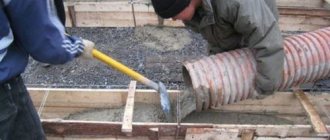
The final stage is pouring the load-bearing foundation slab. This process is carried out in one moment. Industrial concrete is purchased in advance in the required quantity. The poured surface is compacted using a deep vibrator or bayonet with a reinforcing rod.
Maintenance of the finished slab includes:
- covering with a rag previously moistened with water from a hose with a sprayer;
- wrapping with plastic film.
A self-made foundation acquires design strength in 28–30 days.
ORGANIZATION AND TECHNOLOGY OF WORK EXECUTION
Before installing the foundation slab, the following work must be completed:
drainage of surface water from the pit is organized;
access roads and roads have been constructed;
the paths of movement of mechanisms, places for storing reinforcing mesh and enlargement of formwork are indicated, installation equipment and devices are prepared;
concrete preparation for the foundations has been completed;
reinforcing mesh, frames and formwork kits were delivered in quantities to ensure uninterrupted operation for at least two shifts;
foundation acceptance certificates were drawn up in accordance with the as-built diagram;
Temporary electric lighting for workplaces was installed and electric welding machines were connected;
a geodetic alignment of the axes and marking of the position of the foundation slab were carried out in accordance with the project; marks are applied to the surface of the concrete preparation with paint, fixing the position of the working plane of the formwork panels.
The works covered by the map include:
auxiliary (unloading, storing, sorting reinforcing mesh, reinforced frames and formwork kits);
The entire range of work is carried out in accordance with SNiP 3.03.01-87.
Unloading and laying out of reinforcing mesh, reinforced frames, formwork elements, as well as installation of reinforced frames, mesh and formwork panels is carried out using a KS-2561D truck crane.
Reinforcing mesh and reinforcement frames arrive at the construction site in assembled form.
The assembly of formwork panels is carried out at the installation sites in a certain sequence:
the boards are laid with the working surface down, wooden slats are placed in the places where mounting and working fasteners are installed;
the overall dimensions of the panels are checked, wooden limiting bars are nailed along the contours of the panels;
the shields are connected to each other with spring clips or crimps;
at the locations of wooden slats, the boards are connected with bolts;
holes with a diameter of 18 - 20 mm are drilled in wooden slats in places where the ties pass;
fights are laid out on top of the shields;
fights with shields are connected with tension hooks with a wedge or screw lock;
on top of the contractions, rigidity ties are laid perpendicular to them, for which the same contractions are used;
contractions with ties are connected with bolts;
on the upper tier of contractions, mounting loops are strengthened;
Struts are attached to the lower tiers of the contractions or stiffeners, ensuring the stability of the panels in a vertical position.
The formwork is assembled from enlarged panels for a temperature block of 37.2 ´ 44.35 m.
Reinforcement work is carried out in the following order:
install the lower nets on the clamps, providing a protective layer of concrete according to the project;
install upper meshes on frames;
lay individual reinforcing bars.
When laying reinforcing mesh and frames, formwork panels should be secured to the latter through holes in wooden slats with wire.
Within the temperature block, concreting of the foundation slab is carried out with replaceable grips. The number of replaceable grips is determined based on the performance of the adopted mechanisms for concreting.
Within the shifting area, concreting should be carried out without interruption.
When constructing a working seam at the boundaries of interchangeable grips, it is recommended to use metal woven mesh with small cells as formwork.
The concrete mixture is supplied to the laying site using a concrete pump (basic option), tower cranes (option 2), and a concrete paver (option 3).
Concreting the slab using a concrete pump in combination with the required number of concrete mixer trucks is carried out on the first grip from the edge of the pit, and on subsequent grips - from the previously concreted grips of the foundation slab.
The concrete mixture should have a cone settlement within 4 - 12 cm.
The composition of the concrete mixture is selected in the construction laboratory.
When concreting a slab with a tower crane, the concrete mixture is supplied in rotary hoppers. The bunker is slung using a two-legged sling with a lifting capacity of 5 tons.
When concreting a slab with a concrete paver LBU-2, the concrete mixture should have a cone settlement within 1 - 4 cm.
The concrete mixture is laid in horizontal layers 0.3 - 0.5 m thick.
Each layer of concrete is carefully compacted using deep vibrators. Overlapping the previous layer of concrete with the next one must be done before the concrete in the previous layer begins to set.
Measures for the care of concrete during the period of strengthening, the order and timing of their implementation, control over the implementation of these measures must be carried out in accordance with the requirements of SNiP 3.03.01-87. The exposed concrete surfaces of the slab must be protected from moisture loss by watering them with water or covering them with damp materials. The holding period and frequency of watering are determined by the construction laboratory.
When carrying out work in winter conditions, measures are taken to ensure normal hardening of concrete with an expected average daily outside air temperature below 5 °C and a minimum daily temperature below 0 °C in accordance with SNiP 3.03.01-87.
Options for recommended machines and equipment when constructing a monolithic reinforced concrete foundation slab
Name of the set of machines and equipment
Digging a pit and installing formwork
In principle, there is nothing complicated about digging a pit. It is necessary to remove the soil to a certain depth. The main thing is to prevent deepening in any part of the pit.
If this suddenly happens, then there is no need to add soil or sand under any circumstances. Then you need to deepen the pit by this amount. The bottom is leveling out.
Next, the axles are divided along the cords. At the places where they intersect there will be the corners of the house. Sometimes pipes are laid under the foundation to drain runoff or rainwater.
Installation of mortgages for communications and installation of ring drainage around the perimeter of the foundation
The drainage pipe is laid in crushed stone, which is wrapped in high-density geotextile
Inspection wells of the drainage system are installed according to the level
After installing the embeds and drainage, we make a cushion of coarse sand with pouring and layer-by-layer compaction
Related:
How to make a foundation from 20x20x40 blocks
How to pour a strip foundation yourself: without special equipment and...
Technology of tying screw piles with timber, channel
The top layer of the cushion is made of crushed gravel
Installation of a waterproofing membrane
All seams are taped with bitumen tape
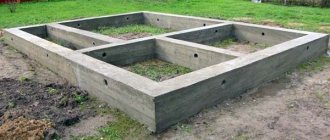
Formwork is made from durable construction boards. A frame is knocked out of it. The corners are strengthened. The inside is covered with film or roofing felt and is often insulated with polystyrene foam.
The sides are reinforced with spacers every 50-70 cm. On one side they are rested against the formwork, on the other - against the bottom or wall of the pit. It is also necessary to leave a working gap between the pit wall and the formwork. The formwork must be assembled evenly, without gaps. There should be no changes in it. Otherwise, there may be an overuse of concrete when pouring the foundation. This was discussed above.
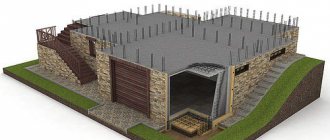
Construction of a monolithic foundation slab
A monolithic slab is the most reliable type of foundation. The design is selected if the future building will be located on an area with difficult soil. In practice, a monolithic slab is erected in the following cases:
- close location of groundwater;
- wetlands;
- peat bogs.
This type of foundation is also called floating in construction. The structure received this name because when the soil subsides or heaves, the foundation floats as if on waves. The base is a reinforced concrete slab. The monolithic slab reliably protects the walls of the building from deformation, since any changes in the soil spread across the surface of the foundation slab.
Advice! A foundation slab is an ideal solution for a house with two or more floors. Craftsmen also recommend choosing this type of construction for brick or block buildings.
A disadvantage of the design is the fact that with such a foundation it will be problematic to build a basement. This disadvantage can be circumvented if you choose a deep foundation. In this material we will analyze in detail the structure of the base, and also consider the process of preparing and installing a monolithic slab.
Design
The main parameter when designing a foundation slab is its thickness. The strength and other characteristics of the finished base depend on this. When calculating, take into account:
- characteristics of the soil on the site;
- expected mass of the building.
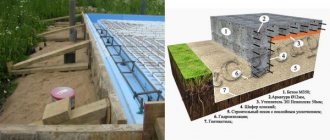
The design of a slab foundation includes the sequential arrangement of the following layers:
- a pit with soil compacted at the bottom;
- “pillow” made of sand;
- a layer of geotextile - the so-called footing (a drainage pipe is laid on top);
- a layer of crushed stone (prevents clogging of the drainage with soil);
- concrete screed;
- a layer of waterproofing (prevents the concrete from becoming saturated with moisture and cracking);
- extruded polystyrene foam for insulation (Penoplex is often used);
Schematic representation of a slab foundation
- waterproofing made of polyethylene film;
- reinforcement, installation step – 20–25 cm.
A reinforced concrete slab is laid on top of these layers.
Preparation for foundation construction
The construction of any type of foundation begins with preparatory operations; a monolithic slab is no exception. When a suitable scheme has been selected, preparatory work can begin:
- Selection of the “pie”. This definition refers to the composition and number of layers of which the slab will consist. In addition to concrete, the “pie” includes a sand cushion, as well as insulating layers.
- Selection of reinforcement method. To select a suitable structure, it is necessary to conduct an analysis of the soil, landscape, and also know the approximate load of the future building.
- Selection of suitable thermal insulation materials. The house will stand on a solid concrete slab, so it’s worth thinking about thermal insulation in advance.
- Waterproofing for walls. We are talking about structures that will rest on the edges of the base after construction is completed.
- Calculation of fortifications from armored belts, which are a mandatory requirement when constructing a building made of brickwork or blocks. Otherwise, cracks will form in the base and supporting structures.
Readers probably have a question: “Is it possible to build this type of foundation with your own hands?” In theory, this is possible, but many people must be involved when pouring concrete, since the foundation needs to be poured quickly and evenly. As for the preparatory stages, it is mandatory to participate in them.
How to choose a brand of cement
- M50 is suitable for the construction of light, auxiliary buildings (summer house on a summer cottage, garage, outbuildings).
- F-75 will be needed if the winter temperature is below minus 20 °C.
- For residential buildings, a grade of at least M200 with a water resistance level of 95% is required.
If you plan to pour the base at once, it is recommended to use the entire prepared volume of concrete in one day. If this is not possible, work is resumed at least 12 hours after the first layer has completely dried. Without this, cracks will form on the surface of the base due to the uneven distribution of uncured concrete.
Cement M400 for foundation
The process of constructing a monolithic foundation
It cannot be said that a monolithic slab is the most complex structure, but there will be more work here than with a strip, column or pile type of foundation. You should start construction and calculations only after consultation with professionals who will draw up a project for you. It is also recommended to take care of special equipment; it will significantly speed up the construction process.
Having studied the device, you can start working:
- The first step is to mark the site where construction will take place. The next step will be digging a pit - in construction this stage is called excavation.
- When the pit is dug, you can start laying insulating materials, the choice of which professional builders will advise you on. Quite often Dornit is used in the construction of slabs. This layer is placed to prevent sand from penetrating into the clay.
- Now you can move on to the sand cushion. The site is filled with crushed stone and sand, after which compaction is performed. The pillow is placed in several layers of about 10 centimeters each, the sand must be clean. This stage is performed using a vibrating plate. As an alternative, wooden tampers can be used.
- After the pillow, the laying of communications begins, which include water supply and sewerage.
- Next, concrete preparation is carried out. This is a 10-meter screed, which is located above the sand cushion. For this work, you can use M100 cement, since high quality is not required here. The solution is most often prepared from sand concrete grade M300.
- The concrete slab is already there, now you need to take care of waterproofing. For monolithic slabs, rolled materials are used, the installation of which is carried out using a special soldering iron or torch. This way they are securely attached to the base. The next waterproofing layer should be polystyrene foam; usually builders choose the extruded version. By performing additional waterproofing of the foundation, the owner will not have to insulate the floor of the basement or first floor.
- The result is a layer cake, onto which the device is mounted using reinforcement. The frame must be erected from two meshes; for this purpose it is necessary to purchase reinforcement bars of 12-16 millimeters. The connection of the rods should form cells of 20x20 and 30x30 centimeters. The first mesh should be placed at the bottom of the base of the monolithic slab, and the second - on top.
Scheme of reinforcement of a monolithic foundation slab
- Having completed all the above steps, you can proceed to installing the formwork. The supports must be secured as securely as possible, as the monolithic slab has very high pressure.
- Now the concrete mixture is poured again, the compaction of which must be done manually. Deep vibrators will help with this. Next, you need to smooth and level the concrete. Since the area is large, this process must be carried out by several people, the number of which depends on the size of the monolithic slab.
- The main work is completed - the slab should be covered with film and wait for complete hardening (usually this occurs 25-30 days after pouring). Concrete must be moistened once a week.
- Once fully cured, additional waterproofing work can be carried out if necessary. In any case, this is discussed when drawing up the project.
Scheme of waterproofing the foundation slab - the material is selected depending on the type of soil, climate and landscape. The builders who will draw up the project for the future construction will tell you in detail about this.
Construction technology of insulated slab
Energy saving is becoming a really hot topic, so few people build foundations without insulation anymore. Any slab foundation is a multi-layer structure, and in the case of insulation there are even more layers. To achieve the desired level of quality, each level must be carefully completed. Let's look at each in more detail.
Foundation structure: monolithic slab
Preparing the base
The dimensions of the pit for the monolithic slab must be at least 1 meter larger than the building itself. In this area, the fertile soil is completely removed. Its thickness varies in different regions - from 20-30 cm to 50 cm and more. In any case, everything is removed.
Dig a pit with a margin of 1 meter in all directions
Along the edge of the pit, just below the general bottom level, drainage pipes are laid to drain surface water into drainage wells. This measure is necessary so that the walls and the foundation itself do not get wet.
Complete foundation diagram monolithic slab
The bottom is leveled, the holes are filled in, the humps are removed, everything is carefully leveled to the horizon level and compacted. Geotextiles are rolled out onto the leveled bottom. It should cover not only the bottom, but also the walls. The canvases are spread with an overlap, the edges are glued together with reinforced tape. Geotextiles prevent plant roots from germinating and also prevent sand, which serves as a damping pad, from being washed away.
Leveling the bottom
Clean, medium-grain sand is poured onto the laid geotextile. The layer of sand is 20-30 cm. It is poured in thin layers, distributed evenly and compacted layer by layer. The layer of sand that can be properly compacted with a manual vibrating plate is 8-10 cm. These are the layers that sand is laid in. It must also be laid level, in an equal layer throughout the entire pit.
The sand is poured, it needs to be spilled and compacted
The thickness of the layer can be controlled using stretched cords. They are tied to driven stakes, specially made supports - benches, to formwork installed in a level (see photo below). All cords must be in a horizontal plane. Knowing the initial distance from the bottom of the pit to the tensioned threads, you can determine the height of the poured layer.
Crushed stone is poured onto the compacted sand. Fill the entire volume at once, distributing it evenly over the site. The leveled crushed stone is compacted to a high density.
Crushed stone is filled, sewerage and water pipes are installed
At this stage, sewer and water pipes are laid. Ditches of the required depth are dug in the already compacted crushed stone. They should be such that there is some space around the embedded elements. Pipes are laid in the ditches, filled with sand, leveled, and the sand is compacted with a shovel or board. More severe compaction may lead to cracks. That’s why the pipes are laid after compaction.
Concrete preparation
Formwork is placed around the perimeter of the pit. It is usually assembled from 40 mm thick boards or 18-21 mm plywood. The height of the formwork for a monolithic slab is the total thickness of the remaining layers. Along its edge it is convenient to control the level of concrete when pouring, so the board must be edged. To save material, you can set up the formwork only for preparation. After the concrete has set, it is dismantled and placed higher, reused to fill the main slab. But the loss of time with this approach is significant, so this is not always done.
In any case, the formwork is supported from the outside with stops and jibs. The structure must be rigid to support the mass of concrete.
A 100 mm layer of concrete is poured onto the compacted gravel. This can be low grade concrete - B7.5 - B10. Concrete preparation will be a reliable basis for laying waterproofing and insulation, and also serves to more evenly distribute the load from the house.
Concrete preparation poured
Waterproofing
Since the monolithic foundation slab is completely in the ground, it needs careful waterproofing. Therefore, two types of materials are usually used: coating and roll. The base is first thoroughly dust-free, then impregnated with diluted kerosene or solvent primer (and the sides of the concrete preparation are also coated). It is sold very thick and does not adhere well to concrete. As a result, the roll waterproofing adheres poorly and the foundation will get wet. When diluted, it becomes more fluid and penetrates deeper into the concrete. At the same time, it almost does not lose its properties.
When laying out rolled waterproofing, it is released 10-15 cm beyond the foundation. The panels are rolled out with an overlap, the connecting edges must be coated with bitumen mastic and pressed well. When laying out, you need to make sure that there are no creases or waves.
If the groundwater level is high, two layers of roll waterproofing may be needed. It is then rolled out crosswise and also glued onto a primer (bitumen waterproofing), but it can no longer be thinned.
Double waterproofing of a monolithic foundation slab - coating and roll
Of the rolled waterproofing materials, Gidroizol and TechnoNIKOL Technoelast EPP-4 on high-density polystyrene performed the best. Tekhnolnikol of this brand has a high tensile strength of about 60 kg, which increases the chances that it will not be damaged during further work. You shouldn’t use roofing felt, no matter how much you want to save money. In its modern version, it is too thin and brittle and quickly loses its properties. You cannot replace the waterproofing in the slab, so use the best material.
Capillary suction of moisture through the slab can also be reduced using liquid impregnations such as Betonite. It significantly reduces moisture absorption. Penetrates to a depth of 50-60 cm, so it saturates the concrete preparation through and through. The disadvantage of this material is its high price, but the properties of the material are excellent.
Insulation
To insulate the slab foundation, high-density extruded polystyrene foam is used. The thickness of the insulation layer is 10-15 cm, depending on the region (for the Middle Zone 10 cm is enough). Laying is carried out in at least two layers, overlapping the seams that form cold bridges. This requires more time, but heating costs will be lower. If the slabs have an L-shaped lock, they can be laid in one layer.
The insulation is laid
Since polystyrene foam is not friendly with petroleum products, a thick polyethylene film is spread on it, and then heat-insulating material is laid.
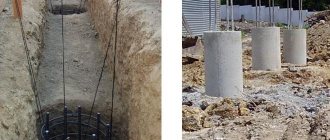
Reinforcement
For the reinforcing frame, ribbed reinforcement of class AIII, with a diameter of 12-14 mm, is used. It is laid lengthwise and crosswise, in increments of 15-30 cm, and can have one or two layers. It all depends on the type of soil and the mass of the building. All reinforcement parameters are calculated separately.
The reinforcement must be at a distance of at least 5 cm from the edge of the slab. Therefore, it is placed on special supports that provide the required clearance.
The first row of reinforcement is tied, some posts are exposed for tying the second belt
When reinforced, a cage is obtained; at each intersection, the rods are tied together with a special soft steel wire. There are also connection techniques - using plastic clamps or welding. Plastic clamps are quick to tie, but not everyone trusts them. It is not recommended to use welding, because the weld seam is the most vulnerable place to rust, and the connection is too rigid. When using wire and clamps, the entire structure can “play” a little without destroying the ligament, and when welding, such movements lead to the seam bursting. As a result, the reliability of such reinforcement is low.
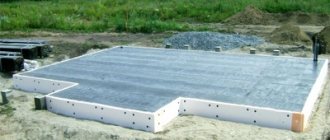
Pouring the foundation slab with concrete
The thickness of the slab is calculated for each specific case and can be from 20 cm to 50 cm. When pouring, use concrete of at least grade B30. The entire perimeter must be filled in one day, avoiding the appearance of vertical seams. Therefore, for concreting a slab foundation, ready-made concrete is most often delivered: large volumes are required within a certain period of time.
Simultaneously with the distribution of concrete, it is vibrated
The arrival schedule of the vehicles must be calculated so that you have time to distribute the first portion and compact it. For compaction, construction deep vibrators are used, which create high-frequency vibrations. As a result, all air is removed, the concrete mixes better, becomes more fluid and plastic. The result of this treatment is not only a smooth concrete surface, but also a higher hygroscopicity class.
As a last resort, you can fill the slab in horizontal layers. Vertical division in this case is unacceptable, since cracks are likely to appear at the joints.
Curing
For the normal process of concrete hardening, a sufficient level of humidity of 90-100% and temperatures above +5°C are required. It is advisable to fill the slab in warm weather with a temperature of about +20°C. This temperature regime is optimal for the hardening process. Caring for concrete monolithic slabs consists of preventing mechanical damage and maintaining moisture.
Immediately after laying, the concrete is covered with a diaper or tarpaulin. This prevents it from heating up from the sun, and the wind does not affect it. The film is glued into large panels. The strips are laid with an overlap of 10-15 cm and taped with tape. It is desirable that there be as few unlined joints as possible, that is, the shelter should consist of one or two pieces, if one is too inconvenient. In this case, individual pieces of film overlap each other by at least half a meter.
After pouring, the monolithic slab is covered with film
The dimensions of the film are such that the side surface of the formwork is also covered, and a load can be placed on the edges of the film, which will prevent the wind from lifting it. Also, with a load - boards - they press the place where the two panels overlap to reduce windage; they can be spread out on the surface.
If the air temperature is above +5°C, approximately 8 hours after pouring, the concrete is watered for the first time. Irrigation should be drip, not jet. To avoid damaging the surface with drops, you can lay burlap on it or sprinkle a layer of sawdust and cover it with film on top. The covering material is watered, and it maintains the moisture content of the concrete. In any case, watering is carried out only at temperatures above +5°C.
Polished surface
If there is a threat of frost, the slab and formwork are additionally insulated. You can use any heat-insulating materials, both those prepared for building a house, as well as sawdust, straw and other available materials.
When to remove formwork
For a monolithic slab, it is recommended to remove the formwork after the concrete has gained 70% of its design strength. This period depends on the temperature at which hardening occurs. This dependence is shown in the table.
Table of concrete strength gain depending on temperature
Positive and negative sides of a monolithic slab
If a foundation slab were the best solution, it would be used for absolutely all buildings. Like any type of foundation, a monolith has its pros and cons.
It's worth starting with the positives. These include maximum strength among other structures and durability (a building on a slab can last up to 150 years). The monolith can be used for different types of structures. If a deep foundation is chosen, then the slab becomes the floor for the first, basement or ground floor of the house.
The diagram demonstrates that a monolith can also be made in the strip foundation of a house.
The disadvantages include the high cost of work, because a foundation slab requires much more material than a standard strip or column base. Also avoid complicated calculations, which simply oblige you to contact a construction bureau. And the last thing is the labor intensity of the process, because workers have to perform a large amount of excavation work.
Recommendations
A similar algorithm is used to create pile-slab, pile-strip types of foundation. Due to their high load-bearing capacity, they are able to withstand, among other things, seasonal soil movements. To increase the strength of the foundation, it is made wider in size than the structure itself.
In private construction, slab foundations are used to build houses from various materials: brick, SIP panels, aerated concrete, solid wood beams.
If you are designing a structure yourself, you may need advice on how to make a foundation for a bathhouse from a monolithic slab, or how to properly make a foundation for an extension to a house. Here you will find the answer to the question in which cases a pipe foundation is needed, as well as technological requirements for a foundation cushion.
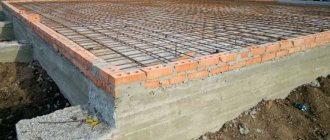
Reinforcement and sealing of seams
Brickwork around the perimeter of the floor
To increase the rigidity of the created structure and improve the stability of the slabs, an armored belt is created around the perimeter. The work technology is as follows:
- formwork is installed around the perimeter;
- reinforcement is placed inside;
- connect the rods in the structural units using wire or welding;
- pour concrete.
An alternative to armored belt is brickwork. It is laid out around the perimeter. The work uses reinforcing mesh to make the structure stronger.
Immediately after installation of the floors, the joints and remaining voids are sealed with cement mortar. In some cases, formwork is installed under wide seams.
Reinforced flooring has increased reliability. The period of operation of the building increases, it collapses more slowly. Sealing joints and voids can significantly reduce heat loss.
The process of laying floor slabs is shown in the video below. The laying of floor slabs on the plinth must be carried out in strict compliance with safety regulations. This will help avoid injury. Before installation, the panels and foundation surfaces in contact with them are prepared accordingly. After installation, in order to improve the performance characteristics of the created structure, reinforcement is performed and the joints are sealed. Compliance with installation technology allows you to achieve high-quality and durable results.
Carrying out preparatory work
Preliminary measures are intended to create conditions for further productive work and adherence to technology. The process begins with preparing the slabs and base surface.
The panels are first inspected for chips, protrusions, and compliance with geometric parameters. Detected defects are eliminated before installation work begins.
Then the ends are processed. Existing holes are closed in two ways:
- by laying bricks followed by filling with cement;
- filled with insulation, covering it with plaster.
Filling holes with bricks and cement mortar
The foundation is prepared as follows:
- using a level, determine the curvature of the base surface;
- Based on the magnitude of the differences, select the appropriate alignment option;
- when the discrepancies do not exceed 5 cm, then use a cement screed laid on a reinforcing mesh;
- for large differences, leveling is done using bricks.
The foundation assembled from blocks, before laying the slabs on it, is combined using a reinforced concrete belt.
The slabs are placed on a flat surface to minimize further costs of leveling the floor of the structure and to facilitate further construction work.
Mistakes and tips for construction
Technology violations include:
- Weak compaction of sand and crushed stone or insufficient thickness of these layers.
- Savings on reinforcement frames (laying one row instead of the minimum two, deviation from the recommended and design cross-section of the reinforcement to a smaller extent, laying welded mesh instead of strapping).
- Pouring mortar into leaky or weakly reinforced formwork.
- Concreting errors (conducting work under unsuitable conditions, pouring layers with technological breaks of more than 2 hours, displacement of the frame or communications during air expulsion or ignoring the need for concrete compaction, hardening without wetting the surface and film, excessively early removal of formwork).
A clear plan of action and the use of special equipment helps to simplify construction with your own hands. Expenses for renting or purchasing a vibrating plate, vibrators, or ordering mortar from a factory are always paid off by the reliability of the foundation and a reduction in work time.
Design and calculation of the reinforcing frame
Concrete has excellent resistance to compressive loads, but poor resistance to bending and tension. If we talk about building a house on a foundation slab, then it is subject to:
- the occurrence of a constant bending moment due to uneven load on different parts of the structure;
- periodic exposure associated with soil movements.
It is possible to actively resist alternating soil pressure using a metal frame. The so-called reinforcement belt copes well with bending and tensile forces, while concrete actively resists compression.
Reinforcement of a slab foundation is carried out unevenly, with additional reinforcement around the perimeter, as well as in the areas where walls and columns are located (experts call these areas squeeze-out zones). A slab of minimal thickness (up to 150 mm) requires single-layer reinforcement, while more massive structures require the construction of a reinforcing frame.
When determining the cell size, they rely on the design load. Thus, for brick walls, the reinforcement is fastened in increments of 200 mm, while when constructing lighter wooden or frame houses, the rods are knitted at a distance of 250–400 mm. At the same time, the width of the cell should not exceed the thickness of the foundation slab by more than 1.5 times. As for the pitch of the rods in the punching zones, there it is reduced by half. Such reinforcement of the frame helps prevent the appearance of cracks at the junction of load-bearing walls and columns.
The distance between the frame rods can be different and depends on the area that the slab covers
If, when installing an armored belt, the length of the rod is not enough to cover the longitudinal or transverse dimensions, then it is increased by rolling stock of the same diameter. The connection is made with an overlap of 40 rod diameters in length, that is, for reinforcement Ø14 mm, the joint will be 40x14 = 560 mm.
With frame reinforcement, the rods are mounted in two tiers, attached to vertical rods. The pitch between these structural elements may differ from the cell width by 1.5–2 times.
The ratio of the cross-sectional area of the foundation and steel reinforcement laid in the longitudinal or transverse direction is 0.3%. The minimum diameter of the rods is 10 mm - such rods are used for slabs with a side of up to 3 m. For larger structures, rolled sections with a cross section of 12, 14 and 16 mm are used. For vertical rods, rods with a minimum diameter of 6 mm are used, taking into account the method of fastening - welding or wire.
Reinforcement errors: 1 - it is prohibited to use stones as frame supports (spacers); 2 - vertical rods stuck into the ground will contribute to the spread of corrosion into the slab; 3 - there is no waterproofing that prevents the absorption of cement laitance into the soil
When calculating the reinforcing frame, it is necessary to protect the rods with a layer of concrete at least 20 mm thick, otherwise they will rust and collapse. To mount the frame at a distance from the drainage pad, use a variety of plastic clamps, as well as metal “hedgehogs” and “chairs”.
Main stages of construction
In principle, the technological procedure for pouring a slab foundation is not particularly complicated. This work includes several basic steps:
- markings are made at the site chosen for the construction;
- excavation work is being carried out;
- a crushed stone-sand cushion is laid at the bottom of the dug pit;
- formwork is installed;
- the reinforcement frame is installed;
- The concrete mixture is poured.
At the final stage, the formwork is removed from the finished foundation, and then, after the concrete gains strength, the construction of the building itself begins.