Even at the design stage of a summer building, it is worth paying special attention to the type of foundation, because it plays a key role in the service life and reliability of the structure. The best option for light-weight structures is a columnar foundation. In addition to the gazebo, it is perfect for building a bathhouse, garage, pergola, terrace, gazebo, outbuilding, frame house or timber structure.
Advantages and disadvantages
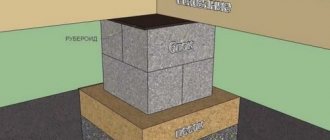
The standard type of columnar foundation is the required number of concrete pillars dug into the ground at a distance of up to 3 m from each other. The upper edges of the supports are tied with wood and reinforced concrete. The concrete pouring method can be used. Used in regions with stable soils.
Users often search for:
- Construction of a strip foundation
- We are building a brick foundation for a gazebo
Among the main advantages it is worth highlighting:
- Short creation time.
- There is no need to deepen the foundation much.
- Such a foundation can be built manually in a couple of days, without involving outside help or special equipment.
- Economical consumption of materials.
- No need for serious hydro- or thermal insulation.
- Inexpensive compared to other types of bases.
But the disadvantage of such a foundation is that it is suitable for structures with a volumetric weight of no more than 1000 kg/m3.
It is most often used under wooden, metal or brick gazebos. In the latter case, a grillage (a solid ribbon of concrete) is poured over the pillars.
It is not recommended to form a foundation from aerated concrete (gas blocks), sand-lime brick, or cinder block. These types of raw materials do not tolerate high humidity, so the service life of a building with such a foundation will be only a few years. In the future, the pillars will begin to crack and warp.
Why do distortions occur?
It's all about the soil: it sags and squeezes out (heaves). There are two main reasons for its deformation:
- Seal. Loose soil can become compacted under the weight of the structure. Especially under the influence of rain and melt water.
- Swelling. Water expands significantly when it freezes, increasing the volume of the soil. The pressure exerted on the foundation in the horizontal plane (on the foundation walls) is insignificant. But vertical heaving is very dangerous - it raises the foundation. Since soil moisture is uneven, the movement of the walls is also uneven along the entire length. This leads to deformation of supporting structures, the appearance of cracks, and distortion of door and window frames (even to the cracking of glass!).
Heaving soils include clays and alumina. From pebble and sandy areas the water “goes” down. Its remains, expanding when freezing, fill microvoids. No swelling occurs.
Distortions and swelling. The result of ground movement.
Which material to choose?
To get a reliable base for the gazebo, you need to purchase the appropriate type of material. These include:
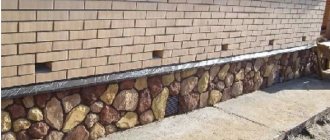
- Brick. It will be the right solution on dry sandy soil, where groundwater is quite low. Brick racks have good load-bearing capacity, so they are suitable for any outbuildings. Their height will depend on the climatic characteristics of the region (how strongly the soil freezes in winter) and the overall size of the base indicated in the drawing. The service life can be up to 100 years.
- FBS. Preparing and pouring such a base takes no more than 2 days. The standard block size is 20x20x40 cm. To make it, you do not need to wait for the concrete solution to dry completely. You can continue working just a day after filling it.
- Tree. Preparation of such a foundation includes mandatory treatment of logs with antiseptics and firing. However, due to low bearing capacity and instability to groundwater, this type of material is rarely used as the main one.
- Monolithic concrete. For such a foundation, it is important to fasten the formwork from wooden boards, fix the reinforcement frame inside it and fill it with concrete. To extend the life of the structure for the base of this type, it is necessary to make a cushion of crushed stone with sand, which will compact the position of the supports and prevent them from being pushed out of the ground during severe frosts and shrinkage of the gazebo.
- Foam concrete. Gained wide popularity due to its low cost and speed of creation. However, a foundation made of foam blocks requires special attention, since it is unstable to excessive moisture, like cinder block material. For it, it is imperative to create reliable heat and waterproofing. The latter is a cushion of sand and gravel; for the outer part, roofing material with bitumen mastic is suitable. Not recommended for use on heaving soil.
- Asbestos pipes. Such a foundation can be built quickly and cheaply. An excellent solution for loose, moving soil. The pipes are filled with concrete solution and reinforced with wire rods with a diameter of no more than 12 mm.
- Steel pipes. Suitable for use are pipes with a wall thickness of 4 mm and above. Before use, coat with a metal primer to protect against corrosion. Among all types of material they have the greatest load-bearing capacity. Such a foundation can easily support a gazebo with a massive stove, barbecue or barbecue.
An analogue of the latter type can be plastic pipes. In rare cases, natural stone can be used for the foundation, but laying it is a labor-intensive process and takes a lot of time.
Preliminary measures
You need to start building a 4 by 4 gazebo with design. At this stage, the location of the building is selected, as well as its appearance. The location should be on a flat area where there is dense soil and there are no roots or stumps.
To build the structure, you will need wooden beams with dimensions of 10 by 10 or 15 by 15. You can build a chopped gazebo using logs. The floor is usually covered with OSB boards or ordinary boards. Sometimes a concrete screed is made or tiles are laid.
The roof and walls are made of boards of various sizes: 75 by 2.5, 150 by 5 or 10 by 5 cm. Also, the use of logs and OSB boards is allowed for wall cladding.
Don’t forget about the material before creating the gazebo
It is best to give preference to wood. This material is easy to work with and construction is completed quite quickly.
To build a gazebo you will need the following tools:
- saw;
- hammer;
- screwdriver;
- level;
- tape measure and pencil for measurements;
- twine and wooden pegs for marking.
If concrete and tiles are used, then the list of tools will be supplemented with mortars, spatulas and the rules necessary to level the floor.
Carrying out calculations: number of pillars, depth
An important dimension of a columnar foundation for a gazebo is its depth. It depends on the type of material, design parameters and soil properties in the treated area.
Depending on the obtained indicator, the basis is:
- Unrecessed. The pillars are completely located on the soil surface. For reliability, the top layer of soil underneath is removed and a cushion of sand and crushed stone is made.
- Shallow. The depth of the supports is 35–75 cm from the soil level.
- Recessed. The pillars are installed in such a way that their depth is below the freezing point of the soil (from 2 m or more).
In some cases, the depth of the foundation in different places of the site may differ, then the maximum depth is taken as a basis.
The number of supports is determined by the following parameters: the size and weight of the gazebo.
The pillars must be placed under load-bearing beams, in corners, in the center, at the intersection of walls, under the stove (if one is provided).
The distance between them can vary from 1.5 to 3 m. The height of the supports must be at least 30 cm above the ground level. And in order to end up with a solid base structure, you must not forget to make a grillage.
The accuracy of the calculations will be ensured by the use of the “Foundation” computer program or its analogues. Therefore, for work you should prepare the following data in advance:
- location of the structure;
- depth of pillars;
- approximate weight of the building, including decorative elements;
- soil type and characteristics;
- groundwater depth;
- soil freezing level;
- winter temperature indicators;
- total weight of the foundation;
- possible climatic load (wind speed, volume of snow).
The result of the calculations will be the determination of the load-bearing capacity, size, cross-sectional area, and the required number of pillars.
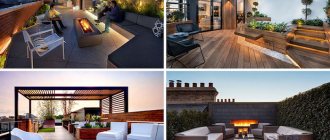
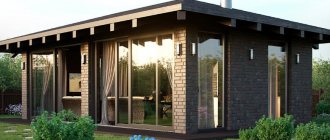
Photos of various options
Finally, I have prepared a selection of photographs that will help you decide on the choice of a particular gazebo.
Before building any standard gazebo, it is recommended to explore as many options as possible. Perhaps among them you will find the structure that you will definitely want to build in your summer cottage.
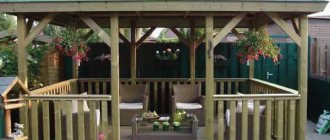
Simple and beautiful
The gazebos presented below do not differ in any serious architectural forms. They are made in the usual style, from simple material, but they look impressive. In the first photo, notice the beautiful decorative sheathing made in a semicircle.
Projects for the garden
A couple of examples that are ideal for a summer cottage. Dimensions of 3 by 4 meters allow twelve people to comfortably fit, that is, you can relax in a big way. If the area on your site allows you to install such a structure, then it is quite possible to consider it.
Construction company prices
If financial resources allow, then the installation of the foundation and the creation of the entire structure can be ordered from one of the construction companies. Specialists will carry out the work in accordance with the gazebo design, providing a guarantee for their services.
The price range in different cities may vary significantly. So, for 1 m3 of a columnar foundation in Moscow you will have to pay from 25 thousand rubles. And this is provided the ground is level and motionless. If the depth of the pillars is different, then the cost of 1 m3 will immediately double. In Kyiv, pouring this type of base will cost from 3,000 hryvnia per 1 m3.
In addition, at the request of the customer, the foreman goes to the site free of charge, carries out the necessary measurements and calculations, and draws up a cost estimate, thanks to which the consumer can choose the most profitable option for cooperation.
Features of a pile-bearing base for gazebos
Such a foundation is not so often used in the construction of gazebos, but it is considered no less reliable than the previous ones, and the cost is acceptable.
Luxurious option on a pile foundation
FOUNDATION FOR A HOUSE ON STILLS. THREE SOLUTIONS
The piles are simply screwed into the ground at the corners and along the walls of the structure. Even if the soil foundation is not reliable, such a building will stand for a very long time. Great option for a slope or right on the water.
Step-by-step instructions for creating a foundation with your own hands
To build a columnar foundation yourself, you need to prepare the necessary materials in advance. Among them:
- sand,
- crushed stone,
- brick,
- fittings,
- wooden boards, bars for formwork,
- anchors, brackets,
- concrete,
- roofing felt
The area is cleared of debris and vegetation. Level the surface. Next, the order of work is as follows:
- Places for supports are being marked.
- In the corners of the future structure, holes are dug for pillars, 50-70 cm deep, walls 30-40 cm wide. The distance between them can vary from 1.5 to 2 m. It all depends on the size of the gazebo.
- A layer of crushed stone is poured onto the bottom, then sand 20 cm high.
- A piece of roofing felt is placed on top.
- Concrete is poured at a level of 10 cm.
- The mixture needs to be given a couple of days to harden.
- Laying begins. 2 bricks are laid side by side on a layer of cement mortar. Mortar is applied again on top of them and a new pair of bricks is laid perpendicular to the first.
The average height of the pillar should be up to 50 cm above the ground surface. For a building measuring 3x3, 4x5 meters, 4-6 pillars will be enough.
After the laying of the pillars is completed, the first crown is attached and the creation of the base part of the structure begins.
Thus, with a little effort, you can build a foundation for a gazebo with your own hands, the quality and reliability of which will leave no doubt and will save you money.
Installation of flexible windows around the perimeter of the gazebo
Our large gazebo with wooden railings turned out to be very beautiful; it provided excellent protection from rain and sun, but, alas, it allowed air to pass freely, so staying inside was not very comfortable in windy weather.
We thought for a long time about how to cover the walls so as not to disturb the decorative effect. Ordinary plastic windows are not suitable for these purposes; they can only be installed in rectangular spaces - there will still be a draft under the railings. A friend saw some interesting soft windows somewhere and said they would suit us.
We searched the Internet and found it. A very convenient window option is PVC transparent material with special holes for fastening, which is thicker and stronger than ordinary polyethylene film. It can be ordered in the required width and length.
Each window is fixed along the entire perimeter of the canvas through eyelets - tightly in its upper part and using original latches on the sides and bottom. Such a window can be rolled up if necessary, secured under the roof overhang.
We decided to install these windows ourselves.
Stage 3. Construction of walls
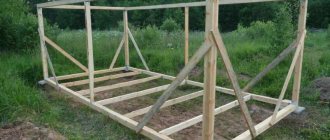
From the existing timber 100x100 mm, I cut 4 racks of 2 m each. They will be installed in the corners of the gazebo. I drilled holes at the ends of the posts and put them on the reinforcement bars. They didn’t really hold the vertical and tried to move at the most inopportune moment. Therefore, I fixed them with jibs, specially cut for this purpose in a miter box. The jibs were nailed to the floor boards and racks. Only after this the racks no longer leaned to the side and swayed from the wind.
Stands in the corners of the future gazebo
Once the corner posts were installed, I attached 6 more intermediate posts. I also fixed them with jibs.
Next, I cut off 4 beams and, by analogy with the lower frame, secured the top frame to the upper ends of the racks. The timber connection was also made in half a tree.
The turn of the horizontal railings came. They will form the walls of the gazebo, without which the entire structure will look like an ordinary canopy. I cut the railings from 100x100mm timber, and for the back wall I decided to save a little and took a 100x70mm board. This lightweight option is suitable exclusively for sheathing.
Gazebo frame with posts, railings and trim
To install the railings, I cut into the posts, installed horizontal rails in them, and hammered nails. Since it is assumed that people will lean on the railing, such a connection cannot be left. Additional fastening parts are needed for rigidity. For this purpose, I used additional jibs, which I tacked from the bottom of the railing. I didn’t install the jibs on the back wall; I decided to fasten the railings there with corners from below.
After everything was done, I began to work on the appearance of the wooden elements of the gazebo. To begin with, I sanded the entire wood using a grinder. I didn't have any other tool. So I took a grinder, put a sanding wheel on it and got to work. By the time I cleared everything out, a whole day had passed. I worked in a respirator and goggles, because a lot of dust was generated. At first she soared into the air, and then settled where she pleased. The entire structure was covered with it. I had to take a rag and a brush and clean all the dusty surfaces.
When there was no trace of dust left, I coated the wood with varnish in 2 layers. For this I used Rolax varnish stain, chestnut color. The structure shone and acquired a noble hue.
Gazebo frame painted with varnish-stain in 2 layers
How to dig deep?
The depth of the foundation depends on the type of soil and the depth of its freezing, characteristic of a particular region. You can roughly get your bearings using the following table, compiled according to SNiP (indicated in meters):
| Loams and clays | Fine sand (loamy sand) | Coarse sand | |
| Arkhangelsk | 1,56 | 1,90 | 2,04 |
| Pskov | 0,97 | 1,18 | 1,27 |
| N.Novgorod | 1,45 | 1,76 | 1,89 |
| Rostov-on-Don | 0,66 | 0,80 | 0,86 |
| Kazan | 1,43 | 1,75 | 1,87 |
| Surgut | 2,22 | 2,70 | 2,90 |
| Tyumen | 1,73 | 2,10 | 2,25 |
Maximum values: when drawing up SNiP, the most unfavorable conditions are taken into account. The presence of natural (snow, ice) and artificial insulation is not taken into account.
Even if the freezing depth is still far away: sand (not to be confused with sandy loam - fine, dusty, dense sand) does not swell significantly and can serve as a reliable support for the foundation.
Foundation depth. The freezing indicator becomes irrelevant when it is possible to “get to the bottom” of coarse sandy soil.
Construction of a foundation for a grill or barbecue
A structure with a heating and cooking device is equipped with two independent bases.
For gazebos with a barbecue or other stove, the best option would be to pour a strip foundation or a monolithic concrete slab. In the first case, the area under the stove must be tied to the main tape and immediately filled, not forgetting to mount a double horizontal belt of reinforcement.
On the barbecue area, the tape should be 20 cm above the floor level, or even more.
It should be remembered that in such buildings, according to the requirements of SNiP, it is necessary to provide for the possibility of access by a fire engine.
In addition, the part of the pipe that goes onto the roof is well insulated so as not to provoke a fire in the roofing material.