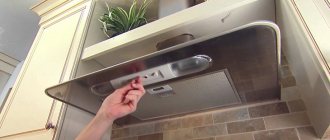
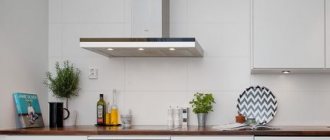
As you know, kitchen hoods come in classic and recirculating types.
The first discharges air into the ventilation shaft or directly to the street. The recirculation system simply pushes it through itself, trapping fat. It is designed with filters to remove odors from the air.
The main questions and problems arise when installing and connecting the classic version. We will consider it in as much detail as possible.
To begin with, we will briefly list the main mistakes that await you along this path. Below we present ways to solve them and the most popular installation methods.
Mistakes when installing a kitchen hood
1 Blind connection of the air duct to natural ventilation is the most common mistake.
Some people, of course, leave a grille for natural air movement, but still manage to block it with the air duct itself. 2 Connecting an air duct of too small a diameter through an adapter to a powerful hood with a large outlet flange.
Recommended dimensions for round air ducts are d=125mm. For rectangular ones - 204*60mm.
3 Exit the air duct to the street through a homemade hole in the wall.
In most cases, this is prohibited by the rules. Specific points will be given below in the text.
You can, of course, lay a separate box along the facade straight to the roof. But is it worth it? Although in restaurants and cafes located on the ground floors of high-rise buildings, this solution is widely used.
By the way, the ban on venting air to the street through a wall does not apply to private houses, but only to high-rise buildings.
4 Complex route geometry with a large number of transitions and curvatures.
First of all, this will affect the noise. Although, of course, the turns themselves are not the greatest evil. And sometimes you can’t do without them.
It is the turns that follow one after another, without acceleration sections, that are dangerous.
5 Connecting an overly powerful hood (for example, 1000 m3/h) to a standard ventilation duct, which is capable of passing about 300 m3/h.
Remember that a productivity of 200-300 m3/h is quite enough to effectively remove all odors, with minimal load on the ventilation of the house.
6 Installing the hood at the wrong height.
The installation height directly depends on what kind of stove you have - gas or induction hob.
7 Assembling a plastic ventilation duct without a good seal, or joining parts with superglue.
Believe me, sometimes this structure has to be disassembled.
8 Upper, rather than lower, location of the slots in the decorative grille in the same frame as the air duct.
Why this is a mistake, and when it is still possible to do this, is discussed below.
9 Lack of a separate outlet in the upper part of the wall for the hood.
As a result, connecting it haphazardly, through carriers and extension cords. Do not forget that in the end this is not a portable device, such as a fan, heater or mobile air conditioner.
This means that the wiring for it needs to be done stationary and wisely.
10 Incorrect installation of check valve.
It must be embedded and installed in compliance with the appropriate angles and inclinations. Otherwise it will work every other time.
In general, installation of a hood can be divided into two main stages. The first is its connection to electricity. The second is the air duct structure and everything connected with it.
Let's look at each of them separately.
Surface preparation
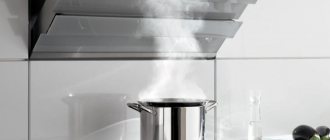
The hood helps eliminate unpleasant problems that usually arise during the cooking process: fat settling, evaporation, unpleasant persistent odors. She draws all the dirt into herself and removes it. But the full functioning of the device depends on its correct installation.
Before installing the hood, it is worth considering its location in advance. Of course, it should be installed above a gas stove, but you should also not forget to pay attention to the quality of the wall surface. For this reason, in order to choose the right area for installing this product, it is worth studying the important features:
- First of all, it is recommended to check the quality of the walls. To install this system, you should choose a strong and durable wall that is made of a high-quality base;
- the most suitable option for installing a hood is a wall surface made of concrete or brick;
- It is imperative to prepare fasteners; they must fully fit the selected base;
- When installing a hood, it is worth considering that it must be located above the stove at the correct height.
A wall made of concrete or brick is suitable for installation.
Particular importance is given to height; the correct functioning of this device depends on it. So, in order to correctly determine the required height level, you should follow the following recommendations:
- the permissible height above the surface of the electric stove is 65 cm;
- the maximum height above the surface of the gas height should be 75 cm;
- It is imperative that the lower limits be strictly observed, otherwise the device may fail during heating and melt;
- the upper boundaries of the product must be adjusted to the growth of the owner;
- You definitely need to know the correct width parameters, they should be the same as for a gas stove - 50-60 centimeters.
Once the surface for installation has been selected and a suitable hood model has been purchased, you can begin installation. The structure, which will be installed and connected in accordance with all rules and recommendations, will be able to last for a long time.
Connecting the hood to electricity
This stage is the simplest. It’s very good when initially planning your kitchen, you carefully planned the location of all sockets and electrical points.
You can find out how to avoid making a bunch of basic mistakes and maintain all distances in a separate article.
If you do not have a free socket for the hood, you will have to install it. To do this you will need the following materials:
- three-core cable VVGngLs 3*2.5mm2
For home wiring, use a cable of this particular brand (with the index Ls).
- regular 16A socket with grounding contacts
The hood itself, unlike other kitchen appliances, is a low-power device. Accordingly, it is not at all necessary to pull separate wiring under it directly from the switchboard.
The same cannot be said about the hob or dishwasher.
It turns out that this unit can be connected from a common socket group from the nearest distribution box.
Pull a groove or cable channel from the distribution box to the location of the future outlet and mount the socket box.
This outlet is located on top, almost under the ceiling, slightly above or to the side of the hood itself. The choice of a specific location will depend on the length of the cord and the requirement for the minimum installation height of the exhaust unit above the stove.
Often you have to cut a hole in the nearest kitchen cabinet for this purpose.
Next, remove the insulation from the cable, mark the cores and connect them together in the junction box.
All that remains is to connect the outlet correctly.
The wiring for the kitchen unit is ready. Let's move on to the air duct.
How to install a dome hood
In the modern market of household appliances, hoods with dome shapes are especially popular. They fit harmoniously into the kitchen space and cope with their functions perfectly. These products, in turn, are divided into several subtypes:
- fireplace (wall-mounted). These devices are fastened to the wall surface. The design of products of this type is similar to ventilation systems for fireplaces;
- corner. Hoods with this configuration are rare in kitchens. They are installed only in cases where the stove is in a corner;
- island. These options are installed only in large rooms, for example, in dining rooms. They are suitable when the gas stove is installed in the center of the room. The devices are fastened to the ceiling surface.
Types of hoods
In order to correctly install a dome hood, you need to know the main features of this process. It is advisable to entrust this work to professionals; they will be able to do everything correctly and efficiently.
Dome hood installation option
If you decide to install the hood yourself, be sure to remember a few important recommendations:
- To perform the installation, you need to connect the hood to the ventilation system and connect the device to the electrical network;
- It is advisable to furnish the kitchen area with furniture in advance, and only after that mark the location of the hood. In this case, it is necessary to take into account the height of this device;
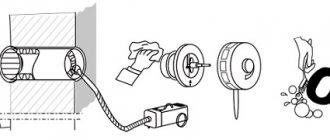
- Next you need to drill holes for the dowels. Using bolts, we mount supports onto which the base of the exhaust device is placed;
- after this, a special outlet of the exhaust device is connected to the corrugated air duct, and the tightness must be maintained;
- At the end, the operation of the hood is checked and the upper casing of the device is put on.
Connection requirements
The hood must be installed correctly, taking into account all important requirements. A prerequisite for installing this device is to ensure that the existing electrical outlet is grounded. If you do not know how this process is performed, then it is better to seek professional help.
Incorrect connection of the exhaust duct to the ventilation
The main problem during installation is to correctly connect the air duct without disturbing the natural ventilation in the apartment.
Some of the craftsmen generally advise taking the whole thing out into the street, through the nearest wall. However, according to SNiP it is prohibited to do this.
It clearly states that such a hole cannot be placed closer than 8m from the adjacent window. Since this window is considered a device for supplying outside air.
Here, read the paragraphs of the set of rules SP54 and SP60.
That is, drill a healthy hole in the wall, spend a lot of nerves and money, and the neighbor will complain about you, and you will be obligated to repair it all.
How do most consumers connect? An ordinary corrugation is taken, placed on the outlet, stretched and attached to a flange, which is screwed to the ventilation hole.
That's all. Simple, cheap and wrong. What are the disadvantages of this method? First of all, the noise.
When air passes through such a ribbed corrugation, it makes extremely unpleasant sounds.
But most importantly, when your device is turned off and not working, natural ventilation is forced to draw air from the apartment through the hood. Not only can your box be clogged, but in the summer there is sometimes no traction at all (due to the same temperature at home and outside).
Moreover, you are actually putting an oily mesh, motor, turbine, etc. in the path of the air. Also, air suction will not occur at the ceiling level, but at the level of the middle of the kitchen.
Although the collection of all odors of waste products should be carried out from the maximum height.
It is quite clear that in this case there will be no traction. That is, with your own hands you are depriving yourself of natural ventilation.
This threatens the occurrence of fungus and increased humidity. In the off-season, your doors will simply begin to swell and close poorly.
There will also be a lack of oxygen and constant poor health. At the same time, someone falls into mysticism and begins to think that they have been damaged or the apartment has bad energy, but in fact, there it is - improper ventilation!
Initially, in Soviet times, when designing our multi-story buildings, engineers expected that air would flow into the apartment due to leaks in wooden windows.
However, with the installation of plastic windows and sealed doors, we thereby blocked this channel of fresh air in the house. You will also close the ventilation and you will live like in a submarine.
To correct the situation in such cases, it is recommended to install a supply valve on a plastic window.
Instead of clogging, you can do everything more intelligently. What alternative options are used for this?
Operating standards and care rules
Conditions of use and timely service are the key to the longevity of kitchen appliances. It is not surprising that devices with a warranty period of 1-3 years, if certain rules are followed, will easily work for 8-10 years without requiring expensive repairs.
Safe use of the device
In order for the hood in the kitchen to function without problems, you must initially install it correctly and connect it to communications - power supply and ventilation. There shouldn't be any distortions.
When tested, the device will operate quietly, producing an acceptable noise level. Creaking, crackling and other extraneous sounds are evidence of errors made during installation.
Immediately after installation of the equipment, you should check the functionality and noise level. You can use a real noise level meter, if available, or an app of the same name by downloading it to your smartphone
It is strictly forbidden to use a household exhaust device in production - only for its intended purpose. Otherwise, the owner will lose the warranty.
In addition, the following actions are prohibited:
- close or plug the openings on the product body;
- limit or completely block the free flow of air during operation of the device;
- connect the air duct to the duct to remove smoke and other hot emissions;
- carry out repair or maintenance operations without disconnecting the hood from the electrical network.
Such prohibitions are related to the safety of users and the equipment itself - violation of the rules will result in failure of the fan, without which the device will not be able to function.
When the final stage of preparing a dish is a flambé, for example, a delicious steak is about to convey subtle notes of aged cognac, you should carry out the process extremely carefully to avoid burning the fat filters
Do-it-yourself equipment maintenance
Carrying out maintenance work depends on the frequency of use of the hood, the nature of the dishes being constructed and the mode selected for its operation. It is important to remember that maintenance is carried out when the device is completely disconnected from the electrical network.
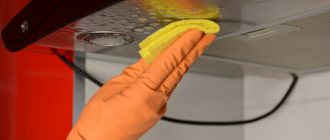
Caring for the product consists of monthly washing of the grease filters - you need to remove them and remove traces of soot and dust with a soap solution and a soft sponge. Leave to dry at room temperature.
Ignoring the rules for cleaning grease traps can lead to accidental fire and damage to the exhaust equipment. Moreover, dirty filters can cause poor filter performance.
If you have and use the recirculation mode, you will have to change the carbon filters. This is done on average every 4-6 months. The frequency depends entirely on the device model and its manufacturer's recommendations.
If the installed equipment is only capable of evacuating exhaust air from the room, then there will be no need for additional expenses on the purchase of filtering devices.
In addition, the device needs to regularly remove dirt from the surface of the case - with a soft rag soaked in a soap solution, you will have to wipe off stains formed during operation.
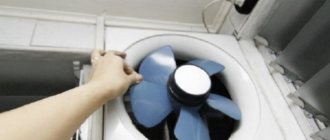
The same procedure should be repeated on all parts of the device that are inside the device and that can be reached. Particular attention should be paid to cleaning the fan blades - an excessive amount of waste accumulated on them leads to a decrease in hood power.
You can remove stains with any dishwashing detergent. The main thing is that it does not contain coarse inclusions that can scratch the surface of the filter or the housing of kitchen appliances
If the light bulbs burn out, you will have to replace them with new ones, choosing the same power and size. If any mechanism breaks down, it is better to contact a service center for help without trying to fix the problem on your own.
Hood duct and grille with non-return valve
The first is that instead of corrugation, a plastic pipe is taken (for example, d-125mm), and through one or several bends it is led into the hole in the ventilation duct. In this case, a certain division is made in the hole itself under the ceiling.
An entrance to the pipe is mounted on top, and a small rectangle is left below through a grate with a valve for natural inflow.
Moreover, the grille should be at the bottom, and not at the top. Otherwise, the air flow from the hood will blow upward and lift the so-called non-return valve.
Although, of course, if you have a more advanced valve design - a circle or rectangle with an offset axis, and not simple strips of polyethylene, or there is a solid partition, then you can safely install it as you want - on top, side, bottom.
However, in fact, this whole structure often does not work as intended. When you turn on the exhaust unit and create pressure, a small part of the dust still seeps through the cracks and micro-holes, after which it safely ends up in your kitchen on the dining table.
No check valves are 100% effective. The bulk of the air, of course, goes outside, but the gradual formation of dust inside the apartment is a fact.
And even when the hood is turned off due to the reduction in the diameter of the original hole, natural ventilation through narrow grilles will be much worse.
Everything can be done much better.
Hood operating rules
In order for the air purifier to serve flawlessly for many years, it is important to comply with the requirements for safe operation. Consider these important rules:
- Hood installation . The required distance from the surface of the stove is at least 70 cm. This measure can prevent damage to the device from exposure to high temperatures when used with gas and electric stoves.
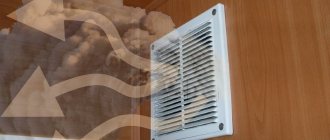
- Presence of draft in ventilation . We check this parameter before installing the device. If the air is moving poorly, it is better to clean the shaft.
- Air duct installation . An air duct that is too long and straight increases the noise level of the device and significantly reduces its performance.
Types of air ducts
- Power regulator . Available on almost all modern devices. It is not recommended to use maximum power immediately after switching on. It is worth starting operation with a minimum air flow speed, gradually increasing it. This creates ideal conditions for soft operation of the engine, which is less damaged by starting currents.
- Surface care . It is recommended to use mild detergents in combination with water. Do not over-water the device with cleaning solution. For safety reasons, experts advise carrying out wet cleaning by disconnecting the hood from the power supply.
Grease stains are removed with a soft sponge or cloth, without the use of abrasive
- Connection to the power supply network . For a safe connection, it is important to create conditions under which the device cable does not overheat from a working stove.
- Timely and regular replacement of filters . Or their cleansing. On average, replacement is required once every 3-6 months. A rarer one is not recommended due to the high load on the motor.
Grease filters need to be washed when they are visually dirty.
Correct connection of the air duct to the ventilation system
For this you will need:
- plastic air duct
- offset check valve
- tee splitter
In the end, you should end up with something like this.
How does it all work? When the hood is turned off, the valve will be open and warm air from the kitchen will quietly flow by gravity into the ventilation duct. As soon as you turn on the exhaust hood, the valve immediately closes automatically, blocking the air flow into the room.
In this case, all odors from the stove will easily go outside. When switched off, the pressure in the box drops and the valve automatically opens, connecting the ventilation shaft to the apartment.
Performance, filters, management
According to sanitary standards for kitchen premises, tenfold air changes are recommended every hour. Therefore, when calculating the performance of the hood, you should focus on the volume of the kitchen, expressed in cubic meters. To do this, you need to multiply the length, width and height of the room, and increase the resulting result ten times.
For example, for a kitchen with an area of three by four meters and a ceiling height of three meters, you will need a hood with a capacity of (3 m X 4 m X 3 m X 10) 360 cubic meters per hour. And this is the minimum value.
Sellers recommend purchasing a kitchen hood with some power reserve. If the performance of the device is lower, it simply will not cope with cleaning the kitchen air from contaminants. How to calculate the power of a kitchen hood is written in detail here.
Grease filters vary in composition as follows:
- organic (based on synthetic winterizer);
- paper (based on non-woven fabric);
- synthetic (acrylic based);
- metal (aluminum or steel).
Paper filters are a disposable option and need to be replaced with new ones every time they become dirty. Synthetic analogues can be washed, but this must be done very carefully, as they are easily damaged. They will also have to be replaced from time to time, although not as often as paper ones.
Metal filters are considered the most reliable; they are wear-resistant cassettes. Coal varieties, which are used only in recirculating installations, also cannot be purified. They must be replaced promptly, otherwise the performance of the hood may be significantly reduced.
When choosing a hood, you should pay attention to its type of control. Electronic control usually allows:
- automatically adjust performance levels;
- change operating modes;
- configure the device to turn on and off automatically;
- turning on the built-in lighting when there is movement near the stove;
- light indication of filter status, etc.
Among the useful functions of a hood built into a cabinet, one can note the residual mode: the fans run for some time after the hood is turned off to ensure the most complete removal of contaminants.
The additional ventilation mode allows you to automatically start the hood at low power at certain intervals to maintain optimal air exchange in the kitchen.
Assembly instructions - all numbers and performance
How does this all come together in practice? For capacities up to 300 m3/h (low speeds of most hoods), a d-125mm pipe is sufficient. On the device itself, the outlet hole may be larger.
For example, for 650 m3/h you will need a d-150mm pipe. However, you are unlikely to find such plastic pipes, and if you use the next standard size d-160mm, it will turn out to be a huge and awkward structure that spoils the entire interior and design of the kitchen.
Moreover, you will have to drill a factory hole for the ventilation duct in the wall, expanding it.
Therefore, in most cases, the optimal diameter of 125 mm is chosen. And you don’t need more.
The forced throughput capacity of standard channels and shafts with dimensions of 100*150mm is 400 m3/h.
An air flow of more than 450 m3/h simply will not fit there (it was tested in practice), even if it says 1200 m3/h on your hood!
Remember also that you cannot underestimate the diameter of the air duct too much compared to the outlet pipe on the hood. Otherwise, the vibration and noise will be so strong that the structure will have to be re-glued every month.
The connection of different diameters is made using special adapters.
Let's start assembling. First, install the adapter on the hood and connect the vertical section to it.
To improve its sound insulation, it makes sense to go crazy and stick a 5mm thick heat-sound-insulating material on top.
It wouldn’t hurt for them to cover the inside of the decorative casing and the noisiest part - the adapter. This is where the greatest turbulence occurs.
Next, add 90-degree elbows and other straight sections of duct as necessary to ultimately exit toward the hole in the wall.
All this is glued together with silicone, no superglues. There should be no gaps anywhere.
We reach the tee. A valve is installed in it from the side of the room.
Keep in mind that this is a gravity valve! It opens not due to air flow, but due to its weight.
One half of it is heavier than the other and at the same time it is installed at a slight angle of 2 degrees.
How to harmoniously fit an air duct into the kitchen interior
For a scrupulous housewife, this issue is no less important than the efficiency of ventilation.
There are several ways to hide the air duct:
- The easiest way is to place the pipes behind, inside or above wall cabinets. This method does not require additional costs.
- If there is a ceiling with two levels, the air duct can be placed between them. If the kitchen has a suspended ceiling, then the air duct can be placed directly above it. In this case, the air path will be completely invisible.
- To mask the pipes, you can use a special rectangular box. If you experiment with the color of this interior element and install pendant lamps, your kitchen will be transformed. At the same time, it is possible to quickly access the pipes in case repairs are required.
- Another option is to simply paint the pipes in a tone that matches the overall design of the room. You can use modern materials and organically fit the air duct into your kitchen.
It is best to buy pipes, hood and adapters at the same time, or it is better to buy a ready-made kit. Manufacturers offer a wide selection of such options. This will avoid difficulties with choosing a color scheme and save your time.
Preparing the ventilation shaft hole
Before all installation work, it is advisable to plaster the entry into the ventilation shaft itself and remove all sharp corners. This will give the entrance maximum aerodynamic qualities.
You should end up with approximately the same surface as a standard 90 degree round elbow.
It is recommended to add ceresit liquid (ceresit CT99) to the plaster solution.
This hole will be exposed to fat and moisture. And ceresite contains components that prevent the formation of mold.
However, do not use gypsum plaster under any circumstances. Its use in ventilation shafts is a direct path to the appearance of mold and fungi.
Attach sections of a standard air duct to the tee on both sides. From the side of the wall, 5-7 cm, wall it up in the ventilation duct. The exit itself is decorated with a square frame.
Select duct size
Hood performance is reduced by two factors:
- The presence of 90 degree turns (sharp corners are not allowed at all).
- Reducing the cross-sectional area of the ventilation tract.
How does what has been said relate to the everyday life in which we live? The ventilation ducts of most buildings traditionally have a diameter of 14 cm. Square shafts are built with a side of 13 cm. It is not difficult to guess that when connecting an air duct with a smaller cross-section, we partially use the passage. Rework will become the bottleneck of the channel. Conversely, an air duct with an excessively large cross-section will not bring much benefit, since the duct narrows further. It would be correct to evaluate the dimensions before choosing a hood. You should buy an umbrella or air ducts after understanding how well the products will work together.
Why does the check valve sometimes not work and close?
On the kitchen side, a check valve is mounted on the tee. In the factory version it will be quite long. In this case, it is better to shorten it so that this “gun” does not stick out too much.
The valve is inserted inside a section of a standard air duct d-125mm, and this air duct is put on and siliconized onto the tee.
If this whole structure seems too cumbersome to you, and the protruding pipe with the valve is not very aesthetically pleasing, you can do it a little differently. You make the air duct not with a round pipe, but with rectangular channels.
In this case, you install the above check valve on a straight section, as close as possible to the turn.
You can't achieve a factory connection here, so you'll have to farm collectively. Buy a rectangular tee with a round outlet on one side. Next, this round timber is cut off and a check valve is glued in its place.
The valve is placed strictly at an angle (2 degrees). Otherwise, it will open every once in a while or not open at all.
Many people have encountered this problem and easily solved it this way.
The damper itself is also mounted with a vertical deviation. The upper turning point, based on the hour dial, is at 13.00 (1 o'clock), and the lower one is at 17.00 (5 o'clock). This is if your flow direction is from right to left.
Otherwise, the circle is placed at the 11 o'clock - 7 o'clock position.
For more reliable operation and stable opening of the damper, you can stick some kind of weighting material (no more than 2 grams) on one side. Glue it close to the edge.
By the way, do not throw away the previously cut round pipe. It is tightly inserted onto the valve from above, after which a decorative grille diffuser is mounted on it.
What nuances might there be with this method? If your hood stands exactly above the entrance to the ventilation shaft, and the duct pipe goes straight, without any turns in the horizontal plane, then the valve installed on such a straight section does not work normally, at least at 1st speed.
You will simply have nowhere to get the increased pressure to close it. The air will fly through this “turn” in a straight line. You definitely need an angle.
The valve cover and its rotating mechanisms are easy to clean and do not be afraid of them becoming overgrown with grease. For this to happen, you will have to fry huge wild boars on the stove and stew them in your oven for several hours a day, no less.
If you don’t want to see a protruding “hollow” under the ceiling at all, then, as an option, you can install a tee so that the middle elbow rests against the wall, otherwise, where the valve is located, it would look to the side. In this case, also close the hole with a decorative cover.
Everything will look much nicer. However, due to the additional rotation, the performance of natural ventilation will deteriorate slightly. And the grill will reduce it by another twenty percent.
In addition, it will no longer be possible to clean the channel by hand or with a vacuum cleaner. But many do this deliberately and even hide the entire structure in a wooden or plastic box.
As they say, beauty requires sacrifice.
Tools for work
To hang and connect a hood in the kitchen, prepare the following set of tools:
- electric drill;
- drills with a diameter of 6–8 mm, equipped with carbide brazing for drilling walls;
- core drill or jigsaw for cutting openings in wooden furniture walls;
- building level;
- roulette;
- hammer;
- screwdrivers and pliers.
To secure the air duct, prepare brackets and appropriate fasteners. The corrugated pipe should be connected to the branch pipe and the ventilation duct grille in the kitchen using tightening clamps, sold in automotive and hardware stores.
Why does the air from the kitchen get to the neighbors - is the hood to blame?
Despite all the advantages, such a hood connection system has many critics. They believe that in this way you are rudely interfering with the overall ventilation system of the entire house.
For example, everything will be fine with you, but have you thought about your neighbors? Allegedly, due to this connection of the hood to the ventilation, all odors from your kitchen will automatically penetrate into the apartments through the riser above.
They started frying pies, and all the neighbors already knew about it. However, all critics are mistaken based on misconceptions about the ventilation system in apartment buildings.
They think that from bottom to top there is one common channel 110*150mm with “holes” for each apartment.
In fact, in 5 floors, all the channels are individual and you are unlikely to be able to blow out extraneous odors from your neighbors. In houses of 6 floors and above, there is already a ventilation system with air removal through satellite channels, connecting to a common collection channel through one floor.
This common channel has a cross-sectional area 6-8 times larger than individual shafts in apartments with dimensions of 110 * 150 mm.
Schematically, such a ventilation system for a multi-story building can be represented like this.
Yes, in such buildings, if several hoods are turned on at the same time to the maximum, reverse draft may occur. But this is an extremely rare case.
Look - the natural draft from apartments, at best, ranges from 100 to 150 m3/h. You have a nine-story house. The first seven floors are embedded in a common channel measuring 510*270mm, or even more. The total natural flow in it is about 1000 m3/h.
And then, instead of the usual draft of 150, you turn on your hood at 300 m3/h. Do you think it is capable of creating reverse draft in this case and starting to expel air to the neighbors?
To do this, it is necessary that all 6 floors do the same thing, and at maximum speed.
Then one apartment will be unlucky and its inhabitants will have to smell all the aromas of their neighbors’ cooking. But this option is unlikely.
Despite all this, sometimes the air from your kitchen actually gets into other apartments in the house. Or, on the contrary, you have a great feeling that your neighbors are grilling you for lunch today. Why does this happen and where to look for the reason?
This happens for several reasons. For which ones, read in more detail under the spoiler.
Why does the smell from your apartment penetrate to your neighbors?
Types of kitchen hoods
Modern manufacturers keep up with the times. There are many options for ventilation systems with different functionality. A high-quality assistant can not only quickly eliminate unnecessary odors, but also prevent the appearance of soot and sticky grease deposits on your favorite furniture.
Taking into account the specific parameters of the room and our style preferences, we can select certain designs.
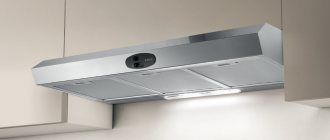
Hanging
Inexpensive and common option. Installation takes place directly above the kitchen stove. The equipment includes a motor, fan and filters. The mechanism sucks in air, purifies it and releases it into the environment. Filters need to be changed when they become dirty. The design is compact and does not have a connection to the ventilation system. Will fit even in the smallest kitchen.
It is quite possible to use this simplest option
Built-in
The laconic design is mounted together with the cabinet, which is located above the stove. It has a telescopic fragment, which allows you to significantly increase the working surface area of the unit with one movement of the hand. Can be used with a connection to ventilation, or with the use of cleaning filters.
For lovers of built-in technology it will be indispensable
Dome
They are one of the powerful units. They should be used when arranging large kitchens. They have a wide range of design solutions to suit every taste. They work most efficiently due to their ventilation.
The dome system is well suited for air purification
Corner
Allows you to apply non-standard planning solutions when decorating the kitchen space. Now important equipment can be placed in any corner and provide a comfortable atmosphere without compromising the decor. Such a hood can even be built-in or domed.
Design solution for air purification in high-tech style
Island and T-shaped hoods
Work effectively over large areas. Technical features allow you to mount the unit on the wall, on the ceiling, near the stove or above the stove. Refers to high-power systems.
A properly selected design not only cleans the air, but also gives the room a complete look.
Hoods are distinguished according to their operating principle.
Read the review of models of hoods without venting, and also study the selection rules in a special article on our portal.
Standard type, also known as flow-through
Requires mandatory connection to the general building ventilation system or installation of a separate outlet to the street. The latter is especially relevant when carrying out work in old houses.
A heavily polluted or narrow air shaft will not allow even the most advanced design to operate at full capacity. Accordingly, one cannot expect more or less high-quality results without dedicated ventilation.
The problem is not so significant when it comes to the kitchen in a new home. If the ventilation is working properly, you just need to connect a new device to it.
More often found in dome hoods.
Recirculation type
Used in mounted and built-in units. The device filters the air, absorbing steam and foreign odors. In the most advanced models, cleaning involves two stages. At first, the air passes through the filter, entering the internal tank. This is how heavy particles such as fat, soot and soot are captured. Next, a fine carbon filter is put into operation. It is responsible for removing unpleasant odors.
Combined type
Such progressive devices make it possible to use one of two types of work depending on the situation. Switching makes the hood universal, convenient for frequent moves.
Remember to regularly replace or clean filters
Video - Choosing a kitchen hood
Prices for kitchen hoods
Kitchen hoods
What is needed for installation?
To secure and install the exhaust system you need:
- corrugation - for venting air into the ventilation duct.
Advice: it is better to choose plastic corrugation rather than aluminum. It looks more beautiful and works silently
- clamps (2 pcs.) - to install the corrugation on the hood;
- grill for ventilation shaft;
- screwdriver (for a wooden wall);
- hammer drill or impact drill (for a concrete wall);
- hacksaw and sandpaper (for cutting and processing pipes);
- jigsaw - for making a hole in a cabinet or shelf (if the system is built-in);
- level, tape measure, marker - for marking;
- knife;
- screwdriver;
- sealant (silicone) – for sealing cracks and joints between structural elements.
Be sure to: carry out all work wearing gloves and goggles!
Hood with ventilation outlet: parameters and selection criteria
Having decided on the design of the device and the design style of the room, we proceed to the most important stage - selecting a kitchen hood. When choosing a household unit, it is important to consider the location of the gas or electric stove in the kitchen. As for the selection criteria taking into account the technical characteristics and parameters of the device, this issue is worth dwelling on in more detail.
Modern hood in the kitchen interior
Performance
Performance is one of the main characteristics of the device, by which its ability to remove a given volume of air per unit of time (in 1 hour) is assessed.
This parameter is easy to calculate independently: the area of the room is multiplied by the height of the room and the final value is multiplied by 10. Based on the resulting figure, the need for hourly oxygen renewal is judged.
For studio apartments, it is better to purchase units with a power reserve
Experienced experts recommend multiplying the calculated value by 1.3. Using the specified coefficient, a more accurate performance of the unit is obtained, where the presence of contaminants and the length of the air channel are already taken into account. Obviously, it is better to purchase a model with a 15-20% performance reserve, because... A device that constantly operates at the limit of its capabilities quickly exhausts its intended resource and makes a lot of noise.
Kitchen hood with ventilation outlet - dimensions
In the case under consideration, they are guided by a simple relationship - the area of the working area of the hood must correspond to (and sometimes slightly exceed) the area of the stove or hob. Everything is obvious here - a small hood does not have enough power to remove the entire volume of polluted air. As a result, the kitchen will always be filled with steam from cooking food, particles of fat, and a sticky layer will certainly form on the furniture.
Kitchen hood with retractable work surface
Noise level during operation
Each household appliance makes a certain noise when operating. It is measured in special units - dB (decibels). Each person has an individual sound sensitivity, and therefore each person has their own reaction to noise. Values in the range from 35 to 50 dB are considered comfortable.
A quiet conversation between 2 people is audibly within 40-45 dB, taking into account a distance of 2-3 meters. If you approach the source of acoustic waves by 1 meter, the value will increase to 60-65 dB.
Noise levels
The limit value is 70 dB at maximum fan speed. Almost all modern devices equipped with reliable electric motors have the appropriate technical data. Despite their higher cost, this is the case when the price is completely justified. However, if noise is not important, then it is better to take a closer look at more affordable units.
Control Panel
The ease of working with a household device also depends on the control panel. In the case of a hood, this is either a push-button control or a touch panel. Modern models are equipped with a number of sensors that monitor humidity and temperature in the working area. Taking into account the received data, the device automatically switches to the optimal operating mode, which is very convenient and practical.
Kitchen hood with touch control
When purchasing a unit with mechanical control, we recommend that you evaluate the convenience of placing controls and buttons on the front panel of the device. The main criterion is to be in line of sight, which will allow you not to be distracted from preparing dishes every 2-3 minutes.
In terms of ease of use, systems with programmable electronic control are unrivaled. Having installed the program and adjusted its operation just once, in the future it will be enough to simply select it from the available list.
Island hood with ventilation outlet
Housing materials
Hoods with bodies made of 3 main materials are available for sale. Budget models are equipped with metal structures decorated with enamels. These solutions are durable and look beautiful, but they require careful maintenance and careful operation.
The most expensive and elegant are devices made of polished stainless steel. They are distinguished by their structural lightness and ease of maintenance.
The hood is formed from modules built into the ceiling and connected to a remote filter
The main material for the housing of type 3 devices is tempered glass. This option can be safely recommended to owners with refined taste. Such devices look stylish, but cleaning them requires time and certain skills, because... marks and stains remain on the glass surface.
Before purchasing, it is important to decide on the main parameters of the device, to distinguish among them the primary and secondary ones. It is necessary that a household appliance combine functionality and an appearance that matches the interior.
At what height from the stove should the hood be installed?
The height of the hood above the electric stove is no less than 70 cm. The device can be installed above the gas hob at a distance of no less than 80 cm.
Before installing the exhaust system, I had to ask the experts for their opinion on this matter. Some said that the distance between the gas stove and the hood could be 70 cm. Allegedly, this is enough for all the fumes to escape.
However, remember that hotter air comes from a gas stove than from an electric stove, so the power of the device may not be enough to draw in combustion products. In addition, filters and other parts of the exhaust system can deteriorate from such a temperature, and this affects the performance of the device. Is it worth the risk, trying to maintain the minimum possible distance? It’s up to you to decide?!
The distance between the hood and the stove also depends on the height of the person who will stand at the hob. The system must be fixed at such a height that a person does not hit his head on the body of the device.
About fastening the exhaust system
If the system operates according to a flow-through design, then an air duct with a diameter of at least 120 mm must be brought into the ventilation shaft. It cannot be narrowed, bent or attempted to be lengthened, otherwise power loss is guaranteed. You can use either a round or square duct.
Nikonorov Vladimir
Our expert. Specialist in the field of air conditioning and ventilation with 10 years of experience.
Ask a Question
Please note: it is better to purchase an air duct not with a corrugated surface, but with a smooth one. This will significantly reduce the noise level of the device in operating condition.
If the hood is circulation, then there is no need to connect it to the ventilation shaft. The main element, the filter, will have to be purchased separately.
Working with the bottom shelf of the cabinet
Preparing a kitchen cabinet for installation of a built-in hood
When installing a built-in hood in a closet, you can go in several ways.
- Order a kitchen cabinet without a bottom. To bring out the air duct, you will need to make appropriate holes for it in the middle shelf and the top.
- Make a cabinet for the hood with your own hands, based on the dimensions.
- Remodel an existing piece of furniture, first remove the bottom or cut a hole according to the existing dimensions.
There is no need to disassemble the cabinet. You need to remove it from the wall and disconnect the doors. It will be more convenient to perform your actions on the floor. “Unstitch” the back wall, unscrew the side fastenings, then the bottom shelf will easily come off on its own.
When you cut out a place for a hood, you need to do it so that the body of the device fits tightly to the front wall, and not vice versa. Mark the place where you will cut with a marker, drill holes in the corners of the mark, and then cut.