Home » Building a house
We are building a house
Alexander Korovaev 03.23.2020
38530 Views 1 comment
SavingSavedRemoved 6
The basement under the house is not the best place for long-term storage of workpieces. The temperature there is elevated, and closer to spring the vegetables in it will become flabby. Therefore, sooner or later, novice homeowners have a reasonable question: “How to make a free-standing cellar with your own hands?”
What kind of cellar to build at the dacha
A modern cellar is a complex engineering structure, which is easy to see by looking at the vegetable storage facilities of users of our portal.
At FORUMHOUSE, such structures are made using nanotechnology, heavy equipment, many cubic meters of reinforced concrete, counting and laying bricks, and concrete rings. Popular are monolithic structures that resemble a bomb shelter and beautiful “hobbit holes” with a convenient entrance.
You can build a cellar at your dacha, as in the photographs above, with your own hands - but it is expensive and will take time.
It is not necessary to build such complex structures; if the task is simply to preserve the grown products until spring, an ordinary vegetable pit with earthen walls or finishing with material that every homeowner has on hand may be sufficient.
All cellars are divided into:
- underground (buried),
- semi-recessed
- ground. They are made if groundwater already lies half a meter from the surface of the earth.
The deeper the pit, the less likely it is to freeze, so in practice, owners of dachas and country houses always try to make recessed or semi-recessed structures. Let's look at these options in detail.
Selecting a location
The safety of products and the durability of the structure itself largely depend on the location chosen for construction.
You should not build a cellar on:
- in an open area illuminated by the sun - it is better to choose a place in the shade
- near large trees that can damage the structure with their roots
The highest possible location for the building is selected. In this case, the likelihood of flooding by groundwater when it rises in the spring is reduced. Plus, rainwater or melt water will not accumulate on such a site.
The vegetable storage facility is located on an elevated area
To avoid the collapse of buildings, the cellar pit should be located no closer than 0.5 m from the foundation of the buildings.
When building a vegetable storage facility under an unheated room, you will not only save space on the site, but also ensure ease of use - you will no longer have to clear snow every time you go for food supplies.
The walls and roof of the building will create additional protection from cold winds and scorching heat.
When building a ground cellar, the exit is located on the shady side. If this is not possible, you will need more thorough thermal insulation of the vestibule and the entrance door.
When do you need an underground cellar?
In-depth cellars are located entirely underground, so the composition of the soil (only clayey ones are suitable here) and the groundwater level (permissible depth - at least 2-2.5 meters) are of great importance for their construction. In a damp area with a close groundwater level and high water with a buried pit, you won’t have any troubles and will be exhausted in pumping out water - it will be right to choose above-ground structures.
ChapelenForumHouse Member
I have a cellar in the Moscow region under the kitchen floor 80 cm deep. It floods halfway during long rains and melting snow in winters with little snow. No amount of sealing helps.
The simplest option for a buried cellar is a structure with earthen walls and an adobe floor. The height from the base to the ceiling should be 1.8 m. It is allowed to add soil to raise the bottom.
The walls of the pit should not be strictly vertical, but inclined at a slight angle, then they will not crumble.
To protect against capillary moisture, it is recommended to pour a five-centimeter layer of crushed stone impregnated with hot bitumen on the bottom, and then make an adobe floor on top (about 10 cm) with the addition of small crushed stone.
Andrey506FORUMHOUSE user
Moist air always comes from the ground; moisture condenses on the cold parts of the underground. With all the ensuing consequences (dampness, mold, mildew, etc.).
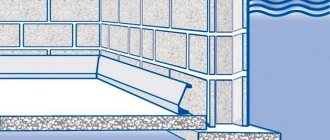
How such a structure is made can be seen in the diagram.
The cellar is covered with a ceiling, insulated and covered with earth. Previously, a cellar was always placed on the pit - a building in the form of an insulated gable roof. There you can organize temporary summer storage of supplies and keep gardening tools, materials, etc. there.
In hard soils, earthen walls are sufficient for long-term use without any problems. This is a great option for a summer residence. If the soil is weak, then the walls need to be strengthened - in the Russian burial tradition, logs were used for this, now the walls are increasingly reinforced with concrete or red brick. An excellent cheap option for strengthening the walls of a cellar in a country house is sheets of used slate.
Covering and backfilling with earth
The ceilings of a semi-buried cellar structure are, in most cases, built from slabs. In addition, the floor is usually covered with several layers of soft clay, after which roofing felt is additionally laid to ensure the maximum level of insulation of the room. A layer of soil is poured on top, which remains from digging a pit. It is important that the slopes are 45 degrees.
It is worth noting that the minimum backfill thickness should be 60 cm.
The entire structure could potentially be washed away by rain. And to prevent this from happening, it is covered with turf on top. This will ensure protection of the cellar itself and the earthen layer from getting wet and flooding after rains.
It is not difficult to build a semi-buried cellar, but experts note that, if possible, it is best to make the traditional option.
Making an underground cellar step by step
It is right to start the construction of an underground cellar with geological surveys, as our user with the nickname Evgeniy G. did. Before starting to dig a pit, he ordered a study and found out that the groundwater is very far away, there is no high water, the soil is 2 meters of loam, then sand . In these conditions, you can get by with earthen walls, but Evgeniy decided to “make waterproofing, like in a swamp,” designed the formwork and filled the monolithic cellar.
You can get by with much less effort and financial costs: a FORUMHOUSE user with the nickname Zagrebin built the structure from materials that were at hand.
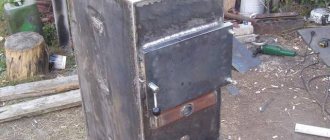
It is worth considering this technology step by step. To make such a storage, you need:
- Dig a pit 2x2 m (but this depends on the depth of soil freezing; if it is large, you will have to dig with an excavator;
- Weld a frame from metal pipes (these were purchased at a scrap metal collection point). In this case, the vertical pipes are not dug in and no foundation is made for them - the lower perimeter of the pipes protects them from subsidence. The pipe, which is made in the middle for fastening the shelves, stands on a metal plate 12x12 cm.
- Protect the hole by lining the inside with old sheets of slate;
- Weld the shelves. For safety, it is important to do this immediately, in an open space;
- Cover the hole with a sheet of iron, insulate it with polystyrene foam (layer thickness 50 mm), cover it with earth;
- Be sure to cover the pipes and metal ceiling with mastic to protect against rust.
- In such a cellar it is easy to arrange supply and exhaust ventilation. To do this, it is necessary to drill holes in the opposite pipes of the frame: in one near the ceiling, in the other at ceiling level. Take the ventilation outside the pit and insulate it outside - in winter this will save you from the formation of frost in the cellar.
- At the stage of backfilling the cellar, lay a corrugated cable duct for lighting wiring.
- Make a hole: weld the box and weld it to the sheet to create additional rigidity. But here you need to remember that the metal box and hatch are an excellent bridge of cold, so for the winter the hatch is insulated from above with hay or warm trash. It is better to make the box and hole out of wood.
To keep such a cellar always dry, you need to properly insulate it.
EfhFORUMHOUSE user
Either the hole had to be made deeper, or the thickness of the insulation layer had to be increased, not only in the ceiling, but also in the upper part of the side walls.
The optimal shelf sizes were determined experimentally.
- Width 50 cm (or a multiple of three-liter jars)
- The height of the first tier is such that plastic boxes of vegetables can easily fit in; the next tier is the height of a three-liter jar + 10 cm.
- The shelves are made either from boards, pre-dried and treated with antiseptics and sauna varnish, or you buy ready-made plastic modules. Life hack - hardware stores often have discounts on them.
If you need a very small cellar in the country, you can simply dig a cast-iron bathtub into the floor in the garage and insulate it well with polystyrene foam. This is what a user of our portal with the nickname ami did.
Cellar made of reinforced concrete rings
An option often used is a buried cellar made of reinforced concrete rings. Usually, two meter-long rings are lowered into the prepared pit, several rows of bricks are laid on top, and the bottom is filled. Sometimes one ring is enough.
This is what our user with the nickname slavontin did.
Slavontin FORUMHOUSE user
The ring is 1.5 meters, with formwork on top, the height is 2 meters.
The photo below shows a small cellar made of reinforced concrete rings with a diameter of two meters from our user with the nickname Mastr DV.
Here's how to make such a structure:
- Dig a hole 2.5 m deep;
- Lower the two rings;
- You can buy a ready-made lid, or you can pour it yourself (you need a thickness of 10-12 cm);
- Lay the ventilation pipe and wire under the light;
- Use a brick to raise the hole to the required height;
- Cover with soil.
Recommendations
In an above-ground cellar, vegetables will remain fresh for a long time.
Any person can master the theory of cellar construction. However, in order to avoid unforeseen difficulties, you should use the advice of the experts:
- when choosing a location, consider the risk of flooding;
- before construction, start drawing up drawings;
- do not deepen the building below half a meter;
- use moisture-resistant building materials;
- do drainage;
- treat wooden elements with antiseptics;
- Perform electrical wiring in accordance with fire safety requirements.
To build an above-ground storage facility for grown crops, follow the technology and the drawn up project. Supplies will remain fresh for a long time if the building is equipped with ventilation and the walls are insulated.