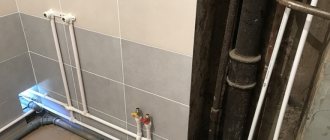
Well, not exactly a river. Not even a trickle, but an almost imperceptible drip leak. Nevertheless, she did not give peace. This was all aggravated by the fact that it was time to start building a new wall of the plumbing duct. And after its construction, access to the lower elements of the sewer riser will become seriously more difficult. The reason for the digging could not be explained.
Everything looked something like this. The lowest joint of the riser pipes, or rather the pipe sticking out of the floor and the cross inserted into it, was constantly wet. However, there were no visible signs that water was getting there from above. Moreover, upon careful examination with a flashlight, periodic expulsion of drops from the lower pipe was clearly observed. Actually, this gave rise to the version that the cause of the leak was a poor-quality or missing rubber sealing collar of the pipe.
One way or another, earlier I was still thinking about replacing the tee, since two more clients were added to the riser: a washing machine and a dishwasher in the kitchen behind the adjacent wall. Previously, in the bathroom, we easily changed the riser tee together with my godfather, spending about 20 seconds on this procedure. But I didn’t really want to change the tee on my own in a sewer riser that was obviously leaking. As far as I know, risers, both sewer and water, are the responsibility of the DEZ. Therefore, I called there and invited the plumber Vasily, the author of the legendary phrase “domestic valve with a cap for the seal,” to come to 18:00.
Vasily agreed that the reason was probably the lack of a cuff. However, he said that it would be better for me to invite a team to repair the riser tomorrow morning or afternoon. To this I assured him that he could count on me as a member of the team, and that if a team of two people was enough, then it would be time to start the repairs right now.
- Okay, let's look at the cuff first! - Vasily decided and the procedure began.
We need to change it! But how to disassemble a sewer riser?
Really? HOW? Now everything will be told in detail.
No - I will tell those who think that in order to remove the pipe from the riser, the entire pipe assembly is moved up or down - this is unrealistic, since the pipes sticking out from the ceiling and floor are fixed quite thoroughly.
And not so - there will be an answer to those who believe that the riser should be tilted to the side and then its length will increase, which will make it possible to release the element.
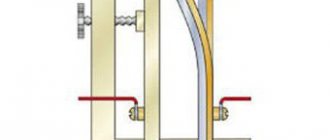
In fact, disassembling the riser is quite simple! For this purpose, it has a special element - compensator . This is a short pipe, the bell of which is significantly longer than the 5 cm bells usual for all other elements of the route. Thus, this compensator can be pushed onto the upper pipe by 15-20 centimeters, which will make it possible to easily disassemble the sewer riser and replace any of its elements .
IMPORTANT! If you decide to make such a replacement, then to make the work easier, 2-3 hours before starting, drop a little machine oil into the connections of the compensator and other elements that you plan to disassemble. And on the wall it would be completely useful to mark the original heights of the joints. Just in case.
So. Having moved the compensator up along with all the tees attached to it from below, we removed and opened the lowest connection. Vasily fished the cuff out of the pipe. And while none of the residents of the upper 9 floors decided to wash themselves, or, which is certainly much more fun, to flush the toilet, we pushed the cross back into the pipe. The cuff did not cause any complaints.
There was no particular point in changing the cuff, and I suggested that Vasily replace the lower tee with a new cross. Vasily asked to see it, and after examining it, expressed satisfaction with the quality of the element, finding it higher than that of the existing element. Indeed, all surfaces of the cross were perfectly smooth, unlike the noticeably rough old one.
After waiting 3-4 minutes for the sound of water inside the sewer to subside, we moved the compensator up a second time. Vasily inserted a new (just in case) cuff into the lower pipe - 3 seconds. Disconnected the old cross - 2 seconds.
Then a bad and very suspicious sound began to appear in the riser! (drum roll) Increasing in strength, like an approaching locomotive, the sound left no doubt that its cause was 6 liters of water from the toilet tank + a certain amount of human waste products - in liquid or somewhat more solid form.
Having absolutely no desire to verify the type of product with our own eyes, we, with coordinated movements, installed a new cross into the lower pipe and moved the compensator and upper tee down, within 3 seconds. The entire replacement took 8 seconds, although the last three seconds, it seemed to me, dragged on for a very long time...
Such a quick replacement is possible if all the old elements being separated and the new elements being connected are pre-treated with lubricant at the joints. If you don’t have machine oil on hand, then, at worst, you can use regular sunflower oil.
We installed all the riser holders back, we went to wash our hands and asked ourselves the question:
Why did the sewer riser leak?
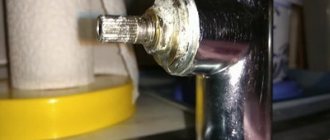
The rubber cuff was removed, the narrowing of the cross was pushed all the way into the lower pipe. There is only one reason left - there is a crack in the crosspiece. And it can only be in one place - in the one that could not be seen while it was part of the riser. This is the bottom corner of the tee.
Turning it upside down, we immediately discovered this crack.
Judging by the appearance, the crack was far from fresh. Apparently it was clogged from the inside with you-know-what, and when it dried, it formed a sealing layer. However, all you had to do was move the outlet a little and this unreliable sealant stopped performing its functions.
- See how shitty it is! - Vasily pointed his finger at the defective tee.
I just offered to take this with me to the DEZ as proof of the repair of the riser without calling the emergency team. He politely refused. Just as politely, he did not refuse a small thank you, and, as it seemed to me, very pleased with the work done and the reason found, he took his leave.
And who is he - our today's hero?
ZYZH: It is clear that drawing conclusions about quality based on such a small sample is incorrect. Therefore, if you have something to say about the quality of this or that manufacturer of PP pipes for sewerage, please comment!
Source: https://www.superchip.ru/Products/dirid_12/tek_32/
Optimal material for tee
As a rule, a sewer riser tee is selected from the same material as the rest of the system elements. For a plastic riser, it is most convenient to use a PVC tee. If all the parts are made of cast iron, then use a cast iron sewer tee. When choosing, various factors are taken into account:
- the tee is subject to pressure from the rest of the vertical assembly located above it. If work is carried out on the lower floor of an apartment building, the load will be quite high. As a rule, cast iron pipelines are not attached to walls, relying on the self-supporting ability of the material. When replacing this becomes a noticeable problem;
- assembly of plastic elements is easier and faster. They are connected into a socket equipped with O-rings. You just need to insert one element into another. Cast iron pipes must be sealed separately, and the gap in the socket must be sealed with cement mortar or other compounds.
In addition, you must remember to connect the rest of the internal sewer line. Usually it is made of plastic pipes with a diameter of 50 mm. If a cast iron assembly is used, an appropriate adapter will be required.
The important point is that there are two tees. One is built directly into the riser and provides drainage to the horizontal part. The second one is connected to this outlet and is needed to connect the toilet. This assembly scheme is typical for most apartments. If a sewer tee is replaced, then, as a rule, both elements are changed at once. However, sometimes one tee is cast iron, the second is made of PVC.
This option is quite acceptable; you only need a rubber adapter to connect the plastic and metal elements. There is another type of similar elements called “revision”. Its outlet is used as a service hole for cleaning or servicing the system. After completing the work, the hatch is closed with a special sealed lid.
Types of pipes and tips for choosing
Before dismantling the old sewer system begins, you need to count all the existing water intake points in your home and draw up a diagram of the new sewer system. They take into account not only the plumbing, but also the devices to which the sewer pipes are connected.
Based on the diagram, the required number of pipes and additional elements are calculated: couplings, adapters, bends, and so on. To avoid problems with fitting components during the installation of the system, it is better to buy all materials from one manufacturer.
It is better to buy a corrugated pipe for the toilet. It is easier to install as it bends. The pipe diameter should be 110 mm
Characteristics of ceramic sewer pipes
Such pipe products are made from high-quality refractory clay . Inside they are covered with a layer of clay glaze, which prevents moisture from being absorbed into the material.
Pipes are produced with a diameter of 10-60 cm and a length of 100-150 cm. Overall dimensions and properties allow their use in sewer systems.
Ceramic pipes are rarely used in residential sewer systems because they are quite heavy and expensive. A meter piece of pipe with a diameter of 10 cm weighs 15 kg
The main advantages of ceramic pipes include resistance to corrosion and aggressive environments.
Among the disadvantages, it should be noted the possibility of damage due to a strong impact. In addition, the products are short (maximum 150 cm), during the installation process they will have to be connected to each other more often, and this is both more expensive and more effort will be expended.
Features of steel and cast iron pipes
Pipes made of steel or cast iron are also used for laying sewers. Steel pipe products can transport substances with high temperatures. They are durable and inexpensive. However, they are not suitable for installation in apartments, as they are prone to corrosion.
Previously, in almost all apartment buildings, communications were laid from cast iron pipes. Nowadays they are rarely used, as their throughput deteriorates over time.
Unlike steel, cast iron pipes are more resistant to corrosion processes. Cast iron can be used in the sewer system both externally and internally. The design will be durable and will last a long time.
However, if there is a need to replace such sewer pipes in an apartment, the use of additional installation equipment will be required. The disadvantages of pipe products include high cost and heavy weight.
Basic properties of polymer pipes
The best option for internal sewer systems are stabilized polypropylene pipes. They come in gray color and are made by hot extrusion .
Main advantages:
- The inside walls are completely smooth - waste easily slides into the pipe without forming deposits on the surface.
- Light weight - pipes are easy to work with, even alone. The finished drain circuit is definitely not capable of pushing through the floor covering.
- Corrosion resistance – polymers do not rust, so you don’t have to worry that the pipe will become leaky over time and leak.
- They can transport waste with high temperature conditions - the material begins to melt at a temperature of +175 °C.
- Quick installation and ease of maintenance - there is no need to paint the pipes, they are simply wiped clean from dust. If any section of the pipe fails, it can be easily replaced without dismantling the entire sewer system.
There are also polyvinyl chloride (PVC) pipes. They are resistant to ultraviolet radiation and have good strength.
It is better to use polypropylene variations as sewer pipes, since their technical characteristics and properties are significantly higher than PVC products
PVC pipes can be used in the sewer system, but when heated, the material releases harmful substances. Therefore, they are more often used for arranging an external sewer system. In addition, such pipes have low resistance to aggressive environments and their surface wear resistance is worse than that of polypropylene options.
Polymer pipes are connected to each other using the socket method - the narrow end of one pipe is placed in the socket (widened part) of the other. A sealing material is used to seal the pipe connection.
We discussed more recommendations and features of choosing pipes for internal sewerage in the next article.
What tools and materials will be needed for replacement?
In order to change the tee, you will need the following tools:
- grinder with cutting disc for cutting cast iron or plastic;
- a long screwdriver or chisel for removing the cement seal of cast iron sockets;
- lubricant for the repair coupling (ordinary shampoo will do);
- new tee;
- a piece of straight sewer pipe of the same diameter as the main pipeline;
- through coupling;
- adapter from cast iron to plastic (if necessary);
- device for hanging a vertical pipe (selected according to the situation);
- hammer, possibly with a rubber striker.
If the sewer crosspiece is being replaced, the procedure and set of tools will be needed the same. Only the most necessary items are listed. Disassembling the riser is not easy. You need a strong and reliable suspension. To avoid collapsing the top assembly. Usually they use a clamp that is attached to the wall. It must be taken into account that the toilet of a typical apartment will not accommodate large structures. Therefore, it is necessary to make the suspension as compact as possible. Even combined toilets (as in Khrushchev) are very limited in working space. Therefore, before replacing a cast iron tee in a sewer riser, you need to think through the procedure. It is important to ensure free access to the work area and reliable support for the top of the riser.
In addition, it is necessary to notify neighbors about the start time of work. If someone uses the drain during the replacement, the entire contents of the pipe will end up on your floor. It is important to organize the process correctly so that it goes quickly and with the desired result.
You may also like:
Replacing a cast iron sewer riser with a plastic one - features and procedure
Sanitary standards for the distance of sewerage from a private house: requirements and rules
Replacing an old vertical sewer pipe
One of the unpleasant events that can happen in a house is a burst drain. To prevent this from happening, it is necessary to replace the sewer riser with a more reliable material, for example, polyvinyl chloride pipes. You can do the work yourself or use the services of specialists.
How to dismantle the riser
Before replacing the tee in the sewer riser, you will need to partially disassemble the vertical part of the system. Considering the pipe connection technology, two disassembly methods can be used:
- sequential dismantling of the entire riser, starting from the top point;
- partial dismantling of a riser section in one apartment.
The first option can be applied if the work is carried out on the penultimate or top floor of the building. The second method is most often used - partial disassembly.
Action plan:
- shut off the water in the apartment;
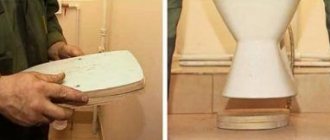
- temporarily dismantle the toilet;
- disconnect the horizontal part of the system;
- the riser is cut at approximately 1-1.2 m above floor level;
- remove the remaining part of the straight pipe;
- remove the defective element.
It's easy to cut a plastic pipe. If the riser is cast iron, cutting is performed according to a certain pattern:
- make two cuts one above the other;
- the riser is securely suspended from the top to ensure the immobility of the assembly located above;
- A chisel or chisel is inserted into the upper cut, and a part of the pipe is broken out with gentle blows;
- after this, the remaining part is cut and the defective elements are removed.
Replacing a cast iron sewer tee is a procedure that requires accuracy and thoroughness. It is quite difficult to remove the problematic element. Especially if the riser has worked for many years before and all connections are tightly cemented. The parts must be removed carefully, without shaking them too much in their sockets. If the safety of the components to be replaced is not important, then the socket of the lower part of the riser must be kept in normal condition. This is important, since the lower part will have to be replaced from the apartment located on the floor below. This will create unnecessary complications, so such danger should be avoided. Sometimes a cross is used instead of a tee. It is usually used in apartments of old construction or in private houses. Replacing a crosspiece in a sewer riser is practically no different, only you will have to disconnect the horizontal part of the system from both sides.
Conclusions and useful video on the topic
Visual instructions for installing sewer pipes are given below:
Almost anyone can change the sewer system in their apartment on their own. Especially if the system is made of polypropylene pipes. No welding is required to connect them. The pipes are inserted into a socket with rubber gaskets, and perfect sealing is achieved using sealant. Installation of such a sewer system will be inexpensive, and it will last longer than cast iron.
Have you recently changed the sewer system in your apartment and want to share your experience with other users? Tell us what difficulties you encountered in the process of replacing the riser - the comment form is located below.
If you have questions about the topic of our publication, do not hesitate to ask our experts for advice - we and other site visitors will try to help you.
Tee installation
After removing the old elements, begin installing a new tee. To do this you need to do the following:
- thoroughly clean the lower bell of the riser from any remaining sealant and other deposits;
- apply a layer of sealant to the walls of the socket and insert a new assembly into it;
- Place a coupling on the top of the riser and push it up so that the end of the pipe protrudes;
- Insert a piece of straight pipe of the same diameter into the socket of the installed element using the same method. It must be adjusted in length so that after installation in the socket both ends are as close to each other as possible;
- slide the straight coupling down and connect the top of the riser to the bottom.
After this, the horizontal part of the system is connected to the new outlet - a 110 mm tee and a pipe with a diameter of 50 mm. Connect the toilet, seal all connections and check the system for functionality. If all steps are performed correctly, there should be no leaks or other problems. Periodically it is necessary to carry out maintenance of the cast iron tee in the sewer riser. This will remove any buildup or fatty deposits that are causing blockages. For maintenance, it is recommended to install an inspection - an element with an inspection hatch. It is placed on top of the main unit and used for various repair work.
Reviews from owners of self-hooking fishing rods
Most reviews about this kind of fishing rods are positive, few people don’t like them.
Here are some of them:
PashaAsUralmashA noted that it is best to create a fishing rod with a self-hook yourself
All its details can be taken from improvised means, and there is no need to spend money; Whereas the Snake doubted the effectiveness of using a fishing rod when catching bream with a pull or a float;
Vladimir kept trying to buy a fishing rod with an automatic hooker, but its cost seemed high to the fisherman.
Marich noticed that Chelyabinsk residents banned the use of a fishing rod for catching whitefish, arguing that this was a prohibited type of fishing. Although he didn’t listen, he still got his catch.
DeDnt couldn't be happier with this miraculous invention
The fish is caught, and your hands warm in your pockets. Fairy tale!
How does winter cutting differ from summer cutting? There are no special differences between winter and summer undercutters. Everything depends directly on the possibility of fixing the mechanism in different seasons. But in general they are not much different.
Pressure testing of the water supply system
This is a mandatory activity, it can be entrusted to specialists, but it is quite easy to do it yourself. Equipment for this - a driven or manual crimping machine - can be purchased at the construction market, or you can simply take it to the arena for a few days.
The system is pressure tested in the following order:
- Familiarize yourself with the initial data for pipes on the maximum permissible pressure. This indicator is indicated in the quality certificate and cannot be exceeded.
- Read the unit's instructions and act in accordance with its recommendations.
- Fill the system with water and connect the device.
- Bring the pressure in the system to 4.8 atmospheres (working pressure), check for leaks, and, if necessary, eliminate defects.
- Continue pumping the liquid to a pressure of 7.2 atm (5.8 x 1.5), repeat the control operation.
- To be completely sure, raise the pressure in the system to 9 atmospheres and leave it in this position for a day.
Ideally, after this time, the pressure in the system should remain unchanged.
Check the remaining circuits in the same way.
Price issue
Replacing a sewer tee that will meet the requirements of GOST is a service that is in demand in the Russian Federation, and accordingly, it has its price. It is difficult to answer the question of price with utmost precision, because it depends on many factors. We are talking about the material used to make the new adapter that is planned to be installed. Just so you know, a propylene tee costs several times less.
The price of the service reflects:
- tee location;
- its diameter;
- current condition of pipes, etc.
The cost of the service is approximately 4000 rubles
Today, the cost of replacing a riser sewer pipe with a tee with a diameter of 110 mm is approximately 4 thousand rubles. Moreover, the price is not fixed and may vary depending on conditions.
Stages of preparatory work
Like any household work, replacing old sewer pipes will be faster and more efficient if you evaluate the work in advance, draw up a plan and carry out thorough preparation. The entire volume can be divided into several stages.
Planning and purchasing materials
Due to the fact that in this case the sewerage system will not be installed from scratch, but only the pipes will be replaced, design work can be simplified. However, they must be carried out in two cases:
- it is planned to change the design of the engineering system, taking into account the shortcomings of the previous version;
- new consumers need to be added.
If the system functioned successfully, experts recommend laying pipes along the old route and using existing technological holes in the partitions.
Before replacing a sewer pipe, it is necessary to clarify the number and nature of water intake points in the apartment or house. They are: household appliances, namely washing machines, dishwashers, sinks, toilets, bidets and others.
In this case, it is easier to purchase materials. When compiling a shopping list at a building materials store, you will also need measurements of the old pipeline and a census of the fittings used. Naturally, new sewer pipes and fittings will be qualitatively different than dismantled ones, since the industry for their production is rapidly developing, offering more and more effective solutions, but the quantitative volume will be the same. You just need to provide a certain reserve.
Pipe measurements
Today, polymer pipes are mainly used for sewer installation; steel pipes are less commonly found, the installation of which is associated with certain difficulties.
Dismantling
When the old system has been studied and the places that need to be changed have been specified, you can begin to dismantle it. Basic rules for dismantling:
- It begins with the fact that furniture and household appliances that may interfere and are subject to the possibility of being damaged are removed from the premises.
- First turn off the water supply and also disconnect the hose that leads to the toilet flush tank.
- Old sewer pipes are cut into fragments using a grinder and taken out of the apartment or house.
- If the place where the pipe runs is far from the riser, and you can’t get there with a grinder, you can simply break it with a hammer or sledgehammer, since cast iron is quite fragile.
Sewage dismantling
Carrying out work
Dismantling an old sewer system includes several main stages: dismantling the intra-apartment pipe distribution, removing the cast-iron riser pipes and dismantling the tee (cross).
Removing the indoor system
When carrying out a major overhaul, it is advisable to completely disassemble the wiring (to the kitchen and other devices). If the joints are made very firmly, then there is no point in wasting time disconnecting all the elements.
It is simply cut as close as possible to the socket of the tee using a pipe cutter or grinder. Difficulties with disassembly may arise if the pipes were previously masked with floor coverings - they will have to be carefully removed. It’s even worse if the pipes get under a concrete floor screed. In this case, you will have to work with a hammer drill, a chisel (chisel) and a hammer.
Why do you need to repair communications?
Partial replacement of sewage communications - removal of worn-out drainage systems in a single room. This action is required in the following cases:
- the appearance of a leak in the riser;
- major repairs of the sewage system by the owner and tenant themselves;
- planned replacement of communications due to their complete deterioration.
Leaks and blockages in pipes
In apartment buildings built more than 10-20 years ago, communications were created from cast iron products. The material itself is considered very reliable, but over time it becomes very dirty, rust settles on the walls, and therefore needs repair.
At whose expense
Another question that needs to be examined in detail so that you don’t have to pay money in vain. Everything is quite simple here:
- If part of the structure is changed due to an emergency, damage or constant leaks, all costs are borne by the service organization.
- When a planned reconstruction of a building is carried out with a complete replacement of the riser, residents are also not required to pay the costs. Funds are taken from contributions for major repairs, which are paid monthly.
- If the design is changed by the owner of the property on his own initiative, all costs must be paid by him. Especially if there are no reliability claims.
Important!
You shouldn’t try to break the design in order to present everything as an accident. If the examination reveals such a fact, you will have to pay not only the cost of materials and work, but also a fine.
Replacing the sewer riser in an apartment is the responsibility of housing and communal services
Sometimes they refuse to carry out major repairs, explaining that there are debtors among the owners who have not made payments for their services. This basis is not a legal reason for failure to fulfill the duties of the Housing Office. Who pays for the replacement of risers Apartment owners contribute monthly funds for maintenance and repairs.
That is why all capital work, including replacing the riser, is carried out without raising additional money from the owners. The apartment owners already paid for the repairs. If the housing office offers residents to independently raise money for capital work, then this is illegal.
Apartment owners in such a situation can complain about such actions to the prosecutor's office or to the court.
At whose expense are the risers in the apartment replaced?
This question arises quite often among apartment owners, however, the answers to it among practitioners are ambiguous. On multiple Internet sites, users try to find a definite answer, although it practically lies on the surface.
One group of people believes that payment should be made at the expense of residents, others talk about payment by persons who independently express their desire, others say that replacement is carried out at the expense of developers, optimists talk about free provision. In this article we will try to find the truth.
How to replace risers in an apartment
Initially, you need to contact the management company and provide an application for changing the risers. Persons must provide a compelling justification for the replacement in the application, as well as provide evidence (for example, photographs or an expert opinion).
The application is drawn up in two copies, the first of which is given to the accounting department or department accepting applications, the next copy serves as evidence that the application has been accepted, so it must be signed by the person who accepted it.
In cases where the application is drawn up correctly and the facts indicated in it are legal, the Housing Office is obliged to carry out the appropriate work in the near future. Otherwise, the person will receive a refusal paper with explanations on what grounds the application is withdrawn.
If a person does not agree with the refusal, he should file an appeal to the prosecutor’s office, attaching all the documents in the applicant’s hands. It is also not prohibited for homeowners to replace risers without obtaining the appropriate permit. The person also has the right to take the initiative to replace the risers.
The sequence of steps for replacing risers is explained in the following instructions:
Writing an application to the housing office, in which the person expresses his desire to carry out such a replacement in his home. It must also indicate how the replacement will be made: with your own hands or with the help of another company. In such cases, the housing office issues permission to carry out this work and indicates the date and time period during which the replacement can be carried out
It is necessary to pay attention to the fact that disconnecting the risers is an expensive service, and the amount of money is deposited into the account of the management company. It is necessary to prepare a set of tools and materials in advance, in which case the work will be accelerated
A complete set of tools must be ready before work begins.
It is also necessary to gain access to neighbors living above and below to organize the work.
Design Guidelines
It is strongly recommended not to do the following:
- carry risers and modify them;
- cover them with static structures (gaining access to the riser is carried out along its entire length);
- operate small plumbing hatches that are not convenient during operation.
Decorative apple tree
This tree can rightfully be called Russian sakura - it is magnificent during the flowering period, as it is dotted with a huge number of pink flowers, and when the time comes for the fruits to ripen and they acquire a red tint, perfectly combining with the color of the foliage, this small tree looks very impressive.
A decorative apple tree will help to place the necessary accents on the garden plot and even highlight a shaded corner.
It should be noted that this species stands out for its unpretentiousness, as well as resistance to adverse weather conditions. This tree is not afraid of severe frosts, so it can be grown even in very harsh climates.
Today, there are many varieties of ornamental apple trees that can rightfully occupy a central place in your garden plot. The color of the petals and leaves can be different, as well as the shape of the crown, therefore, before choosing one or another, you should carefully study all the varieties and characteristics of this tree.
Among the many varieties of ornamental apple trees, the following can be distinguished:
- Riverside, or weeping;
- Royal Beauty;
- Royalty;
- Nedzvetsky;
- Pioneer.