18.02.2020
9082 views,
The idea of slatted design of walls and ceilings came to us from Europe, and now slats are becoming one of the promising and popular design trends, regardless of the interior style.
With the help of slats, they add emphasis to one of the walls or ceilings and enclose a functional area. In this way, you can adjust the space by increasing or decreasing the size of the rooms, and at the same time get an original effect. The slats are ideal for zoning: they reliably separate the desired area without interfering with the passage of sunlight. They are capable of changing acoustics: the sound-absorbing effect occurs due to an increase in the area of the absorbing surface.
Reiki in the interior: examples of use, functions
When decorating walls, decorative buffels help to create an original interior in the living room, bedroom or kitchen. Often slats are used to create memorable accents in a room. The elements are placed above the sofa, in the dining room or at the head of the bed.
Hall with wooden decoration Source yandex.ua
Decorative finishing is used for zoning space. The relief detail attracts the eye, so it will become a noticeable part of the design. Air partitions made of lamellas visually limit the room, without reducing visibility and square meters. A “wall” of horizontal buffels will help separate:
- bedroom from study;
- dining room from the kitchen;
- toilet from the bathroom.
Zoning with slats in the interior Source choiz.me
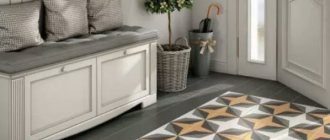
In the hallway, slatted decor is used as a clothes hanger and an accent surface. Vertical cladding visually raises a low ceiling, horizontal cladding makes a compact room appear larger. In a large hall, it is worth installing a wooden sheathing that completely covers one of the walls.
Slats in the interior of the corridor Source homify.ru
Decorative clothes hanger Source yandex.ua
Decorative slats in the interior play the role of protection on stairs without railings or upper flights. A translucent elegant partition prevents you from falling when climbing to the second floor. The element is used in housing with children and elderly relatives.
Lathing made of wooden baffles Source sense-life.com
Decorative protection of openings Source pinterest.fr
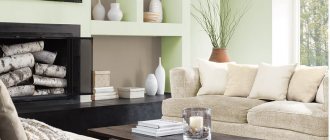
In a room, adjacent walls are often tiled or an organic transition from the floor is made. The finish matches the color and texture of the laminate board. Luxurious decoration brings a sense of peace and closeness to nature to the space. A smooth flow will help to emphasize the high ceiling in the room.
Wooden slats in the room Source yandex.ru
Decorative slats on the ceiling Source infpol.ru
See also: Catalog of companies that specialize in finishing materials.
Decorative buffels will soften the transition between different finishes. The slats focus attention on a beautifully designed arch or door (window) opening. Using panels, they create a practical and original niche with drawers, shelves and ledges in the kitchen, hallway or living room.
Practical transparent wall Source pinterest.com
Wood in the hallway Source rehouz.info
Color and light
Buffels are usually painted in all natural tones from light to dark. The color contrast with the main decoration of the room makes the plank decor the main accent. In this case, a difference of one or two tones is enough, since the corrugated structure itself is already expressive. If you paint the slats to match the rest of the surfaces, you can get a calmer interior. For example, in the bedroom, the monotony and smooth lines of a low-contrast natural color relaxes and sets the mood for sleep.
Note: glazing compounds (glazes and impregnations) will help to obtain a beautiful shade and emphasize the texture of the wood. They form a translucent coating and protect the product from external influences.
Rhinestones, stones, and narrow mirror strips can serve as extravagant decorations for lamellas. LED strips or long lamps built between the slats will add special solemnity and deepen the zoning effect.
Interior decoration using slats
In the classic style, wide decorative slats with minimal clearance are used. Modern design emphasizes the relief of narrow buffels on a plain background. In high-tech, they play with black and white matte monochrome made from a metal profile. In a Scandinavian interior, painted slats are arranged in a continuous pattern, sometimes turning into a lattice.
Buffel installation options Source comfortoria.ru
If massive iron slats are used in the design or a TV is planned to be hung on the wall (pictures in heavy baguettes), then the material is mounted on a frame. The surface is pre-primed against mold and putty is applied. A lathing is assembled from the bars, onto which the lamellas are fixed with screws or nails. The finished structure is coated with varnish, paint or tinting stain.
Original use of slats Source yandex.by
You can hang a TV, a pot with plants, or framed photographs on a decorative wall. On a wooden or metal surface, shelves that match the tone or are darker (lighter) than the background look original. A panel made of live moss and LED lighting harmoniously fits into the interior with slats.
Beautiful slatted design Source baffelua.com
Vertical baffle partitions between rooms should not put psychological pressure. In a small room it is better to use material of medium width and light shades. In three-dimensional space, boards of different parameters and tones are used. The raw material matches the color and texture of the finish on the floor.
Design of a small room Source zen.yandex.com
Slatted finishing in design Source zen.yandex.by
If decorative slats extend from the walls to the ceiling, then the area needs to be well lit. A pendant chandelier or flat lamp is mounted in the center of the site. For finishing with a three-dimensional relief, spot LEDs are installed between the elements on top.
Decoration and lighting in the room Source woodline.msk.ru
The functional half-partition made of slats, located in the center of the room, looks unusual. A large TV panel or a bright picture in a frame is mounted on the surface. Living plants in identical pots are hung on the crate in a symmetrical order.
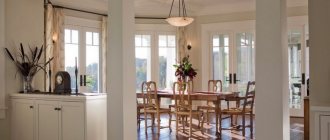
In a room combined with a loggia, designers often use slatted partitions. The material is installed in the opening of the window block, creating a decorative translucent wall. The wood element echoes the design of the space. It is recommended to use panels made from natural raw materials indoors.
Partition to the loggia Source yandex.ua
DIY installation
The material and color have been chosen, the sketch is ready - it’s time to find out how to bring the idea to life.
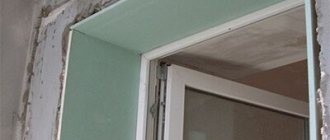
First, markings of elements are applied to a flat, already painted wall. We must not forget about hidden communications and electrical wiring that can pass through the places where the boards are fixed.
On a note! To quickly level walls with defects, waterproof plywood is used, which is glued with parquet glue and additionally fixed with self-tapping screws. This base simplifies the installation of slats.
1 cm of the total length is sawn off from the boards. Installation requires a mandatory technological gap of 5 mm at the top and bottom for free expansion of the wood. It should be taken into account that the finished structure does not hide the junction of the wall and floor in the spaces between the slats. They try to make it as neat as possible.
A little trick: it’s convenient to choose a 5-mm backing for the floor bars according to the width of the decor. And after finishing the work, simply pull it out from under the slats.
Decorative slats are installed after they have been properly prepared and painted. Installation is possible in two ways. Both will require liquid nails or parquet glue.
Easy way
Suitable for small cross-section planks 20×30, 20×40, 20×60 mm.
- The back side of the lamella is glued with double-sided tape. This will free you from the need to hold the surfaces together until the glue sets.
- Glue is applied to the tape according to the manufacturer's instructions.
- Mounted on the wall.
A little trick: usually the distance between the planks is equal to the width of one block. It is convenient to measure the gaps by inserting scraps of the same material into them.
Veneered slats in a private interior
If the finish is used as decoration, it is easier to install it with glue. The wall is pre-treated against mold and plastered. The slats are coated with stain or protective varnish and left to dry. The parquet composition is applied to the bars and tightly attached to the walls or ceiling.
Adhesive installation of material Source rehouz.info
Using technology, you can create an original ornament from wood of different lengths. The decorative canvas will become a bright detail in the dining area of the kitchen or in the living room. The relief pattern looks luxurious as a headboard in the bedroom.
The original decoration will create a noticeable accent in the loggia or glazed balcony. The slats are fixed on the walls with a smooth transition to the ceiling. In a limited area, place an armchair with a coffee table or a soft couch for relaxation. Designers recommend using lamellas in light shades (alder, walnut).
Loggia design with wooden inserts Source yandex.ua
Fastening a wooden beam to a brick wall - technology features
In the process of performing various construction works, there is often a need to secure the timber to a brick wall. For inexperienced craftsmen, this task often raises a number of questions. Therefore, in this article we will look at how to fasten a wooden block to a brick wall, as well as some other wooden parts.
How to properly lay a vapor barrier on the ceiling?- Is it possible to glue wallpaper on whitewashed walls?
- Imitation of a brick wall made of gypsum plaster
Fastening the timber to the wall
Types of wooden slats
The beauty of interior buffels depends on the material from which the decoration is made. Natural wood options look luxurious and expensive. Designers use three popular types of decor:
- Oak. Durable and durable slats have a recognizable texture. The array is resistant to moisture, fungi and insects, so initial treatment is sufficient for protection.
- Beech. Dense material with a beautiful natural surface fits effectively into any interior style. The raw materials absorb moisture, so they must be varnished.
- Pine. Inexpensive and durable finishing material with a pleasant wood texture will create a feeling of closeness to nature in your design. Due to low resistance to rot and parasites, it must be protected with special impregnations.
Natural material in design Source pinterest.pt
Wood in the interior of premises Source zawooda.ru
Decorating a room with natural wood Source dizainexpert.ru
Designers recommend replacing the expensive natural option with decorative slats. Glued MDF boards are very durable and practical. Veneered material repeats the texture of the wood that covered the surface. Deformation-resistant buffels are used in the kitchen, hallway or bathroom.
Adhesive-based material Source yandex.ua
Metal strips are used in the interior of housing. Durable material is easy to use. Painted and laminated slats are appropriate in loft, Scandinavian and modern designs. Options with imitation of the surface of natural wood are used in the decoration of rustic styles.
Metal finishing in the interior Source countouros.com
Metal protection Source yandex.ua
Buffels are created in the form of flat boards or volumetric bars. The thickness and width of the decorative material depends on the wishes of the customer. Wood products are produced in the range from 10x10 mm to 20x50, veneered slats - up to 50x50. The length of the raw material varies from 1 to 3 m.
Half wall in design Source pinterest.se
Design of a room with wooden slats Source design-homes.ru
Choosing the right wood
The main building element of the interior design is a decorative wooden strip, which can be made of different types of wood:
- pine is an inexpensive option that is resistant to fungus and small pests; does not tolerate moisture well, so requires careful processing before use;
- beech is a durable but expensive species; not always resistant to rotting, therefore also requires processing;
- oak is strong, durable and resistant to moisture, mold and small parasites; does not require special processing, but is considered an elite option, so it is expensive.
It is also worth mentioning an alternative practical and inexpensive option: veneered MDF. The material successfully imitates an array, but is inferior in environmental friendliness and beauty.
When to install a wooden frame correctly
Despite the development of the construction market, traditional environmentally friendly materials remain in demand. If brick or foam block is used for the house, then the bathhouse will definitely be made of timber. For such buildings, it is logical to install drywall on wooden slats.
In utility rooms with niches, on loggias, it is necessary to cut the metal profile into pieces; their assembly is difficult in cramped conditions. It is much more convenient to cut the bars. Wood has low thermal conductivity, so it will be warmer on the balcony. You can find out how to insulate walls on a balcony on our website. The sheathing can be made of different depths and the timber can be selected according to its width. Insulation of the required thickness is installed in it.
In a private house with a subsidiary farm there is a supply of wood. From it you can cut a beam for a frame of the required size. The wood is easy to process and convenient to adjust to small sizes.
Wooden blocks are easy to process and convenient to adjust to small sizes
Individual elements can be hung on drywall with a wooden base. The profile frame is reinforced with timber, attaching it inside the planks..
And finally, attaching drywall to a wooden beam will cost less than attaching it to a profile.
Design disadvantages
The disadvantages include:
- Afraid of increased dampness. Therefore, in the bathroom and rooms with unstable temperature conditions, it is not recommended to install a wooden base under the gypsum board. Special impregnations can increase resistance to moisture and prevent the formation of mold and mildew.
- Wood is a living material; under unfavorable conditions it shrinks and can lead. To prevent this from happening, be sure to choose dry timber (14-16% humidity). Before installation, it must rest indoors for at least a week.
- Wood is heavier than metal profiles - take into account the loads, especially when assembling ceiling structures.
Remember that even after treatment with special impregnations, wood is highly flammable.
Types of slatted ceilings
First of all, there is a classification based on the quality of wood species, on which the technical characteristics and aesthetic appeal of the structure depend. According to these parameters, several groups of materials are distinguished:
- C – not the best specimens, they contain defects, unevenness, there is a high probability of damage, the slats will quickly become unusable; to avoid this, you will have to resort to additional processing measures; however, the material is the most affordable;
- A and B - they look more attractive, the surface is much better quality, these classes are the most popular, however, some small external flaws still appear;
- Extra class - planks made of expensive wood, the surface is perfect, without flaws, stains or knots.
Types of slatted ceilings
There is also a gradation according to the method of fastening the elements and appearance:
- Open - small gaps are left between the slats, which can be left or covered with special plugs. The standard size of the gaps is usually a fifth of the width of the slats itself, although at the request of the decorator, the distance can be adjusted depending on the composition, etc. The higher the ceiling, the less noticeable the distance between the slats.
- Closed - the planks fit tightly to each other, there are no gaps, so the ceiling is a continuous surface. Some planks are equipped with tongues and grooves for ease of fastening, making joining much easier.
- Combined - from different materials, colors, sizes. A spectacular look and original composition are guaranteed.
Installation of beams
Separately, it should be said about how to support a wooden beam on a brick wall. This procedure is very important, since beams usually take on a large load or even serve as a ceiling. Therefore, embedding a beam into a wall (support) must meet certain strength and reliability requirements.
So, the installation of beams is usually carried out in special niches with a depth of at least 150 mm.
The process itself looks like this:
- The first step is to cut the ends of the beam at an angle of about 60 degrees.
- Then the ends of the part are impregnated with an antiseptic liquid, and after drying they are treated with resin.
- Next, the bottom of the niche is leveled and covered with several layers of roofing material.
- After this, the ends of the beam are wrapped with roofing felt and laid so that they do not reach the wall of the niche by about 40 millimeters.
- Then the remaining space in the niche is filled with concrete.
This completes the embedding process. It must be said that to add rigidity to the structure, additional fastening of the beam with an anchor is often performed. In this case, the anchor is installed during the process of laying the wall, and is located at a distance of about 12 cm from its outer surface.
Sealing scheme using an anchor
The other end of the anchor should protrude 20 cm into the room. In order to mount the beam, a hole is made in it corresponding to the diameter of the pin. This installation method is used in cases where it is necessary to obtain a particularly strong fastening.
In what cases is it necessary to fasten the timber to the wall?
Fastening timber to brickwork is a fairly common construction operation that may be required in the following cases:
- When fastening various structures and interior elements.
- When performing redevelopment.
- During the process of insulation or cladding of the facade, in this case it is necessary to fasten the wooden sheathing to the brick wall.
- For installation of canopies and canopies adjacent to the house.
Below we will consider in detail how the timber is installed.
Installation of wooden sheathing