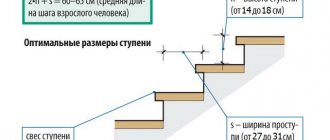
How to remove cracks in glued-on skirting boards made of different materials: a review of methods
Home renovation involves significant costs.
Therefore, many of its owners try to carry out construction on their own so that the price of the work decreases. However, if you do not have skills in this area, you will not be able to get good quality work. For example, after an amateur repair, immediately or after a certain period, the question arises: how to seal the cracks in the ceiling plinth that appeared in the areas where it joins the walls. One thing needs to be said – don’t panic. Our article will help you cope with this problem.
Such gaps often arise when installing skirting boards.
Quantity calculation
Before choosing decorative slats, it would be a good idea to find out how many of them you will need. A preliminary calculation will help you decide on your budget. It will become clear what length of strips is best to take in order to reduce the number of trims to a minimum.
Let us have a room with the following parameters: 2 walls of 3 meters each and 2 walls of 4 meters . Let's find the general perimeter:
3+3+4+4=14 m.
Don't forget that there is a door in the room. The width of the opening together with the platbands is 0.8 m. Let’s find the final length:
14-0.8=13.2 m.
Trouble may arise during installation. You will need spare material. What if the trading center or store is already closed? This often happens during the holidays. Especially New Year's. What to do? Add 10 % to the footage:
13.2+10%=14.52 m.
Here it is, the final number. Let's take a standard plinth 2500 × 47 × 23 mm. We only need the first number since this is the length of the batten. Let's get the quantity:
14.52/2.5=5.8 pieces.
Round up. The final indicator is 6 units.
What methods can be used
The photo shows sealing the gap with sealant.
There are several effective methods for masking gaps between walls and baseboards, the most popular of which are:
- filling the space with sealant, silicone or acrylic;
- filling cracks with putty;
- making inserts from plinth fragments.
Note! At first glance, the above methods do not seem particularly complicated. However, it should be borne in mind that the success of the repair and its difficulty depend on several circumstances. Firstly, your accuracy. Secondly, the nature of the cracks and their size. Thirdly, the method of eliminating them that you choose.
What is taken into account
When thinking about how to seal the gaps between the wall and the baseboard in order to correct the resulting defects, you need to proceed from the size of the gaps:
- So, gluing in a piece cut from the baseboard itself will help if the gap is relatively large.
- Here you need to take into account that you are unlikely to be able to prepare a segment whose shape will ideally match the space being repaired.
- Based on this, the edges of the hole being sealed will most likely have to be adjusted using a knife so that the fragment fits tightly into it.
Covering gaps with putty.
You will also have to widen the gap if you determine that it is necessary to apply putty or sealant.
- To prevent the repair mortar from falling off over time, to improve adhesion it is necessary to increase the area of its contact with the base.
- For this purpose, the best option is to clean the gap and give it a cone-shaped shape with an extension at the top.
- It is best to fill the prepared gap with putty using a rubber spatula. It is convenient for them to remove excess mortar and give evenness to the joint being sealed.
- Using sealant to correct defects is even easier. It must be carefully squeezed out of the tube, while simultaneously filling the space being repaired. Then you need to use a plastic spatula or a finger dipped in water to create an even and smooth joint.
Note! The sealant should dry a little. Therefore, the seam should be formed some time after it is filled. It will be best if you practice performing the operation on some unnecessary object.
If the case is non-standard
If the gaps are small, they can be filled with this glue.
Often, special construction adhesive is used to install upper (ceiling) skirting boards. When such a composition hardens, it is very difficult to cut it with a knife in order to widen the gap and give it the desired shape with your own hands.
And wide cracks do not form when using such a material. Based on this, it will be quite enough to apply a layer of Moment-Montazh adhesive to the gap.
Not in all cases, the reason for the appearance of cracks at the junction of walls and baseboards is non-compliance with technical installation requirements.
Here it is necessary to take into account that planks made of different materials can be used to decorate the perimeter of the top of the walls:
- Thus, slats made of polyvinyl chloride are included in the package of plastic suspended or suspended ceilings.
- Analogues made from expanded polystyrene are best suited for concrete, plastered, wallpapered walls or partitions, partitions constructed from gypsum plasterboard.
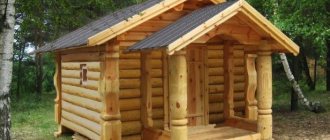
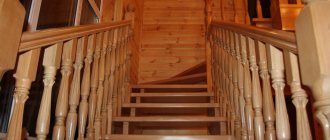
- Wooden plinths are good for corresponding walls - cobblestones, log frames or surfaces lined with wood.
There are no cracks on smooth walls.
Note! The instructions warn that if the plane of the ceiling and its junction with the walls are completely flat, then no problems will arise when installing the skirting boards. Especially when the work is carried out by a competent specialist.
However, in older houses, the walls often have such a curvature that stuns most modern builders. There won't be enough money to level them out.
Based on this, when sheathing ceilings, between walls and baseboards used as initial planks, gaps of different sizes inevitably form. It is impossible to hide the gap with a ceiling plinth in such conditions. All that remains is to seal it with sealant.
Removing a wooden baseboard nailed to the floor
Most often, the nail heads protrude above the surface of the wood, so finding them is not so difficult. But even if they are recessed into the baseboard, even then they are easy to find by their characteristic recesses.
Dismantling with a crowbar - option No. 1
- In this case, before removing the plinth from the floor, you need to drive the pointed end of the crowbar under it, not far from the location of the nail holding the plinth.
- After this, pull the crowbar towards you.
True, if the nails are rusty and hold tightly, the crowbar will leave a noticeable dent in the floorboard. To avoid this and increase the support area of the tool, you need to put something quite thin but strong (a piece of plywood, a thin board, a metal plate) under the crowbar. But if you apply too much force, the baseboard may break, so you need to act carefully.
For the same purpose - not to damage the border - it is better to start dismantling the baseboard from the edge. First, you need to lift it above the floor in the area of the first nail, then repeat the same at the next, then at the third, and so on, until the entire length of the plinth is at the same distance from the floor. Then continue the operation until the nails finally come out of the floorboards.
The crowbar must be placed as close to the nail as possible, otherwise, the further it is located, the more likely it is that the material will break.
Dismantling with a crowbar - option No. 2
You can do it a little differently: first lift the plinth near the first nail, then near the second, then return to the first, and then move on to the third, then the second, etc.
Video on how to remove an old wooden baseboard from the floor:
If the nails “do not lend themselves” to the crowbar
If the baseboard does not give in anyway, then all that remains is to use a chisel to cut out a small depression near the nail so that the nail can be grabbed by the head with a nail puller. After this, it will be possible to pull the nails out of their homes. Here you can choose a thick wooden block as a support for the crowbar.
If you can't see the nail heads
Sometimes it is not possible to see the location of the nails on a wooden baseboard - in cases where they were puttied before painting.
It can be assumed that the nails are spaced 50-70 cm apart from each other, and the first one is most likely 10-20 cm from the corner of the wall. This is where you should try to find nails when solving the problem of how to remove the baseboard.
- First, you need to drive the crowbar under the baseboard 10-20 cm from the corner of the wall and slowly and carefully try to lift it.
- There is no point in paying attention to the putty falling off during manipulation - this process is inevitable, and it will need to be renewed later.
- A similar procedure continues with the remaining nails until the baseboard is completely removed.
What to do with wooden planks
It is better to repair wooden slats with such putty.
Wooden floor skirting boards also often need adjustment. The problem of this natural material is well known - it changes its shape under the influence of the environment. In this regard, a reasonable question arises: how to cover the gaps between the wall and the baseboard.
In this case, the best option is to use putty. It can be gypsum, or even better, use a special polymer-based composition for wood. Then you can choose the color of the solution that will best match the tone of the walls.
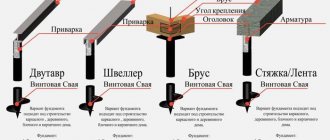
Features of plinth with cable channel
According to its characteristics, the plinth with cable channel is divided into the following types:
- profile with a groove in the center, which is closed with an original insert
- profile, which consists of a base, which is all closed with an insert
The first type is the most popular. This plinth can hide 5-6 wires, but its shape is made in such a way that it can hide 5 more cables before installing the whip. The second type makes it possible to hide 10 or more cables for various purposes.
Skirting boards with cable duct are made from various materials. Most often, people choose PVC products. PVC products differ in shades and parameters, which makes it possible to please every customer.
Main types of skirting boards:
- plastic _ This is a floor-standing model in which the channel is located in the middle. There is even material for extending the connector beyond the profile. You just need to install the output sections in the required places, thereby freeing the room from unnecessary clumps of wires. Another plastic profile is designed for laying wires. There are special dividers on the mounting rail for this purpose.
- wooden baseboards. Wood profiles with cable ducts are a very rare occurrence. This can be made to order. You can run the cable through the recess in clips from wooden baseboards. But it is possible to lay only one cable, since a large number of wires can lead to a fire. Therefore, for safety reasons, a wooden baseboard is far from the best option. This also applies to veneered MDF plinths.
- aluminum plinth. As for fire resistance, this type is best suited. The appearance of such a plinth is not very attractive, but it can hide quite a large number of wires
Preparation for work
Filling such cracks falls into the category of cosmetic repairs. Preparation depends on what decorative elements your walls or floor are decorated with. If there is a baseboard, it must be removed, the wallpaper removed, the paint layer cleaned and removed, and the whitewash washed off. In the latter case, you need to let the wall dry completely. Remove all dust and dirt that may interfere with the quality fixation of the sealing materials.
If the sealing takes place in a room where you do not plan to carry out a complete renovation, then you need to remove the wallpaper only partially, or try to carefully tear off the strip from the wall so that after finishing the work you can glue it back, returning the wall to its original appearance. All surfaces that may get dirt during the repair process must be protected with film, paper and secured securely - this will avoid additional costs when putting things in order. Such measures will protect the floor and walls from polyurethane foam, plaster and paint. Paper or newspaper should not be used if there will be a lot of water in the workplace - it is useless as a protective material in this case.
Advantages and disadvantages of the solution
The still unusual decorative element has significant advantages. Let's list the main ones.
pros
- Aesthetically masks technological joints of floor and wall coverings.
- A large number of design options, which makes it possible to create interesting design solutions.
- Possibility to arrange lighting. Moreover, this can be done in different ways.
- The location of the plank in the plane of the wall is convenient when arranging furniture; it can be moved close to the wall.
- The surfaces are smooth, without protrusions or protrusions, so dirt and dust do not accumulate on them. Cleaning becomes easier.
- The presence of cable channels allows you to mask wires from electrical appliances.
The decor has few shortcomings, but they are significant. Those who choose it should definitely know about them.
Minuses
- Difficult installation of hidden skirting boards. Attaching the insert strip is not difficult, so it may seem that everything is very simple. But the most difficult thing is installing the aluminum profile. It will take literally the jeweler's work of finishers to install the planks at the same level around the perimeter of the room, and use plaster or plasterboard to level the surface of the wall.
- High price. The price includes metal profiles and decorative strips, installation. The latter depends on the qualifications of the finishing team. But we must understand that only professionals can cope with such complex work. Their services are not cheap.
Instagram plintus_net
- Decoration
A look from below: how to make a baseboard a spectacular decorative object
The goal is a large gap
To fill the hole, the ideal option would be suitable sized pieces of brick, polystyrene foam, polystyrene foam or plastic. If the parts are large, then they need to be broken or broken - small filling components guarantee that they will fit inside the hole as tightly as possible and thoroughly fill the cavity. Be careful that when filling the gap, you do not deform the existing hole or expand it.
These materials will help you save expensive mounting foam, which should be poured into the gap after the previous materials. Practice shows that using bricks or other fillers, only one container of polyurethane foam is required to restore even very large damage.
You should not fill it to capacity, because it tends to expand several times. Fill the remaining space by about a third, in very severe cases - by half. If the layer turns out to be very large, then apply it not at once, but in parts, allowing the previous layer to completely expand and harden. This will reduce the risk of overfilling and subsequent falling out of rags of foam, and as a result, will save its volume.
Installation of plastic plinth
Do-it-yourself installation of plastic skirting boards is done using the following tool:
- screwdriver
- hammer drill
- knife
- screwdriver
- hacksaw or grinder
- self-tapping screws
Installing a plastic plinth with a cable channel that has an internal insert allows you to hide the fastenings of the product, since the fastening elements, in particular the heads of screws or nails, are hidden under a decorative insert located in the center of the structure. Connections of skirting boards to each other in a straight line and in the corners are usually made using special adapters and internal and external corners. The middle insert is detached and the product is mounted using self-tapping screws or dowels to the wall. Then the artificial insert returns to its place, covering all the fasteners of the plastic plinth with cable channel .
Installation of a plastic plinth without plastic connectors and corners is not suggested by the manufacturer's instructions, but this method is one of the most popular, since with this installation not a single splice - connector, and not a single internal or external corner that could ruin the entire appearance - is invisible - however This is the most labor-intensive and at the same time most inconspicuous installation of plastic skirting boards. Standard connecting elements and corners stand out above the main surface of the product, differ in color and are striking against the general background.
First remove the insert and file both edges of the plinth at an angle of forty-five degrees. After fixing the plastic product to the vertical surface of the wall, an insert is built into it so that the middle is where the two plinth strips meet. The second insert must be cut in half (also at an angle of forty-five degrees) and inserted on both sides of the whole plank
When installing a plastic plinth, this method also involves sawing corners, both internal and external, at an angle of forty-five degrees, similar to cutting a wooden piece of product. Sawing flaws must be corrected with sandpaper; it is also possible to use a grinder with a round sanding disc.
Installing a plastic plinth with snaps comes down to simply snapping the profile into special locks that are pre-fixed to the wall. The latches are fixed using self-tapping screws at 50 cm intervals. Due to the protruding structure of the product and the peculiarity of its fastening to the latched locks, some free space is created. Telephone and television wires can be placed in this cavity. The installation order is as follows: first of all, lay the cables, and then fasten the plinth to the latches.
Installing a plastic plinth with your own hands to walls made of plasterboard, lining, wood, MDF, differs from installing a profile on brick or concrete walls. The plinth is attached to these walls using metal screws, which are screwed through plasterboard or MDF into a galvanized metal profile, or using special plasterboard dowels directly into the panel. Plastic plinths are attached to wooden walls using wood screws. A natural wooden profile rather than a plastic profile will look more harmonious with wooden walls.
Installing a plastic baseboard with glue.
Fixed using adhesives (most often “liquid nails”), the plastic product looks quite attractive. Installation will not be very difficult - you need to measure the required length, install plugs, couplings and corners. Fit all the parts, then spread with glue and press against the wall. Such installation of a plinth places quite high demands on the quality of the wall surface, and when dismantled, the profile loses its original appearance and becomes unusable. During installation, be careful not to stain the walls, floor or profile itself with glue.
Installing plastic skirting boards using self-tapping screws
, it does not look very aesthetically pleasing, but it is not demanding on the quality of the base, it is reliable and not expensive.
For installation, it is necessary to drill holes in the profile with a diameter of 2-3 millimeters, in increments of 400 - 500 mm. from each other. In these holes, using a knife or a large-diameter drill, you need to make conical recesses for the heads of the self-tapping screws
. Starting from the corner you like, and pressing the plinth against the wall, use a pencil or small marker to make marks through the holes. Using these marks, we drill holes in the wall with a hammer drill and install dowels. We connect the profile to the wall and carefully screw in the screws so as not to deform the plastic. It is better to install and mark one profile strip at a time. To mask contrasting screw heads, special plastic plugs are used, which are available in different colors. This installation of plastic plinth, despite its not very beautiful appearance, is the most common.
The target is a medium or small slit
The ideal option for filling such holes would be soft, plastic materials with high density - tow or construction felt. To prevent such materials from becoming a haven for insect pests, before filling they must be thoroughly impregnated with insecticidal substances, most often formaldehyde.
The material is rolled into small rolls, the diameter of which should be slightly larger than the size of the gap, and applied to the gap. Next, using a small rubber or wooden hammer, the roll is carefully but confidently driven into the hollow space of the damage. It is advisable to fill the void with a single piece of material, without small parts, so that unnecessary cavities do not form between them.
If the gap is so small that you physically cannot drive tow in there, then a soft spatula and a plastic gypsum mortar will come to the rescue. The technology is simple - apply a strip of plaster to the tip of the spatula and apply it to the damage, then gently press. This will allow the mortar to fill the entire cavity and immediately finish the wall surface to minimize finishing preparation.
To protect the surrounding area from dirt, you can use self-adhesive construction fabric (which will not work if you already have wallpaper) or the above methods. After the gap is completely clogged, the formaldehyde dries - you can decorate the seam.
The gap between the baseboard and the wall or floor
It usually forms when old walls become warped or wooden baseboards dry out. Such an error can be repaired very simply - using acrylic sealant; modern stores provide a choice of any colors and shades. The cylinder is installed in a special device for supplying sealant and applied over the distance between the elements.
Rules for working with polyurethane foam
Two thirds of cases still require the active use of polyurethane foam, even in small quantities. Therefore, it is important to figure out how to use it correctly. The recommendations are:
- Before filling the cavity, its surface must be slightly moistened with ordinary water. To do this, it is advisable to use a mechanical spray bottle or a bottle with holes in the lid. This is done to better fix the foam inside the damage.
- When filling, be aware of the foam's ability to expand. In addition, moisturizing the surface will only enhance this effect. The foam must be applied carefully, carefully, little by little.
- Ideal working conditions with it are from five to twenty-five degrees Celsius. The cylinder must be heated in water at the appropriate temperature.
- Before use, the container with foam should be shaken thoroughly.
- Carry out work only with protective glasses and gloves - the foam is very caustic and firmly sticks to all things and objects. In case of accidental contact with finishing surfaces, it is recommended to remove foam only after complete drying; wipe off foam that has not yet hardened with a special solvent.
- Hardened foam is removed with a sharp knife.
kak.feedjc.org
High-quality repairs require careful and careful attention to detail. When finishing work with the ceiling, you need to decorate it well - ceiling skirting boards are used for this. As a rule, installing the planks does not cause any particular difficulties; you will have to tinker with the corners. Let's take a closer look at how to cut ceiling plinths in the corners, talk about different methods, and give useful recommendations on the topic.
Ceiling plinths from any material can be cut using one of the methods described below. They are suitable for all except plastic ones: these are designed using ready-made corners.
Finishing the wall after repairing the damage
Excess foam should be removed so that a small depression remains at the seam site. It will be filled with a small layer of putty or plaster using a spatula and brought to the same level as the wall. After the layer of mortar has dried, not a trace will remain of the gap. The top of the wall can be finished in all sorts of ways - attaching a plinth, painting, adding wallpaper, finishing with tiles, plastic, wood, and so on.
How to glue ceiling plinth
Start working from the corners of the room, as they are easier to work with, then move on to other parts of the room. Seal the corners in such a way that, if possible, no gaps are formed or, if unavoidable, defects are minor. For plastic skirting boards, finishing putty is used.
Water or soil is applied to the fastening areas. After the putty mixture has dried, all cracks must be sealed - various sealants are used for sealing (professional builders recommend choosing acrylic-based products). In general, one package is required per room. Installation using sealant is carried out in the same way as when using putty.
How to seal the gap between the wall and the sides of the bathtub: 7 simple ways
Renovating a bathroom is such a difficult task that even minor mistakes of builders sometimes baffle. For example, what should you do if, when installing a bathroom, it turns out that there are wide gaps between its sides and the already lined walls? We offer 7 ways out of this situation
Cement-sand mortar
The easiest and cheapest way is to seal the cracks with cement-sand mortar. But this method cannot be called ideal (or even good). Quite quickly, under the influence of moisture, the porous material begins to mold, crack and crumble. Protection is required - painting, sealing, etc. And this is additional trouble. So they resort to cement only when the gap between the walls and the bathroom is too large (more than 0.5-0.7 cm) and a high-strength seam is needed.
Polyurethane foam
Another option for sealing relatively wide seams is polyurethane foam. But not just any one. For extreme bathroom conditions, only a one-component polyurethane composition is suitable. It is strong, elastic and moisture-resistant enough to cope with the task.
The sealing job is simple enough that you can do it yourself. The sides of the bathtub are thoroughly cleaned and degreased, and then masking tape is glued around the perimeter, trying to lay it as close to the crack as possible. After this, the gap is filled with foam and left until it hardens completely. Finally, cut off the excess material with a sharp knife and remove the tape.
Is it possible to do without tape? You can, but then you will have to spend a lot of time and effort to scrape off the foam from the edges of the bathtub. This is quite difficult to do, and most likely you will have to resort to washes.
So, closing the gap with foam is quite easy. But you can’t leave it in its pure form. Firstly, this material does not look very good, and secondly, over time it will turn yellow and deteriorate. Needs additional finishing.
Sealant
One of the most common materials for sealing joints is silicone sealant. It performs well in cases where it is necessary to close a seam no more than 0.5 cm wide, and does not require any additional finishing.
Before sealing the surface, you should thoroughly wipe it with white spirit, then place the nozzle of a container with sealant in the gap and run it along the entire perimeter, gradually squeezing out the compound. Then wet your finger in soapy water and coat the joints. This will both seal and level the sealant.
This protection usually lasts for several years. Then the sealant begins to darken and become moldy. You have to remove it and apply a new one.
Only silicone sealants should be used in the bathroom. Acrylics do not have proper elasticity
Plastic border strip and plinth
Self-adhesive border tape
One of the common options for sealing joints is a flat tape with a longitudinal seam, which is folded and laid in the joint area. Many manufacturers apply glue to the reverse side of products, trying to make installation as easy as possible. But experienced craftsmen strongly recommend buying clean tape and fixing it with reliable moisture-resistant glue or liquid nails purchased separately. Factory self-adhesive often does not stick well. However, it also has a right to exist, especially if the joints need to be repaired quickly.
To ensure a better fit of the plastic tape with a self-adhesive layer, its back surface can be heated with a hairdryer before laying.
In addition to tape, there are also plastic borders (fillets, strips, corners)
. You can choose corners and end caps for them. Obviously, products of this kind are more expensive than tapes, but they also last much longer. And they look more aesthetically pleasing.
In any case, almost anyone can lay a plastic product in a seam. You need to clean and degrease the sides of the bathtub, measure them and cut pieces of tape/border of the required length with scissors, a sharp knife or a saw with fine teeth.
The tape or plinth with glue applied is pressed tightly to the surface and left for 24 hours. After this period, the bathroom can be used.
Plastic tape and border are inexpensive and easy-to-install materials. But you shouldn’t expect that such a finish will last for decades. After a couple of years, even the best glue will lose its useful properties and the seam will have to be sealed again.
Acrylic baseboard
Acrylic border
A more reliable, durable and aesthetic analogue of plastic plinth is acrylic plinth. This is a rigid monolithic product of white color that does not turn yellow over time. Dirt does not settle on its smooth surface, so no special care is required. It is enough just to wash the border occasionally with soapy water or a gentle cleaning agent.
If the baseboard is nailed to the floor
In 55% of cases, the nail heads are above the surface of the baseboard, so finding them is not a problem. In other cases, they are recessed into the baseboard, and you can find them by their characteristic pits. In this case, the pointed end of the crowbar is driven under the baseboard. The crowbar should be located near the place where the baseboard is nailed to the floor. They pull her towards themselves.
The support area of the crowbar increases if you make a backing at the support point under the crowbar, for example, from a piece of thin board, thick plastic or plywood. If the calculation is incorrect, the plinth breaks. What should I do? At the support point of the crowbar, it is necessary to place a wooden block on the floor, having a thickness of about 6 cm, but not less than 3 cm.
To avoid damage to the baseboard, it is better to start dismantling it from the edge. First, it is raised 1-3 cm from the floorboard on the first outermost nail, and then on the second and subsequent ones. At this distance, the product should be torn off the floor along the entire wall. The procedure is repeated until the baseboard is removed.
Of course, you can act a little differently. To do this, they undermine the plinth on the first nail from the edge, then on the second, then again on the first, then on the third and on the second, return to the first, etc. However, these are already conventions; it all depends on how convenient it is for the master. If it is not possible to remove the plinth in this way, then using a chisel you can cut out small recesses in the wooden plinth next to the nail. Then the nails are pulled out, clinging them to the heads with a crowbar. In this case, the fulcrum will be more of a thick wooden block.
If nails are not visually visible on a wooden baseboard, this most likely means that the joints were puttied before painting. It is known that they are located at a distance of half a meter from each other, a maximum of 70 cm. The first nail is located 10-20 cm from the edge of the wall. So, the crowbar is driven with its pointed end under the baseboard at a distance of 10-20 cm from the edge. After this, it is smoothly and slowly raised. Then the last nail is seated in place. The fact is that if the holes from the nails are puttied, then this finishing material will definitely bounce off due to vibration. The procedure is repeated again and again until the entire baseboard is removed.
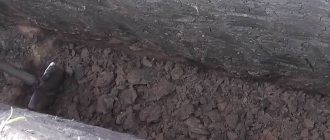
How and with what to seal the gap between the wall and the floor
Repair is not an easy task. Since unforeseen situations often arise associated with additional costs. For example, when removing an old baseboard, you usually need to seal the gap with the wall and floor in order to subsequently avoid dampness, drafts, and insect infestation. And - you need to do everything correctly from the very beginning, so that you don’t have to redo anything additional later.
How to remove plinth from the floor? Dismantling plastic, wooden, MDF skirting boards
In fact, any serious repair begins with some kind of dismantling work. If you need to repair the floor, then first of all you will need to dismantle the floor plinth. Of course, the skirting boards can be torn out “with meat”, that is, so that later they can simply be thrown away. But this is not always reasonable and rational, because very often skirting boards can be reused. In such cases, you need to know how to remove the old baseboard from the floor carefully without damaging it. The difficulty of removing the baseboard depends on the material it is made of and the method of fixing it to the floor (nails, glue, putty).
- How to remove plastic skirting board from the floor?
- Dismantling a wooden plinth nailed to the wall
- Dismantling a wooden plinth nailed to the floor Dismantling with a crowbar - option No. 1
- Dismantling with a crowbar - option No. 2
- If the nails “do not lend themselves” to the crowbar
- If you can't see the nail heads
Preparatory work
To quickly and effectively eliminate defects suddenly discovered after dismantling the baseboard, you need to purchase a suitable arsenal:
- polyurethane foam (+ protective gloves);
- putty (+ spatula);
- pieces of brick;
- Styrofoam;
- tow;
- moss;
- jute felt (+ formaldehyde);
- spray (+ water);
- caulk;
- knife;
- hammer.
However, for effective sealing, the gap needs to be slightly widened. When using polyurethane foam, the hole must be moistened to achieve better adhesion.
If fastened with screws or self-tapping screws
The heads of self-tapping screws or self-tapping screws are most often recessed into the wood, and you can find them by looking at the holes. In addition, the caps may stick out above the surface, making them even easier to find in this situation. In 3% of cases, the caps are closed with plastic plugs. As you understand, they are also noticeable.
To remove the baseboard you just need to unscrew the screws or self-tapping screws with a screwdriver. In some cases, screws are driven into baseboards. What should I do? A crowbar and the methods for dismantling the baseboard described above come to the rescue.
How to seal the joint between different floor coverings
Modern designers use various materials to design joints and transitions between different materials:
This decor is made from:
And also their combinations.
This material allows you not only to make the interior beautiful and aesthetically pleasing, but also to fill it with unique charm, harmony, and sophistication.
Household repair No. 1
Choose reliable craftsmen without intermediaries and save up to 40%!
- Fill out the application
- Receive offers with prices from masters
- Select performers by price and reviews
Post a task and find out prices
Each renovation involves creating a comfortable and cozy interior. To make the room look attractive, every little detail must be taken into account. Sometimes the aesthetic appearance of a room can be ruined by cables that have nowhere to hide. Modern manufacturers have invented an excellent solution - a plinth with a cable channel. This practical invention quickly gained immense popularity. Thanks to it, you can beautifully and neatly hide the cables of your phone, modem, or TV.
The principle of sealing a joint
In fact, everything looks very simple: you need to fill the gap with suitable material, foam or cover it. When dry, cover the joint between the floor and the wall with a plinth.
The material, first of all, is selected depending on the depth of the cracks and the severity of the damage. Mostly putty, plaster and polyurethane foam are used.
Defects that appear at the junction of the wall and floor vary in complexity:
- Small (up to 3 mm);
- Medium (3-5 mm);
- Large (5-10 mm);
- Huge (over 10 mm).
To protect the surface from accidental damage, you need to use plastic film, and also be careful during the work process and remove excess putty and foam in a timely manner.
Adhesive for polyurethane skirting boards
Polyurethane skirting boards are usually glued only to the wall and it will be easier to install them if the walls are perfectly smooth. A slight curvature can be compensated due to the elasticity of the material. But you will need to support the bar with something in this place or hold it until the glue sets.
Note! The polyurethane floor plinth is glued to the wall prepared for finishing. That is, the walls were leveled, puttied and sanded. Everything is ready for painting and wallpapering. In addition, the flooring must also be laid. And you need to glue the baseboards right at this moment - after laying the covering on the floor, but before finishing the walls. The exception is decorative plaster. Here you can first apply plaster and then glue the baseboard, but it’s not a fact that it will turn out perfect.
Choosing glue for skirting boards
Not long ago, a new type of material appeared - duropolymer. These are the same white skirting boards, very similar to polyurethane ones. They are similar until you pick them up. They are much denser, heavier and stronger. However, adhesive for polyurethane skirting boards is also suitable for them. So if you decide to use the new product, you will need the same ingredients. The only difference is that you will need to take them with strong fixation - they are, after all, heavier.
Mounting and docking
There are two types of adhesive for polyurethane skirting boards: mounting - for gluing to the wall, joining - for fixing corners and joints. If you want to have a good result, you need to use them, and you need both compositions. You can't do it alone. Assembly adhesive for polyurethane skirting boards is very different from joining adhesive. How? The one that is docking:
- Must have high adhesive ability. It is at the joints that the skirting boards experience heavy loads and this is where cracks and crevices appear. Therefore, the fixation strength must be very high.
- It should set quickly. No one will hold pieces of plinth for long. A few seconds, a minute at most. This is the amount of time that passes between gluing and “setting”. And after a few minutes the connection cannot be disconnected. Just tear it off with the material. The glue layer remains on one of the parts.
- Polyurethane joint adhesive can be used instead of putty. Trimming skirting boards in corners is not always ideal. The cracks are covered with a joining compound, so it is usually white or transparent.
- The paint should adhere normally to the dried glue. Polyurethane skirting boards are usually painted before installation, and joints after installation.
Adhesive for polyurethane skirting boards must be of two types: assembly and for joints.
Assembly adhesive from the entire set must have sufficient fixing ability and elasticity. From all that has been said, it is clear that it is impossible to glue the joints of polyurethane baseboards with assembly glue. No, they will stick together. And perhaps they will look good, but not for long. In six months or a year, cracks will appear at the joints, then they may expand and will have to be restored.
Types, brands
If we talk about which glue is “correct” for polyurethane skirting boards, then there are only two types: acrylic for gluing to the wall and polyurethane for joints. They were developed for specific tasks. So, if you want to properly glue a polyurethane skirting board, you will need the following compounds:
- Acrylic mounting adhesive for polyurethane. Most often it is water-based acrylate. Almost odorless, dries for a long time - 24-48 hours. After drying, it remains elastic. Excess is removed before it hardens (check the packaging for the time limit, but it takes 20-30 minutes). Use a damp cloth, a dampened spatula, or even your finger for this. Acrylic glue is easy to apply and spread, can be used for puttying, filling the gap between the edge of the baseboard and the floor or wall. There are the following varieties:
- Conventional - for normal operating conditions, applied to smooth walls. Example - DecoFix Pro, Perfect, Europlast mounting, NMC ADEFIX P5.
Types of glue - Strong fixation - for heavy and massive parts, wide polyurethane plinths. It is easier to work with such compositions on imperfect walls, since the glue “sets” faster and holds well. Examples - ORAC-DECOFIX PRO, Perfect Plus.
With hydrophobic additives - for gluing polyurethane in rooms with high humidity - ORAC-DECOFIX HYDRO and others with increased water resistance.
Actually, using such glue for polyurethane skirting boards is the recommendation of manufacturers of polyurethane stucco molding, moldings and moldings. And these same compositions are recommended by installers who specialize in finishing. Why is acrylic adhesive for polyurethane better than others? Because it has a similar expansion coefficient to polyurethane. This means that when drying/cooling/heating, the baseboard and glue increase/decrease in proportion. And the elasticity of the composition allows you to maintain contact with the wall. The result is reliable fixation, no cracks, perfect appearance.
What else can polyurethane be glued to?
Today there are a lot of adhesive compounds, so you can glue a polyurethane baseboard using another type of glue, and not just specialized ones. But none of them are perfect. Each has its own shortcomings and in some cases they are not critical. To know exactly what to expect, consider the possible options:
- White liquid nails. Glues quickly, holds perfectly. But after drying it is absolutely inelastic. Polyurethane has a solid coefficient of thermal expansion. Due to this, it increases in size. Since the glue is hard, it can come off and cracks may form.
- Universal adhesive type Moment. Everything is the same: after drying it becomes very hard.
- Sealants. Acrylic sealant is used to glue polyurethane foam. Among them there are those that remain elastic after drying and that can be painted. The option is possible, but the degree of fixation is not always sufficient. They are, after all, intended for sealing, and not for gluing decorative elements. May tear off under load.
Remove any remaining glue immediately - Polyurethane foam. Suitable for fixing, easy to process. It may be a good option on curved walls, but additional putty and sealing of the gap between the baseboard and the wall and floor is required. So another composition will be needed.
- Glue onto putty. The bad option is that the putty contains a lot of water. When you glue inexpensive skirting boards, they expand from moisture. After drying, they decrease, which leads to the formation of cracks. But it's still a matter of putty. If it is with polymers, then perhaps everything will be fine, but not a fact.
This is all that can be used to glue the baseboard except for the special glue for polyurethane baseboards. If there are some materials left after the renovation, it may make sense to use them. But if you need to buy, then it’s better to buy something that was developed specifically for this purpose. Moreover, all of the listed “non-special” compounds for joints are poorly applicable.
What to do with a large gap
You will need material of suitable sizes to fill the voids that appear. In this case you will need:
- Brick fragments;
- Pieces of wood;
- Styrofoam;
- Polyurethane foam.
At the same time, it is important to select a material for filling of such dimensions that it does not widen the gap, but is not too small.
First, we place a piece of foam plastic or brick into the hole, then we blow it with foam or plaster it. In the latter case, wood cannot be used, since under the influence of absorbed moisture from the solution the material will begin to swell, rot, and also provoke the appearance of mold.
When using foam, you must first of all take into account the fact that it increases in size and hardens in 8–10 hours. If it gets on the skin, it should be quickly washed off with a special composition before it damages the surface.
It is worth noting that polyurethane foam is difficult to wash off from hands, so you need to use special protective gloves. Under the influence of ultraviolet it is destroyed. So if decoration with a baseboard is not provided, then you will need to additionally putty or plaster the surface.
When is the need for repair work?
Before you seal the gap between the floor and the wall under the baseboard, you need to find out where it came from, because this is very important to avoid problems in the future.
Cracks form more often for the following reasons:
- The boards are subject to excessive stress. That is why floors are often additionally strengthened, especially when it is planned to furnish the room with heavy furniture.
- The appearance of rodents. These creatures can even chew through concrete. As for the tree, there are no obstacles for them at all. If this is why cracks appear, then before sealing the concrete is additionally processed, metal or glass chips are added to it.
Important! The poison is not added immediately, since the death of rodents can cause an unpleasant odor.
- Using boards that are too fresh. Natural wood is filled with moisture, and when it is laid on the floor, it dries out too quickly. It is because of this that the volume of the structure is reduced. Therefore, the boards must first be dried naturally. Wood must contain no more than 10% moisture before use.
- Wrong type of wood. Externally, maple, ash, and cherry look the best, but they have too much flexibility. That is, it is better not to use them for finishing the floor. It is recommended to choose breeds with the maximum level of rigidity. These include pine, spruce, oak.
- Poorly executed floor installation. It is important that the boards do not diverge, so they are laid on logs. Wood begins to deteriorate from moisture only when, due to the height of the room, it is impossible to use this technology. In addition, the screed requires careful drying. It is imperative to use waterproofing protection for wooden materials.
- Strong temperature fluctuations. As previously mentioned, wood contains too much moisture; in winter, the air inside the material dries out under the influence of heating devices. As a result, the tree releases the moisture that has accumulated in it during its life cycle. Because of this, the wood dries out and its volume decreases.
Important! The reduction in wood volume remains completely unnoticeable as long as it maintains relative humidity. But the cracks become increasingly wider throughout the entire period of operation.
In order not to encounter such a problem, it is necessary to ensure that the humidity in the room does not exceed 40-60%, but does not fall below these levels. Special air humidifiers help with this, which, among other things, are very good for health. The cracks make the room not only unsightly in appearance, but also dangerous, because it becomes cold in it, and odors from other apartments begin to penetrate into it. That is, the risk of biological contamination increases. But in fact, you can easily and simply seal cracks in the floor yourself.
What to do with a small and medium gap
Minor defects can be eliminated without any problems, for example, using putty. Depending on the room (wet or dry), the grouting solution can be cement or gypsum based.
You can seal a medium-sized gap between a wall and a floor using tow or felt, which is hammered into the gap in the form of a rolled sausage and compacted with a caulk or spatula. When the hole is filled, plastering or blowing with foam is done.
The appearance of cracks between the wall and the floor, first of all, has various causes. To eliminate the consequences, you need to find out why the defects appeared, as well as find the source of the problems. This is the only way to effectively seal the cracks without causing new ones to grow.
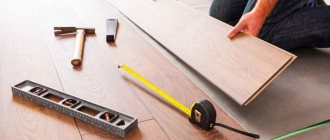
Why do gaps appear at joints?
The nature of the occurrence of cracks between lamellas is divided into two groups: installation and operational.
The first is caused by violations of the technology for working with laminate, the second by non-compliance with operating rules or natural phenomena. If a gap formed during laying of the coating and was discovered immediately, then, in most cases, it will not take much effort and time to eliminate the gap.
Uneven base
The most unpleasant and difficult reason to correct is an uneven foundation. There is only one option - remove the laminate and level the base. Continuing the work, there is a high risk of damaging the lamellas by trying to fit them tightly together.